环境概述:
环境描述 相关信息
centos V:7.7.1908
centos ip 10.227.253.230
docker V:19.03.12
jenkins V:2.235.5
python V:3.6.5
pytest V:6.0.1
allure V:2.7.0
git V:2.28.0
docker
docker部分学习视频:B站检索–【狂神说Java】Docker最新超详细版教程通俗易懂
Step1:卸载docker
[root@localhost ~]# yum remove docker
docker-client
docker-client-latest
docker-common
docker-latest
docker-latest-logrotate
docker-logrotate
docker-engine
Step2:安装yum-utils
[root@localhost ~]# yum install -y yum-utils
Step3:设置镜像仓库
# 推荐阿里云
[root@localhost ~]# yum-config-manager
--add-repo
https://mirrors.aliyun.com/docker-ce/linux/centos/docker-ce.repo
Step4:更新yum软件包索引
[root@localhost ~]# yum makecache fast
Step5:安装docker
# ce:社区版 / ee:企业版本
[root@localhost ~]# yum install -y docker-ce
Step6:查看docker 版本
[root@localhost ~]# docker version
Client: Docker Engine - Community
Version: 19.03.12
Step7:启动docker / 加入开机启动项
[root@localhost ~]# systemctl start docker
[root@localhost ~]# systemctl enable docker
docker_jenkins
Step1:查找jenkins镜像
[root@localhost ~]# docker search jenkins
Step2:下载jenkins/jenkins镜像
[root@localhost ~]# docker pull jenkins/jenkins:lts
Step3:查看本地镜像
[root@localhost ~]# docker images
REPOSITORY TAG IMAGE ID CREATED SIZE
jenkins/jenkins lts 697d76eba014 2 weeks ago 677MB
Step4:启动镜像
# -d:后台运行容器
# --name:指定容器名字
# -p:指定容器暴露的端口 host_port:container_port
[root@localhost ~]# docker run -d --name jenkins8899 -p 8899:8080 jenkins/jenkins:lts
c6689cb6f8b9204ea83fe84a35215123f8b0a37c3636cfe645304ffc1fc0f199
Step5:进入到容器
# docker ps:先查看正在运行的容器
[root@localhost ~]# docker ps
CONTAINER ID IMAGE COMMAND CREATED STATUS PORTS NAMES
c6689cb6f8b9 jenkins/jenkins:lts "/sbin/tini -- /usr/…" 13 hours ago Up 13 hours 50000/tcp, 0.0.0.0:8899->8080/tcp jenkins8899
# -u root:以root用户进入容器
[root@localhost ~]# docker exec -it -u root c6689cb6f8b9 /bin/bash
root@f632b6ec09ec:/#
Step6:获取最新的软件包并升级已安装所有软件包
# 获取最新的软件包
root@f632b6ec09ec:/# apt-get update
# 升级已安装的软件包
root@f632b6ec09ec:/# apt-get upgrade
# 提前安装,以便接下来的配置操作
root@f632b6ec09ec:/# apt-get install -y vim gcc make zlib*
docker_jenkins_allure
Step1:下载allure
https://github.com/allure-framework/allure2/releases
Step2:将allure-2.7.0.zip上传到服务器
# 将allure-2.7.0.zip上传到/usr/local/src路径下
[root@localhost ~]# cd /usr/local/src
[root@localhost src]# ls -l
总用量 12072
-rw-r--r-- 1 root root 12358435 8月 25 19:43 allure-2.7.0.zip
Step3:将allure-2.7.0.zip从服务器复制到docker容器中
[root@localhost src]# docker ps
CONTAINER ID IMAGE COMMAND CREATED STATUS PORTS NAMES
c6689cb6f8b9 jenkins/jenkins:lts "/sbin/tini -- /usr/…" 18 hours ago Up 18 hours 50000/tcp, 0.0.0.0:8899->8080/tcp jenkins8899
[root@localhost src]# docker cp ./allure-2.7.0.zip jenkins8899:/usr/local/src
Step4:进入容器,解压并配置allure
# 以root用户登录到docker容器
[root@localhost ~]# docker exec -it -u root jenkins8899 /bin/bash
root@f632b6ec09ec:/# cd /usr/local/src
root@c6689cb6f8b9:/usr/local/src# ls -l
total 12072
-rw-r--r-- 1 root root 12358435 Sep 5 15:58 allure-2.7.0.zip
root@f632b6ec09ec:/usr/local/src# chmod 777 allure-2.7.0.zip
root@f632b6ec09ec:/usr/local/src# unzip allure-2.7.0.zip
root@f632b6ec09ec:/usr/local/src# cd allure-2.7.0
root@f632b6ec09ec:/usr/local/src/allure-2.7.0# pwd
/usr/local/src/allure-2.7.0    # 该路径在jenkins配置Allure Commandline时会用到
docker_jenkins_python3
Step1:安装aptitude
root@f632b6ec09ec:/# apt-get install -y aptitude
Step2:安装依赖包
root@f632b6ec09ec:/# apt install -y build-essential zlib1g-dev libncurses5-dev libgdbm-dev libnss3-dev libssl-dev libreadline-dev libffi-dev wget
Step3:下载python3.6.5
root@f632b6ec09ec:/# cd /usr/local/src
root@f632b6ec09ec:/usr/local/src# wget https://www.python.org/ftp/python/3.6.5/Python-3.6.5.tgz
Step4:解压Python-3.6.5.tgz
root@f632b6ec09ec:/usr/local/src# ls -l
total 22456
-rw-r--r-- 1 root staff 22994617 Mar 28 2018 Python-3.6.5.tgz
root@f632b6ec09ec:/usr/local/src# chmod 777 Python-3.6.5.tgz
root@f632b6ec09ec:/usr/local/src# tar -zxvf Python-3.6.5.tgz
Step5:执行安装
root@f632b6ec09ec:/usr/local/src# cd Python-3.6.5/
root@f632b6ec09ec:/usr/local/src/Python-3.6.5# ./configure --prefix=/usr/local/src/python36
root@f632b6ec09ec:/usr/local/src/Python-3.6.5# make && make install
root@f632b6ec09ec:/usr/local/src/Python-3.6.5# chmod 777 -R ../python36/*
docker_jenkins_PATH
Step1:配置python / allure环境变量
[root@localhost ~]# docker exec -it jenkins8899 /bin/bash
jenkins@f632b6ec09ec:/$ cat >> ~/.bashrc << "EOF"
export PATH=/usr/local/src/allure-2.7.0/bin:$PATH
export PATH=/usr/local/src/python36/bin:$PATH
EOF
jenkins@f632b6ec09ec:/$ source ~/.bashrc
jenkins@f632b6ec09ec:/$ python3 --version
Python 3.6.5
jenkins@f632b6ec09ec:/$ allure --version
2.7.0
PS:配置文件后需要重启容器
Step2:安装pytest / allure-pytest
配置好python环境变量后,才可以使用pip3安装相关插件
# 安装pytest
root@f632b6ec09ec:/$ pip3 install pytest -i http://pypi.douban.com/simple --trusted-host pypi.douban.com
# 安装pytest-html
root@f632b6ec09ec:/$ pip3 install pytest-html -i http://pypi.douban.com/simple --trusted-host pypi.douban.com
# 安装allure-pytest 生成测试报告
root@f632b6ec09ec:/$ pip3 install allure-pytest -i http://pypi.douban.com/simple --trusted-host pypi.douban.com
# 安装allure-python-commons
root@f632b6ec09ec:/$ pip3 install allure-python-commons -i http://pypi.douban.com/simple --trusted-host pypi.douban.com
gitLab
1、注册gitLab账号
2、创建gitLab项目
3、创建python代码文件:test_错误示例.py
4、将以下代码复制到文件中
5、本机安装gitLab客户端
6、将test_错误示例.py上传到gitLab项目中
# coding=utf-8

def setup_module():
print('
 *** 初始化-错误模块 ***')

def teardown_module():
print('
 *** 清除-错误模块 ***')

class Test_错误登录():

@classmethod
def setup_class(cls):
cls.log.info("错误登录--类初始化")

@classmethod
def teardown_class(cls):
cls.log.info("错误登录--类清除")

def setup_method(self):
self.log.info("方法初始化")

def teardown_method(self):
self.log.info("方法清除")

def test_R001001(self):
self.log.info('错误登录--用例R001001')
assert 1 == 1

def test_R001002(self):
self.log.info('错误登录--用例R001002')
assert 2 == 2

def test_R001003(self):
self.log.info('错误登录--用例R001003')
assert 3 == 2

def test_R001004(self):
self.log.info('错误登录--用例R001004')
assert 4 == 4
jenkins
Step1:修改jenkins下载插件地址
root@f632b6ec09ec:/$ find -name hudson.model.UpdateCenter.xml
root@f632b6ec09ec:/$ cd ./var/jenkins_home/
root@f632b6ec09ec:/$ cp hudson.model.UpdateCenter.xml hudson.model.UpdateCenter_back.xml
</sites>jenkins@c6689cb6f8b9:~$ sed -i "s/https/http/g" hudson.model.UpdateCenter.xml
root@c6689cb6f8b9:~$ cat hudson.model.UpdateCenter.xml
<?xml version='1.1' encoding='UTF-8'?>
<sites>
<site>
<id>default</id>
<url>http://updates.jenkins.io/update-center.json</url>
</site>
# 退出jenkins容器 Ctrl + P + Q
[root@localhost src]# docker restart jenkins8899
jenkins8899
Step2:浏览器访问10.227.253.230:8899

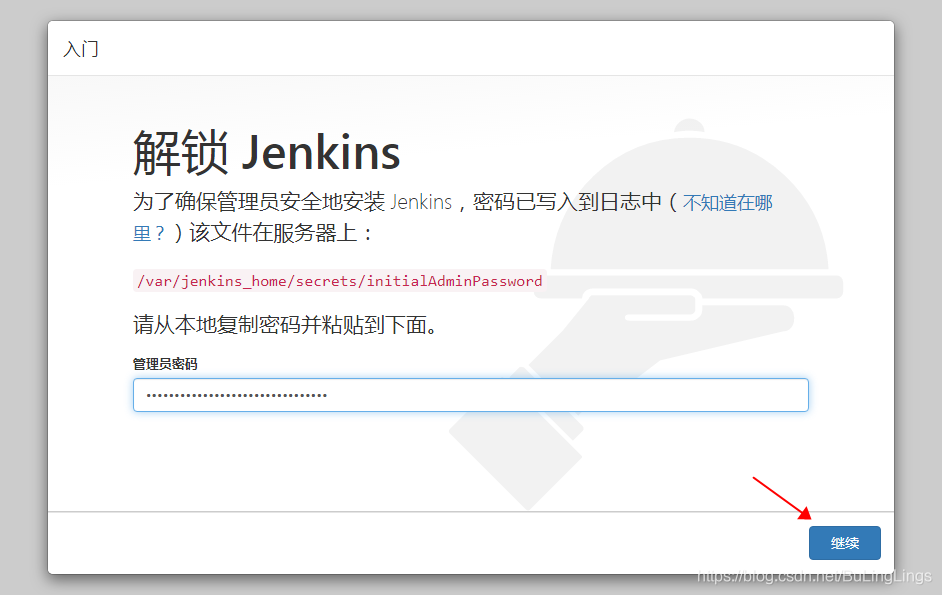
Step3:查看jenkins管理员密码
# 在容器内,根据页面提示路径进行查询
jenkins@c6689cb6f8b9:/$ cat /var/jenkins_home/secrets/initialAdminPassword
18b7b8979f91402dbd8715feb129e240
Step4:复制查询到的密码,并继续
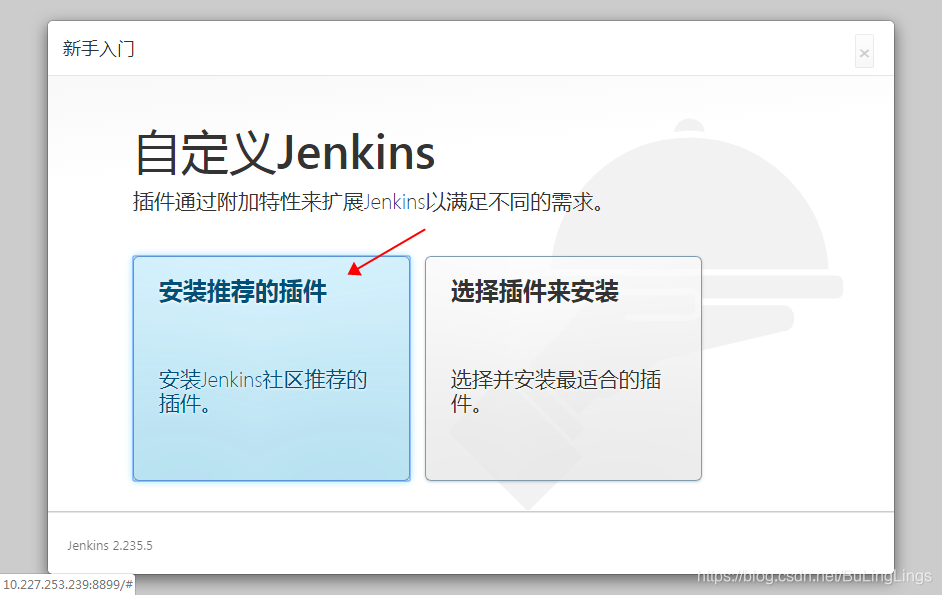
Step5:安装推荐的插件
Step6:等待插件安装中

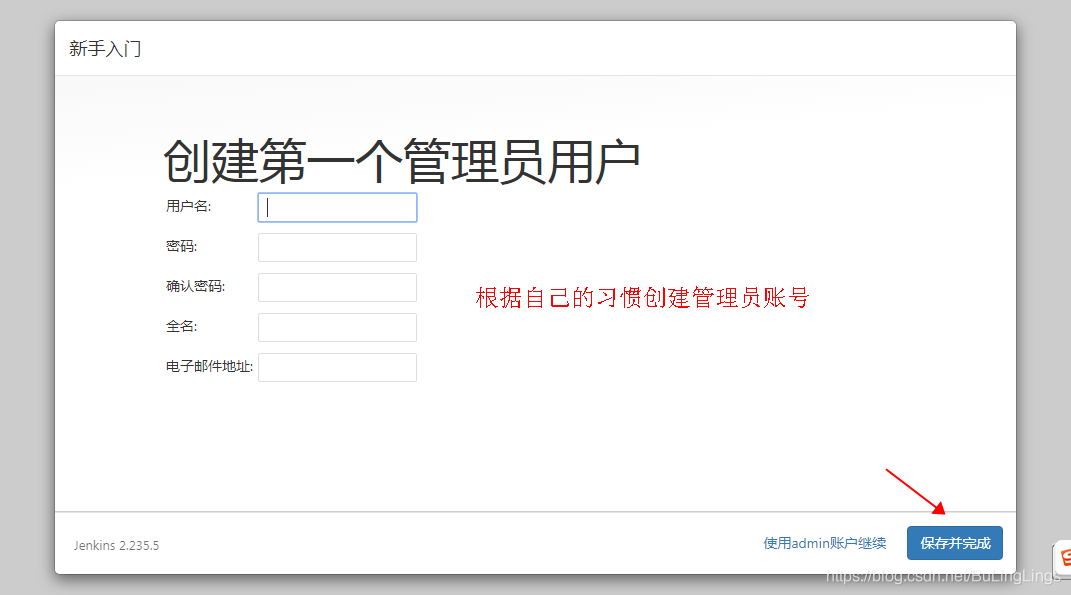
Step7:创建管理员账号
Step8:实例配置

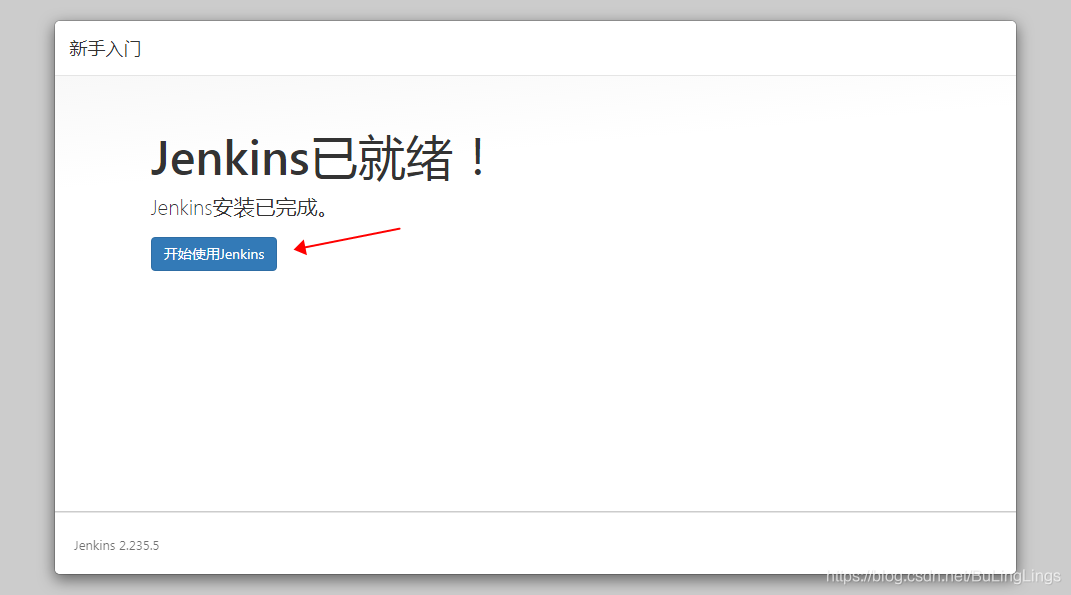
Step9:开始使用jenkins
Step10:设置时间
Manage Jenkins–> Script Console–> 输入脚本–> 运行–> 显示Result表示成功
System.setProperty('org.apache.commons.jelly.tags.fmt.timeZone', 'Asia/Shanghai')
1
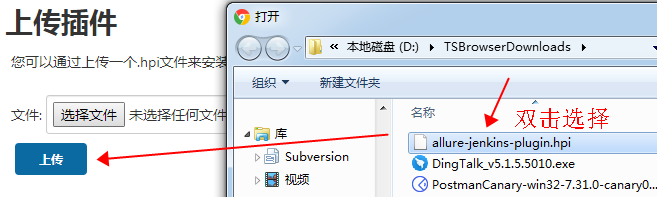
Step11:上传jenkins-allure插件
Manage Jenkins–> Manage Plugins–> Advanced–> 上传插件
allure-jenkins-plugin插件下载地址
安装allure-jenkins-plugin插件成功
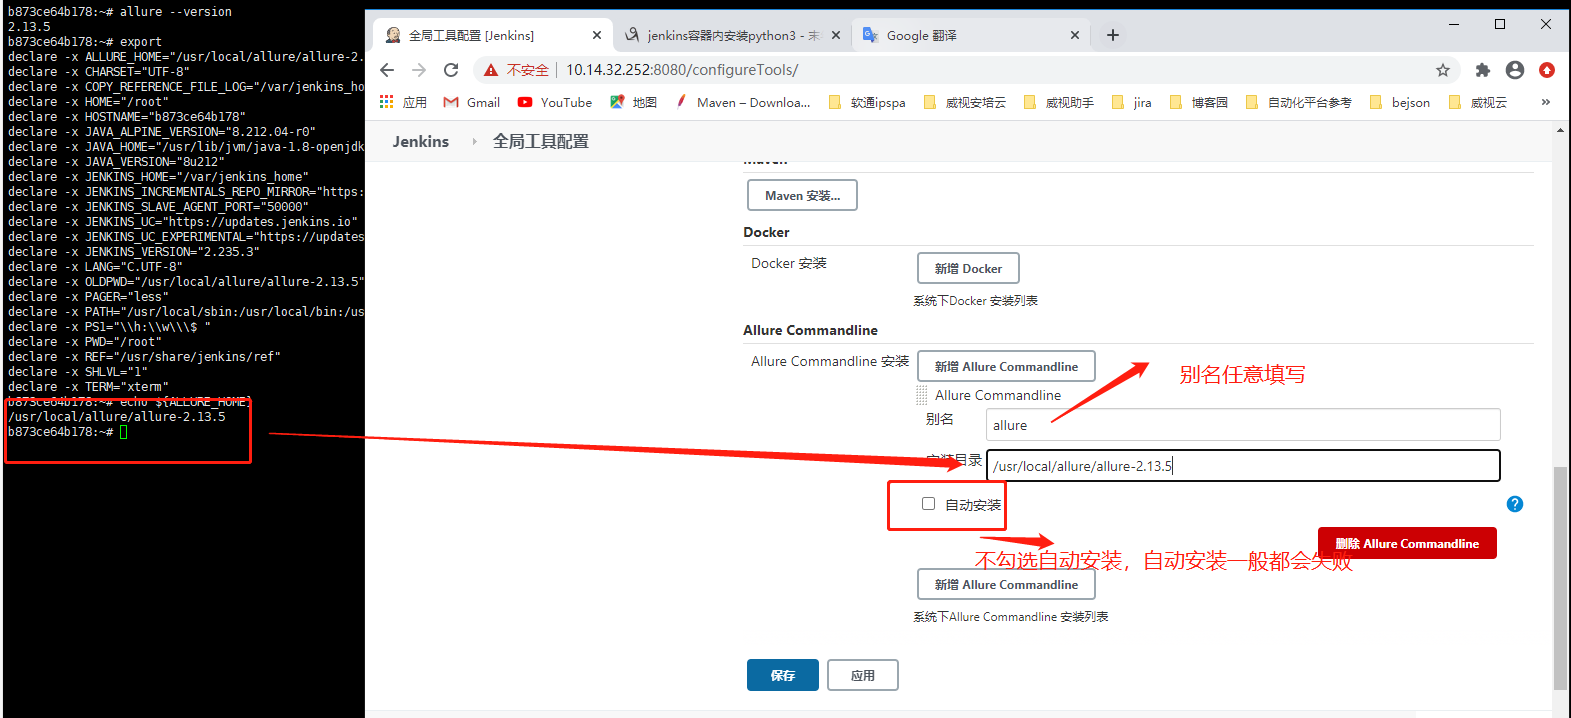
Step12:配置Allure Commandline
Manage Jenkins–> Global Tool Configuration–> Allure Commandline
jenkins@c6689cb6f8b9:/$ find -name allure-2.7.0
./usr/local/src/allure-2.7.0 # 改路径为Allure Commandline安装目录

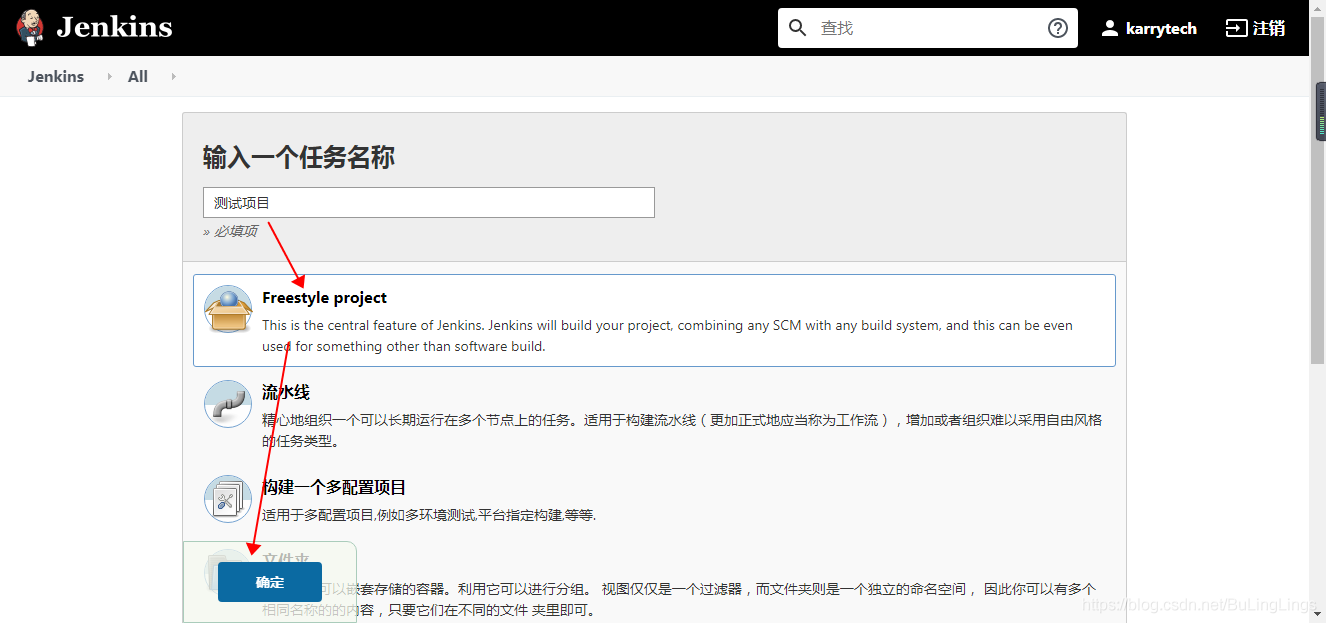
Step13:创建jenkins项目
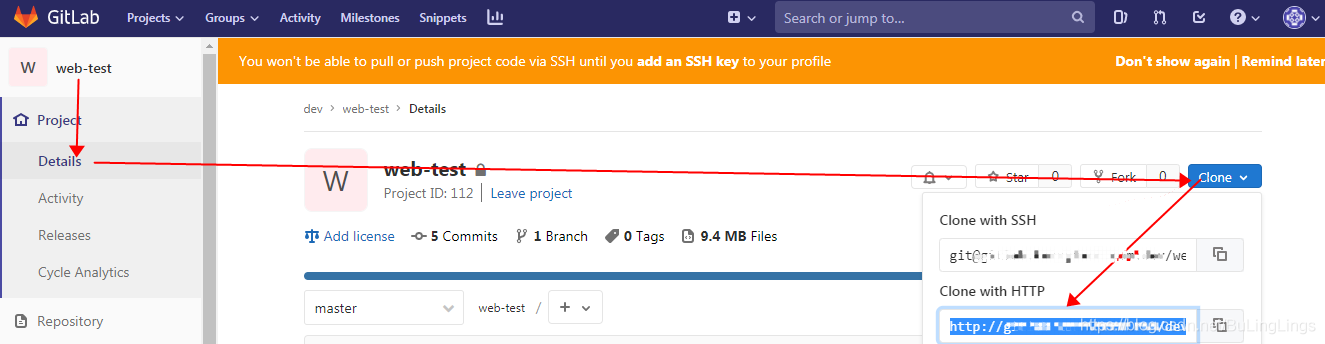
Step14:配置源码管理
1、登录git
2、选择项目
3、查看项目对应git的url
4、复制url到jenkins项目的Repository URL处

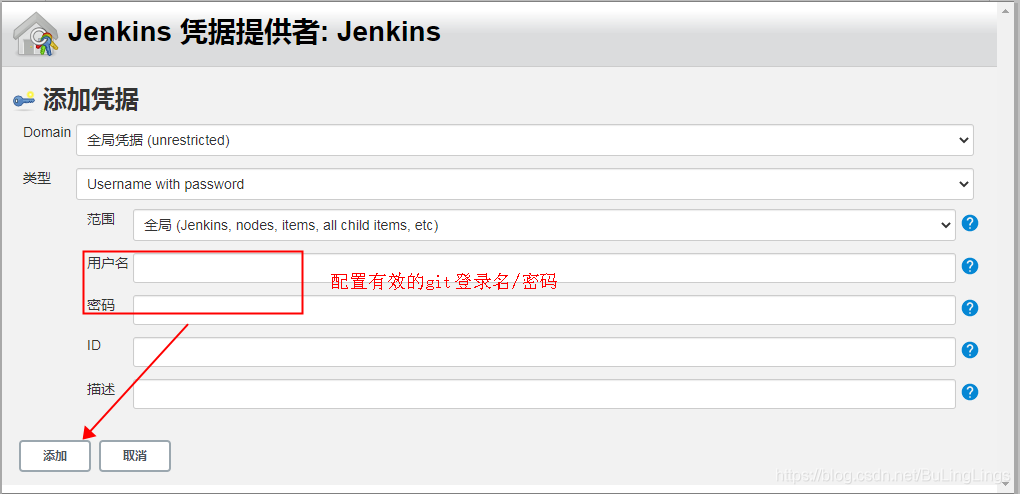
添加凭证,输入用户名/密码,点击添加
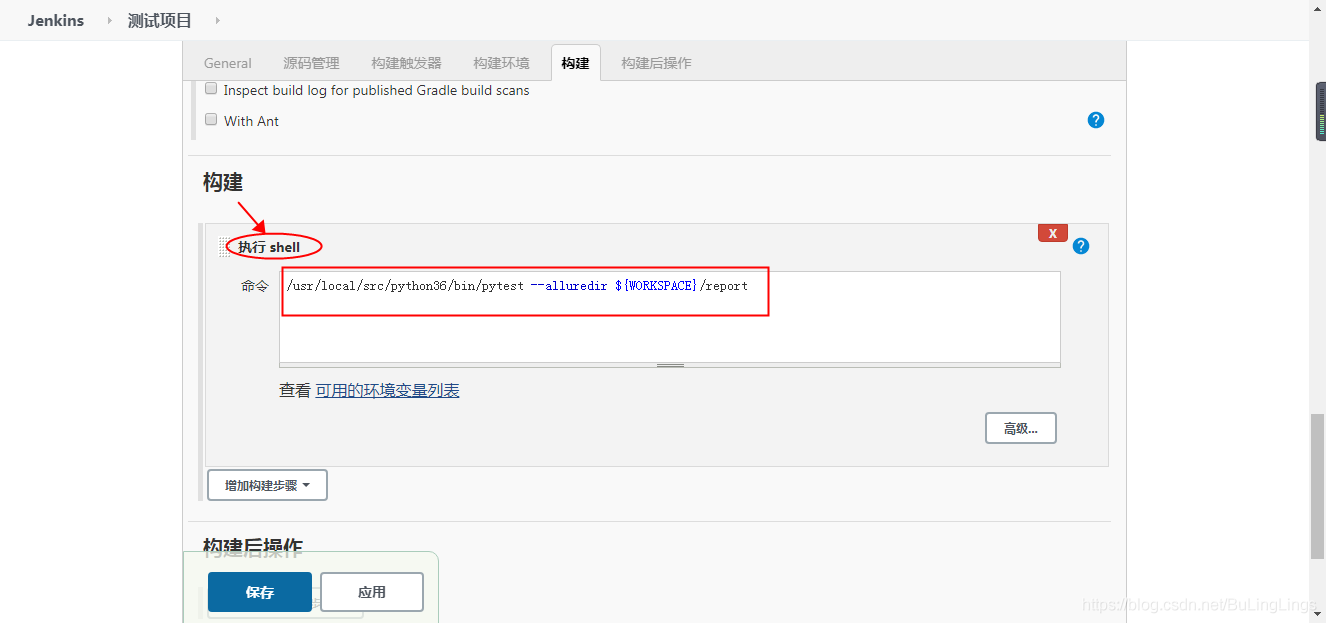
Step15:配置构建
/usr/local/src/python36/bin/pytest --alluredir ${WORKSPACE}/report
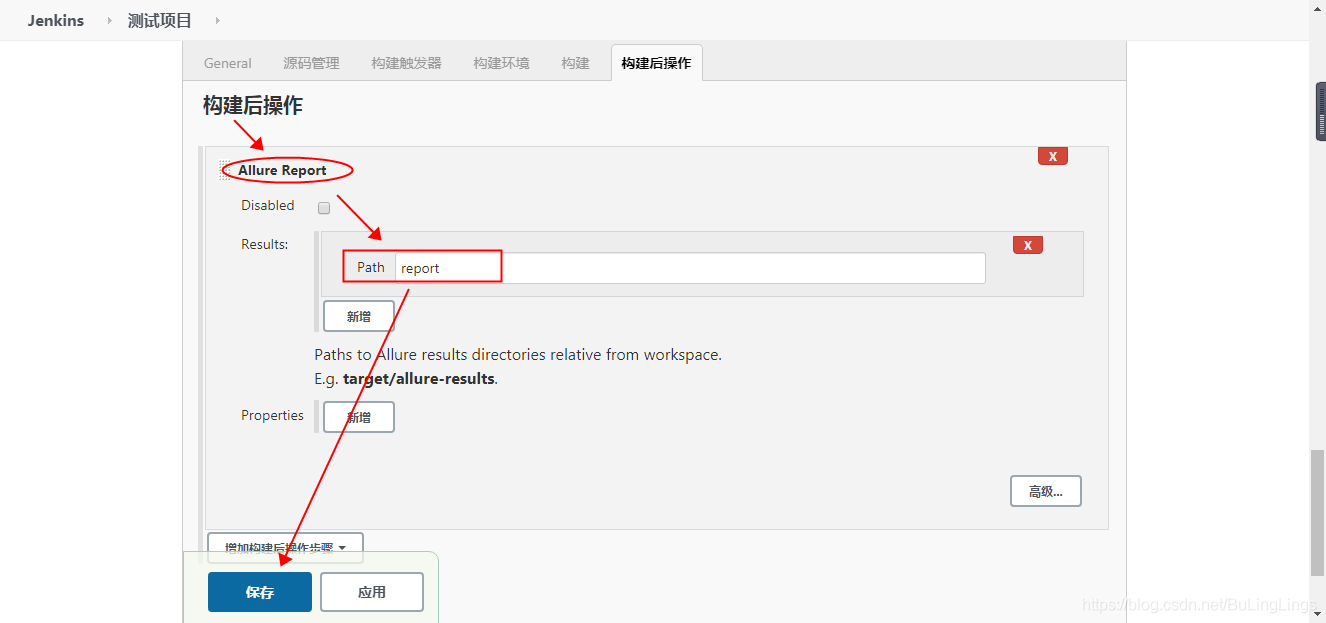
Step16:配置构建后操作
report
Step17:执行立即构建
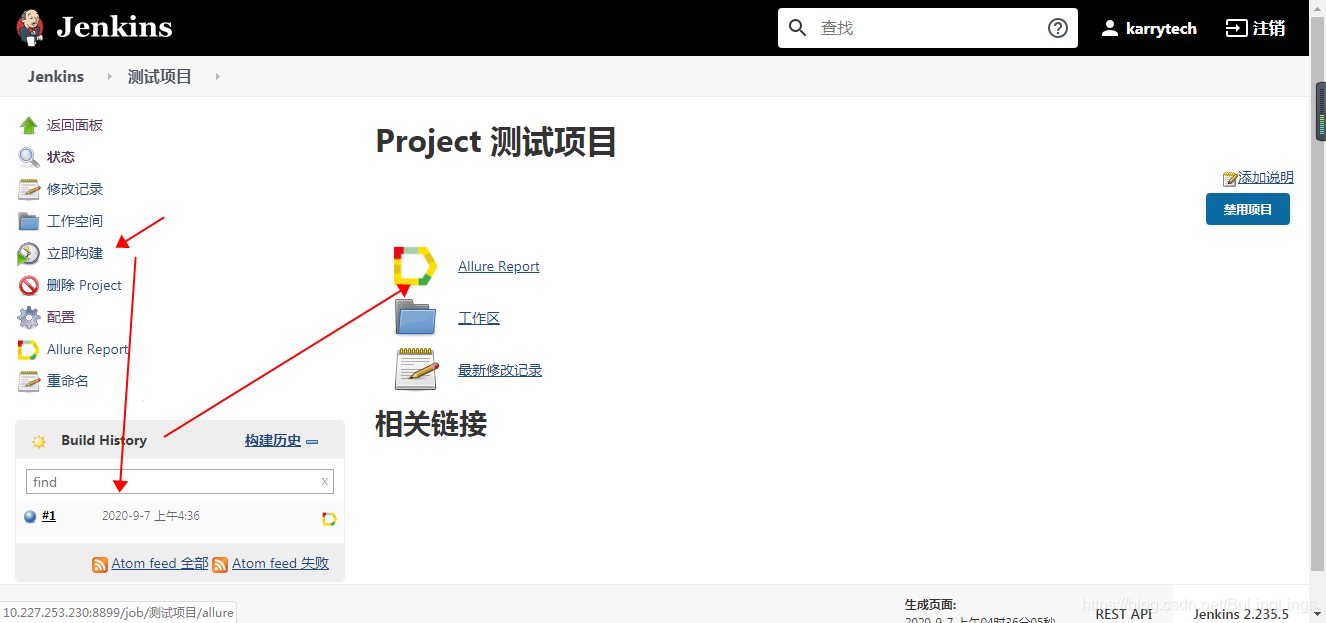
Step18:Allure报告
等待构建完成后,点击Allure Report查看测试报告

以上环境结合Selenium / Appium / Reques即可成为UI / APP / 接口一整套测试框架
————————————————
版权声明:本文为CSDN博主「BuLingLings」的原创文章,遵循CC 4.0 BY-SA版权协议,转载请附上原文出处链接及本声明。
原文链接:https://blog.csdn.net/BuLingLings/article/details/108382511
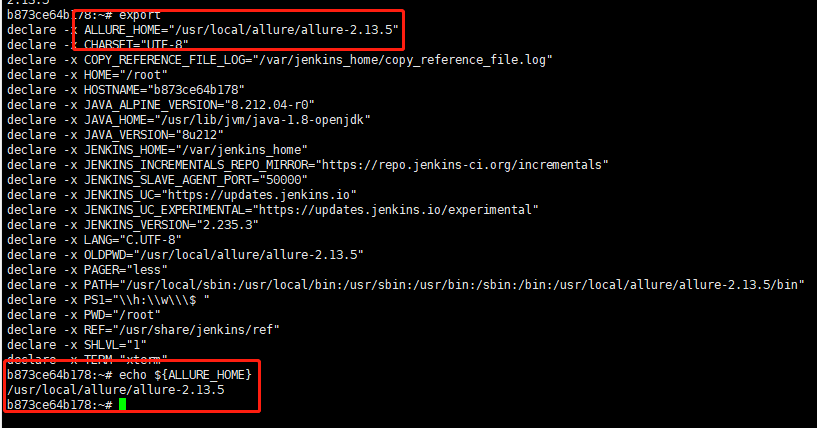
如果出现jenkins容器中执行报错 allure: command not found;解决思路如下:
进入jengkins容器配置环境变量,vim /etc/profile,追加两行内容后,source /etc/profile使修改后 的配置生效:
export ALLURE_HOME=/usr/local/allure/allure-2.13.5
export PATH=$PATH:$ALLURE_HOME/bin
验证服务器上allure安装是否成功:输入allure,运行无报错。
allure --version
二、Jenkins全局工具Allure
1.Jenkins全局工具Allure Commandline
进入jenkins容器
export
echo ${ALLURE_HOME}
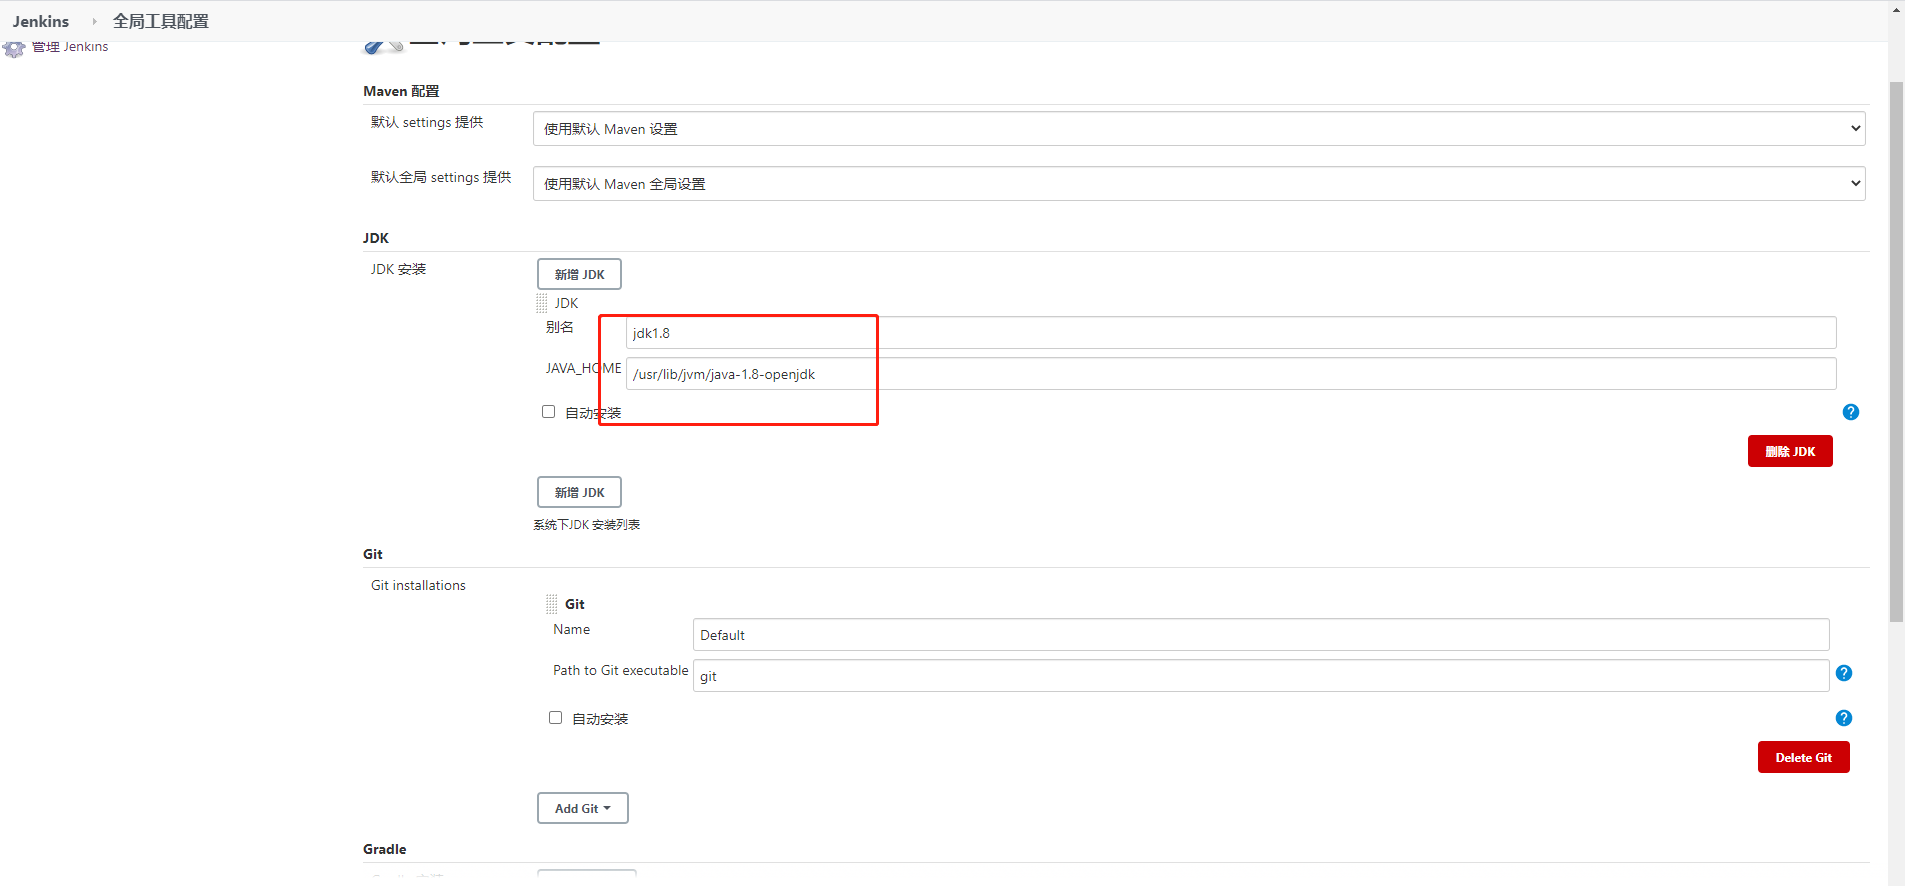
2.配置jdk
echo ${JAVA_HOME}

/usr/lib/jvm/java-1.8-openjdk
三、构建环境配置
1.构建
git pull 代码后执行这些脚本命令
shell脚本
#!/bin/bash -il

source /etc/profile
echo "git pull code finish,start execute shell"
echo ${WORKSPACE}
cd ${WORKSPACE}
pwd
ls
#删除上一次生成的xml测试报告
rm -rf temp
#删除上一次生成的html测试报告
rm -rf report
#生成报告
pytest --alluredir=./temp
#生成html格式的报告
allure generate ./temp -o ./report --clean
jenkins集成Allure+python+pytest镜像:docker pull beijixing0202/jenkins