1.准备软件
  windows版本php下载地址:https://windows.php.net/downloads/releases/archives/  选择 php-5.6.40-Win32-VC11-x64.zip 版本进行下载
  nginx下载地址http://nginx.org/en/download.html 选择稳定版 目前到1.18
  ThinkPhp下载地址http://www.thinkphp.cn/down/610.html  选择3.2.3版本
PS:以上软件解压好即可使用,不用执行程序安装
2.软件用途
  nginx作为服务器提供web服务,nginx通过server模块监听http|s端口,将请求通过fastcgi_pass模块传输到对应fastcgi程序处理
  cgi是某种网络通讯协议,fastcgi是其升级版
  php有遵循fastcgi的规范,可以提供fastcgi形式服务, 显示表现为 php-cgi.exe
  thinkphp是web应用开发框架,可以简化php语言web程序的开发工作
3.配置软件
3.1解压thinkphp
  新建一个tp3的空目录
  在tp3目录中,解压下载好的thinkphp_3.2.3_full.zip文件
  记下tp3目录, 后面将该目录地址配置到nginx.conf文件的root
3.2php配置
  修改php.ini文件的如下内容:
  extension_dir需要配置路径为 ext

  cgi.fix_pathinfo的值改为1
  常规extension功能, 如mysql , gd2等要预先开启

  ;下面两个配置视情况而定, 默认可以不修改
  ;session.save_path需要进行配置, 比如配为 tmp
  ;open_basedir需要配置路径为 thinkphp项目目录的父级目录
  php配置改完后, 使用cmd命令,进入php的安装目录下, 启动php-cgi程序, 并指定服务地址是127.0.0.1:9996, 配置文件为php.ini
  php-cgi.exe -b 127.0.0.1:9996 -c php.ini
3.3nginx配置
    修改nginx.conf文件,增加如下内容:
    server {
        listen 9997; # 监听本地9997端口
        access_log logs/localhost_access.log;
        error_log logs/localhost_error.log;
        location / { # 配置访问静态资源文件, 比如Public目录下的图片,js等
            root   E:/workspaces/MyGit/tp3; # 此处为thinkphp的解压后目录
            index  index.php index.html index.htm;
            if (!-e $request_filename){
                rewrite ^(.*)$ /index.php?s=$1 last;
            }
        }
        location ~ .php(.*)$ {
            root E:/workspaces/MyGit/tp3; # 同上
            fastcgi_pass 127.0.0.1:9996; #此处为php-cgi.exe启动的服务地址, 处理9997端口的请求
            fastcgi_index index.php;
            fastcgi_param SCRIPT_FILENAME $DOCUMENT_ROOT$fastcgi_script_name;
            fastcgi_param PATH_INFO $1;
            include fastcgi_params;
        }
    }
  nginx配置完后, cmd到nginx目录下并启动
  start nginx.exe
4.成果展示
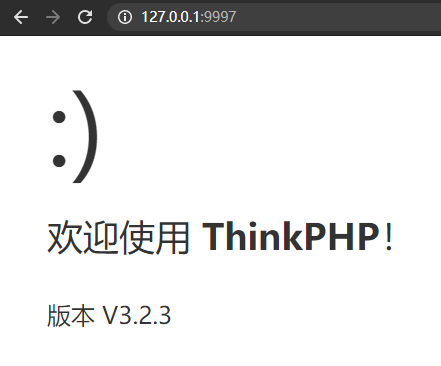
至此, 部署完结, 散花 : )