有些东西看多了,就厌烦了:extjs对我这种感觉最为强烈。甚至,有时觉得设计之殇是审美疲劳。
直角看多了,就想看看圆角,不知何时,这几年刮起了一阵阵的圆角设计风:CSS新标准纳入圆角元素,iphone中几乎随处可见圆角设计,也开始出现很多圆角名片了...
今天我们就实现一个圆角的ListView效果。
圆角的设计,我们并不追求到处都用,无处不用,android中有少数界面用直角确实容易显得锋利,和周边界面太过对比而显得不协调,比如大栏目列表,设置等等,而采用圆角实现,则会活泼,轻松的多,也融合的特别好。
1.感觉
实际上在Android中因为SDK中没有默认对圆角的一个完整的支持,需要麻烦自定义设置才能实现完美的圆角效果,所以绝大多数应用都是采用分组直角列表这种样式。
所以我觉得很有必要让大家看看这些少数的不一样的东西,看看有什么不一样的感觉。
先让我们来看两张图片:
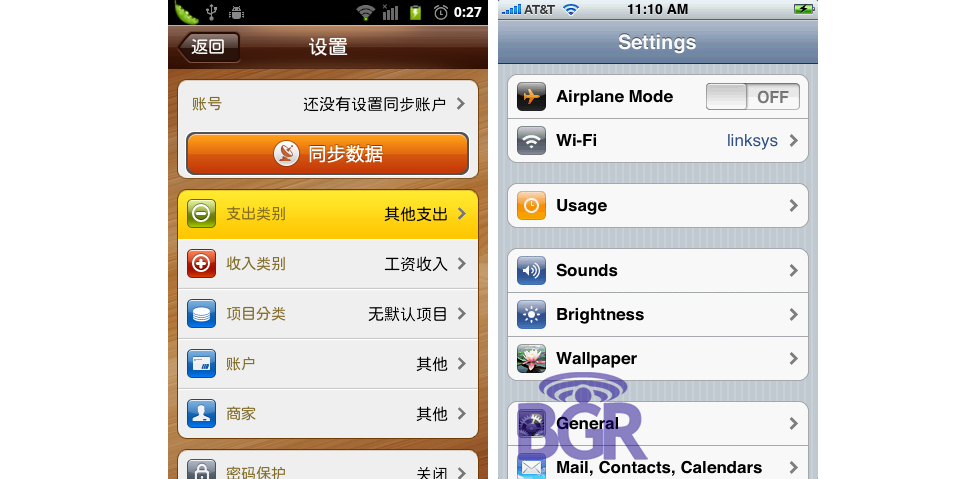
左边的是Android的一个应用的设置界面,右边是iphone系统的设置界面。
ps:上述只是效果,并不是说左边的圆角列表就是用listview是实现的,事实上它是用LinearLayout布局一个一个堆起来的。
2.原理
通过判断ListView上点击的项的位置,我们切换不同的选择器,当然这个切换的动作我们需要定义在重写ListView的onInterceptTouchEvent()方法中。
我把它封装成了一个类
/**
 *
* @ClassName: CornerListView
* @Description: 判断ListView上点击的项的位置,选择不同的位置
* @author ws
* @date 2013-12-11 上午10:53:25
*
 */
public class CornerListView extends ListView {

    public CornerListView(Context context) {
        super(context);
    }

    public CornerListView(Context context, AttributeSet attrs, int defStyle) {
        super(context, attrs, defStyle);
    }

    public CornerListView(Context context, AttributeSet attrs) {
        super(context, attrs);
    }

    @Override
    public boolean onInterceptTouchEvent(MotionEvent ev) {
        switch (ev.getAction()) {
        case MotionEvent.ACTION_DOWN:
            int x = (int) ev.getX();
            int y = (int) ev.getY();
            int itemnum = pointToPosition(x, y);
            if (itemnum == AdapterView.INVALID_POSITION)
                break;
            else {
                if (itemnum == 0) {
                    if (itemnum == (getAdapter().getCount() - 1)) {
                        //只有一项
                        setSelector(R.drawable.app_list_corner_round);
                    } else {
                         //第一项
                        setSelector(R.drawable.app_list_corner_round_top);
                    }
                } else if (itemnum == (getAdapter().getCount() - 1))
                     //最后一项
                    setSelector(R.drawable.app_list_corner_round_bottom);
                else {
                      //中间一项
                    setSelector(R.drawable.app_list_corner_shape);
                }
            }
            break;

        case MotionEvent.ACTION_UP:

            break;
        }
        return super.onInterceptTouchEvent(ev);
    }
}
3.定义选择器
如果只有一项,我们需要四个角都是圆角,app_list_corner_round.xml文件定义如下:
<?xml version="1.0" encoding="utf-8"?>
<shape xmlns:android="http://schemas.android.com/apk/res/android">
    <gradient android:startColor="#B5E7B8"
        android:endColor="#76D37B"
        android:angle="270"/>
    <corners android:topLeftRadius="4dip"
        android:topRightRadius="4dip"
        android:bottomLeftRadius="4dip"
        android:bottomRightRadius="4dip"/>
</shape>
如果是顶部第一项,则上面两个角为圆角,app_list_corner_round_top.xml定义如下:
<?xml version="1.0" encoding="utf-8"?>
<shape xmlns:android="http://schemas.android.com/apk/res/android">
    <gradient android:startColor="#B5E7B8"
        android:endColor="#76D37B"
        android:angle="270"/>
    <corners android:topLeftRadius="4dip"
        android:topRightRadius="4dip"/>
</shape>
如果是底部最后一项,则下面两个角为圆角,app_list_corner_round_bottom.xml定义如下:
<?xml version="1.0" encoding="utf-8"?>
<shape xmlns:android="http://schemas.android.com/apk/res/android">
    <gradient android:startColor="#B5E7B8"
        android:endColor="#76D37B"
        android:angle="270"/>
    <corners android:bottomLeftRadius="4dip"
        android:bottomRightRadius="4dip" />
</shape>
如果是中间项,则应该不需要圆角, app_list_corner_shape.xml定义如下:
<?xml version="1.0" encoding="utf-8"?>
<shape xmlns:android="http://schemas.android.com/apk/res/android">
    <gradient android:startColor="#B5E7B8"
        android:endColor="#76D37B"
        android:angle="270"/>
</shape>
4.背景图片
因为默认的情况下,ListView就要显示一个圆角的边框,这个我们使用一张9patch背景图片来实现app_list_corner_border.9.png:

在这里提示一下,做9patch背景图片的时候,记得把内容区域定义为边框线以内的区域。
5.初步实现
参考前面提供的素材和核心代码,我们初步实现如下
布局文件:


 1 <?xml version="1.0" encoding="utf-8"?>
 2 <LinearLayout xmlns:android="http://schemas.android.com/apk/res/android"
 3     android:id="@+id/set_manageaccout_linearlayout"
 4     android:layout_width="match_parent"
 5     android:layout_height="match_parent"
 6     android:background="@color/gray"
 7     android:orientation="vertical" >
 8
 9     <RelativeLayout
10         android:id="@+id/content_frame_mycollection_toprelative"
11         android:layout_width="match_parent"
12         android:layout_height="50dp" >
13
14         <ImageButton
15             android:id="@+id/set_manageaccount_imagebutton_back"
16             android:layout_width="wrap_content"
17             android:layout_height="wrap_content"
18             android:layout_centerVertical="true"
19             android:layout_margin="10dp"
20             android:background="@drawable/content_frame_imagebutton_back" />
21
22         <TextView
23             android:id="@+id/content_frame_mycollection_textview_title"
24             android:layout_width="wrap_content"
25             android:layout_height="wrap_content"
26             android:layout_centerHorizontal="true"
27             android:layout_centerVertical="true"
28             android:text="@string/set_manageaccount_textview_title"
29             android:textAppearance="?android:attr/textAppearanceMedium" />
30     </RelativeLayout>
31
32         <ImageView
33         android:layout_width="match_parent"
34         android:layout_height="1dp"
35         android:background="@android:color/darker_gray" />
36
37     <ScrollView
38         android:layout_width="match_parent"
39         android:layout_height="0dp"
40         android:layout_weight="1" >
41
42         <LinearLayout
43             android:layout_width="match_parent"
44             android:layout_height="wrap_content"
45             android:orientation="vertical" >
46
47             <com.jzlfapp.model.CornerListView
48                 android:id="@+id/set_manageaccount_list1"
49                 android:layout_width="match_parent"
50                 android:layout_height="wrap_content"
51                 android:layout_marginBottom="10dp"
52                 android:layout_marginLeft="10dp"
53                 android:layout_marginRight="10dp"
54                 android:cacheColorHint="@android:color/transparent"
55                 android:background="@drawable/bg_setting_item_normal" >
56             </com.jzlfapp.model.CornerListView>
57
58             <com.jzlfapp.model.CornerListView
59                 android:id="@+id/set_manageaccount_list2"
60                 android:layout_width="match_parent"
61                 android:layout_height="wrap_content"
62                 android:layout_margin="10dp"
63                 android:cacheColorHint="@android:color/transparent"
64                 android:background="@drawable/bg_setting_item_normal" >
65             </com.jzlfapp.model.CornerListView>
66         </LinearLayout>
67     </ScrollView>
68
69 </LinearLayout>
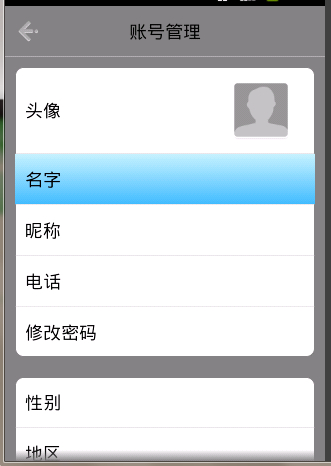
6.效果图
参考资料地址:http://www.cnblogs.com/qianxudetianxia/archive/2011/09/19/2068760.html