一、nginx的单机安装
官网下载:
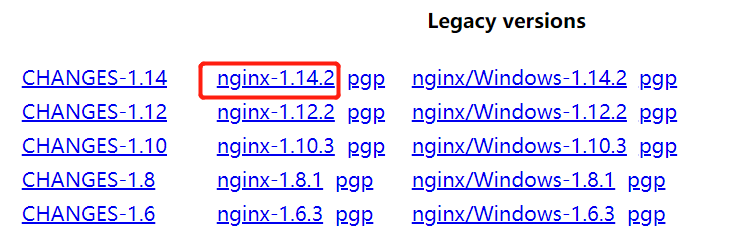
--解压
tar -zxvf nginx-1.14.2.gz.tar
-- 安装
./configure
报错:

-- 查看可安装的pcre library
yum list | grep pcre
-- 安装正则支持
yum -y install pcre-devel
-- 重新安装执行ngnix
./configure
报错:

-- 查看可安装的zlib library
yum list |grep zlib
-- 安装压缩支持
yum -y install zlib-devel
-- 重新安装执行ngnix,未报错,但下图中openssl library is not used,上网查了下:还需要安装 yum -y install openssl-devel;安装后再make
./configure -- 后面发现nginx安装路径是可以修改的 --prefix="/home/wq/nginx"
make install
安装成功:解压出启动命令user/local/nginx/sbin/nginx,
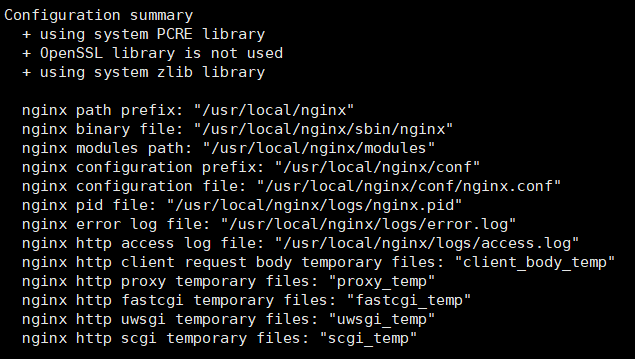
从日志可以看出,nginx安装到/usr/local/ngnix目录下,启动指令是/use/local/nginx/sbin/nginx
-- 移动到指定路径下,执行帮助说明,查看下版本,并测试一下启动关闭
cd /usr/local/nginx/sbin
./nginx -h
./nginx -v -- 查看版本号
./nginx -t -- 测试启动并关闭
./nginx -p -- 指定启动文件的前缀路径,默认/usr/local/nginx/
./nginx -c -- 指定启动的conf文件,默认前缀路径+/conf/ngnix.conf
./nginx --启动 默认的是80端口


二、keepalived安装
(晚上又停电了难受......)
官网下载keepalived
-- 解压
tar -zxvf keepalived-2.0.20.tar.gz
-- 安装
cd keepalived-2.0.20/
./configure
-- 结尾警告不支持ipv6  需要安装libnl/libnl3
yum list | grep libnl
yum -y install libnl3-devel
./configure
make install -- 跟上面nginx相同,有个默认安装路径,默认安装到当前文件路径的keepalived路径下
cd keepalived
keepalived -h --查看启动参数
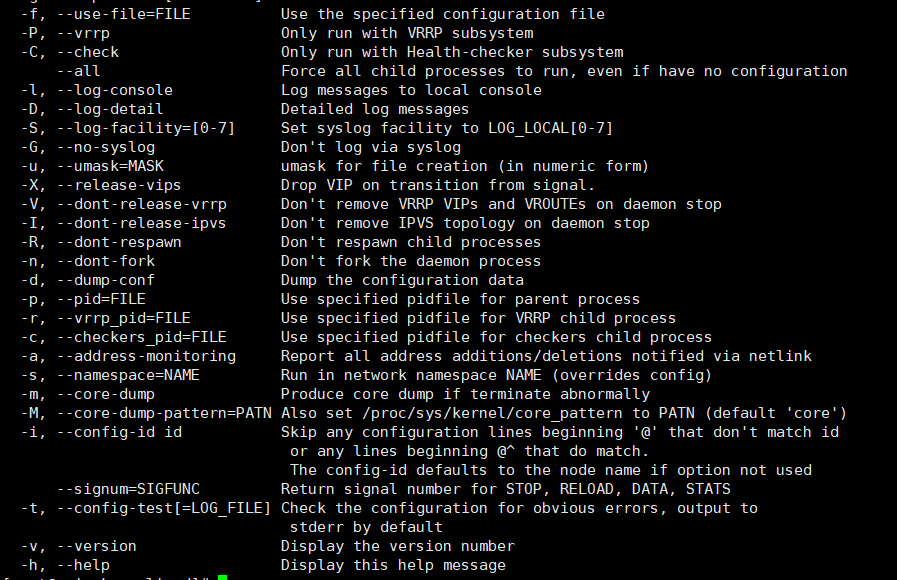
几个重要的参数
keepalived -v  -- 查看版本
keepalived -f  -- 指定启动时的keepalived.conf文件
keepalived -f ./etc/keepalived/keepablived.conf -- 启动
nginx的配置文件和使用,以前上生产时配置过所以比较熟悉。keepalive.conf配置文件就不是很熟悉了,官网学习一下,
keepalived配置文件围绕一组配置文件进行表述,每块都对应一个特定的功能。
- GLOBAL configuration: 全局设置。
- BFD configuration:BFD(双向转发检测机制)设置。
- VRRPD() configuration:对VRRP(虚拟路由冗余协议)设置。
- LVS configuration:LVS(Linux虚拟服务)设置。
默认的keepalived.conf包含GLOBAL、VRRPD、LVS三个设置块,启动时会启动三个进程。
global_defs { -- 全局定义
   notification_email { -- 报警邮件收件人
     acassen@firewall.loc
     failover@firewall.loc
     sysadmin@firewall.loc
   }
   notification_email_from Alexandre.Cassen@firewall.loc  -- 开启报警邮件时,需要配置邮件传输协议smtp服务器地址等相关信息
   smtp_server 192.168.200.1 -- 用于发送通知电子邮件的远程SMTP服务器ip地址,SMTP协议的端口号默认25
   smtp_connect_timeout 30   -- SMTP服务器连接超时(以秒为单位)
   router_id LVS_DEVEL       -- 标识机器的字符串,默认本地主机名
   vrrp_skip_check_adv_addr  -- 检查收到的VRRP广告中的所有地址可能会很费时。设置此标志意味着如果广告来自与以前接收到的广告相同的主路由器,则不会执行检查。
   vrrp_strict               -- 严格遵守VRRP协议。将禁止0 VIP单播对等,VRRP版本2中的IPv6地址
   vrrp_garp_interval 0      -- 接口发送免费ARP(地址解析协议ip->mac)报文的时间间隔,单位毫秒
   vrrp_gna_interval 0       -- 接口上主动发送的NA消息的延迟时间,单位毫秒
}

vrrp_instance VI_1 {        -- VRRP实例定义
    state MASTER            -- 初始状态 MASTER|BACKUP,一旦其他机器启动,举行选举,机器具有最高优先级的将成为MASTER,因此这里的条目并不重要
    interface eth0          -- 内部网卡接口,由VRRP绑定
    virtual_router_id 51    -- 从1到255的任意唯一数字由于区分VRRPD的多个实例,在同一个网卡上运行
    priority 100            -- 优先级100,最高优先级获胜,为MASTER
    advert_int 1            -- VRRP通告间隔,以秒为单位
    authentication {        -- 认证信息
        auth_type PASS      -- 密码类型,PASS|AH PASS:简单密码 AH:AH-IPSEC:复杂的加密
        auth_pass 1111      -- 访问VRRPD的密码,在所有机器上应该相同,仅使用前八个字符
    }
    virtual_ipaddress {     -- 虚拟的ip地址
        192.168.200.16
        192.168.200.17
        192.168.200.18
    }
}

virtual_server 10.10.10.2 1358 {  -- 虚拟服务 host:port
    delay_loop 6                  -- 检查器轮询的延迟计时器
    lb_algo rr                    -- LVS调度方式 rr:轮询 wrr:权重轮询 lc:最少连接 等共13种方式
    lb_kind NAT                   -- LVS转发方式,NAT|DR
    persistence_timeout 50        -- LVS超时时间,单位是秒
    protocol TCP                  -- 传输协议 TCP|UDP|SCTP

    sorry_server 192.168.200.200 1358

    real_server 192.168.200.2 1358 {
        weight 1                      -- 权重
        HTTP_GET {                    -- healthy check方式,HTTP_GET|SSL_GET|TCP_CHECK|SMTP_CHECK|DNS_CHECK|MISC_CHECK|BFD_CHECK
            url {                     -- 测试时访问的网址
              path /testurl/test.jsp  -- 路径 http://192.168.200.2:1358/testurl/test.jsp
              digest 640205b7b0fc66c1ea91c463fac6334d
            }
            url {
              path /testurl2/test.jsp
              digest 640205b7b0fc66c1ea91c463fac6334d
            }
            url {
              path /testurl3/test.jsp
              digest 640205b7b0fc66c1ea91c463fac6334d
            }
            connect_timeout 3         -- 测试连接超时时间,单位为秒
            retry 3                   -- 重试次数
            delay_before_retry 3      -- 延迟失败后重试
        }
    }
}
综上,虽然还有的地方不是很清楚,但是已经可以试验一下了:
三、keepalived+nginx集群
集群的前提条件,单机能先启动两个nginx服务,
-- 建立ngnix命令启动快捷键
ln -s  /usr/local/nginx/sbin/nginx /usr/local/bin/
-- 启动两个服务,所以需要拷贝两份nginx.conf
cd /home/wq/nginx/
cp /usr/local/nginx/conf/nginx.conf .
cp /usr/local/nginx/html/index.html .
cp nginx.conf nginx1.conf -- 复制另一conf
cp index.html index1.html
vim nginx.conf   -- 修改监听端口18080  指定location / root /home/wq/nginx  index index.html  修改user root
vim nginx1.conf --  修改监听端口18081  指定location / root /home/wq/ngnix index index1.html  修改user root
vim index.html -- 加入ip端口信息  mcip:18080
vim index1.html -- 加入ip端口信息  mcip:18081
nginx -c /home/wq/nginx/nginx.conf -- 报错找不到/home/wq/nginx/mime.types,打开mime.types文件看了下,主要是请求格式映射  例如text/html  --> html htm shtml,可以复用,
cp /usr/local/nginx/conf/mime.types .
nginx -c /home/wq/nginx/nginx.conf -- 启动成功
nginx -c /home/wq/nginx/nginx1.conf -- 启动成功
![]()
![]()
拷贝两份keepalived.conf到路径下
cp /usr/etc/keepalived-2.0.20/keepalived/etc/keepalived/keepalived.conf .
cp keepalived.conf keepalived1.conf
keepalived -f /home/wq/nginx/keepalived.conf
keepalived -f /home/wq/nginx/keepalived1.conf
这个时候我才明白没那么简单,keepalived是跟网卡绑定的,单机技能创建一个vrrp实例

集群以后再研究,先说一下对keepalived的理解,下面是两个配置文件
--  keepalived.conf
global_defs {
   router_id LVS_DEVEL
}

vrrp_instance VI_1 {
    state MASTER
    interface enp0s3       -- 本机网卡,两台机器可以不同
    virtual_router_id 51   -- 必须相同
    priority 100               -- 优先级,100>99 会优先选为MASTER
    advert_int 1
    authentication {
        auth_type PASS
        auth_pass 1111
    }

    virtual_ipaddress {
        192.168.0.133        -- 分配的虚拟ip,必须相同
    }
}
--  keepalived1.conf
global_defs {
   router_id LVS_DEVEL
}

vrrp_instance VI_1 {
    state MASTER
    interface enp0s3       -- 本机网卡,两台机器可以不同
    virtual_router_id 51   -- 必须相同
    priority 99               -- 优先级
    advert_int 1
    authentication {
        auth_type PASS
        auth_pass 1111
    }

    virtual_ipaddress {
        192.168.0.133        -- 分配的虚拟ip,必须相同
    }
}
上面两个配置文件,仅在服务器宕机的时候有效,如果要针对ngnix奔溃,需要在keeplived中绑定一个脚本
#!/bin/bash
A=`ps -C nginx --no-header | wc -l` #检测nginx进程
if [ $A -eq 0 ];then
    /usr/local/nginx/sbin/nginx #尝试重新启动nginx

    sleep 2 #睡眠2秒

    if [ `ps -C nginx --no-header | wc -l` -eq 0 ];then
        killall keepalived #启动失败,将keepalived服务杀死。将虚拟ip被到其它备份keepalived抢到
    fi
fi
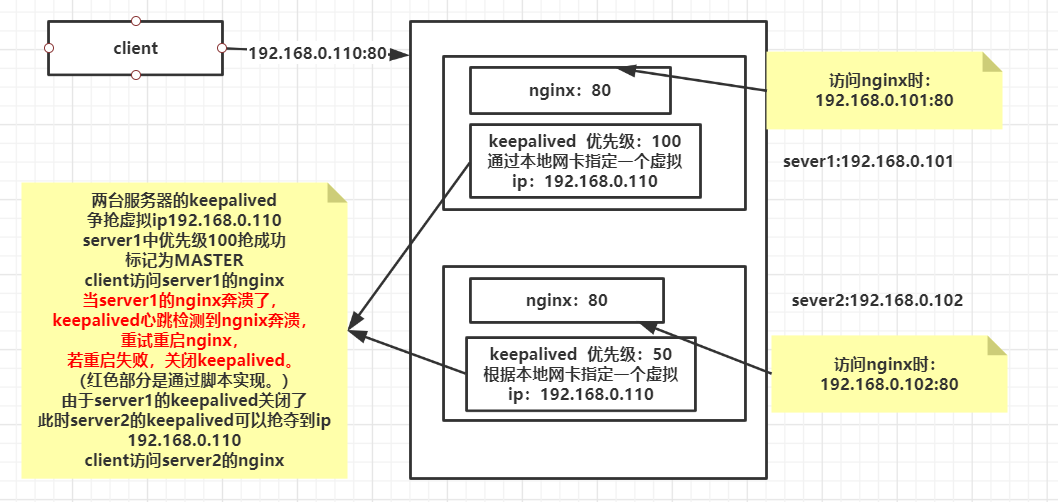
简单的结构图: