


package com.bjsxt.service;
import java.rmi.Remote;
import java.rmi.RemoteException;
/***
* 创建需要发布的服务对应的业务接口
* @author Administrator
* Remote 接口用于标识其方法可以从非本地虚拟机上调用的接口。
*/
public interface UserService extends Remote{
public String helloRmi(String name) throws RemoteException; }
3.3 创建 UserServiceImpl 实现类


package com.bjsxt.service.impl;
import java.rmi.RemoteException;
import java.rmi.server.UnicastRemoteObject;
import com.bjsxt.service.UserService;
/***
* 创建发布的服务对应的实现类
* @author Administrator
*
*/
public class UserServiceImpl
extends UnicastRemoteObject implements UserService {
public UserServiceImpl() throws RemoteException {
super();
// TODO Auto-generated constructor stub
}
@Override
public String helloRmi(String name) throws RemoteException {
// TODO Auto-generated method stub
return "hello "+name; } }
3.4 发布远程服务
package com.bjsxt.app;
import java.rmi.Naming;
import java.rmi.registry.LocateRegistry;
import com.bjsxt.service.UserService;
import com.bjsxt.service.impl.UserServiceImpl;
public class ProviderApp {
public static void main(String[] args) {
try{
/****
* 完成远程服务的发布
*/
//将远程服务发布在本地的 8888 端口
LocateRegistry.createRegistry(8888);
//发布的远程服务的访问 url
String name="rmi://localhost:8888/rmi";
//创建一个提供具体服务的远程对象
UserService userService = new UserServiceImpl();
//给提供远程服务的对象绑定一个 url
Naming.bind(name, userService);
System.out.println("=============发布 rmi 远程服务============");
}catch(Exception ex){
ex.printStackTrace();
} } }

package com.bjsxt.service;
import java.rmi.Remote;
import java.rmi.RemoteException;
/***
* 创建需要发布的服务对应的业务接口
* @author Administrator
* Remote 接口用于标识其方法可以从非本地虚拟机上调用的接口。
*/
public interface UserService extends Remote{
public String helloRmi(String name) throws RemoteException;
}
4.3 消费远程服务
package com.bjsxt.app;
import java.rmi.Naming;
import com.bjsxt.service.UserService;
public class ConsumerApp {
public static void main(String[] args) {
try{
//发布的远程服务的访问 url
String name="rmi://localhost:8888/rmi";
//通过发布的远程服务的 url,获得远程服务的代理对象
UserService userService = (UserService) Naming.lookup(name);
System.out.println("获得的远程服务的代理对象:"
+userService.getClass().getName());
//通过远程服务的代理对象调用远程服务方法
String result = userService.helloRmi("rmi");
System.out.println("result="+result);
}catch (Exception e) {
// TODO: handle exception
e.printStackTrace();
} } }


3 服务提供者实现
3.1 创建 ws-provider 项目
3.2 创建 UserService 接口
package com.bjsxt.service;
import javax.jws.WebService;
/***
* 需要发布的服务对应的接口
* @author Administrator
* @WebService 发布远程的 web 服务,默认情况下该接口中的
* 所有 public 方法都会被发布
*/
@WebService
public interface UserService {
//@WebMethod()
public String sayHello(String name);
}
3.3 创建 UserServiceImpl 实现类
package com.bjsxt.service.impl;
import javax.jws.WebService;
import com.bjsxt.service.UserService;
@WebService
public class UserServiceImpl implements UserService {
@Override
public String sayHello(String name) {
// TODO Auto-generated method stub
return "hello "+name; } }
3.4 发布 webservice 服务
package com.bjsxt.app;
import javax.xml.ws.Endpoint;
import com.bjsxt.service.UserService;
import com.bjsxt.service.impl.UserServiceImpl;
public class WsProviderApp {
public static void main(String[] args) {
/***
* 完成 webservice 服务的发布
*/
//发布的 webservice 服务的访问地址
String address="http://localhost:9999/ws";
//创建 UserService 对象
UserService userService=new UserServiceImpl();
//发布具体的 webservice 服务
Endpoint.publish(address, userService);
System.out.println("----------发布 webservice 服务-------------");
} }
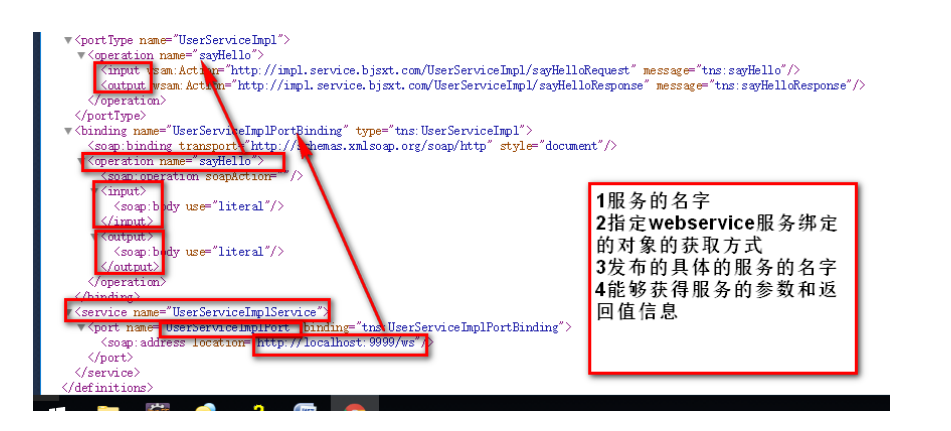
3.5 获取 wdsl 文档
4 服务消费者实现
4.1 创建 ws-consumer 项目
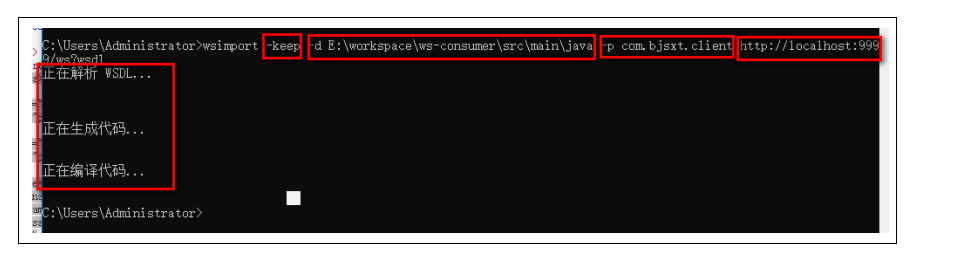
4.2wsimport 生成消费者代码
4.3 消费远程服务
package com.bjsxt.app;
import com.bjsxt.client.UserServiceImpl;
import com.bjsxt.client.UserServiceImplService;
public class WsConsumerApp {
public static void main(String[] args) {
/***
* 完成 webservice 服务的消费
*/
//创建服务类对象
UserServiceImplService service=new UserServiceImplService();
//获得远程服务的代理对象
UserServiceImpl userService=service.getUserServiceImplPort();
System.out.println(userService.getClass().getName());
//进行远程服务调用
String result = userService.sayHello("张三");
System.out.println("result="+result);
} }
<project xmlns="http://maven.apache.org/POM/4.0.0"
xmlns:xsi="http://www.w3.org/2001/XMLSchema-instance"
xsi:schemaLocation="http://maven.apache.org/POM/4.0.0
http://maven.apache.org/xsd/maven-4.0.0.xsd"> <modelVersion>4.0.0</modelVersion> <groupId>com.bjsxt.provider</groupId> <artifactId>order-sys</artifactId> <version>0.0.1-SNAPSHOT</version> <packaging>war</packaging> <properties>
<!-- spring 依赖 --> <spring.version>4.3.18.RELEASE</spring.version> <jstl.version>1.2</jstl.version> <servlet-api.version>2.5</servlet-api.version> <jsp-api.version>2.0</jsp-api.version> <jackson.version>2.9.0</jackson.version>
</properties>
user-sys order-sys
<dependencies>
<!-- jsp 相关依赖 -->
<!-- servlet 依赖 -->
<!-- jstl 依赖 --> <dependency>
<groupId>jstl</groupId>
<artifactId>jstl</artifactId>
<version>${jstl.version}</version>
</dependency> <dependency> <groupId>javax.servlet</groupId> <artifactId>servlet-api</artifactId> <version>${servlet-api.version}</version> <scope>provided</scope>
</dependency> <dependency> <groupId>javax.servlet</groupId> <artifactId>jsp-api</artifactId> <version>${jsp-api.version}</version> <scope>provided</scope>
</dependency>
<!-- springmvc 依赖--> <dependency> <groupId>org.springframework</groupId> <artifactId>spring-webmvc</artifactId> <version>${spring.version}</version>
</dependency> <dependency> <groupId>com.fasterxml.jackson.core</groupId> <artifactId>jackson-databind</artifactId> <version>${jackson.version}</version>
</dependency>
</dependencies> <build> <finalName>order</finalName> <plugins>
<!-- 配置 Tomcat 插件 --> <plugin> <groupId>org.apache.tomcat.maven</groupId> <artifactId>tomcat7-maven-plugin</artifactId> <version>2.2</version> <configuration>
<path>/order</path> <port>7070</port>
</configuration>
</plugin>
</plugins>
</build>
</project>
3.3 创建 Order 订单实体类
package com.bjsxt.domain;
/***
* 订单的实体类
* @author Administrator
*
*/
public class Order {
private String id;
private Double total;
private String date;
public String getId() {
return id; }
public void setId(String id) {
this.id = id; }
public Double getTotal() {
return total; }
public void setTotal(Double total) {
this.total = total; }
public String getDate() {
return date; }
public void setDate(String date) {
this.date = date; } }
3.4 创建 OrderController
package com.bjsxt.controller;
import java.util.ArrayList;
import java.util.List;
import org.springframework.stereotype.Controller;
import org.springframework.ui.Model;
import org.springframework.web.bind.annotation.RequestMapping;
import org.springframework.web.bind.annotation.ResponseBody;
import com.bjsxt.domain.Order;
@Controller
public class OrderController {
/**
* 接收 http 请求,响应订单集合
* **/
@RequestMapping("/loadOrderList")
public String loadOrderList(String uid,Model model){
Order o1=new Order();
o1.setId("111");
o1.setTotal(123.0);
o1.setDate("2018-10-10");
Order o2=new Order();
o2.setId("222");
o2.setTotal(1232.0);
o2.setDate("2018-10-13");
Order o3=new Order();
o3.setId("333");
o3.setTotal(333.0);
o3.setDate("2018-10-31");
List<Order> list = new ArrayList<>();
list.add(o1);
list.add(o2);
list.add(o3);
model.addAttribute("list", list);
return "index.jsp"; }
/**
* 接收 http 请求,响应订单集合,完成的是异步响应
* 将 List 集合序列化为 json 串响应
* **/
@RequestMapping("/loadOrderList02")
@ResponseBody
public List<Order> loadOrderList02(String uid){
System.out.println("uid="+uid);
Order o1=new Order();
o1.setId("111");
o1.setTotal(123.0);
o1.setDate("2018-10-10");
Order o2=new Order();
o2.setId("222");
o2.setTotal(1232.0);
o2.setDate("2018-10-13");
Order o3=new Order();
o3.setId("333");
o3.setTotal(333.0);
o3.setDate("2018-10-31");
List<Order> list = new ArrayList<>();
list.add(o1);
list.add(o2);
list.add(o3);
return list;
} }
3.5 配置 springmvc.xml
<?xml version="1.0" encoding="UTF-8"?>
<beans xmlns="http://www.springframework.org/schema/beans"
xmlns:context="http://www.springframework.org/schema/context"
xmlns:mvc="http://www.springframework.org/schema/mvc"
xmlns:xsi="http://www.w3.org/2001/XMLSchema-instance"
xsi:schemaLocation="http://www.springframework.org/schema/beans
http://www.springframework.org/schema/beans/spring-beans.xsd
http://www.springframework.org/schema/context
http://www.springframework.org/schema/context/spring-context.xsd
http://www.springframework.org/schema/mvc
http://www.springframework.org/schema/mvc/spring-mvc.xsd">
<!-- 扫描 controller --> <context:component-scan base-package="com.bjsxt.controller" />
<mvc:annotation-driven></mvc:annotation-driven>
</beans>
3.6 配置 web.xml
<?xml version="1.0" encoding="UTF-8"?>
<web-app xmlns:xsi="http://www.w3.org/2001/XMLSchema-instance"
xmlns="http://java.sun.com/xml/ns/javaee"
xsi:schemaLocation="http://java.sun.com/xml/ns/javaee
http://java.sun.com/xml/ns/javaee/web-app_2_5.xsd"
version="2.5"> <display-name>order</display-name> <welcome-file-list> <welcome-file>index.html</welcome-file> <welcome-file>index.htm</welcome-file> <welcome-file>index.jsp</welcome-file> <welcome-file>default.html</welcome-file> <welcome-file>default.htm</welcome-file> <welcome-file>default.jsp</welcome-file>
</welcome-file-list>
<servlet-mapping> <servlet-name>default</servlet-name> <url-pattern>/favicon.ico</url-pattern>
</servlet-mapping>
<!-- 以监听器的方式启动 spring 容器 --> <listener> <listener-class>org.springframework.web.context.ContextLoaderListener</listener-class>
</listener>
<!-- 指定 spring 的配置文件 --> <context-param> <param-name>contextConfigLocation</param-name> <param-value>classpath:applicationContext-*.xml</param-value>
</context-param>
<!-- POST 请求的乱码过滤器 --> <filter><filter-name>encodingFilter</filter-name> <filter-class>org.springframework.web.filter.CharacterEncodingFilter</filter-class>
<!-- 指定编码方式 --> <init-param> <param-name>encoding</param-name> <param-value>utf-8</param-value>
</init-param>
</filter>
<!-- 映射 filter --> <filter-mapping> <filter-name>encodingFilter</filter-name> <url-pattern>/*</url-pattern>
</filter-mapping>
<!-- springmvc 的 servlet --> <servlet> <servlet-name>springmvc</servlet-name> <servlet-class>org.springframework.web.servlet.DispatcherServlet</servlet-class>
<!-- 指定 springmvc 的配置文件 --> <init-param> <param-name>contextConfigLocation</param-name> <param-value>classpath:springmvc.xml</param-value>
</init-param>
<!-- 让 springmvc 随系统启动而启动 -->
<load-on-startup>1</load-on-startup>
</servlet> <servlet-mapping> <servlet-name>springmvc</servlet-name> <url-pattern>/</url-pattern>
</servlet-mapping>
</web-app>
3.7 启动 order-sys 项目
4 服务消费者实现
4.1 创建 user-sys 项目
<project xmlns="http://maven.apache.org/POM/4.0.0"
xmlns:xsi="http://www.w3.org/2001/XMLSchema-instance"
xsi:schemaLocation="http://maven.apache.org/POM/4.0.0
http://maven.apache.org/xsd/maven-4.0.0.xsd"> <modelVersion>4.0.0</modelVersion> <groupId>com.bjsxt.consumer</groupId> <artifactId>user-sys</artifactId> <version>0.0.1-SNAPSHOT</version>
<!-- 添加 httpClient 依赖 --> <dependencies> <dependency> <groupId>org.apache.httpcomponents</groupId> <version>4.3.5</version> <artifactId>httpclient</artifactId>
</dependency> <dependency> <groupId>com.alibaba</groupId> <artifactId>fastjson</artifactId> <version>1.2.47</version>
</dependency>
</dependencies>
</project>
4.2 拷贝 Order 订单实体类
package com.bjsxt.domain;
/***
* 订单的实体类
* @author Administrator
*
*/
public class Order {
private String id;
private Double total;
private String date;
public String getId() {
return id; }
public void setId(String id) {
this.id = id; }
public Double getTotal() {
return total; }
public void setTotal(Double total) {
this.total = total; }
public String getDate() {
return date; }
public void setDate(String date) {
this.date = date; } }
4.3 创建测试类
package com.bjsxt.test.client;
import java.io.IOException;
import java.io.InputStream;
import java.io.InputStreamReader;
import java.util.ArrayList;
import java.util.List;
import org.apache.http.Header;
import org.apache.http.HttpEntity;
import org.apache.http.HttpResponse;
import org.apache.http.NameValuePair;
import org.apache.http.client.ClientProtocolException;
import org.apache.http.client.HttpClient;
import org.apache.http.client.entity.UrlEncodedFormEntity;
import org.apache.http.client.methods.HttpPost;
import org.apache.http.impl.client.HttpClients;
import org.apache.http.message.BasicNameValuePair;
import com.alibaba.fastjson.JSON;
import com.bjsxt.domain.Order;
public class TestHttpClient {
public static void main(String[] args)
throws ClientProtocolException, IOException {
/**
* 启动消费者进行服务的消费
* httpClient 发送远程请求,服务提供响应的为 json,
* json 直接可以解析 java 对象,或者 java 对象的集合
* **/
//创建 NameValuePair 对象,封装发送服务提供者的参数
NameValuePair id=new BasicNameValuePair("uid","2002");
/*NameValuePair uname=new BasicNameValuePair("uname","10001");
NameValuePair address=new BasicNameValuePair("address","10001");
*/
List<NameValuePair> params = new ArrayList<>();
params.add(id);
//发送远程的 http 请求的地址
String url="http://localhost:7070/order/loadOrderList02";
//创建 HttpClient 客户端对象
HttpClient client=HttpClients.createDefault();
//创建 HttpPost 对象,发送 post 请求
HttpPost method=new HttpPost(url);
//封装请求体数据
method.setEntity(new UrlEncodedFormEntity(params,"UTF-8"));
//发送具体的 http 请求
HttpResponse response = client.execute(method);
//获得响应头信息
Header[] headers = response.getAllHeaders();
for(Header h:headers){
System.out.println(h.getName()+"-----"+h.getValue());
}
//获得服务提供者响应的具体数据
HttpEntity entity = response.getEntity();
//获得 http 的响应体
InputStream content = entity.getContent();
int len=0;
char[] buf = new char[1024];
//将字节流转化为字符流
InputStreamReader reader=new InputStreamReader(content);
//创建 StringBuffer
StringBuffer result = new StringBuffer();
while((len=reader.read(buf))!=-1){
result.append(String.valueOf(buf,0,len));
}
System.out.println(result);
//将 result,json 字符串解析为 Order 集合
List<Order> list = JSON.parseArray(result.toString(), Order.class);
for(Order o:list){
System.out.println(o.getId()+"	"+o.getDate()+"	"+o.getTotal());
} } }
5GET 请求方式实现
1 本节任务
使用 Spring 提供的 restTemplate 完成 Http 服务消费
2RestTemplate 介绍
RestTemplate 是 Spring 提供的用于访问 Rest 服务的客户端,RestTemplate 提供了多种便捷访
问远程 Http 服务的方法,能够大大提高客户端的编写效率。
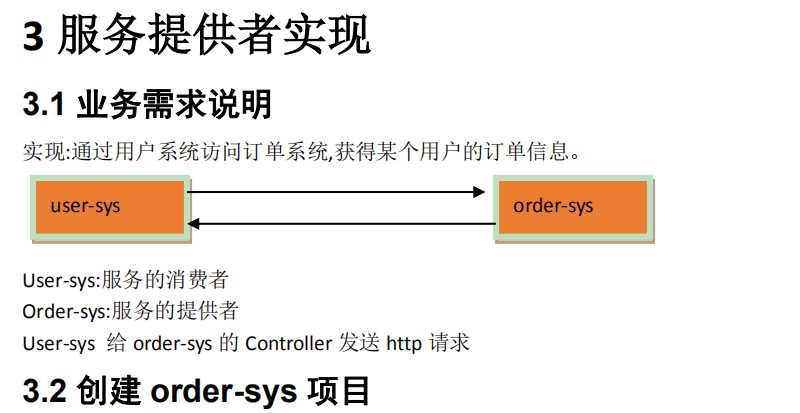
3 服务消费者实现
3.1 业务需求说明
实现:通过红包系统访问订单系统,获得某个用户的订单信息,派发红包.
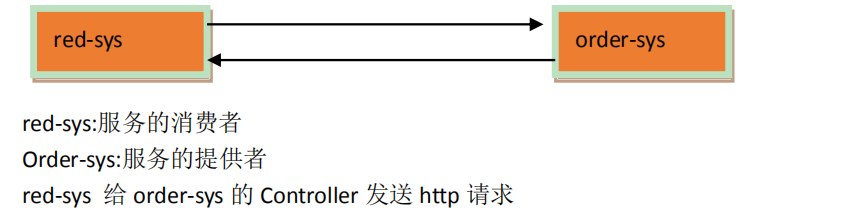
3.2 创建 red-sys 项目
<project xmlns="http://maven.apache.org/POM/4.0.0"
xmlns:xsi="http://www.w3.org/2001/XMLSchema-instance"
xsi:schemaLocation="http://maven.apache.org/POM/4.0.0
http://maven.apache.org/xsd/maven-4.0.0.xsd"> <modelVersion>4.0.0</modelVersion> <groupId>com.bjsxt.red.consumer</groupId> <artifactId>red-sys</artifactId> <version>0.0.1-SNAPSHOT</version> <packaging>war</packaging> <properties>
<!-- spring 依赖 --> <spring.version>4.3.18.RELEASE</spring.version> <jstl.version>1.2</jstl.version> <servlet-api.version>2.5</servlet-api.version> <jsp-api.version>2.0</jsp-api.version> <jackson.version>2.9.0</jackson.version>
</properties> <dependencies>
red-sys order-sys
<!-- jsp 相关依赖 -->
<!-- servlet 依赖 -->
<!-- jstl 依赖 --> <dependency> <groupId>jstl</groupId> <artifactId>jstl</artifactId> <version>${jstl.version}</version>
</dependency> <dependency> <groupId>javax.servlet</groupId> <artifactId>servlet-api</artifactId> <version>${servlet-api.version}</version> <scope>provided</scope>
</dependency> <dependency> <groupId>javax.servlet</groupId> <artifactId>jsp-api</artifactId> <version>${jsp-api.version}</version> <scope>provided</scope>
</dependency>
<!-- springmvc 依赖--> <dependency> <groupId>org.springframework</groupId> <artifactId>spring-webmvc</artifactId> <version>${spring.version}</version>
</dependency> <dependency> <groupId>com.fasterxml.jackson.core</groupId> <artifactId>jackson-databind</artifactId> <version>${jackson.version}</version>
</dependency>
</dependencies> <build> <finalName>red</finalName> <plugins>
<!-- 配置 Tomcat 插件 --> <plugin> <groupId>org.apache.tomcat.maven</groupId> <artifactId>tomcat7-maven-plugin</artifactId> <version>2.2</version> <configuration> <path>/red</path> <port>8080</port>
</configuration>
</plugin>
</plugins>
</build>
</project>
3.3 拷贝 Order 订单实体类
拷贝 order-sys 中的实体类
3.4 创建 RedController 类
package com.bjsxt.controller;
import java.util.Arrays;
import java.util.List;
import java.util.Map.Entry;
import org.springframework.beans.factory.annotation.Autowired;
import org.springframework.http.HttpHeaders;
import org.springframework.http.ResponseEntity;
import org.springframework.stereotype.Controller;
import org.springframework.util.LinkedMultiValueMap;
import org.springframework.util.MultiValueMap;
import org.springframework.web.bind.annotation.RequestMapping;
import org.springframework.web.bind.annotation.ResponseBody;
import org.springframework.web.client.RestTemplate;
import com.bjsxt.domain.Order;
@Controller
public class RedController {
//注入由 spring 提供的 RestTemplate 对象
@Autowired
private RestTemplate restTemplate;
/****
* 发送远程的 http 请求,消费 http 服务
* 获得订单对象的集合
*/
@RequestMapping("/loadOrderList01")
@ResponseBody
public List<Order> loadOrderList01(String uid){
//发送远程 http 请求的 url
String url="http://localhost:7070/order/loadOrderList02";
//发送到远程服务的参数
MultiValueMap<String, Object> params=new LinkedMultiValueMap();
params.add("uid", uid);
//通过 restTemplate 对象发送 post 请求
Order[] orders = restTemplate.postForObject(url, params, Order[].class);
return Arrays.asList(orders);
}
/****
* 发送远程的 http 请求,消费 http 服务
* 获得订单对象的集合
*/
@RequestMapping("/loadOrderList02")
@ResponseBody
public List<Order> loadOrderList02(String uid){
//发送远程 http 请求的 url
String url="http://localhost:7070/order/loadOrderList02";
//发送到远程服务的参数
MultiValueMap<String, Object> params=new LinkedMultiValueMap();
params.add("uid", uid);
//通过 restTemplate 对象发送 post 请求
ResponseEntity<Order[]> entity = restTemplate.postForEntity(url, params,
Order[].class);
//restTemplate.getForObject(url, responseType)
//restTemplate.getForEntity(url, responseType);
//获得响应头信息
HttpHeaders headers = entity.getHeaders();
for(Entry<String, List<String>> e:headers.entrySet()){
System.out.println(e.getKey()+"--------------"+e.getValue());
}
//获得响应状态吗
int status = entity.getStatusCodeValue();
System.out.println(status);
//获得远程服务的响应体
Order[] orders =entity.getBody();
return Arrays.asList(orders);
} }
3.5 配置 springmvc.xml
<?xml version="1.0" encoding="UTF-8"?>
<beans xmlns="http://www.springframework.org/schema/beans"
xmlns:context="http://www.springframework.org/schema/context"
xmlns:mvc="http://www.springframework.org/schema/mvc"
xmlns:xsi="http://www.w3.org/2001/XMLSchema-instance"
xsi:schemaLocation="http://www.springframework.org/schema/beans
http://www.springframework.org/schema/beans/spring-beans.xsd
http://www.springframework.org/schema/context
http://www.springframework.org/schema/context/spring-context.xsd
http://www.springframework.org/schema/mvc
http://www.springframework.org/schema/mvc/spring-mvc.xsd">
<!-- 扫描 controller --> <context:component-scan base-package="com.bjsxt.controller" />
<mvc:annotation-driven></mvc:annotation-driven>
<!-- 实例化 RestTemplate 对象 --> <bean id="restTemplate" class="org.springframework.web.client.RestTemplate"></bean>
</beans>
3.6 配置 web.xml
<?xml version="1.0" encoding="UTF-8"?>
<web-app xmlns:xsi="http://www.w3.org/2001/XMLSchema-instance"
xmlns="http://java.sun.com/xml/ns/javaee"
xsi:schemaLocation="http://java.sun.com/xml/ns/javaee
http://java.sun.com/xml/ns/javaee/web-app_2_5.xsd"
version="2.5"> <display-name>red</display-name> <welcome-file-list>
<welcome-file>index.html</welcome-file> <welcome-file>index.htm</welcome-file> <welcome-file>index.jsp</welcome-file> <welcome-file>default.html</welcome-file> <welcome-file>default.htm</welcome-file> <welcome-file>default.jsp</welcome-file>
</welcome-file-list> <servlet-mapping> <servlet-name>default</servlet-name> <url-pattern>/favicon.ico</url-pattern>
</servlet-mapping>
<!-- 以监听器的方式启动 spring 容器 --> <listener> <listener-class>org.springframework.web.context.ContextLoaderListener</listener-class>
</listener>
<!-- 指定 spring 的配置文件 --> <context-param> <param-name>contextConfigLocation</param-name> <param-value>classpath:applicationContext-*.xml</param-value>
</context-param>
<!-- POST 请求的乱码过滤器 --> <filter><filter-name>encodingFilter</filter-name> <filter-class>org.springframework.web.filter.CharacterEncodingFilter</filter-class>
<!-- 指定编码方式 --> <init-param> <param-name>encoding</param-name> <param-value>utf-8</param-value>
</init-param>
</filter>
<!-- 映射 filter --> <filter-mapping> <filter-name>encodingFilter</filter-name> <url-pattern>/*</url-pattern>
</filter-mapping>
<!-- springmvc 的 servlet --> <servlet> <servlet-name>springmvc</servlet-name>
<servlet-class>org.springframework.web.servlet.DispatcherServlet</servlet-class>
<!-- 指定 springmvc 的配置文件 --> <init-param> <param-name>contextConfigLocation</param-name> <param-value>classpath:springmvc.xml</param-value>
</init-param>
<!-- 让 springmvc 随系统启动而启动 --> <load-on-startup>1</load-on-startup>
</servlet> <servlet-mapping> <servlet-name>springmvc</servlet-name> <url-pattern>/</url-pattern>
</servlet-mapping>
</web-app>
3.8 启动访问 red-sys
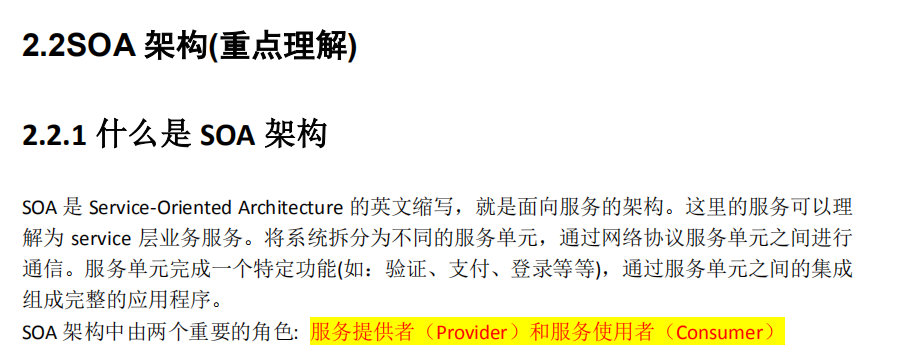
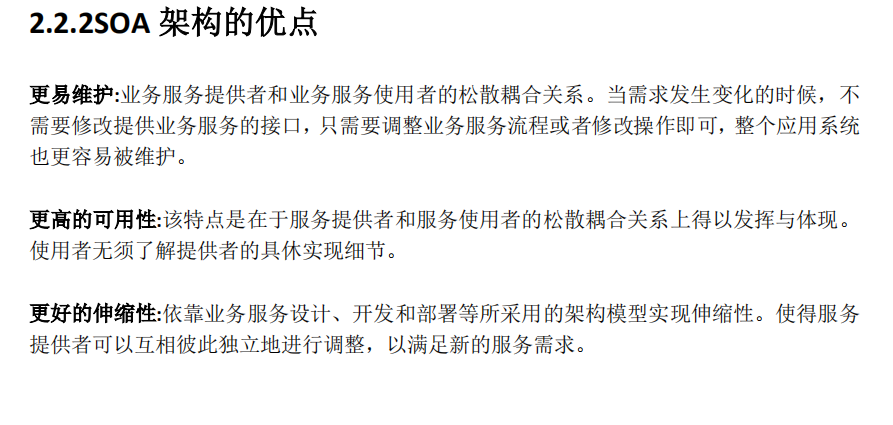
2 系统架构的演变
2.1 传统的单体架构
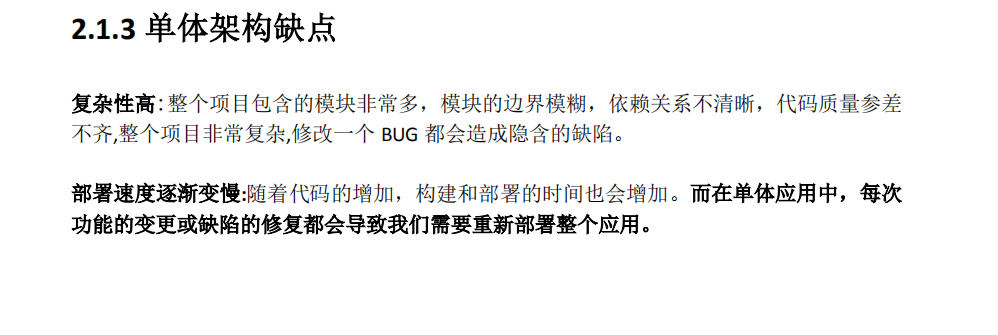
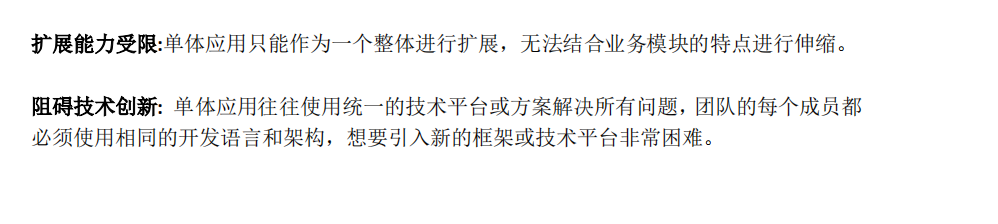
2.1.1 什么是单体架构
一个归档包(例如 war 格式或者 Jar 格式)包含了应用所有功能的应用程序,我们通常称之
为单体应用。也称之为单体应用架构,这是一种比较传统的架构风格。