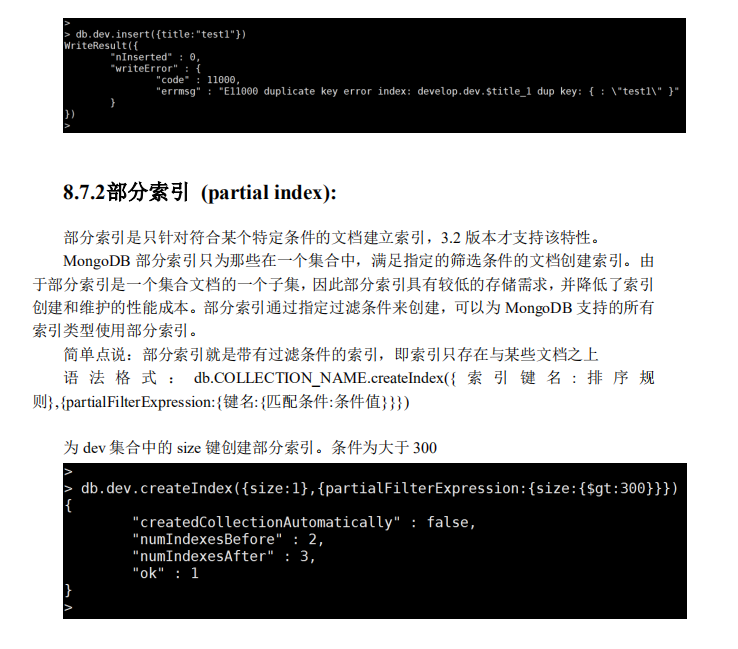
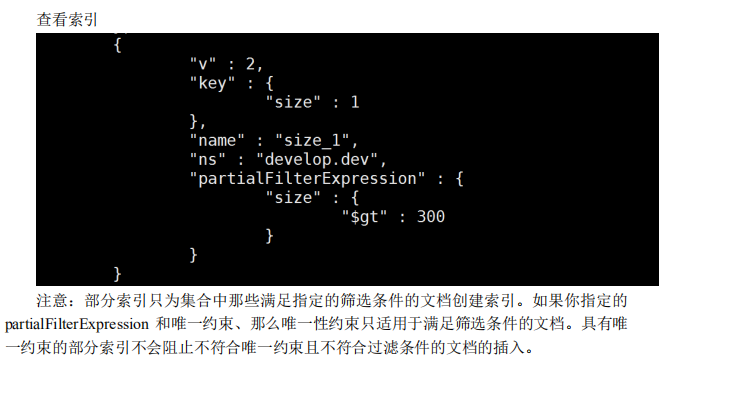
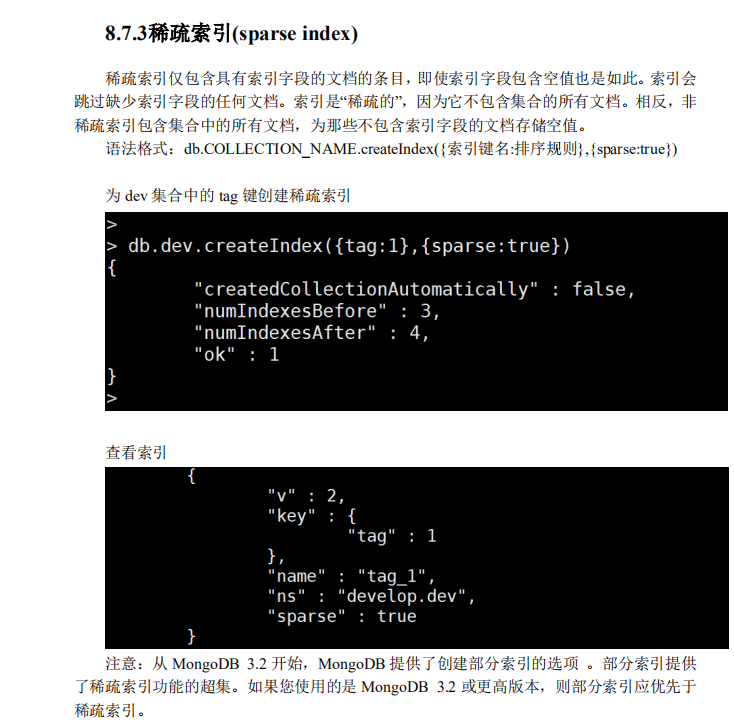
一、 MongoDB 简介
为什么要学nosql数据库?
在我们项目当中,或者互联网当中,所产生的数据量是非常庞大的。在大数据量的情况下,对系统的性能而言,在数据库这层是会产生瓶颈的,因为关系型数据库的检索是非常耗时的,进行大量io操作。所以在数据的存储上是有要求的,除了要有关系型数据库以外,还要添加一些非关系型数据库或者叫onsql数据库或者叫内存型数据库。
1 什么是 MongoDB
MongoDB 是一个基于分布式文件存储的数据库。由 C++语言编写。在为 WEB 应用提
供可扩展的高性能数据存储解决方案。
MongoDB 是一个介于关系数据库和非关系数据库之间的产品,是非关系数据库当中功
能最丰富,最像关系数据库的。它支持的数据结构非常松散,是类似 json 的 bson 格式,因
此可以存储比较复杂的数据类型。Mongo 最大的特点是它支持的查询语言非常强大,其语
法有点类似于面向对象的查询语言,几乎可以实现类似关系数据库单表查询的绝大部分功
能,而且还支持对数据建立索引。
2 什么是 NoSQL
NoSQL(NoSQL = Not Only SQL ),意即“不仅仅是 SQL”,是一项全新的数据库革命性运
动,早期就有人提出,发展至 2009 年趋势越发高涨。NoSQL 的拥护者们提倡运用非关系型
的数据存储,相对于铺天盖地的关系型数据库运用,这一概念无疑是一种全新的思维的注入。(nosql数据库会有丢失数据现象)
3 NoSQL 数据库的分类
3.1键值(Key-Value)存储数据库
这一类数据库主要会使用到一个哈希表,这个表中有一个特定的键和一个指针指向特定
的数据。Key/value 模型对于 IT 系统来说的优势在于简单、易部署。但是如果 DBA 只对部
分值进行查询或更新的时候,Key/value 就显得效率低下了。例如: Redis
3.2列存储数据库
这部分数据库通常是用来应对分布式存储的海量数据。键仍然存在,但是它们的特点是
指向了多个列。这些列是由列家族来安排的。如:HBase。
3.3文档型数据库
文档型数据库的灵感是来自于 Lotus Notes 办公软件的,而且它同第一种键值存储相类
似。该类型的数据模型是版本化的文档,半结构化的文档以特定的格式存储,比如 JSON。
文档型数据库可 以看作是键值数据库的升级版,允许之间嵌套键值。而且文档型数据库比
键值数据库的查询效率更高。如:CouchDB, MongoDB. 国内也有文档型数据库 SequoiaDB,
已经开源。
3.4图形(Graph)数据库
图形结构的数据库同其他行列以及刚性结构的 SQL 数据库不同,它是使用灵活的图形
模型,并且能够扩展到多个服务器上。NoSQL 数据库没有标准的查询语言(SQL),因此进行
数据库查询需要制定数据模型。许多 NoSQL 数据库都有 REST 式的数据接口或者查询 API。
如:Neo4J, InfoGrid。
二、 MongoDB 与关系型数据库对比
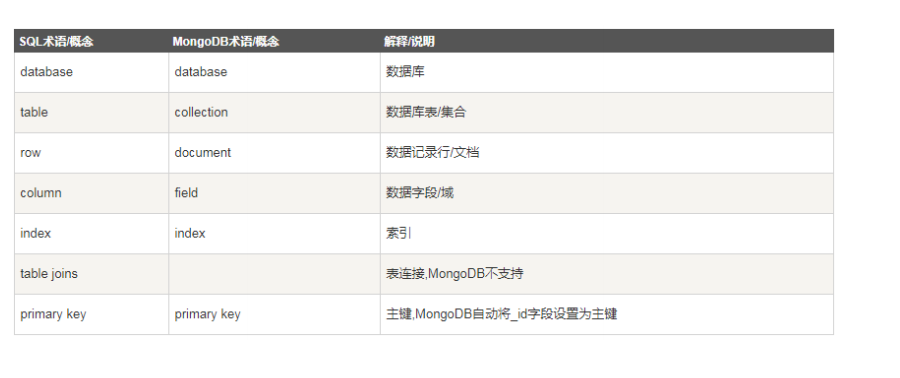
1 与关系型数据库术语对比
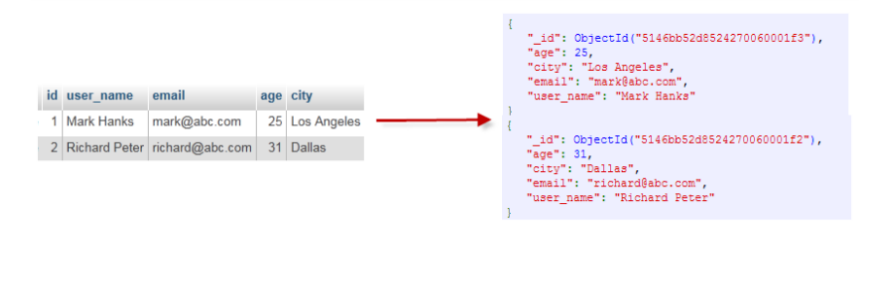
2 存储数据对比
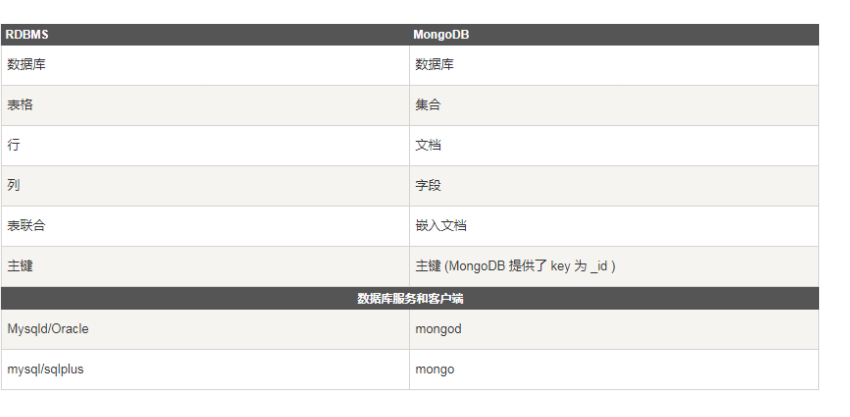
3 RDBMS 与 MongoDB 对应的术语
三、 MongoDB 的数据类型

四、 MongoDB 的下载与安装
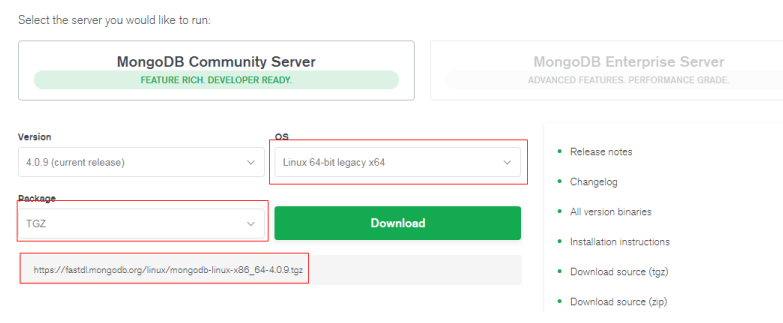
1 下载 MongoDB
下载地址:https://www.mongodb.com/download-center/community
2 安装 MongoDB
2.1.1下载 ForLinux 平台的 MongoDB
2.2Linux 安装
在 Linux 平台的 MongoDB 为解压版。我们只要解压 tgz 文件就可以使用。
2.2.1将下载的 tgz 包上传到 Linux 环境中
我将 tgz 包上传到了自己创建的 temp 目录中。该目录位于/root 目录中。
在 Linux 平台的 MongoDB 为解压版。我们只要解压 tgz 文件就可以使用。
2.2.1将下载的 tgz 包上传到 Linux 环境中
我将 tgz 包上传到了自己创建的 temp 目录中。该目录位于/root 目录中。

2.2.2解压 tgz 文件
通过 tar 命令对 tgz 文件做解压处理。

2.2.3移动 MongoDB
我们将解压完的 MongoDB 目录移动到/usr/local 目录中并改名为 mongodb。

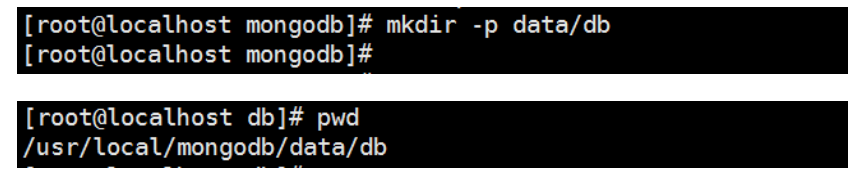
2.2.4创建数据库目录
MongoDB 的数据存储在 data 目录的 db 目录下,但是这个目录在安装过程不会自动创
建,需要手动创建 data 目录,并在 data 目录中创建 db 目录。data 目录可以创建在任何位置。
本套视频中,我们将 data 目录创建在 mongodb 的根目录下。
至此 Linux 平台中的 MongoDB 就已经安装完毕。
3 MongoDB 的启动与关闭
3.1启动 MongoDB
MongoDB 的启动方式分为两种
1)前置启动
2)后置启动
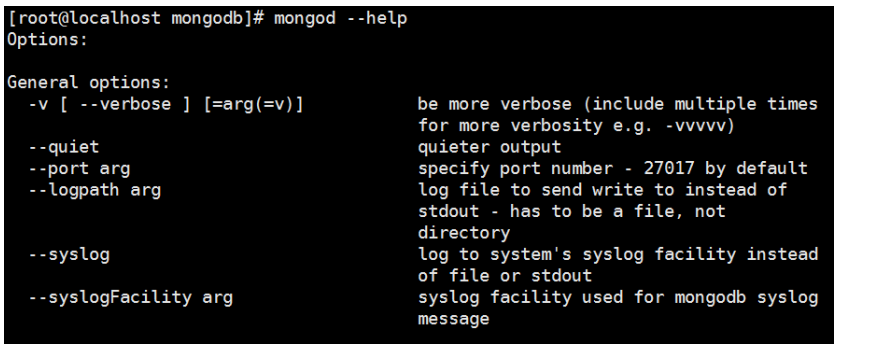
无论哪种启动方式都需要执行 bin 目录中的 mongod 命令。MongoDB 在启动时默认的
查找数据库的路径为/data/db。如果我们数据库路径有变化,需要在该命令中通过--dbpath 参
数来指定 db 目录的路径(该路径可以是绝对路径,也可是相对路径)。
3.1.1前置启动
MongoDB 的默认启动方式为前置启动。所谓前置启动就是 MongoDB 启动进程后会占
用当前终端窗口。
进入到 MongoDB 的 bin 目录。

执行 bin 目录中的 mongod 命令。

由于我们的 db 目录放在 mongodb 的根下,所以在执行该命令时需要通过 --dbpath 参数
指定 db 路径。

启动后会在终端中输出一些启动信息。此时终端窗口已被启动进程所占用。我们通过启
动信息可以看到 MongoDB 默认的监听端口为 27017
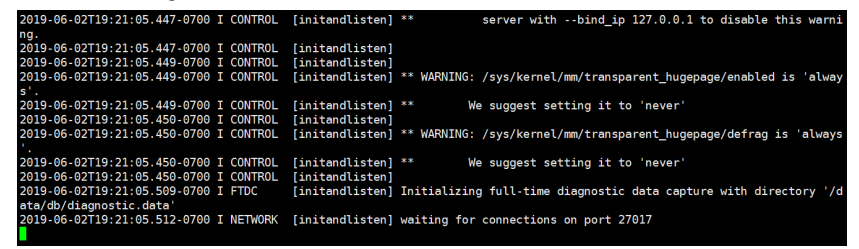
按 Ctrl+C 可结束启动进程关闭 MongoDB

3.1.2后置启动
所谓后置启动就是以守护进程的方式启动 MongoDB。我们需要在执行 mongod 命令中
添加 --fork 参数。需要注意的是,--fork 参数需要配合着--logpath 或者是--syslog 参数使用。
--logpath 与--syslog 参数是指定 MongoDB 的日志文件。MongoDB 的日志文件可以在系统中的任意位置,本视频中我们在 mongodb 目录下创建 log 目录,在该目录中创建一个名为
mongodb.log 的日志文件。
创建 log 目录

在 log 目录中创建 mongodb.log 日志文件


3.1.3常见的启动参数

3.1.4通过配置文件加载启动参数
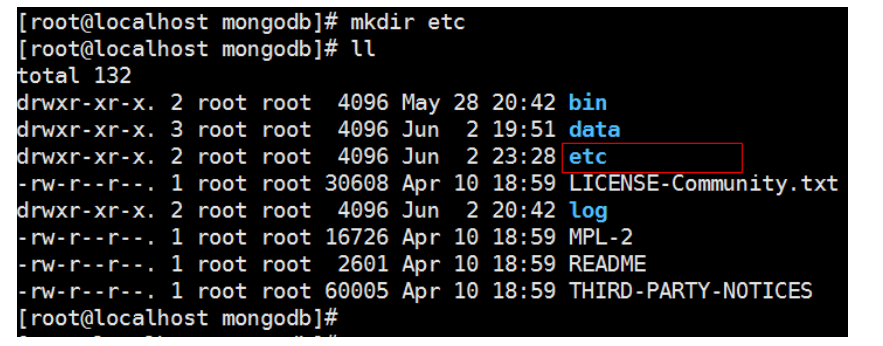
如果觉得在启动 MongoDB 时给定的参数项太多,那么我们也可以通过配置文件来配置
启动参数,配置文件可以在任意目录中,配置文件的扩展名应为.conf,配置文件中使用
key=value 结构。在执行 MongoDB 时通过--config 参数来指定需要加载的配置文件。
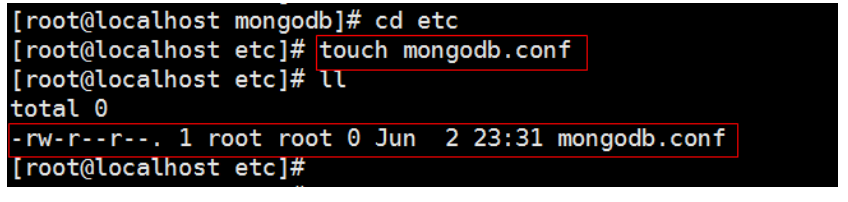
我们在 mongodb 目录下创建一个 etc 目录,在该目录中创建一个名为 mongodb.conf 的
配置文件。
创建 mongodb.conf 配置文件
编辑配置文件,在配置文件中添加配置项:
1)指定 db 路径
2)指定日志文件
3)配置端口
4)配置后端启动
在配置文件中配置启动参数时需要注意的是,在参数前不在加--符号,直接以参数名作
为 key 就可以。

通过加载配置文件启动 MongoDB

3.1.5配置环境变量
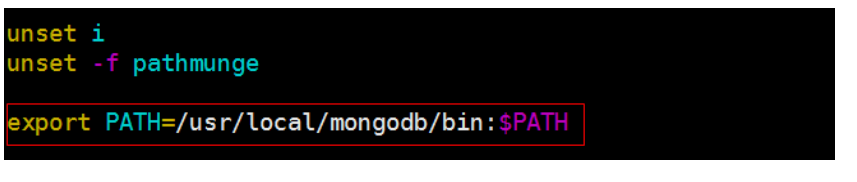
为了能够在任何目录中执行 bin 目录中的命令,我们可以将 bin 目录添加到环境变量中。
修 改 /etc/profile 文 件 , 添 加 export PATH=/usr/local/mongodb/bin:$PATH 。
/usr/local/monogdb/bin 为 MongoDB 的 bin 目录的绝对路径。同学们可根据自己的情况来指定。

3.2关闭 MongoDB
3.2.1使用 Ctrl+C 关闭
如果我们的启动方式是前置启动,那么直接使用快捷键 Ctrl+C 就可以关闭 MongoDB。
这种关闭方式会等待当前进行中的的操作完成,所以依然是安全的关闭方式。(不会立即关闭,等所有的操作都做完了,才会去关闭)
3.2.2使用 kill 命令关闭
我们可以通过 Linux 的 kill 命令结束 MongoDB 进程,然后删除 data/db 目录中的
mongod.lock 文件,否则下次无法启动。但是此方法不建议使用,因为会造成数据损坏现象。
3.2.3使用 MongoDB 的函数关闭
在 MongoDB 中提供了两个关闭数据库的函数:
db.shutdownServer()
db.runCommand(“shutdown”)
如上两个方法都需要在 admin 库中执行,并且都是安全的关闭方式。

3.2.4使用 mongod 命令关闭 MongoDB
mongod --shutdown --dbpath<数据库路径>
mongod 命令的 shutdown 选项能安全的关闭 MongoDB 服务

五、 MongoDB 的用户与权限管理
Mongodb 作为时下最为热门的数据库,那么其安全验证也是必不可少的,否则一个没
有验证的数据库暴露出去,任何人可随意操作,这将是非常危险的。我们可以通过创建用户
的方式来降低风险。
1 Mongodb 用户权限列表

2 MongoDB 用户使用
2.1创建 DB 管理用户
mongodb 有一个用户管理机制,简单描述为,有一个管理用户组,这个组的用户是专门
为管理普通用户而设的,暂且称之为管理员。
管理员通常没有数据库的读写权限,只有操作用户的权限, 因此我们只需要赋予管理员
userAdminAnyDatabase 角色即可。
另外管理员账户必须在 admin 数据库下创建。
2.1.1切换到 Admin 库
管理员需要在 admin 数据库下创建,所以我们需要切换到 admin 数据库。

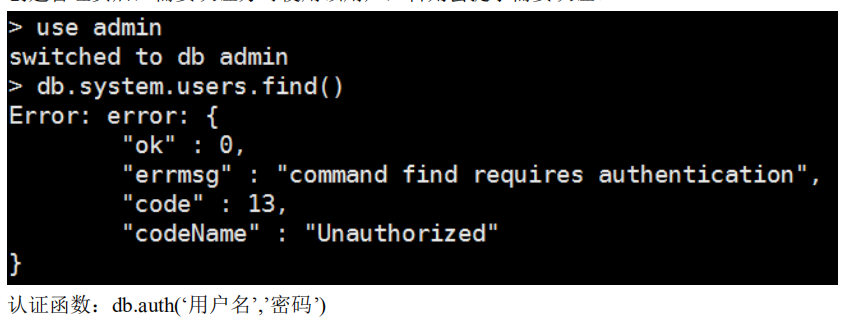
2.1.2查看 admin 中的用户
我们可以通过 db.system.users.find()函数来查看 admin 库中的所有用户信息。

目前在 admin 库中没有用户,所以查无结果。
2.1.3db.createUser 函数
在 MongoDB 中可以使用 db.createUser({用户信息})函数创建用户。
db.createUser({
user: "<name>",
pwd: "<cleartext password>",
customData: { <any information> },
roles: [
{ role: "<role>", db: "<database>" } | "<role>",
...
]
});
1)user:新建用户名。
2)pwd:新建用户密码。
3)customData:存放一些用户相关的自定义数据,该属性也可忽略。
4)roles:数组类型,配置用户的权限。
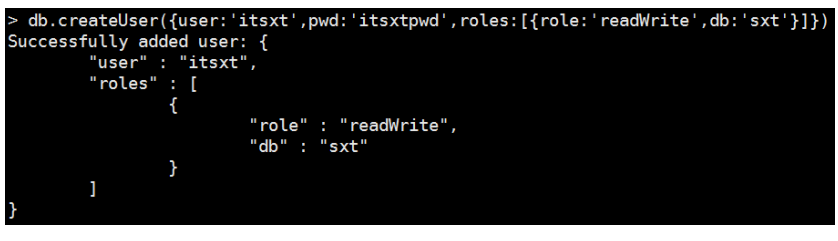
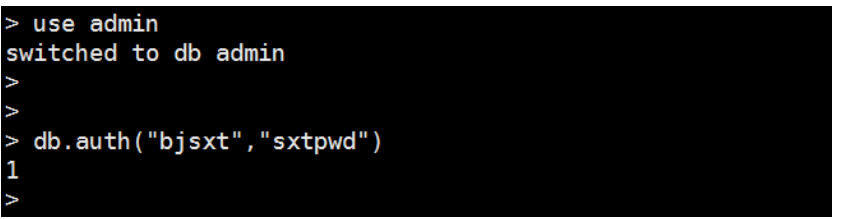
2.1.4创建管理员用户
我们现在需要在 admin 库中创建一个名为 bjsxt 的管理员用户,密码为 bjsxtpwd。
db.createUser({user:'bjsxt',pwd:'bjsxtpwd',roles:[{role:'userAdminAnyDatabase',db:'admin'}])
创建成功后会看到如下提示:

2.1.5重启 MongoDB
在管理员账户创建完成后,我们需要重新启动 MongoDB,并开启验证。
重新启动函数:db.shutdownServer()。

2.1.6使用权限方式启动 MongoDB
在默认的情况下 MongoDB 是不开启用户认证的。如果我们添加用户,那么需要开启用
户认证机制。通过修改 mongodb.conf 配置文件,在文件中添加 auth=true 即可。

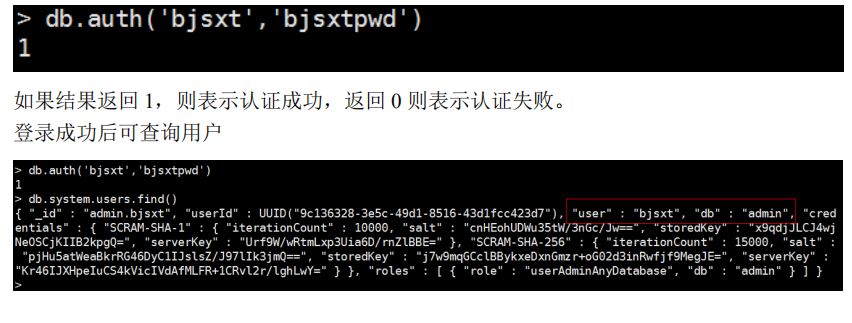
2.1.7用户认证
创建管理员后,需要认证方可使用该用户,否则会提示需要认证。
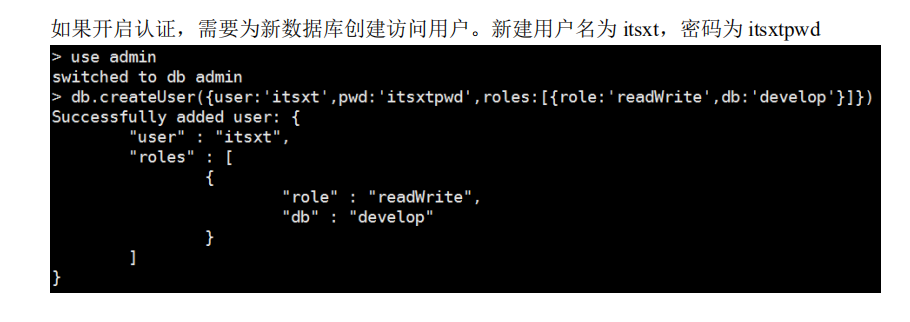
2.2创建普通用户
普通用户由管理员创建。通常需要指定操作某个数据库。
2.2.1需求
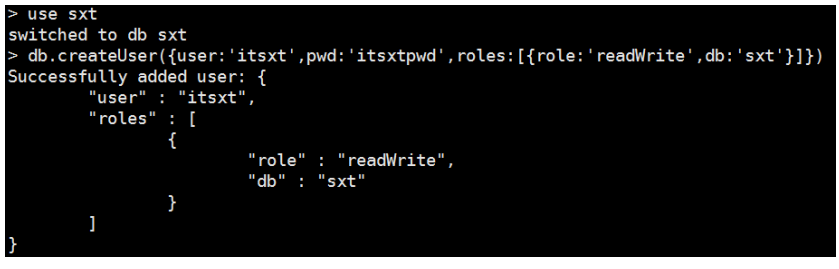
我们创建一个 sxt 数据库,给这个数据库添加一个用户,用户名为 itsxt,密码为 itsxtpwd。
并授予该用户对 sxt 数据库进行读写操作的权限。
2.2.2使用管理员用户登录
普通用户需要由管理员创建并授权。所以,我们首先做的就是用管理员账户登录数据库。

2.2.3创建 sxt 数据库
use 命令切换数据库时如果该库不存在,那么则会创建该数据库。

2.2.4创建普通用户
2.2.5使用普通用户
打开一个新的客户端。

2.2.6切换到 sxt 数据库
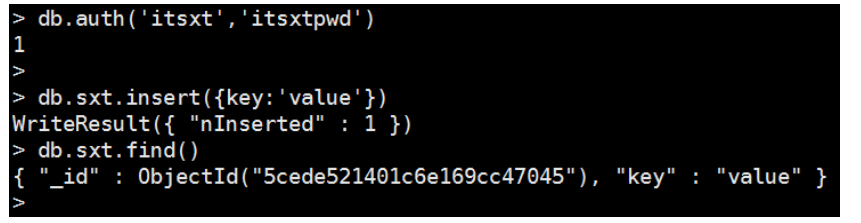
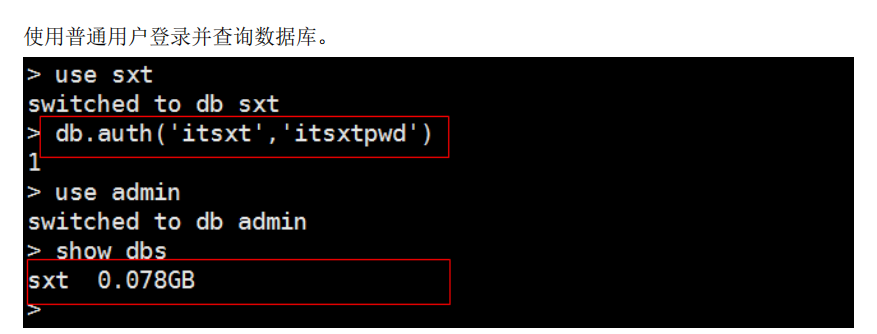
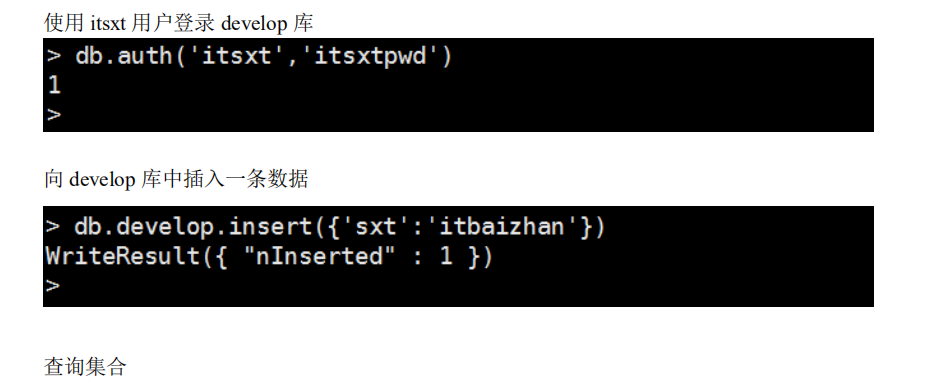
由于我们是在 sxt 数据库中创建的 itsxt 用户,所以需要先切换到 sxt 库。

2.2.7登录普通用户
如果我们不登录会发现无法对该数据库进行插入操作。因为缺少用户认证。

通过认证函数对用户进行登录认证。

认证成功后操作通过该用户操作 sxt 库。该用户对 sxt 库具备读写操作。
2.3更新用户角色
如果我们需要对已存在的用户的角色做修改,那么我们可以使用 db.updateUser()函数来
更新用户角色。注意,该函数需要当前用户具有 userAdminAnyDatabase 或者更高的权限。
2.3.1更新角色语法格式
db.updateUser("用户名", {"roles":[{"role":"角色名称"},{"更新项 2":"更新内容"}]})
2.3.2需求
目前 bjsxt 管理员用户只具备 userAdminAnyDatabase 用户管理角色,我们为该用户添加
一个 dbAdminAnyDatabase 数据库管理角色。
2.3.3更新角色
db.updateUser("bjsxt",{roles : [{"role" : "userAdminAnyDatabase","db" : "admin"},{"role" :
"dbAdminAnyDatabase","db" : "admin"}]})

2.3.4查看用户信息
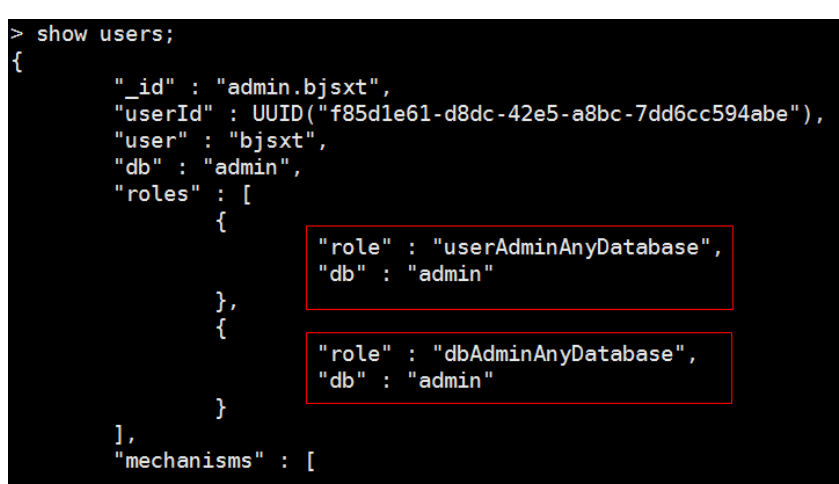
通过 show users 命令查看到 bjsxt 用户的角色已经发生改变。
2.4更新用户密码
更新用户密码有两种方式:
- 1)使用 db.updateUser()函数更新密码。
- 2)使用 db.changeUserPassword()函数更新密码
2.4.1更新密码方式一
使用 db.upateUser()函数将 bjsxt 用户的密码修改为 sxt
2.4.1.1 语法格式
db.updateUser("用户名",{"pwd":"新密码"})

如果未提示任何信息则表示更新成功。退出当前客户端重新连接认证即可。
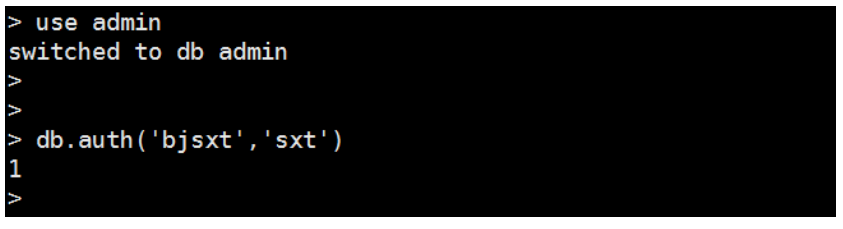
重新使用 bjsxt 用户登录
2.4.2更新密码方式二
使用 db.changeUserPassword()函数将 bjsxt 用户的密码修改为 sxtpwd。
2.4.2.1 语法格式
db.changeUserPassword("用户名","新密码")

如果未提示任何信息则表示更新成功。退出当前客户端重新连接认证即可。
重新使用 bjsxt 用户登录
2.5删除用户
通过 db.dropUser()函数可删除指定用户。删除成功后会返回 true。在删除用户时需要切
换到创建用户时所指定的数据库中才可以删除。注意:需要使用具有 userAdminAnyDatabse
角色管理员用户才可以删除其他用户。
2.5.1需求
我们使用 db.dropUser()函数将 itsxt 用户删除。
2.5.2切换数据库
itsxt 用户在 sxt 数据库中,所以需要先切换到 sxt 数据库。

2.5.3通过函数删除用户

我们可以看到,该函数返回了 true,表示删除成功。
六、 MongoDB 的数据库操作
1 创建数据库
在 MongoDB 中创建数据库的命令使用的是 use 命令。该命令有两层含义:
1)切换到指定数据库。
2)如果切换的数据库不存在,则创建该数据库。
我们使用 use 命令创建一个名为 sxttest 的数据库。

2 查看所有数据库
我们可以通过 show dbs 命令查看当前 MongoDB 中的所有数据库。
如果开启了用户认证,则需要先登录方可查看到结果,否则不显示任何信息。如果使用
的是具备数据库管理员角色的用户,那么则可以看到 MongoDB 中的所有数据库,如果使用
的普通用户登录的那么只能查询到该用户所拥有的数据库。
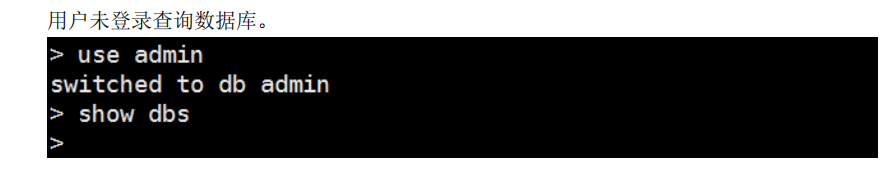

使用普通用户登录查询数据库。
我们在 sxt 数据库中创建一个只具备读写权限的普通用户。
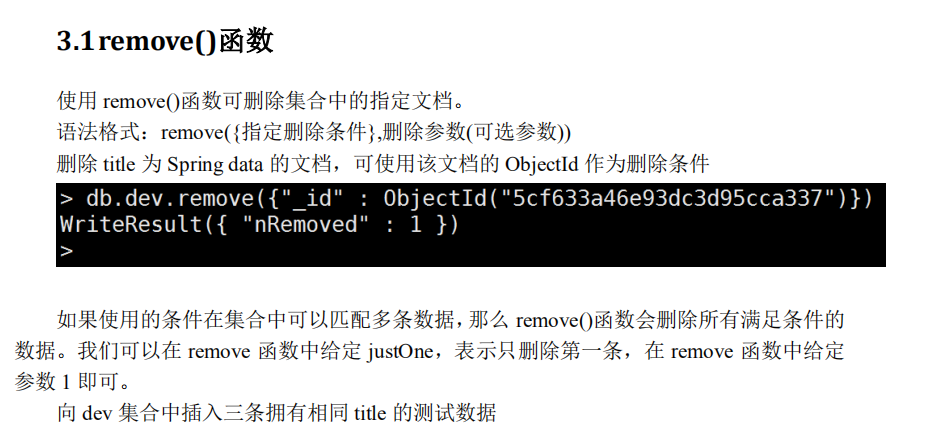
3 删除数据库
在 MongoDB 中使用 db.dropDatabase()函数来删除数据库。在删除数据库之前,需要使用具备 dbAdminAnyDatabase 角色的管理员用户登录,然后切换到需要删除的数据库,执行
db.dropDatabase()函数即可。删除成功后会返回一个{ "ok" : 1 }的 JSON 字符串。
我们现在将刚刚创建的 sxttest 删除。

七、 MongoDB 的集合操作
MongoDB 中的集合是一组文档的集,相当于关系型数据库中的表。
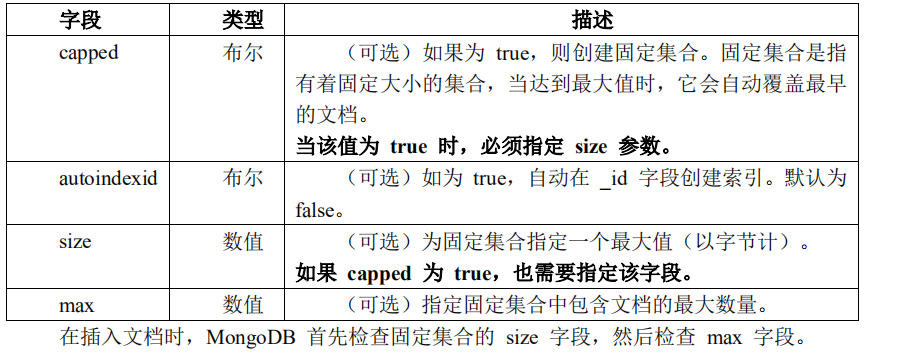
1 创建集合
MongoDB 使用 db.createCollection()函数来创建集合。
语法格式:db.createCollection(name, options)。
name: 要创建的集合名称。
options: 可选参数, 指定有关内存大小及索引的选项。
options 可以是如下参数。
1.1使用默认集合
在 MongoDB 中,我们也可以不用创建集合,当我们插入一些数据时,会自动创建集合,
并且会使用数据库的名字作为集合的名称。
创建一个新数据库,名为 develop


1.2创建不带参数的集合
我们也可以根据自己的情况创建集合。在 develop 数据库中创建一个名为 dev 的集合,
该集合创建时不指定任何参数。如果开启认证,则需要使用具有数据库管理员权限的用户来
创建集合。

1.3创建带参数的集合
在 develop 数据库中创建一个名为 dev2 的固定集合,整个集合空间大小为 2000000kb,
文档最大个数为 1000。
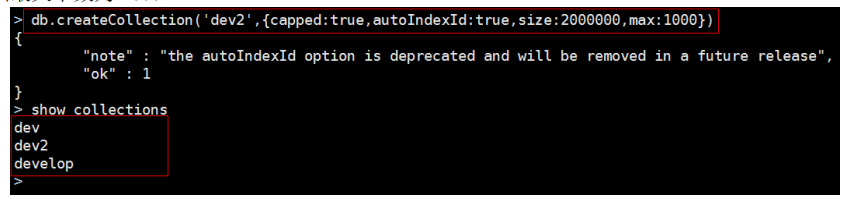
2 查看集合
如果要查看已有集合,可以使用 show collections 或 show tables 命令。
2.1show collections

2.2show tables
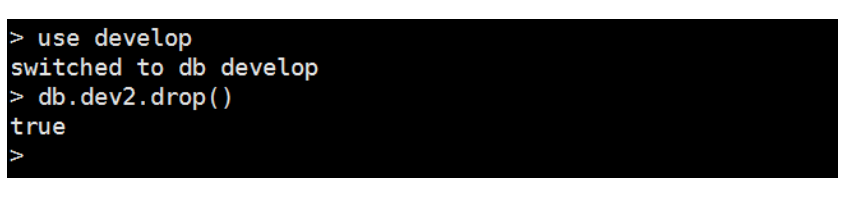
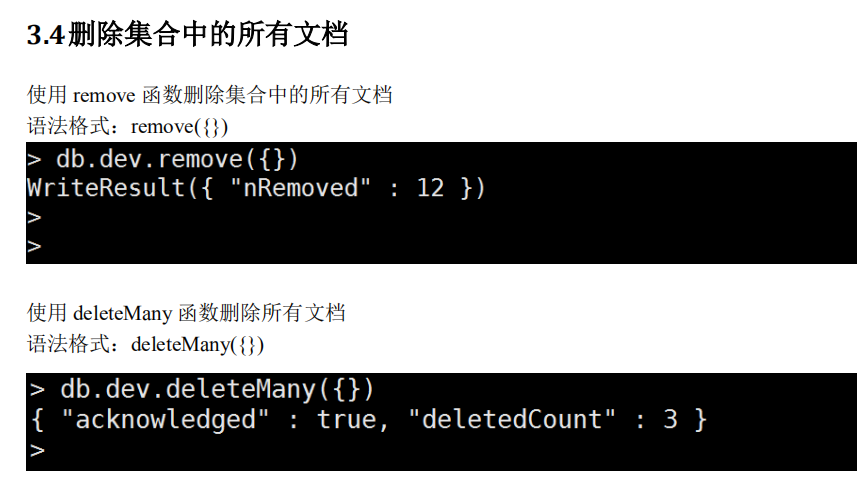
3 删除集合
如果我们要删除集合,需要先切换到需要删除集合所在的数据库,使用 drop()函数删除
集合即可。
删除集合的语法格式为:db.集合名称.drop()。
删除 dev2 集合
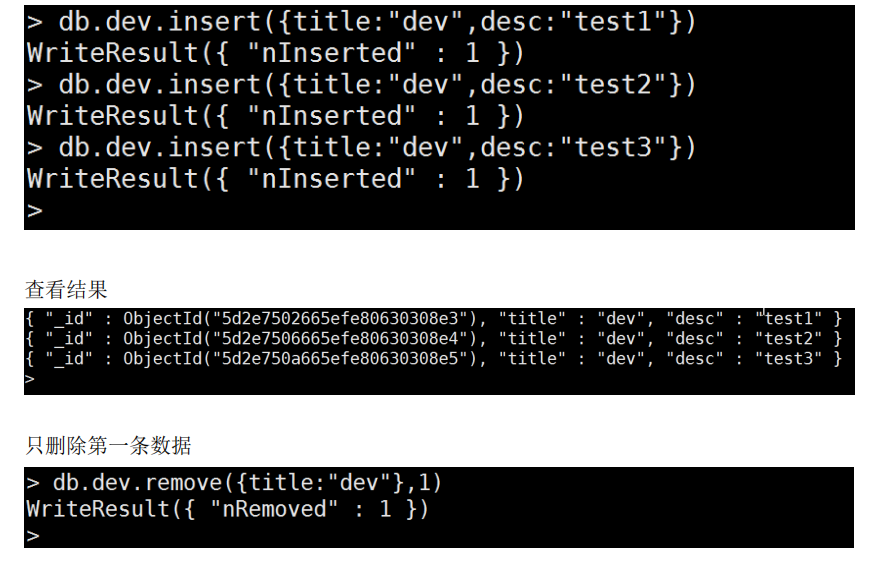
八、 MongoDB 的文档操作
在 MongoDB 中文档是指多个键及其关联的值有序地放置在一起就是文档,其实指的就
是数据,也是我们平时操作最多的部分。
MongoDB 中的文档的数据结构和 JSON 基本一样。所有存储在集合中的数据都是
BSON 格式。
BSON 是一种类似 JSON 的二进制形式的存储格式,是 Binary JSON 的简称。
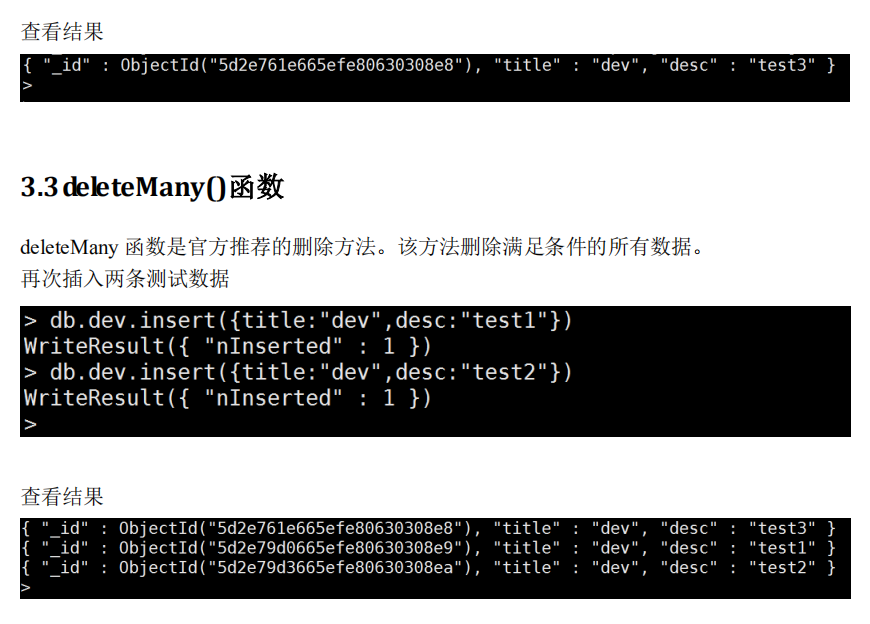
1 插入文档
1.1插入单个文档
1.1.1insert 函数
语法格式为:db.COLLECTION_NAME.insert(document)。
向 dev 集合中插入单个文档。
{title:'北京尚学堂',description:'程序员的摇篮',url:'www.bjsxt.com',tags:['java','大数据','python']}


1.1.2save 函数
向 dev 集合中插入单个文档。
{title:'百战程序员',description:'身经百战,高薪相伴',url:'www.itbaizhan.cn',tags:['javaWeb实战','数据库实战','微服务实战']}

查看文档

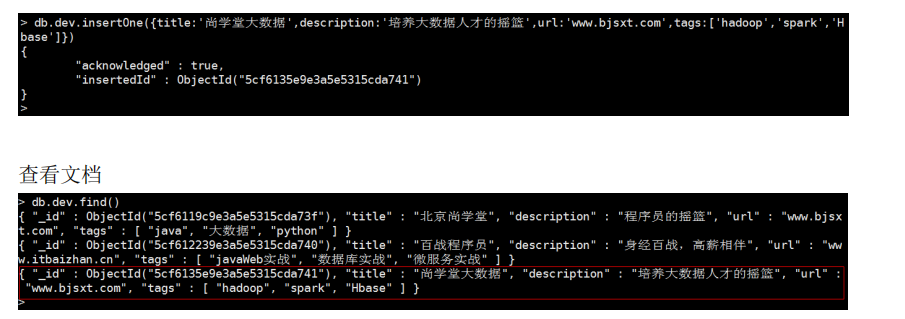
1.1.3insertOne 函数
在 MongoDB3.2 以后的版本中,提供了 insertOne()函数用于插入文档。
向 dev 集合中插入单个文档。
{title:' 尚 学 堂 大 数 据 ',description:' 培 养 大 数 据 人 才 的 摇 篮',url:'www.bjsxt.com',tags:['hadoop','spark','Hbase']}
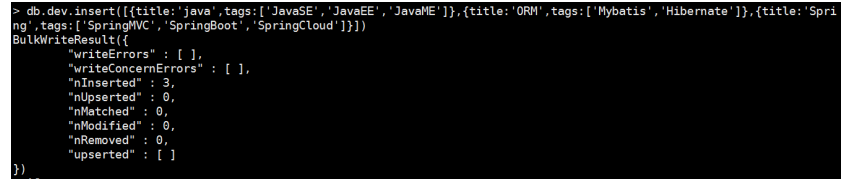
1.2插入多个文档
向集合中批量插入多个文档时,需要使用数组来存放文档。
语法格式:db.COLLECTION_NAME.insert([{},{},{}.....])。
1.2.1insert 或者 save 函数
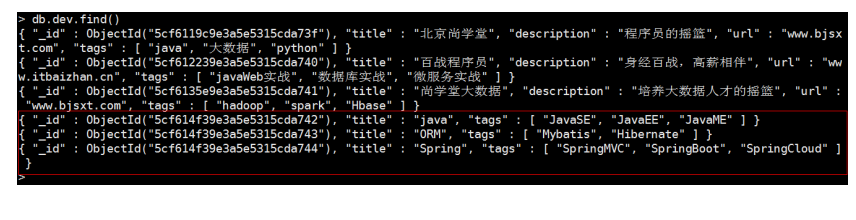
向 dev 集合中批量插入多个文档
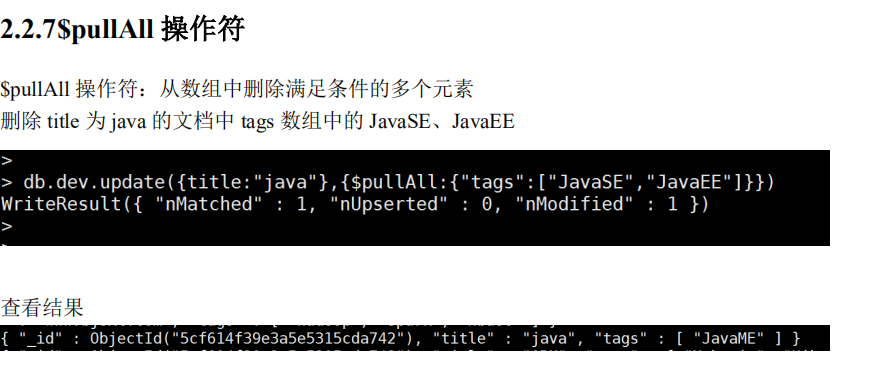
[{title:'java',tags:['JavaSE','JavaEE','JavaME']},{title:'ORM',tags:['Mybatis','Hibernate']},{title:'Spring',tags:['SpringMVC','SpringBoot','SpringCloud']}]
查看文档
1.2.2insertMany 函数
在 MongoDB3.2 以后的版本中,提供了 insertMany 函数用于插入文档。
语法格式:db.COLLECTION_NAME.insertMany([{},{},{},.....])。
向 dev 集合中批量插入多个文档
[{title:'Web',tags:['JSP','Servlet']},{title:'RPC',tags:['RMI','Dubbo']},{title:'DataBase',tags:['Oracle','MySQL']}]


1.3通过变量插入文档
Mongo Shell 工具允许我们定义变量。所有的变量类型为 var 类型。也可忽略变量类型。
变量中赋值符号后侧需要使用小括号来表示变量中的值。我们可以将变量作为任意插入文档
的函数的参数。
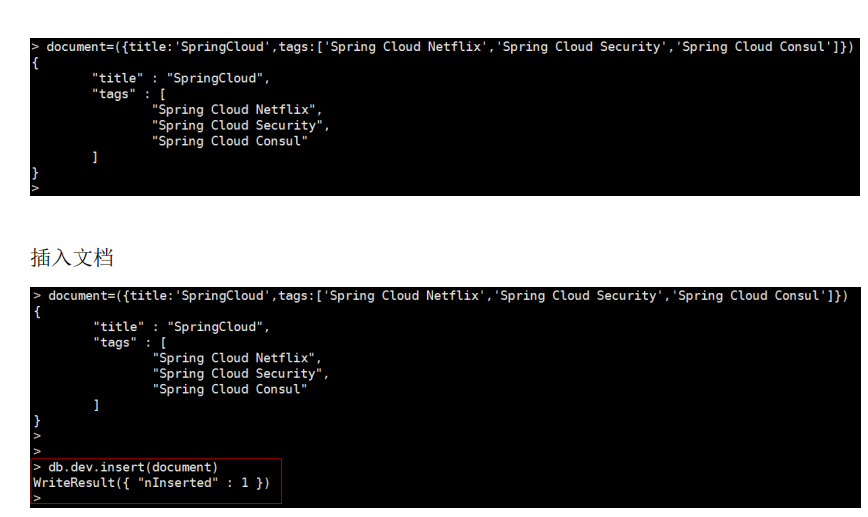
语法格式:变量名=({变量值})
1.3.1通过变量插入单个文档
定义变量
document=({title:'SpringCloud',tags:['Spring Cloud Netflix','Spring Cloud Security','SpringCloud Consul']})
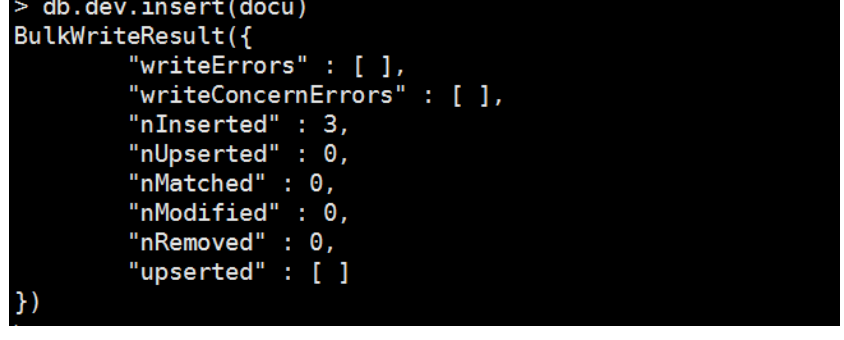
1.3.2通过变量插入多个文档
我们也可以在变量中定义多个文档。
语法结构:变量名=([{},{},{},....])

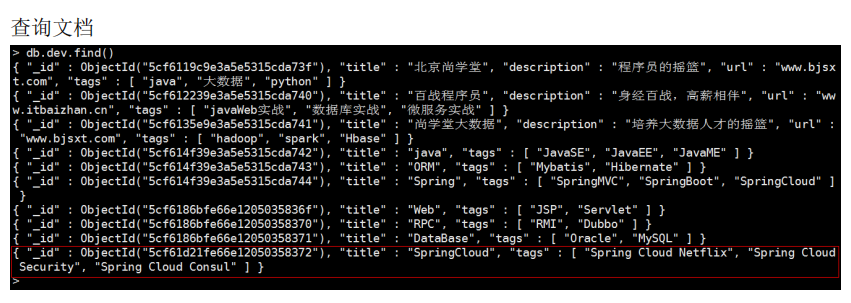
插入文档
我们现在将多个文档放入到了一个变量中,所以在插入数据时,可直接使用插入单个文
档的函数。

2 更新文档
MongoDB 通过 update 函数或者 save 函数来更新集合中的文档。
2.1update 函数
update() 函数用于更新已存在的文档。
语法格式:db.COLLECTION_NAME.update({查询条件},{更新内容},{更新参数(可选)})
将 Spring Data 修改为 SpringData

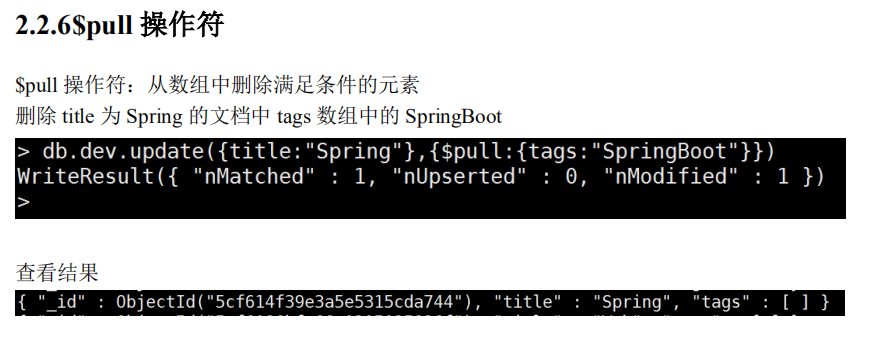
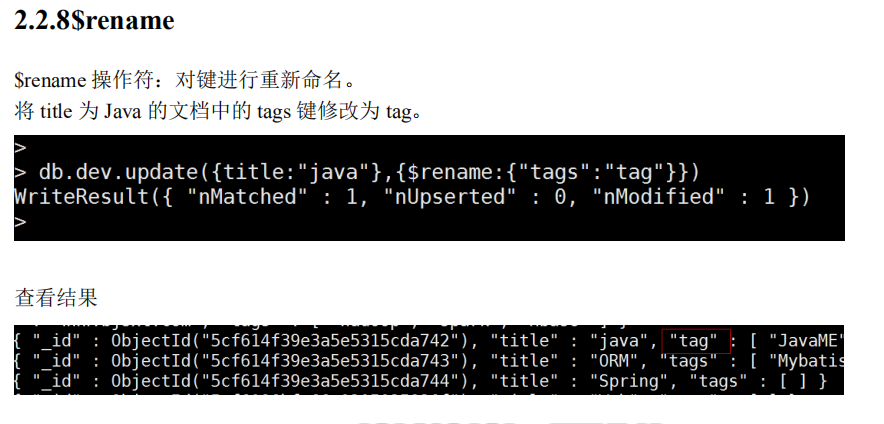
2.2更新操作符
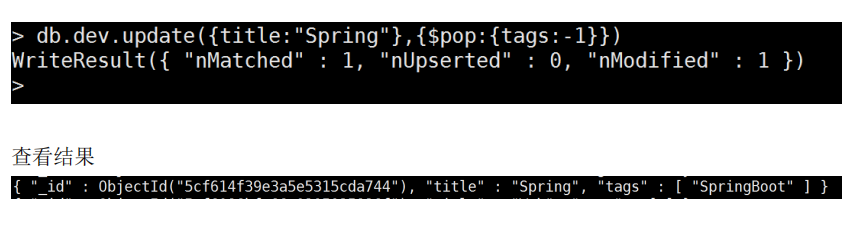
2.2.1$set 操作符
$set 操作符:用来指定一个键并更新键值,若键不存在并创建。
语法格式:db.COLLECTION_NAME.update({查询条件},{更新操作符:{更新内容}})
将 Spring Security 修改为 SpringSecurity。

修改后的结果
使用$set 在 title 为 SpringData 的文档中添加一个属性为 num 值为 1。


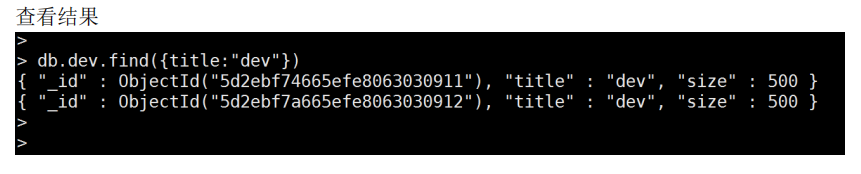
批量更新
在更新文档时,可以使用 multi 参数实现批量更新。
添加测试数据
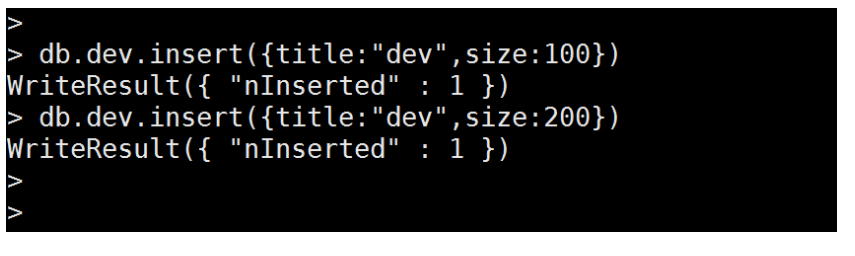
将 title 为 dev 的文档的 size 更新为 500

2.2.2$inc 操作符
$inc 操作符:可以对文档的某个值为数字型(只能为满足要求的数字)的键进行增减的操作。
将 title 为 SpringData 的文档中的 num 值递增 1。


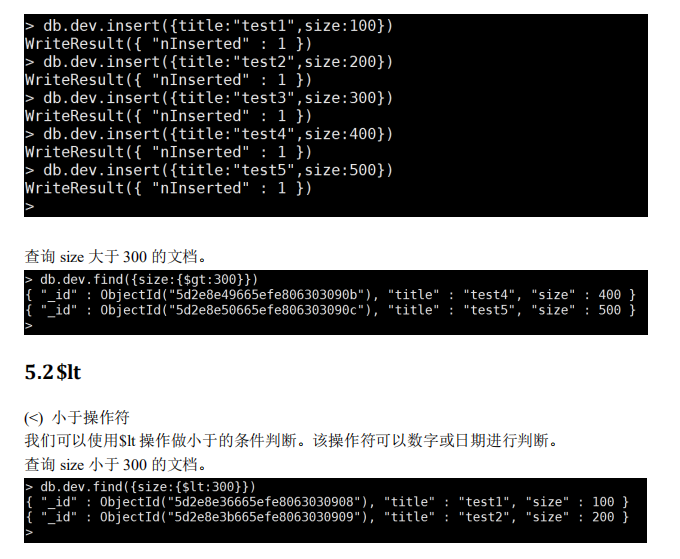
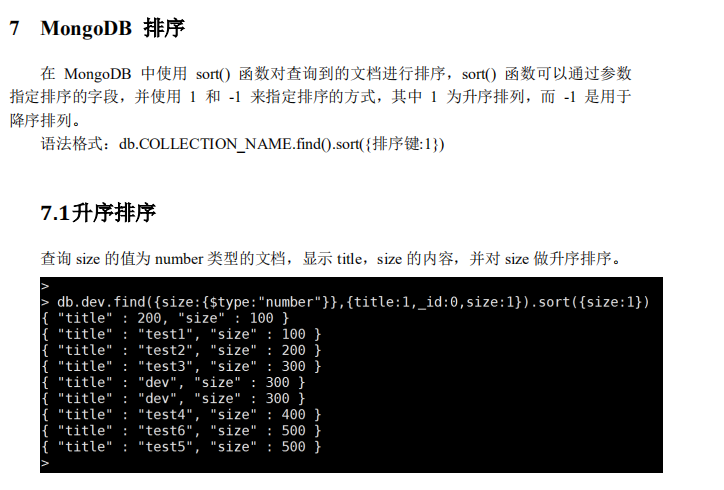
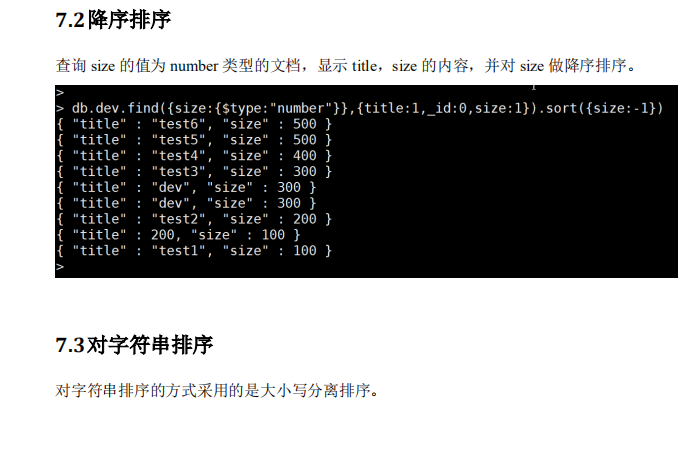
4 查询文档
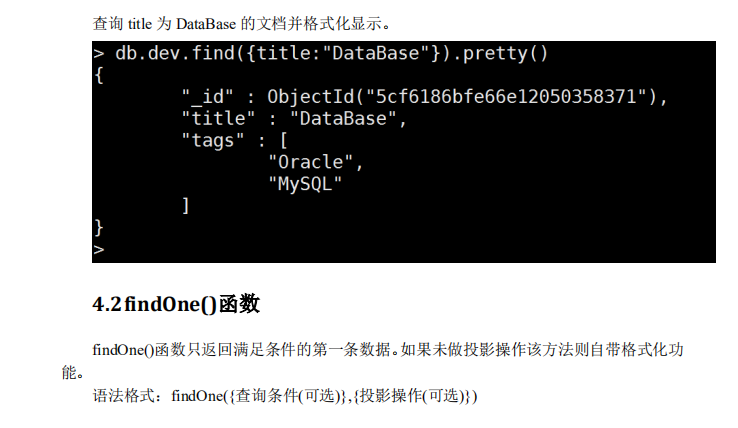
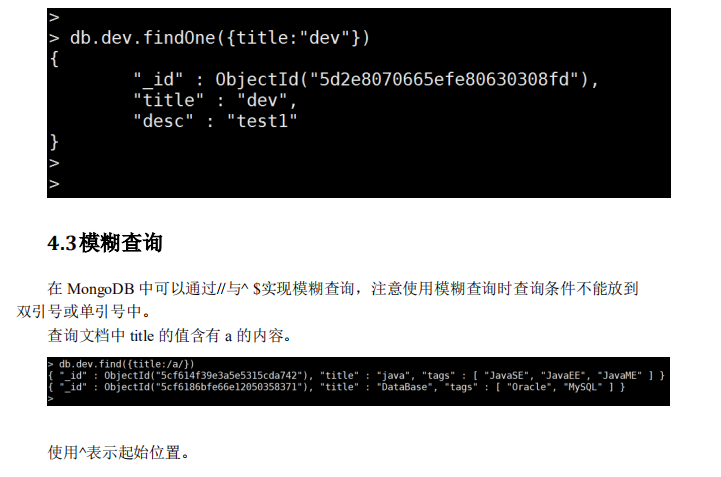
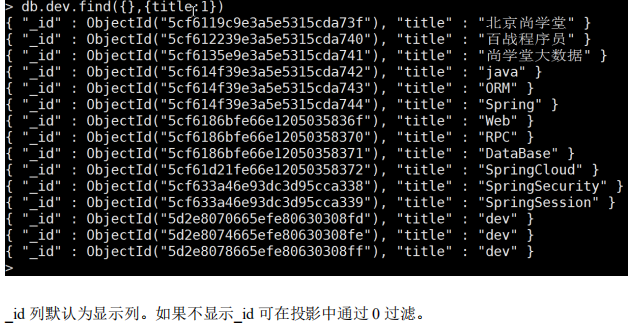
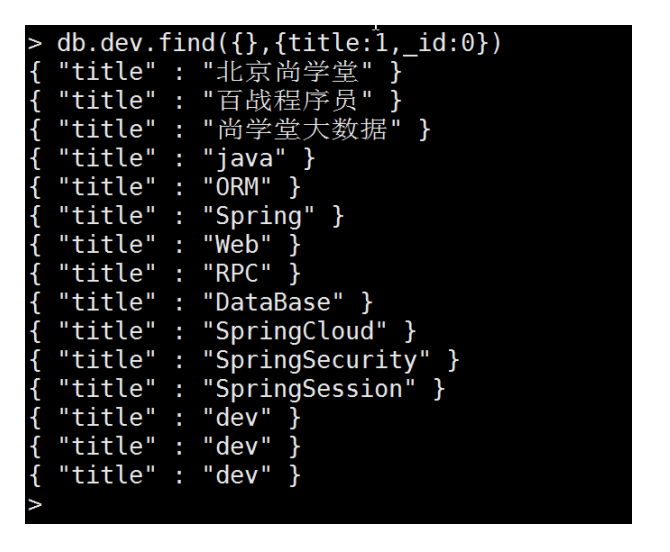
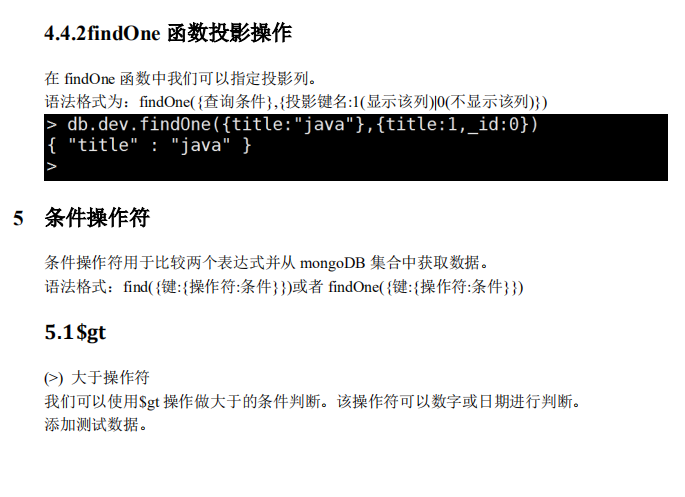
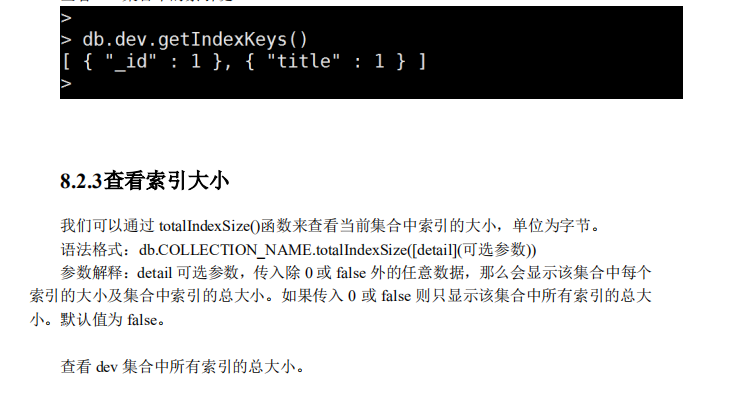
4.1find()函数
在 MongoDB 中可以使用 find()函数查询文档。
语法格式为:find({查询条件(可选)},{指定投影的键(可选)})
如果未给定参数则表示查询所有数据。
pretty()函数可以使用格式化的方式来显示所有文档。
查询 dev 集合中的所有数据并格式化显示。


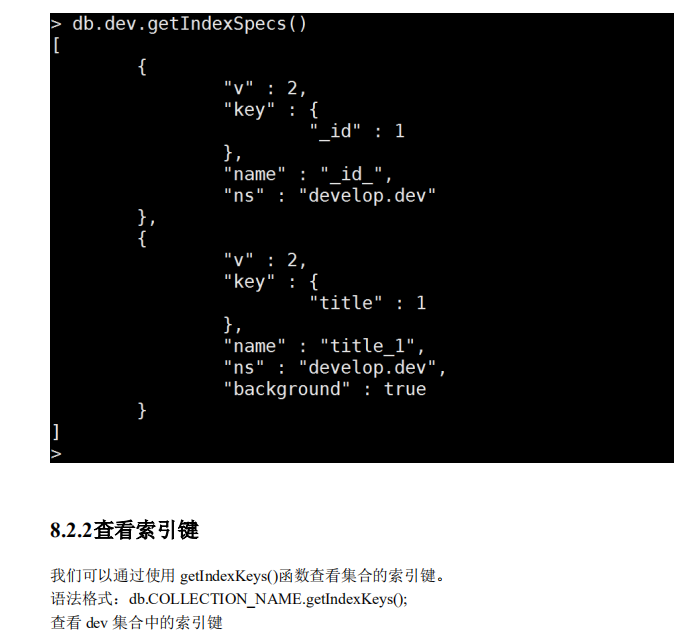
使用 getIndexSpecs()函数查看当前 dev 集合中的索引
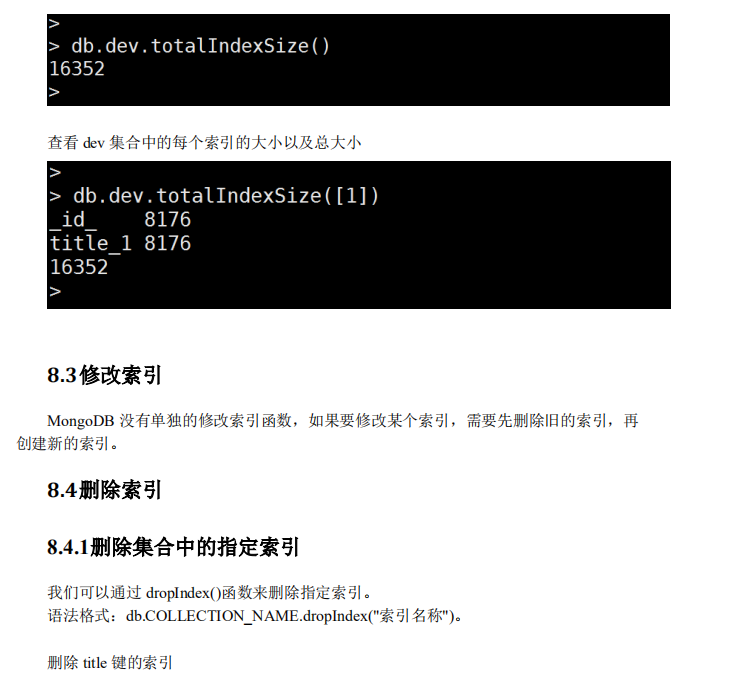


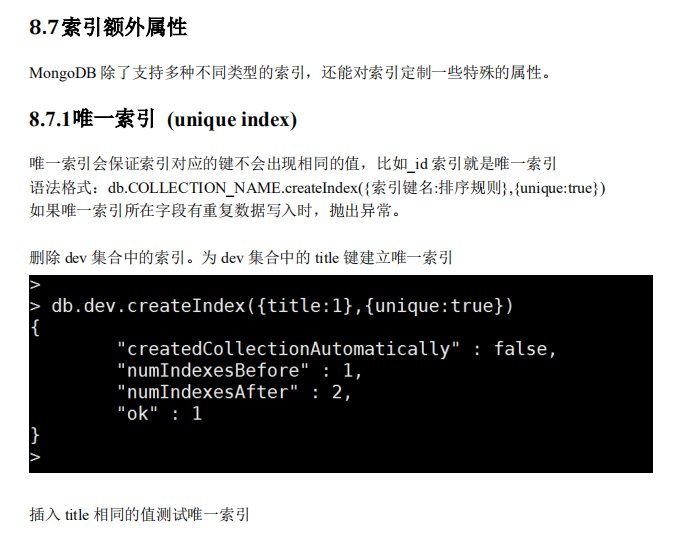
中提取数据,这是非常快速的数据查询。
由于我们的索引中不包括 _id 字段,_id 在查询中会默认返回,我们可以在 MongoDB
的查询结果集中排除它。
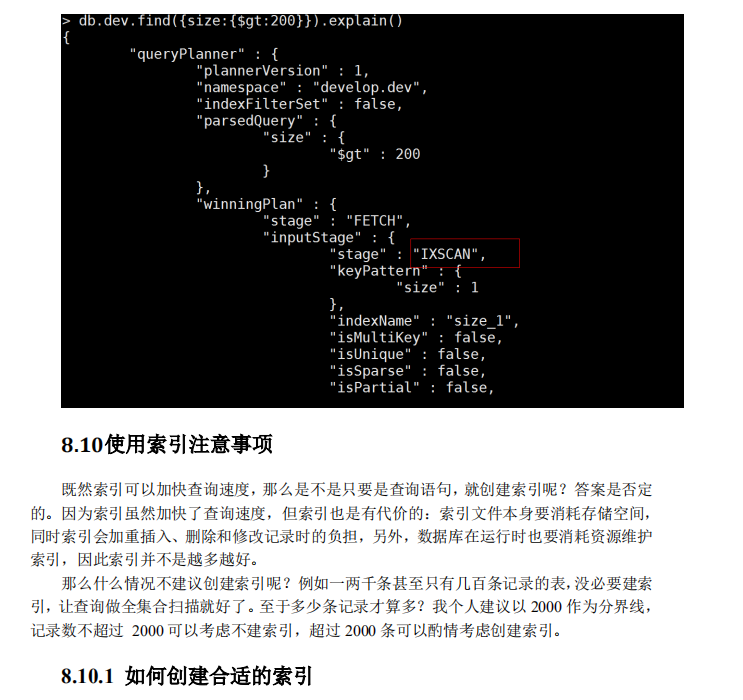
8.9查询计划
在 MongoDB 中通过 explain()函数启动执行计划,我们可以使用查询计划分析索引的使
用情况,可通过查看详细的查询计划来决定如何优化。
语法结构:db.COLLECTION_NAME.find().explain()
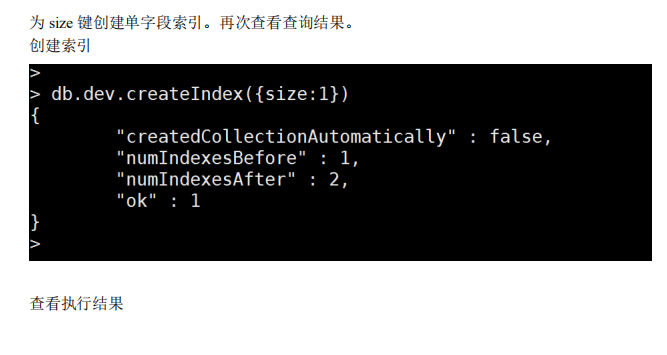
删除 dev 集合中的所有索引。通过查询计划查看查询 size 键的值大于 200 的查询结果

比如需要查询:
db.test.find({"username":"kaka", "age": {$gt: 30}})
那么复合索引应该这样创建:
db.test.ensureIndex({"username":1, "age":-1})
8.10.1.3 查询时尽可能仅查询出索引字段
有时候仅需要查询少部分的字段内容,而且这部分内容刚好都建立了索引,那么尽可能
只查询出这些索引内容,需要用到的字段显式声明(_id 字段需要显式忽略!)。因为这些
数据需要把原始数据文档从磁盘读入内存,造成一定的损耗。
比如说我们的表有三个字段:
name, age, mobile
索引是这样建立的:
db.stu.createIndex({"name":1,"age":-1})
我们仅需要查到某个用户的年龄(age),那可以这样写:
db.stu.find({"name":"kaka"}, {"_id":0, "age":1})
注意到上面的语句,我们除了”age”:1 外,还加了”_id”:0,因为默认情况下,_id
都是会被一并查询出来的,当不需要_id 的时候记得直接忽略,避免不必要的磁盘操作。
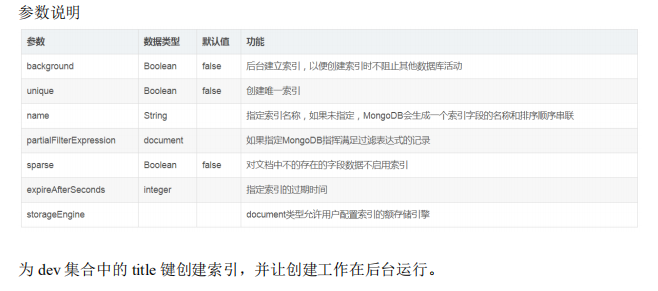
8.10.1.4 对现有的数据大表建立索引的时候,采用后台运行方式
在对数据集合建立索引的过程中,数据库会停止该集合的所有读写操作,因此如果建立
索引的数据量大,建立过程慢的情况下,建议采用后台运行的方式,避免影响正常业务流程。
db.stu.ensureIndex({"name":1,"age":-1},{"background":true})
8.11索引限制
8.11.1 额外开销
每个索引占据一定的存储空间,在进行插入,更新和删除操作时也需要对索引进行操作。
所以,如果你很少对集合进行读取操作,建议不使用索引。
8.11.2 内存使用
由于索引是存储在内存(RAM)中,你应该确保该索引的大小不超过内存的限制。
如果索引的大小大于内存的限制,MongoDB 会删除一些索引,这将导致性能下降。
8.11.3 查询限制
索引不能被以下的查询使用:
正则表达式(最左匹配除外)及非操作符,如 $nin, $not, 等。
算术运算符,如 $mod, 等。
所以,检测你的语句是否使用索引是一个好的习惯,可以用 explain 来查看。8.11.4 最大范围
集合中索引不能超过 64 个
索引名的长度不能超过 128 个字符
一个复合索引最多可以有 31 个字段
8.12正则查询
MongoDB 中查询条件也可以使用正则表达式作为匹配约束。
语法格式:db.COLLECTION_NAME.find({字段名:正则表达式});
或
db.COLLECTION_NAME.find({字段名:{$regex:正则表达式,$options:正则选项}});
正则表达式格式:/xxx/
正则选项:
i - 不区分大小写以匹配大小写的情况。
m - 多行查找,如果内容里面不存在换行符号(例如
)或者条件上没有(start/end),
该选项没有任何效果
x - 设置 x 选项后,正则表达式中的非转义的空白字符将被忽略。需要$regex 与$options
语法
s - 允许点字符(即.)匹配包括换行符在内的所有字符。需要$regex 与$options 语法
i,m,x,s 可以组合使用。
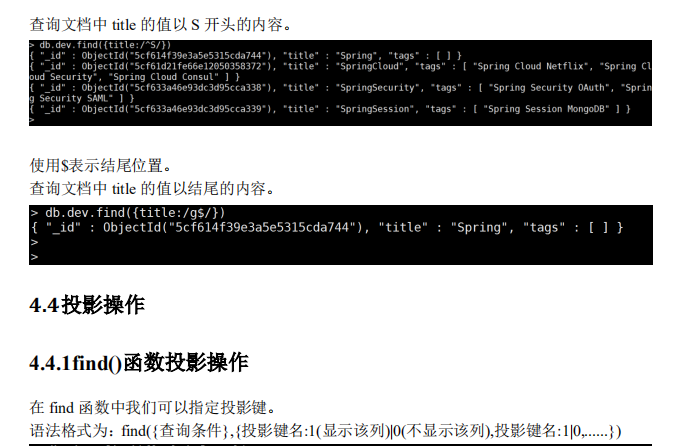
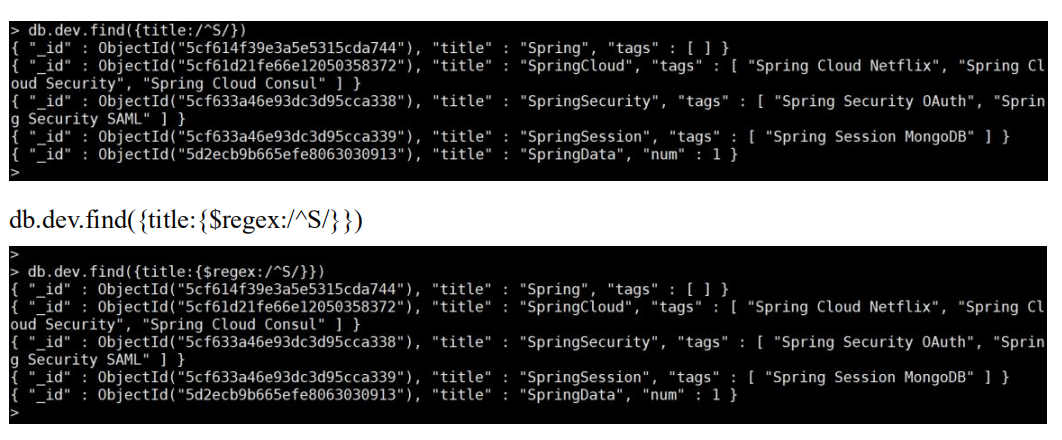
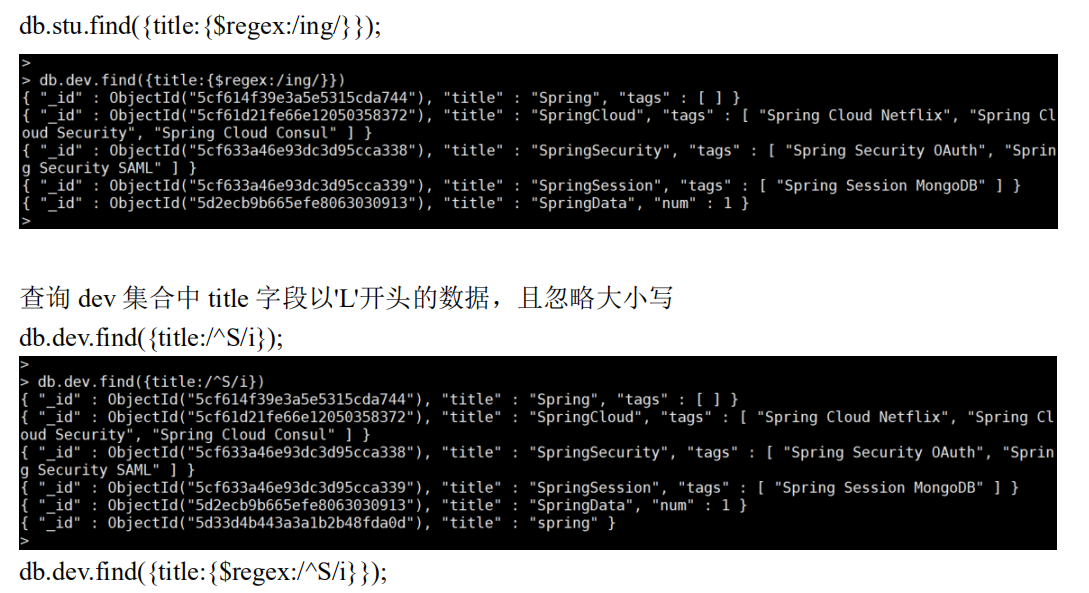
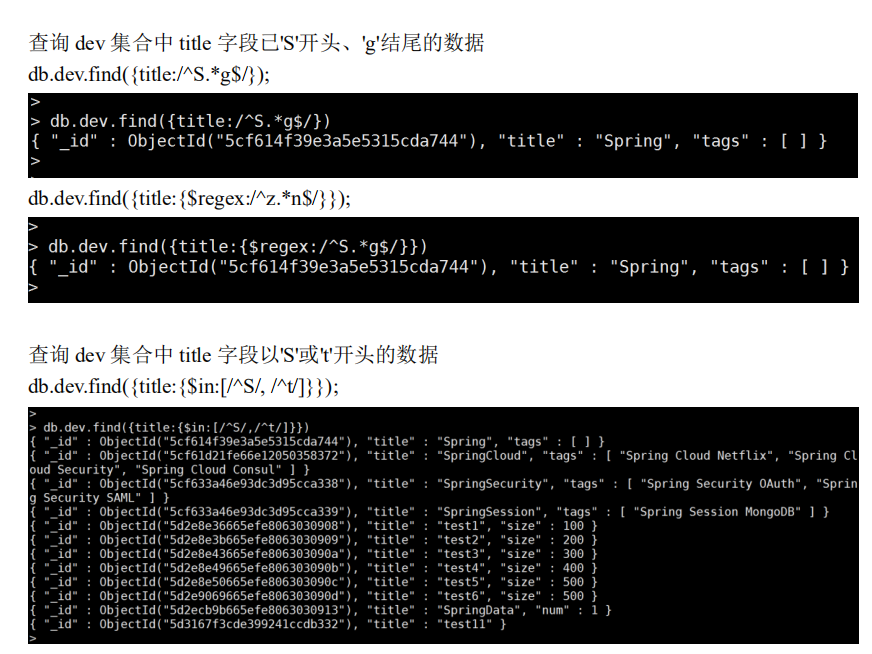
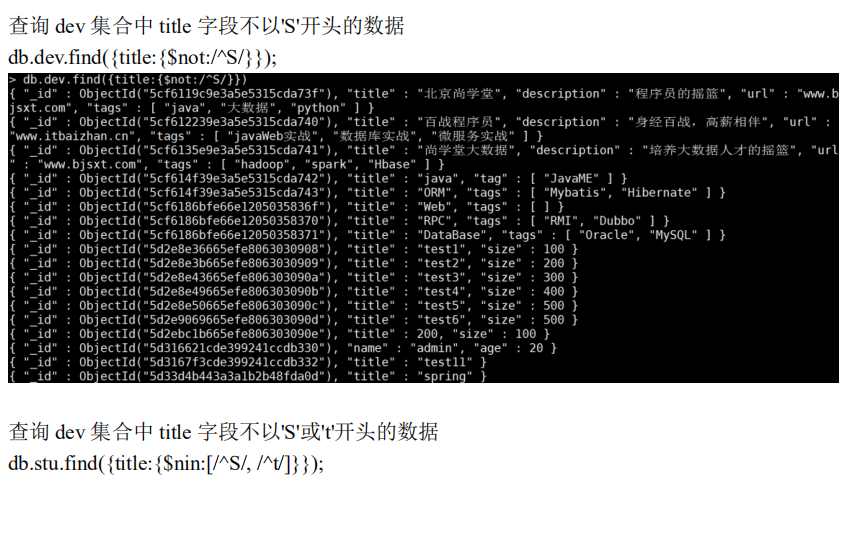
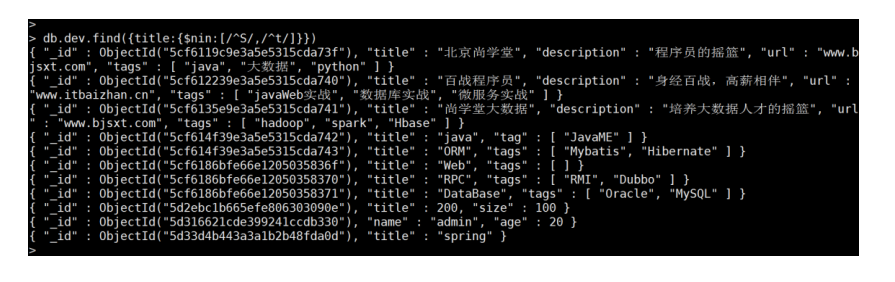
查询 dev 集合中 title 字段以'S'开头的数据
db.dev.find({title:/^S/})
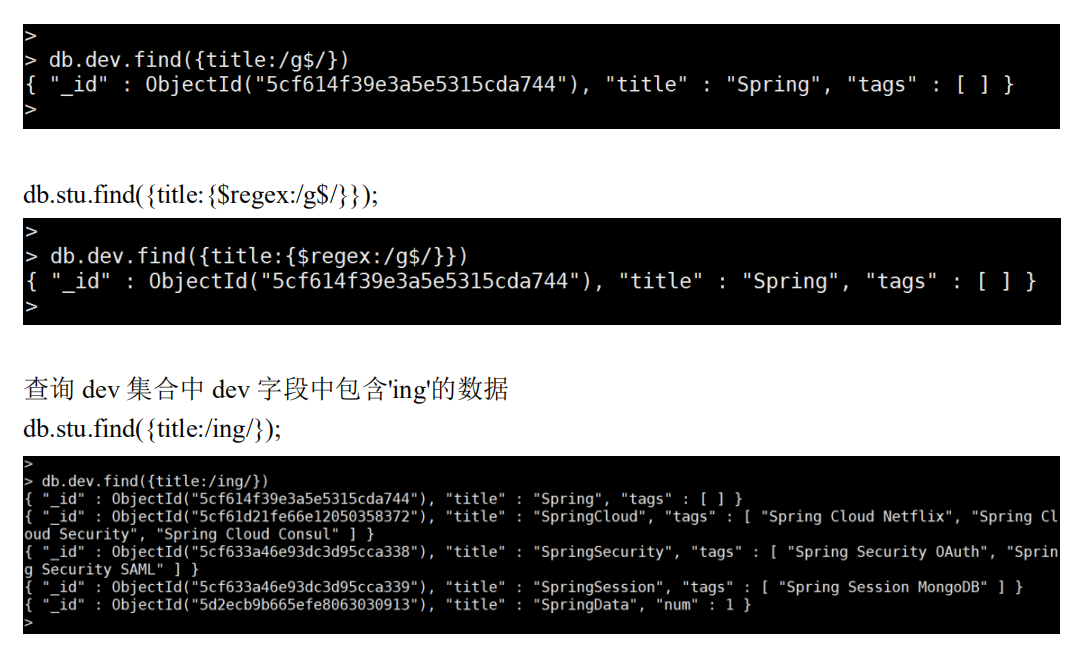
查询 dev 集合中 title 字段以'g'结尾的数据
db.stu.find({title:/g$/})

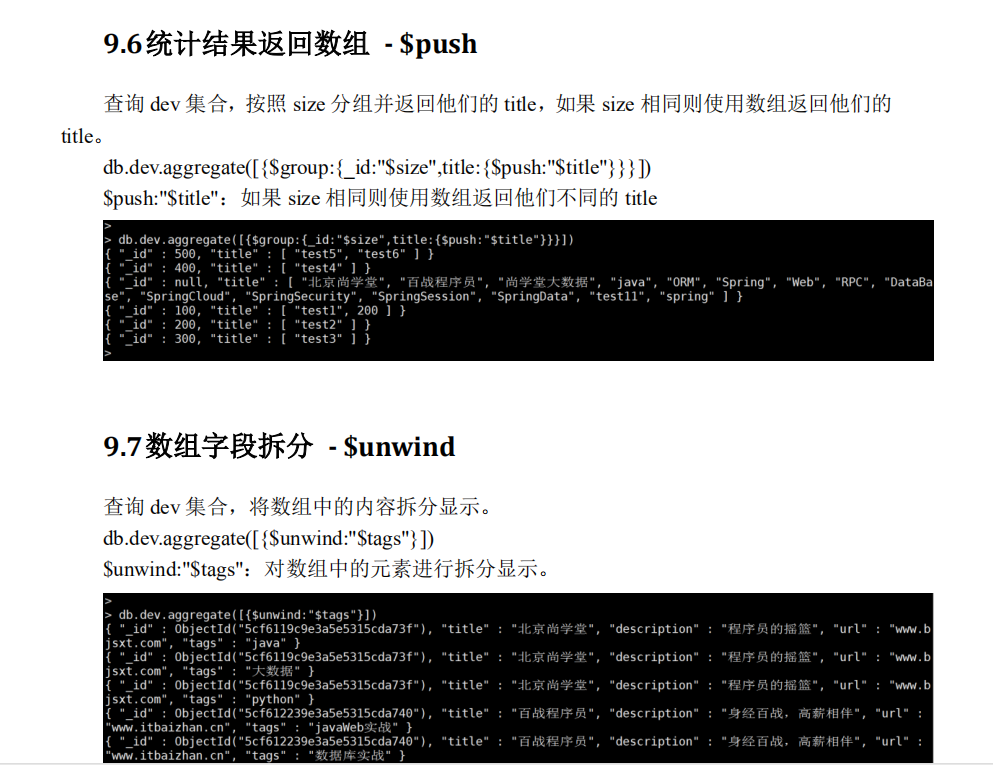
9 MongoDB 聚合查询
在 MongoDB 中我们可以通过 aggregate()函数来完成一些聚合查询,aggregate()函数主
要用于处理诸如统计,平均值,求和等,并返回计算后的数据结果。
语法格式:
db.COLLECTION_NAME.aggregate([{$group:{_id:"$分组键名","$分组键名",.....,别名:{聚合
运算:"$运算列"}}},{条件筛选:{键名:{运算条件:运算值}}}])
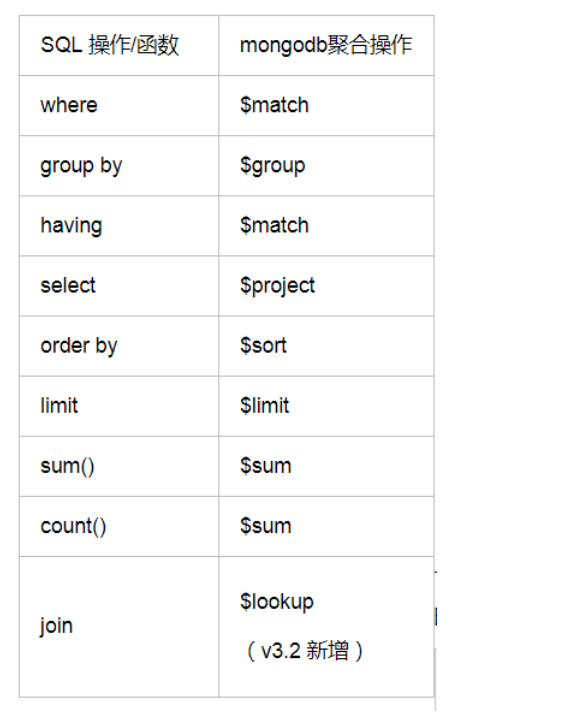
常见的 mongo 的聚合操作和 mysql 的查询做类比
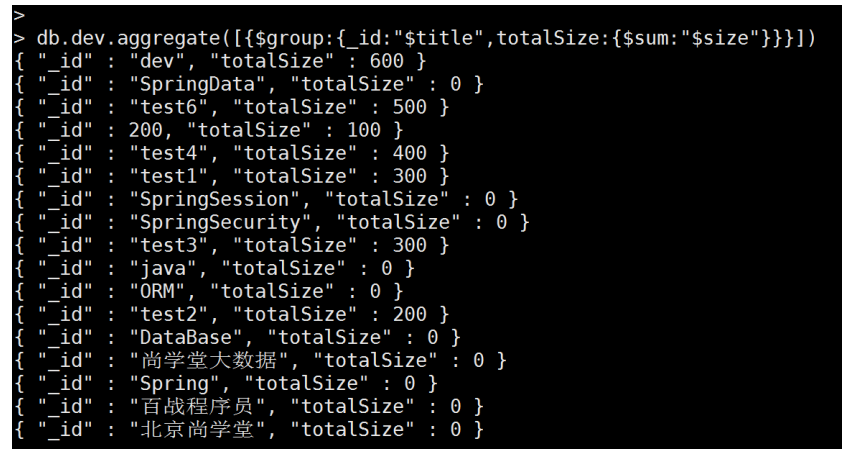
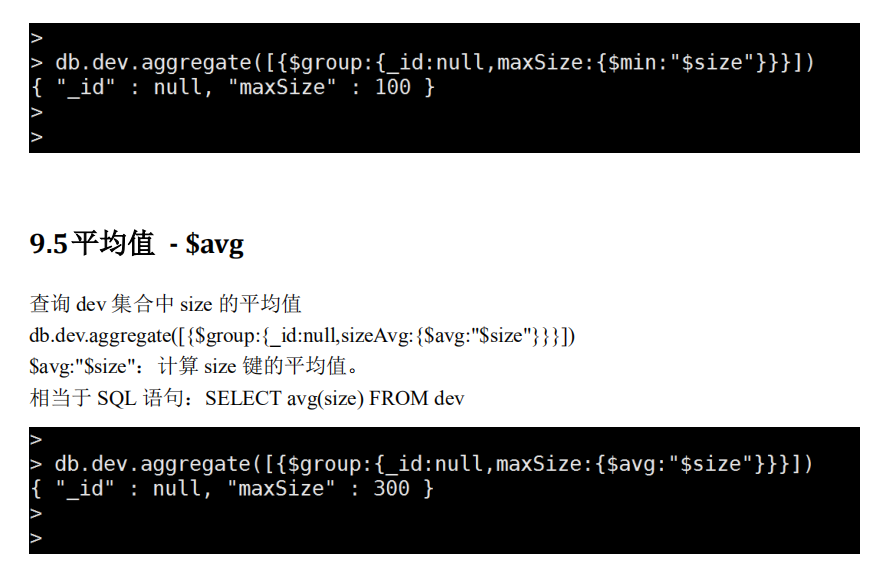
9.1求和 - $sum
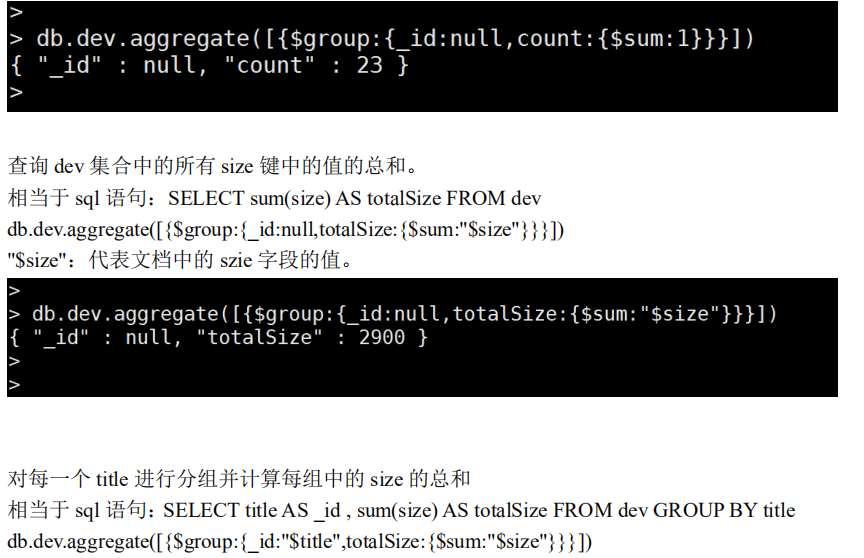
查询 dev 集合中一共有多少个文档。相当于 sql 语句:SELECT count(*) AS count FROM dev
db.dev.aggregate([{$group:{_id:null,count:{$sum:1}}}])
$group:分组,代表聚合的分组条件
_id:分组的字段。相当于 SQL 分组语法 group by column_name 中的 column_name 部分。
如果根据某字段的值分组,则定义为_id:'$字段名'。所以此案例中的 null 代表一个固定的字
面值'null'。
count:返回结果字段名。可以自定义,类似 SQL 中的字段别名。
$sum:求和表达式。相当于 SQL 中的 sum()。
1:累加值。


9.8.3$project-算术运算
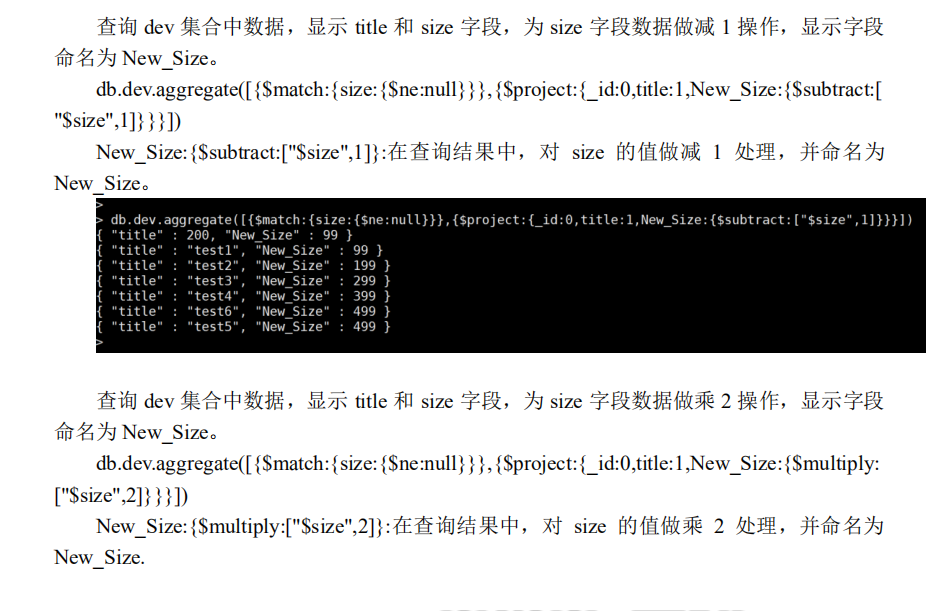
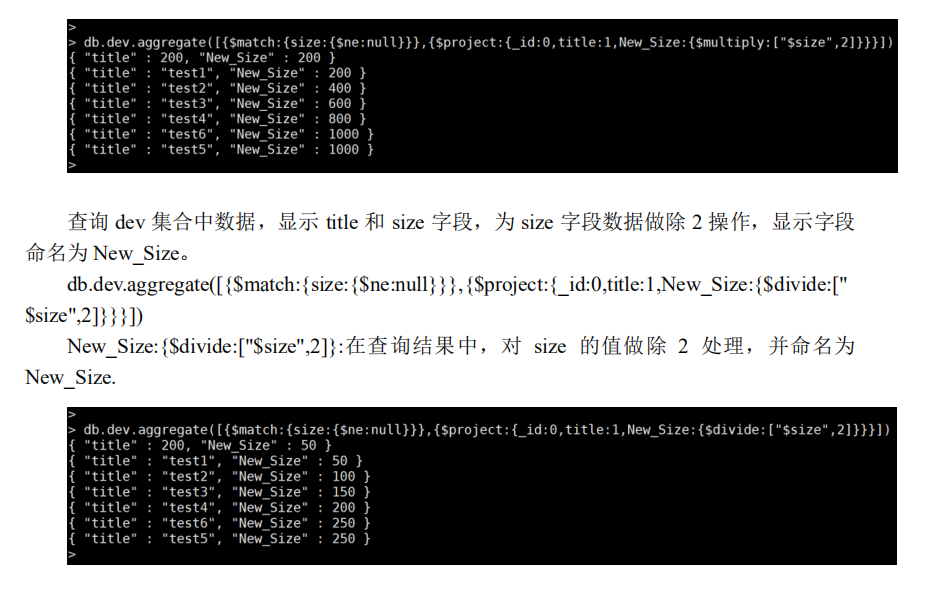
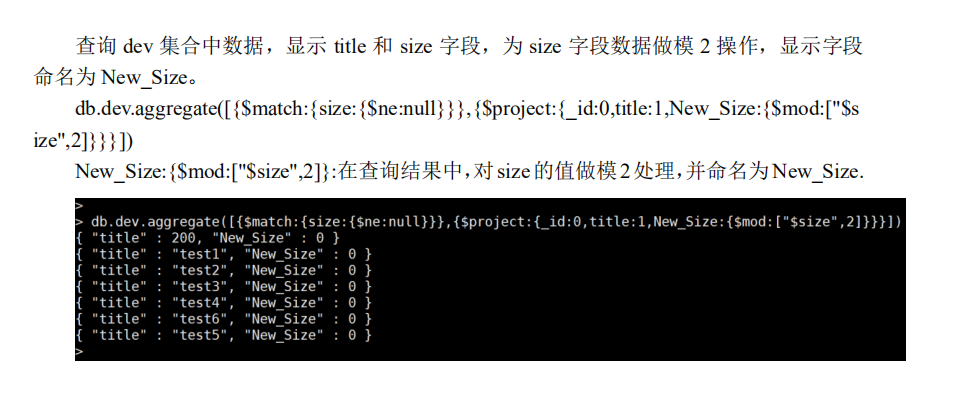
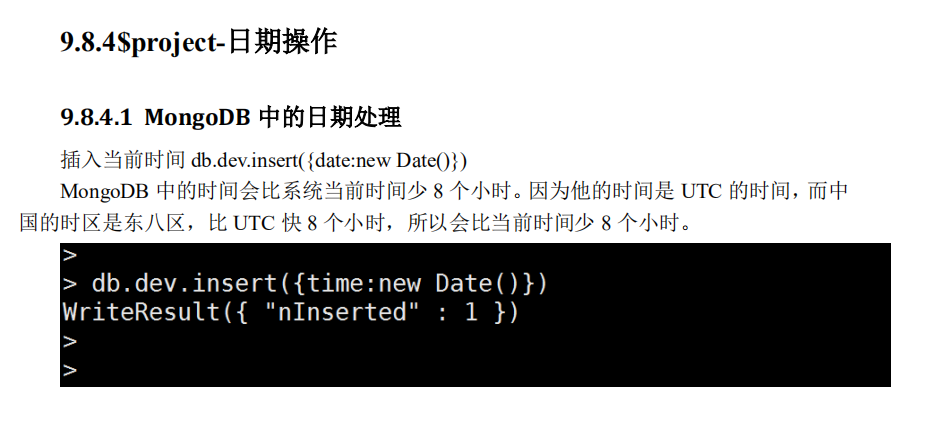
在$project 中我们可以通过 MongoDB 的算数作符对投影的内容做运算处理。
查询 dev 集合中数据,显示 title 和 size 字段,为 size 字段数据做加 1 操作,显示字段
命名为 New_Size。
db.dev.aggregate([{$project:{_id:0,title:1,New_Size:{$add:["$size",1]}}}])
New_Size:{$add:["$size",1]}:在查询结果中,对size的值做加1处理,并命名为New_Size。

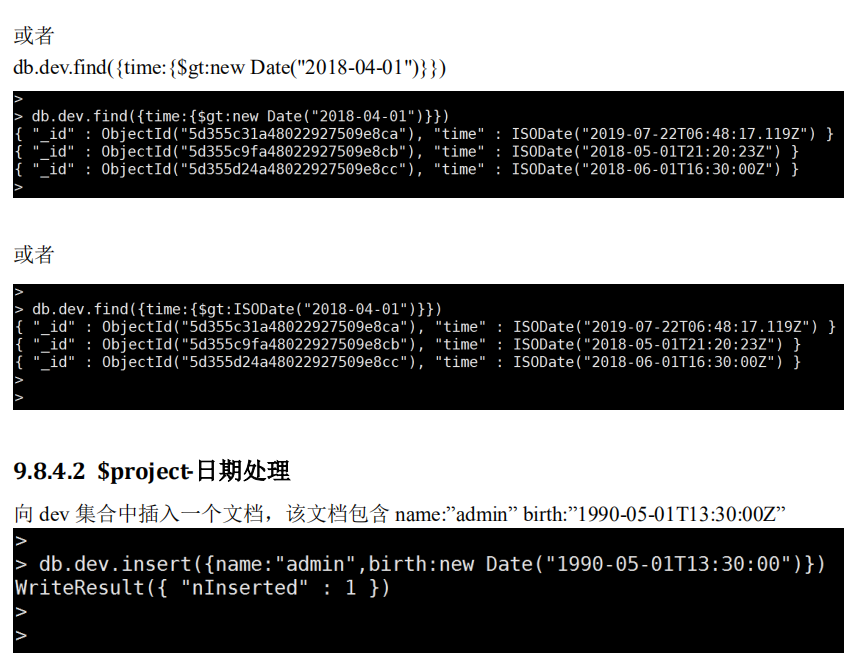

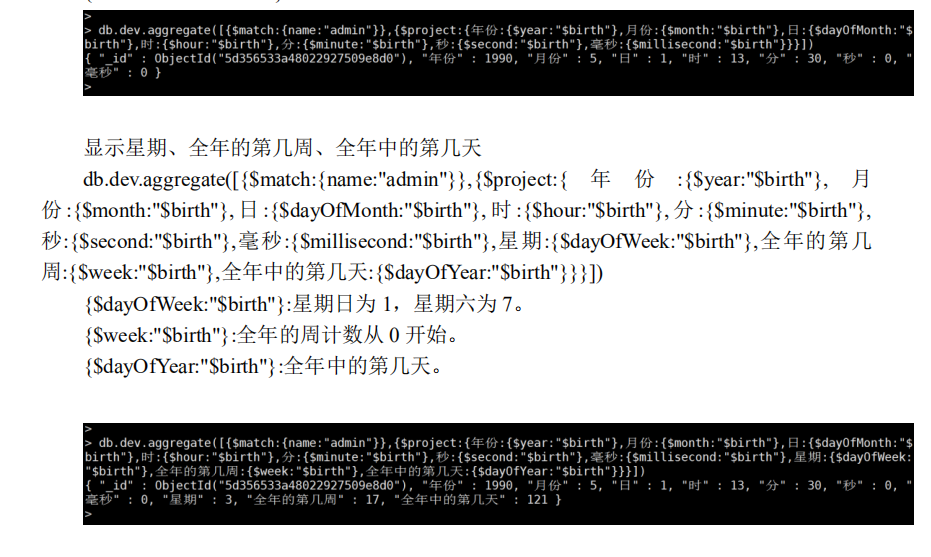
显示自定义日期格式
db.dev.aggregate([{$match:{name:"admin"}},{$project:{ 年 份 :{$year:"$birth"},
月份 :{$month:"$birth"}, 日 :{$dayOfMonth:"$birth"}, 时 :{$hour:"$birth"}, 分 :{$minute:"$birth"},
秒:{$second:"$birth"},毫秒:{$millisecond:"$birth"},星期:{$dayOfWeek:"$birth"},全年的第几
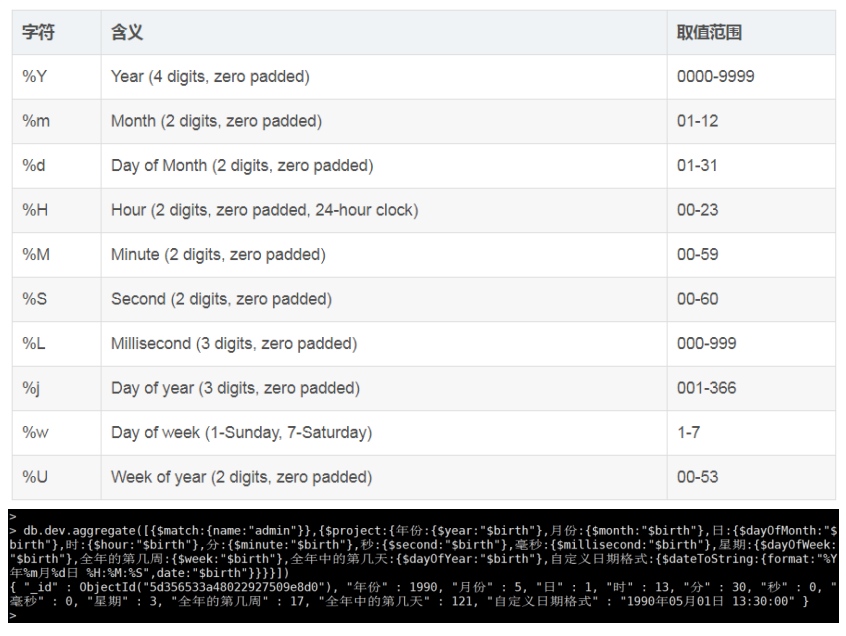
周 :{$week:"$birth"}, 全 年 中 的 第 几 天 :{$dayOfYear:"$birth"}, 自 定 义 日 期 格式:{$dateToString:{format:"%Y 年%m 月%d 日 %H:%M:%S",date:"$birth"}}}}])
{$dateToString:{format:"%Y 年%m月%d 日 %H:%M:%S",date:"$birth"}:自定义日期格式
具体格式如下:
在 POM 文件中添加 MongoDB 驱动坐标
<!--添加 MongoDB 驱动坐标--> <dependencies>
<!--
https://mvnrepository.com/artifact/org.mongodb/mongo-java
-driver --> <dependency> <groupId>org.mongodb</groupId> <artifactId>mongo-java-driver</artifactId> <version>3.8.2</version>
</dependency>
</dependencies>
1.2创建 MongoDB 连接
封装 MongoDBUtil
public class MongoDBUtil {
private static MongoClient client = null;
static{
if(client == null){
client = new MongoClient("192.168.70.156",27017);
} }
//获取 MongoDB 数据库
public static MongoDatabase getDatabase(String dbName){
return client.getDatabase(dbName);
}
//获取 MongoDB 中的集合
public static MongoCollection getCollection(String
dbName,String collName){
MongoDatabase database = getDatabase(dbName);
return database.getCollection(collName);
} }
1.3创建 MongoDB 的认证连接
封装 MongoDBAuthUtil
/**
* 创建 MongoDB 拦截-使用用户认证
*/
public class MongoDBAuthUtil {
private static MongoClient client = null;
static{
if(client == null){
//创建一个封装用户认证信息
MongoCredential credential =
MongoCredential.createCredential("itsxt","develop","itsxt
pwd".toCharArray());
//封装 MongoDB 的地址与端口
ServerAddress address = new
ServerAddress("192.168.70.156",27017);
client = new MongoClient(address,
Arrays.asList(credential));
} }
//获取 MongoDB 数据库
public static MongoDatabase getDatabase(String dbName){
return client.getDatabase(dbName);
}
//获取 MongoDB 中的集合
public static MongoCollection getCollection(String
dbName, String collName){
MongoDatabase database = getDatabase(dbName);
return database.getCollection(collName);
} }
1.4创建 MongoDB 的池连
封装 MongoDBPoolUtil
/**
* 使用池连的方式获取连接
*/
public class MongoDBPoolUtil {
private static MongoClient client = null;
static{
if(client == null){
MongoClientOptions.Builder builder = new
MongoClientOptions.Builder();
builder.connectionsPerHost(10);//每个地址的最大连
接数
builder.connectTimeout(5000);//连接超时时间
builder.socketTimeout(5000);//设置读写操作超时时间
ServerAddress address = new
ServerAddress("192.168.70.156",27017);
client = new
MongoClient(address,builder.build());
} }
//获取 MongoDB 数据库
public static MongoDatabase getDatabase(String dbName){
return client.getDatabase(dbName);
}
//获取 MongoDB 中的集合
public static MongoCollection getCollection(String
dbName, String collName){
MongoDatabase database = getDatabase(dbName);
return database.getCollection(collName);
} }
1.5创建 MongoDB 的认证池连
封装 MongoDBAuthPoolUtil


/**
* 支持用户认证的池连
*/
public class MongoDBAuthPoolUtil {
private static MongoClient client = null;
static{
if(client == null){
MongoClientOptions.Builder builder = new
MongoClientOptions.Builder();
builder.connectionsPerHost(10);//每个地址的最大连
接数
builder.connectTimeout(5000);//连接超时时间
builder.socketTimeout(5000);//设置读写操作超时时间
MongoCredential credential =
MongoCredential.createCredential("itsxt","develop","itsxt
pwd".toCharArray());
ServerAddress address = new
ServerAddress("192.168.70.156",27017);
client = new
MongoClient(address,credential,builder.build());
} }
//获取 MongoDB 数据库
public static MongoDatabase getDatabase(String dbName){
return client.getDatabase(dbName);
}
//获取 MongoDB 中的集合
public static MongoCollection getCollection(String
dbName, String collName){
MongoDatabase database = getDatabase(dbName);
return database.getCollection(collName);
} }
2 操作集合
2.1创建集合
//创建集合
public static void createCollection(String dbName,String
collName){
MongoDatabase database = getDatabase(dbName);
database.createCollection(collName);
}
2.2获取集合
//获取 MongoDB 中的集合
public static MongoCollection getCollection(String dbName,
String collName){
MongoDatabase database = getDatabase(dbName);
return database.getCollection(collName);
}
2.3删除集合
//删除集合
public static void dropCollection(MongoCollection coll){
coll.drop();
}
3 操作文档
3.1添加文档
3.1.1添加单个文档
/**
* 添加单个文档
*/
public void inesrtSingleDocument(){
//获取集合
MongoCollection collection =
MongoDBAuthPoolUtil.getCollection("develop","devtest");
// {}---->Document
//append(String key,Object value)---->{key:value}
Document docu = new Document();
docu.append("username","lisi").append("userage",26).appen
d("userdesc","Very Good").append("userlike",
Arrays.asList(new String[]{"Music","Sport"}));
collection.insertOne(docu);
}
3.1.2添加多个文档
/**
* 文档的批量添加
*/
public void insertManyDocument(){
MongoCollection collection =
MongoDBAuthPoolUtil.getCollection("develop","devtest");
List<Document> list = new ArrayList<>();
for(int i=0;i<5;i++){
Document docu = new Document();
docu.append("username","zhangsan"+i);
docu.append("userage",20+i);
docu.append("userdesc","OK"+i);
docu.append("userlike",Arrays.asList(new
String[]{"Music","Sport"}));
list.add(docu);
}
collection.insertMany(list);
}
3.2更新文档
3.2.1更新单个文档单个键
/**
* 更新单个文档单个键
*/
public void updateSingleDocumentSingleKey(){
MongoCollection collection =
MongoDBAuthPoolUtil.getCollection("develop","devtest");
//更新文档
//Filters 封装了条件的一个工具类{$set:{userage:28}}
collection.updateOne(Filters.eq("username","lisi"),new
Document("$set",new Document("userage",28)));
}
3.2.2更新单个文档多个键
/**
* 更新单个文档多个键
*/
public void updateSingleDocumentManyKey(){
MongoCollection collection =
MongoDBAuthPoolUtil.getCollection("develop","devtest");
collection.updateOne(Filters.eq("username","zhangsan0"),n
ew Document("$set",new
Document("userage",18).append("userdesc","Very Good")));
}
3.2.3更新多个文档中的单个键
/**
* 更新多个文档单个键
*/
public void updateManyDocumentSingleKey(){
MongoCollection collection =
MongoDBAuthPoolUtil.getCollection("develop","devtest");
collection.updateMany(Filters.ne("username",null),new
Document("$set",new Document("userdesc","Very Good")));
}
3.2.4更新多个文档中的多个键
/**
* 更新多个文档多个键
*/
public void updateManyDocumentManyKey(){
MongoCollection collection =
MongoDBAuthPoolUtil.getCollection("develop","devtest");
collection.updateMany(Filters.ne("username",null),new
Document("$set",new
Document("userdesc","OK").append("userage",20)));
}
3.2.5更新文档中的数组
/**
* 更新文档中的数组
* {$push:{}}
*/
public void updateDocumentArray(){
MongoCollection collection =
MongoDBAuthPoolUtil.getCollection("develop","devtest");
collection.updateOne(Filters.eq("username","lisi"),new
Document("$push",new Document("userlike","Art")));
}
3.3查询文档
3.3.1查询全部文档
/**
* 查询全部文档
*/
public void selectDocumentAll(){
MongoCollection collection =
MongoDBAuthPoolUtil.getCollection("develop","devtest");
//返回的是一个文档的迭代器
FindIterable<Document> iterable = collection.find();
MongoCursor<Document> cursor = iterable.iterator();
while(cursor.hasNext()){
Document docu = cursor.next();
System.out.println(docu.get("username")+"	"+docu.get("us
erage")+"	"+docu.get("userdesc")+"	"+docu.get("userlike
"));
} }
3.3.2根据_id 查询文档-$eq
/**
* 根据_id 查询文档
*/
public void selectDocumentById(){
MongoCollection collection =
MongoDBAuthPoolUtil.getCollection("develop","devtest");
FindIterable<Document> iterable =
collection.find(Filters.eq("_id",new
ObjectId("5d398cd64b022206d87d168e")));
MongoCursor<Document> cursor = iterable.iterator();
while(cursor.hasNext()){
Document docu = cursor.next();
System.out.println(docu.get("username")+"	"+docu.get("us
erage")+"	"+docu.get("userdesc")+"	"+docu.get("userlike
"));
} }
3.3.3查询多个文档-$gt
/**
* 根据年龄查询文档,条件是年龄大于 19
*/
public void selectDocumentConditionByGt(){
MongoCollection collection =
MongoDBAuthPoolUtil.getCollection("develop","devtest");
FindIterable iterable =
collection.find(Filters.gt("userage",19));
MongoCursor<Document> cursor = iterable.iterator();
while(cursor.hasNext()){
Document docu = cursor.next();
System.out.println(docu.get("username")+"	"+docu.get("us
erage")+"	"+docu.get("userdesc")+"	"+docu.get("userlike "));
} }
3.3.4查询多个文档-$type
/**
* 根据年龄查询文档,添加是年龄的值是整数类型(number)
*/
public void selectDocumentConditionByType(){
MongoCollection collection =
MongoDBAuthPoolUtil.getCollection("develop","devtest");
FindIterable iterable =
collection.find(Filters.type("userage","number"));
MongoCursor<Document> cursor = iterable.iterator();
while(cursor.hasNext()){
Document docu = cursor.next();
System.out.println(docu.get("username")+"	"+docu.get("us
erage")+"	"+docu.get("userdesc")+"	"+docu.get("userlike
"));
} }
3.3.5查询多个文档-$in
/**
* 查询用户的名字为 zhangsan1,zhangsan2
*/
public void selectDocumentConditionByIn(){
MongoCollection collection =
MongoDBAuthPoolUtil.getCollection("develop","devtest");
FindIterable iterable =
collection.find(Filters.in("username","zhangsan1","zhangs
an2"));
MongoCursor<Document> cursor = iterable.iterator();
while(cursor.hasNext()){
Document docu = cursor.next();
System.out.println(docu.get("username")+"	"+docu.get("us
erage")+"	"+docu.get("userdesc")+"	"+docu.get("userlike
"));
} }
3.3.6查询多个文档-$nin
/**
* 查询用户的名字不是 zhangsan1,zhangsan2
*/
public void selectDocumentConditionByNin(){
MongoCollection collection =
MongoDBAuthPoolUtil.getCollection("develop","devtest");
FindIterable iterable =
collection.find(Filters.nin("username","zhangsan1","zhang
san2"));
MongoCursor<Document> cursor = iterable.iterator();
while(cursor.hasNext()){
Document docu = cursor.next();
System.out.println(docu.get("username")+"	"+docu.get("us
erage")+"	"+docu.get("userdesc")+"	"+docu.get("userlike
"));
} }
3.3.7查询多个文档-$regex
/**
* 查询用户的名字是 z 开头 2 结尾的。
*/
public void selectDocumentConditionByRegex(){
MongoCollection collection =
MongoDBAuthPoolUtil.getCollection("develop","devtest");
FindIterable iterable =
collection.find(Filters.regex("username",
Pattern.compile("^z.*2$")));
MongoCursor<Document> cursor = iterable.iterator();
while(cursor.hasNext()){
Document docu = cursor.next();
System.out.println(docu.get("username")+"	"+docu.get("us
erage")+"	"+docu.get("userdesc")+"	"+docu.get("userlike
"));
} }
3.3.8逻辑运算符-$and
/**
* 查询用户 username 是 zhangsan1 并且年龄为 20 岁的用户
*/
public void selectDocumentConditionUseAnd(){
MongoCollection collection =
MongoDBAuthPoolUtil.getCollection("develop","devtest");
FindIterable iterable =
collection.find(Filters.and(Filters.eq("username","zhangs
an1"),Filters.eq("userage",21),Filters.eq("userdesc","Ver
y Good")));
MongoCursor<Document> cursor = iterable.iterator();
while(cursor.hasNext()){
Document docu = cursor.next();
System.out.println(docu.get("username")+"	"+docu.get("us
erage")+"	"+docu.get("userdesc")+"	"+docu.get("userlike
"));
} }
3.3.9逻辑运算符-$or
/**
* 查询用户要求 username 是 list,或者 userage 是 20 或者 userdesc
是 Very Good
*/
public void selectDocumentConditionUseOr(){
MongoCollection collection =
MongoDBAuthPoolUtil.getCollection("develop","devtest");
FindIterable iterable =
collection.find(Filters.or(Filters.eq("username","lisi"),
Filters.eq("userage",20),Filters.eq("userdesc","Very
Good")));
MongoCursor<Document> cursor = iterable.iterator();
while(cursor.hasNext()){
Document docu = cursor.next();
System.out.println(docu.get("username")+"	"+docu.get("us
erage")+"	"+docu.get("userdesc")+"	"+docu.get("userlike
"));
} }
3.3.10 逻辑运算符-$and 与$or 联合使用
/**
* 查询文档中 username 为 lisi 并且年龄为 20 岁,或者 userdesc 为 Very
Good
*/
public void selectDocumentConditionAndOr(){
MongoCollection collection =
MongoDBAuthPoolUtil.getCollection("develop","devtest");
FindIterable iterable =
collection.find(Filters.or(Filters.and(Filters.eq("userna
me","lisi"),Filters.eq("userage",20)),Filters.eq("userdes
c","Very Good")));
MongoCursor<Document> cursor = iterable.iterator();
while(cursor.hasNext()){
Document docu = cursor.next();
System.out.println(docu.get("username")+"	"+docu.get("us
erage")+"	"+docu.get("userdesc")+"	"+docu.get("userlike
"));
} }
3.3.11 查询文档-排序处理
/**
* 查询文档中 username 是 z 开头的,根据 username 对结果做降序排序。1
升序排序, -1 降序排序规则 $sort:{username,-1}
*/
public void selectDocumentSorting(){
MongoCollection collection =
MongoDBAuthPoolUtil.getCollection("develop","devtest");
FindIterable iterable =
collection.find(Filters.regex("username",Pattern.compile(
"^z"))).sort(new Document("username",-1));
MongoCursor<Document> cursor = iterable.iterator();
while(cursor.hasNext()){
Document docu = cursor.next();
System.out.println(docu.get("username")+"	"+docu.get("us
erage")+"	"+docu.get("userdesc")+"	"+docu.get("userlike
"));
} }
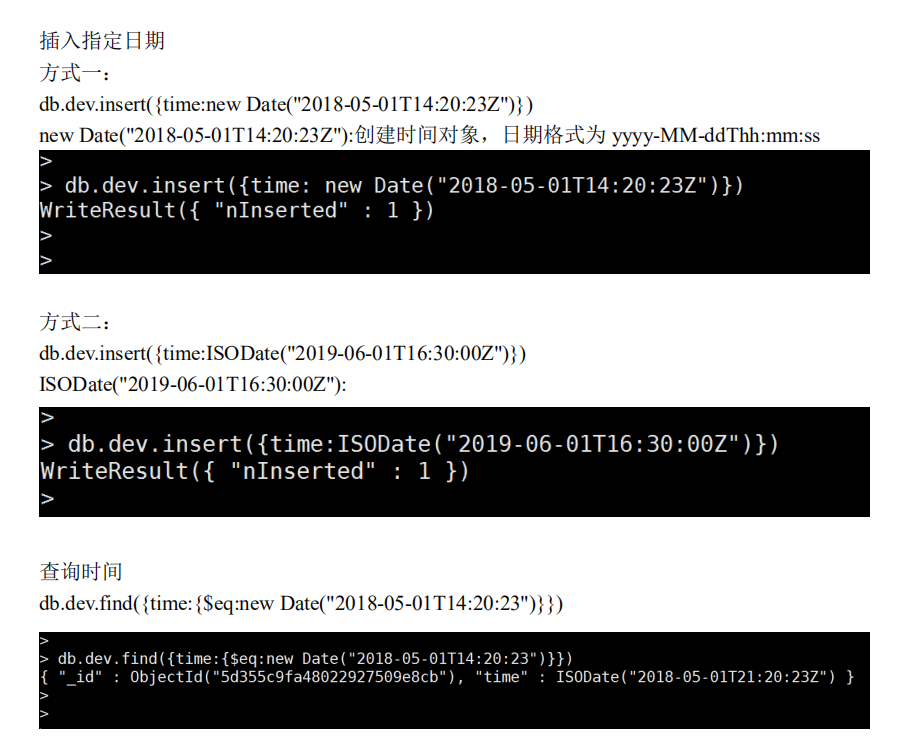
3.4日期操作
3.4.1插入系统当前日期
/**
* 插入系统当前日期
*/
public void insertDocumentSystemDate(){
MongoCollection collection =
MongoDBAuthPoolUtil.getCollection("develop","devtest");
Document docu = new Document();
docu.put("username","wangwu");
docu.put("userage",22);
docu.put("userdesc","Very Good");
docu.put("userlike", Arrays.asList(new
String[]{"Music","Art"}));
docu.put("userbirth",new Date());
collection.insertOne(docu);
}
3.4.2插入指定日期
创建日期处理工具类
public class DateUtil {
/**
* Date To String
*/
public static String dateToString(String pattern, Date
date){
SimpleDateFormat simpleDateFormat = new
SimpleDateFormat(pattern);
return simpleDateFormat.format(date);
}
/**
* String To Date
*/
public static Date stringToDate(String pattern, String
date){
SimpleDateFormat simpleDateFormat = new
SimpleDateFormat(pattern);
Date d = null;
try{
d = simpleDateFormat.parse(date);
}catch(Exception e){
e.printStackTrace();
}
return d;
} }
添加指定日期
/**
* 插入指定日期
*/
public void insertDocumentCustoDate(){
MongoCollection collection =
MongoDBAuthPoolUtil.getCollection("develop","devtest");
Date date= DateUtil.stringToDate("yyyy-MM-dd
HH:mm:ss","2019-05-01 13:32:13");
Document docu = new Document();
docu.put("username","zhaoliu");
docu.put("userage",24);
docu.put("userdesc","Very Good");
docu.put("userlike", Arrays.asList(new
String[]{"Music","Art"}));
docu.put("userbirth",date);
collection.insertOne(docu);
}
3.4.3查询日期-$eq
/**
* 插入日期:查询用的生日为 2019-05-01 13:32:13 的用户信息
*/
public void selectDocumentDateUseEq(){
MongoCollection collection =
MongoDBAuthPoolUtil.getCollection("develop","devtest");
Date date = DateUtil.stringToDate("yyyy-MM-dd
HH:mm:ss","2019-05-01 13:32:13");
FindIterable iterable =
collection.find(Filters.eq("userbirth",date));
MongoCursor<Document> cursor = iterable.iterator();
while(cursor.hasNext()){
Document docu = cursor.next();
String temp = DateUtil.dateToString("yyyy-MM-dd
HH:mm:ss",(Date) docu.get("userbirth"));
System.out.println(docu.get("username")+"	"+docu.get("us
erage")+"	"+docu.get("userdesc")+"	"+docu.get("userlike
")+"	"+temp);
} }
3.4.4查询日期-$gt
/**
* 查询日期:查询用的生日大于 2019-01-01 00:00:00 的用户信息
*/
public void selectDocumentDateUseGt(){
MongoCollection collection =
MongoDBAuthPoolUtil.getCollection("develop","devtest");
Date date = DateUtil.stringToDate("yyyy-MM-dd
HH:mm:ss","2019-01-01 00:00:00");
FindIterable iterable =
collection.find(Filters.gt("userbirth",date));
MongoCursor<Document> cursor = iterable.iterator();
while(cursor.hasNext()){
Document docu = cursor.next();
String temp = DateUtil.dateToString("yyyy-MM-dd
HH:mm:ss",(Date) docu.get("userbirth"));
System.out.println(docu.get("username")+"	"+docu.get("us
erage")+"	"+docu.get("userdesc")+"	"+docu.get("userlike
")+"	"+temp);
} }
3.5聚合操作
3.5.1聚合操作-计算文档总数-$sum
需求:查询集合中的文档数量
Mongo Shell:db.dev.aggregate([{$group:{_id:null,count:{$sum:1}}}])
/**
* 需求:查询集合中的文档数量
Mongo
Shell:db.dev.aggregate([{$group:{_id:null,count:{$sum:1}}
}])
*/
public void selectDocumentAggregateCount(){
MongoCollection collection =
MongoDBAuthPoolUtil.getCollection("develop","dev");
Document sum = new Document();
sum.put("$sum",1);
Document count = new Document();
count.put("_id",null);
count.put("count",sum);
Document group = new Document();
group.put("$group",count);
List<Document> list = new ArrayList<>();
list.add(group);
AggregateIterable iterable =
collection.aggregate(list);
MongoCursor<Document> cursor = iterable.iterator();
while(cursor.hasNext()){
Document docu = cursor.next();
System.out.println(docu.get("count"));
} }
3.5.2聚合操作-计算值的总和-$sum
需求:查询集合中所有 size 键中的值的总和
Mongo Shell:db.dev.aggregate([{$group:{_id:null,totalSize:{$sum:"$size"}}}])
/**
* 需求:查询集合中所有 size 键中的值的总和
Mongo
Shell:db.dev.aggregate([{$group:{_id:null,totalSize:{$sum
:"$size"}}}])
*/
public void selectDocumentAggregateSum(){
MongoCollection collection =
MongoDBAuthPoolUtil.getCollection("develop","dev");
Document sum = new Document();
sum.put("$sum","$size");
Document totalSize = new Document();
totalSize.put("_id",null);
totalSize.put("totalSize",sum);
Document group = new Document();
group.put("$group",totalSize);
List<Document> list = new ArrayList<>();
list.add(group);
AggregateIterable iterable =
collection.aggregate(list);
MongoCursor<Document> cursor = iterable.iterator();
while(cursor.hasNext()){
Document docu = cursor.next();
System.out.println(docu.get("totalSize"));
} }
3.5.3聚合操作-在分组中计算值的总和-$sum
需求:对 title 进行分组,计算每组中的 size 的总和
Mongo Shell:db.dev.aggregate([{$group:{_id:"$title",totalSize:{$sum:"$size"}}}])
/**
* 需求:对 title 进行分组,计算每组中的 size 的总和
Mongo
Shell:db.dev.aggregate([{$group:{_id:"$title",totalSize:{
$sum:"$size"}}}])
*/
public void selectDocumentAggregateGroupBySum(){
MongoCollection collection =
MongoDBAuthPoolUtil.getCollection("develop","dev");
Document sum= new Document();
sum.put("$sum","$size");
Document totalSize = new Document();
totalSize.put("_id","$title");
totalSize.put("totalSize",sum);
Document group = new Document();
group.put("$group",totalSize);
List<Document> list = new ArrayList<>();
list.add(group);
AggregateIterable iterable =
collection.aggregate(list);
MongoCursor<Document> cursor = iterable.iterator();
while(cursor.hasNext()){
Document docu = cursor.next();
System.out.println(docu.get("totalSize"));
} }
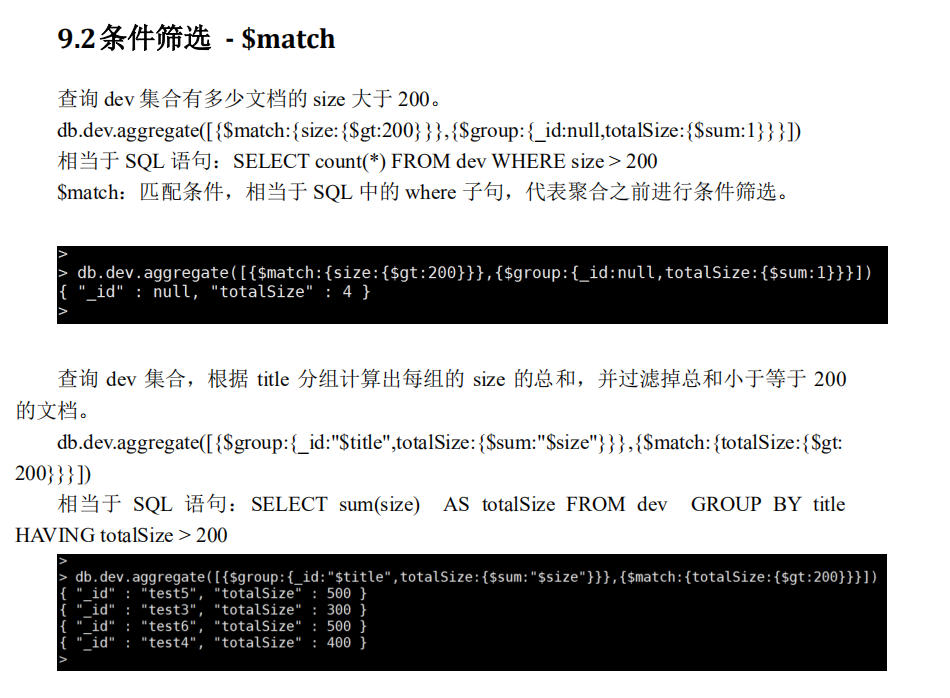
3.5.4聚合操作-分组前的数据过滤-$match
需求:查询 dev 集合有多少文档的 size 大于 200。
Mongo Shell:
db.dev.aggregate([{$match:{size:{$gt:200}}},{$group:{_id:null,totalSize:{$sum:1}}}])
/**
* 需求:查询 dev 集合有多少文档的 size 大于 200。
Mongo Shell:
db.dev.aggregate([{$match:{size:{$gt:200}}},{$group:{_id:
null,totalSize:{$sum:1}}}])
*/
public void selectDocumentAggregateGroupByWhere(){
MongoCollection collection =
MongoDBAuthPoolUtil.getCollection("develop","dev");
Document gt = new Document();
gt.put("$gt",200);
Document size = new Document();
size.put("size",gt);
Document match = new Document();
match.put("$match",size);
Document sum = new Document();
sum.put("$sum",1);
Document totalSize = new Document();
totalSize.put("_id",null);
totalSize.put("totalSize",sum);
Document group = new Document();
group.put("$group",totalSize);
List<Document> list = new ArrayList<>();
list.add(match);
list.add(group);
AggregateIterable iterable =
collection.aggregate(list);
MongoCursor<Document> cursor = iterable.iterator();
while(cursor.hasNext()){
Document docu = cursor.next();
System.out.println(docu.get("totalSize"));
} }
3.5.5聚合操作-分组后的数据过滤-$match
需求:查询 dev 集合,根据 title 分组计算出每组的 size 的总和,并过滤掉总和小于 200
的文档。
Mongo Shell:
db.dev.aggregate([{$group:{_id:"$title",totalSize:{$sum:"$size"}}},{$match:{totalSize:{$gt:200}}}])
/**
* 需求:查询 dev 集合,根据 title 分组计算出每组的 size 的总和,并过
滤掉总和小于 200 的文档。
Mongo Shell:
db.dev.aggregate([{$group:{_id:"$title",totalSize:{$sum:"
$size"}}},{$match:{totalSize:{$gt:200}}}])
*/
public void selectDocumentAggregateGroupByHaving(){
MongoCollection collection =
MongoDBAuthPoolUtil.getCollection("develop","dev");
Document sum = new Document();
sum.put("$sum","$size");
Document totalSize = new Document();
totalSize.put("_id","$title");
totalSize.put("totalSize",sum);
Document group = new Document();
group.put("$group",totalSize);
//{$match:{totalSize:{$gt:200}}}
Document gt = new Document();
gt.put("$gt",200);
Document mtotalSize = new Document();
mtotalSize.put("totalSize",gt);
Document match = new Document();
match.put("$match",mtotalSize);
List<Document> list = new ArrayList<>();
list.add(group);
list.add(match);
AggregateIterable iterable =
collection.aggregate(list);
MongoCursor<Document> cursor = iterable.iterator();
while(cursor.hasNext()){
Document docu = cursor.next();
System.out.println(docu.get("totalSize"));
} }
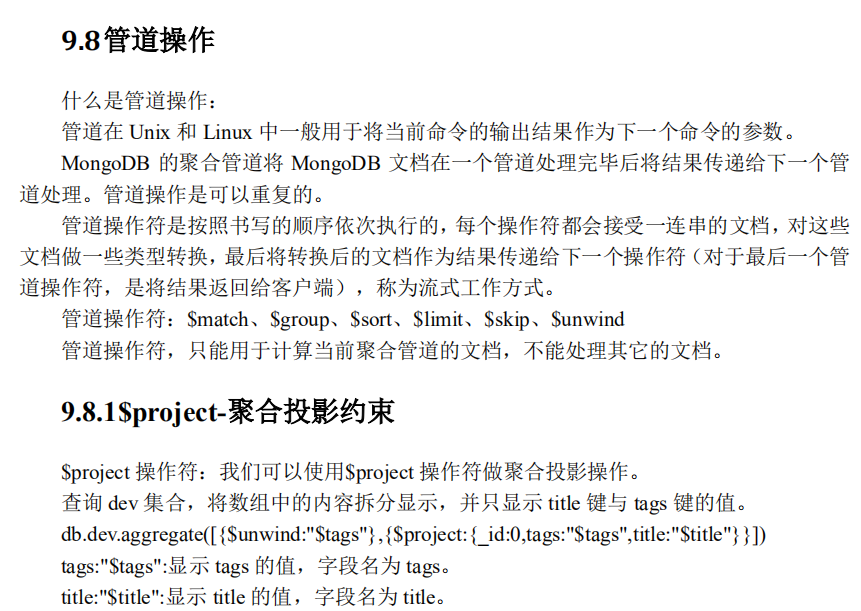
3.5.6聚合操作-$project-聚合投影约束
需求:查询 dev 集合,将数组中的内容拆分显示,并只显示 title 键与 tags 键的值。
Mongo Shell:
db.dev.aggregate([{$unwind:"$tags"},{$project:{_id:0,tags:"$tags",title:"$title"}}])
/**
* 需求:查询 dev 集合,将数组中的内容拆分显示,并只显示 title 键与 tags
键的值。
Mongo Shell:
db.dev.aggregate([{$unwind:"$tags"},{$project:{_id:0,tags
:"$tags",title:"$title"}}])
*/
public void selectDocumentProject(){
MongoCollection collection =
MongoDBAuthPoolUtil.getCollection("develop","dev");
Document unwind = new Document();
unwind.put("$unwind","$tags");
Document pro = new Document();
pro.put("_id",0);
pro.put("tags","$tags");
pro.put("title","$title");
Document project = new Document();
project.put("$project",pro);
List<Document> list = new ArrayList<>();
list.add(unwind);
list.add(project);
AggregateIterable iterable =
collection.aggregate(list);
MongoCursor<Document> cursor = iterable.iterator();
while(cursor.hasNext()){
System.out.println(cursor.next());
} }
3.5.7聚合操作-$project-字符串处理
需求:查询 dev 集合,将数组中的内容拆分显示。将 title 字段和 tags 字段的值拼接为
一个完整字符串并在 Title_Tags 字段中显示。
Mongo Shell:
db.dev.aggregate([{$unwind:"$tags"},{$project:{_id:0,Title_Tags:{$concat:["$title","-","$tags"]}}}])
/**
* 需求:查询 dev 集合,将数组中的内容拆分显示。将 title 字段和 tags
字段的值拼接为一个完整字符串并在 Title_Tags 字段中显示。
Mongo Shell:
db.dev.aggregate([{$unwind:"$tags"},{$project:{_id:0,Titl
e_Tags:{$concat:["$title","-","$tags"]}}}])
*/
public void selectDocumentProjectConcat(){
MongoCollection collection =
MongoDBAuthPoolUtil.getCollection("develop","dev");
Document unwind = new Document();
unwind.put("$unwind","$tags");
Document concat = new Document();
concat.put("$concat", Arrays.asList(new
String[]{"$title","-","$tags"}));
Document title = new Document();
title.put("_id",0);
title.put("Title_Tags",concat);
Document project = new Document();
project.put("$project",title);
List<Document> list = new ArrayList<>();
list.add(unwind);
list.add(project);
AggregateIterable iterable =
collection.aggregate(list);
MongoCursor<Document> cursor = iterable.iterator();
while(cursor.hasNext()){
System.out.println(cursor.next());
} }
3.5.8聚合操作-$project 算术运算
需求:查询 dev 集合中数据,显示 title 和 size 字段,为 size 字段数据做加 1 操作,显
示字段命名为 New_Size。排除那些没有 size 键的文档。
Mongo Shell:
db.dev.aggregate([{$match:{size:{$ne:null}}},{$project:{_id:0,title:1,New_Size:{$add:["$size",1]}}}])
/**
* 需求:查询 dev 集合中数据,显示 title 和 size 字段,为 size 字段数
据做加 1 操作,显示字段命名为 New_Size。排除那些没有 size 键的文档。
Mongo Shell:
db.dev.aggregate([{$match:{size:{$ne:null}}},{$project:{_
id:0,title:1,New_Size:{$add:["$size",1]}}}])
*/
public void selectDocumentProjectAdd(){
MongoCollection collection =
MongoDBAuthPoolUtil.getCollection("develop","dev");
Document ne = new Document();
ne.put("$ne",null);
Document size = new Document();
size.put("size",ne);
Document match = new Document();
match.put("$match",size);
//{$project:{_id:0,title:1,New_Size:{$add:["$size",1]}}}
Document add = new Document();
add.put("$add",Arrays.asList(new
Object[]{"$size",1}));
Document new_Size = new Document();
new_Size.put("_id",0);
new_Size.put("title",1);
new_Size.put("New_Size",add);
Document project = new Document();
project.put("$project",new_Size);
List<Document> list = new ArrayList<>();
list.add(match);
list.add(project);
AggregateIterable iterable =
collection.aggregate(list);
MongoCursor<Document> cursor = iterable.iterator();
while(cursor.hasNext()){
System.out.println(cursor.next());
} }
3.5.9聚合操作-$project 日期处理
需求:查询 devtest 集合查询那些有生日的用户,并按照 YYYY 年 mm 月 dd 日
HH:MM:SS 格式显示日期。
Mongo Shell:
db.devtest.aggregate([{$match:{userbirth:{$ne:null}}},{$project:{ 自定义日期格
式:{$dateToString:{format:"%Y 年%m 月%d 日 %H:%M:%S",date:"$userbirth"}}}}])
/**
* 需求:查询 devtest 集合查询那些有生日的用户,并按照 YYYY 年 mm 月
dd 日 HH:MM:SS 格式显示日期。
* 注意:如果直接在 MongoDB 中做日期的格式化处理,那么是按照表示 UTC
时间来处理的,会少 8 个小时。建议在程序中
* 通过 java.util.Date 来做日期的转换。
Mongo Shell:
db.devtest.aggregate([{$match:{userbirth:{$ne:null}}},{$p
roject:{自定义日期格式:{$dateToString:{format:"%Y 年%m 月%d
日 %H:%M:%S",date:"$userbirth"}}}}])
*/
public void selectDocumentProjectDate(){
MongoCollection collection =
MongoDBAuthPoolUtil.getCollection("develop","devtest");
Document ne = new Document();
ne.put("$ne",null);
Document birth = new Document();
birth.put("userbirth",ne);
Document match = new Document();
match.put("$match",birth);
//{$project:{自定义日期格式:{$dateToString:{format:"%Y
年%m 月%d 日 %H:%M:%S",date:"$userbirth"}}}}
Document format = new Document();
format.put("format","%Y 年%m 月%d 日 %H:%M:%S");
format.put("date","$userbirth");
Document dateToString = new Document();
dateToString.put("$dateToString",format);
Document custoDate = new Document();
custoDate.put("自定义日期格式",dateToString);
Document project = new Document();
project.put("$project",custoDate);
List<Document> list = new ArrayList<>();
list.add(match);
list.add(project);
AggregateIterable iterable =
collection.aggregate(list);
MongoCursor<Document> cursor = iterable.iterator();
while(cursor.hasNext()){
System.out.println(cursor.next());
} }
3.6分页查询
3.6.1使用 skip 与 limit 方法分页
/**
* 通过 skip 与 limit 方法实现分页
*/
public void selectDocumentByPageUseSkipAndLimit(int
pageIndex){
int page = (pageIndex-1)*2;
MongoCollection collection =
MongoDBAuthPoolUtil.getCollection("develop","dev");
Document condition = new Document("size",new
Document("$ne",null));
long countNum = collection.countDocuments(condition);
System.out.println(countNum);
FindIterable iterable =
collection.find(condition).skip(page).limit(2);
MongoCursor<Document> cursor = iterable.iterator();
while(cursor.hasNext()){
Document docu = cursor.next();
System.out.println(docu);
} }
3.6.2优化分页查询
使用条件判断替换 skip 方法
/**
* 通过条件判断实现分页
*/
public void selectDocumentByPageUseCondition(int
pageIndex,int pageSize,String lastId){
MongoCollection collection =
MongoDBAuthPoolUtil.getCollection("develop","dev");
Document condition = new Document("size",new
Document("$ne",null));
long countNum = collection.countDocuments(condition);
System.out.println(countNum);
FindIterable iterable = null;
if(pageIndex == 1){
iterable =
collection.find(condition).limit(pageSize);
}else{
if(lastId != null){
condition.append("_id",new Document("$gt",new
ObjectId(lastId)));
iterable =
collection.find(condition).limit(pageSize);
} }
MongoCursor<Document> cursor = iterable.iterator();
while(cursor.hasNext()){
Document docu = cursor.next();
System.out.println(docu);
} }