NetFPGA Demo ——reference_router_nf1_cml
前言
本博文主要介绍了reference_router_nf1_cml该demo的一路运行,以及一路上艰难跑通遇到的坑。
Github上源码链接:https://github.com/NetFPGA/NetFPGA-1G-CML-live/tree/master/projects/reference_router_nf1_cml
Github Wiki链接:https://github.com/NetFPGA/NetFPGA-public/wiki/NetFPGA-1G-CML-Reference-Router
编译该项目并烧写到NetFPGA中
我们从Github Wiki链接可知,需该nf10_router_output_port_lookup v1_00_a IP核,而我们通过在$NF_ROOT通过make cml_core并没有该IP,所以需下载工具生成相关CAM的Verilog源码,而该工具由Github上源码链接可知,需下载xapp1151_Param_CAM.zip该应用。
TCAM、CAM模块的安装请参加另一篇博客:xapp1151_Param_CAM模块安装
完成相应IP的核的安装后,执行以下命令,进入编译过程,
1、设置相关路径
$ source /opt/Xilinx/14.6/ISE_DS/settings64.sh
$ source <path>/NetFPGA-1G-CML-live/bashrc_addon_NetFPGA_10G
2、进入reference_router_nf1_cml目录进行编译,这里可能需要花费1个多小时的时间
cd <path>/NetFPGA-1G-CML-live/projects/reference_router_nf1_cml
make
编译成功,会出现以下提示
mkdir -p bitfiles
cp hw/implementation/download.bit bitfiles/reference_router_nf1_cml.bit
3、将配置烧到NetFPGA
$ make download
成功时,会出现
INFO:iMPACT - '1': Checking done pin....done.
'1: Programmed successfully.
Elapsed time =     62 sec.
rm -f bitfiles/download.bit
笔者这个过程曾失败,于是换了一个USB口就ok了。
主机软件环境的安装
硬件搞完了,接下来搞软件,主要参照Github Wiki链接
JAVA GUI的安装
cd projects/reference_router_nf1_cml/sw/host/gui
make
编译成功,则会出现以下提示
make[1]: Entering directory `~/NetFPGA-10G-live/projects/reference_router_nf1_cml/sw/host/common'
gcc -fpic -c nf10util.c nf_util.c
gcc -shared nf10util.o nf_util.o -o libnf10.so
make[1]: Leaving directory `~/NetFPGA-10G-live/projects/reference_router_nf1_cml/sw/host/common'
Building java...

Done
Writing router gui manifest...
Building router jar...
Writing script to start router gui...
启动java gui
sudo ./router.sh
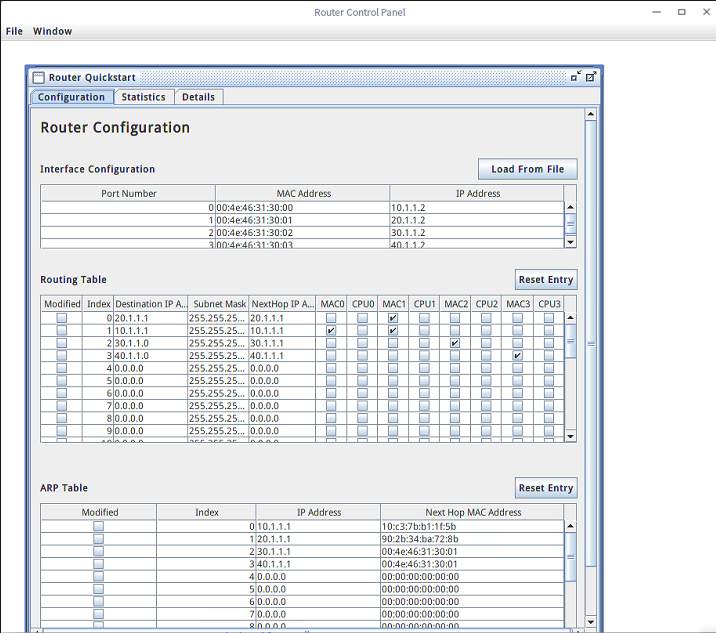
出现以下gui,如果发现的gui无法进行配置相应gui显示的显示时,请重启电脑。
Command Line Interpreter安装
cd projects/reference_router_nf1_cml/sw/host/cli
make
编译成功,则会出现以下提示
gcc -g    -c -o cli.o cli.c
gcc -g    -c -o ../common/util.o ../common/util.c
gcc -lncurses  cli.o ../common/nf2util.o ../common/util.o ../common/reg_defines.h   -o cli
gcc -g    -c -o regdump.o regdump.c
gcc -lncurses  regdump.o ../common/nf2util.o ../common/reg_defines.h   -o regdump
gcc -g    -c -o show_stats.o show_stats.c
gcc -lncurses  show_stats.o ../common/nf2util.o ../common/util.o ../common/reg_defines.h   -o show_stats</pre>
启动cli
sudo ./cli
会出现以下,可以通过help命令查看如何使用,基本GUI的功能,都有,只是命令行界面

SCONE
Router Kit
真机测试
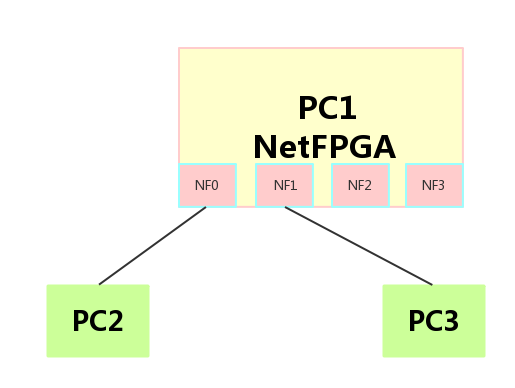
实验拓扑如下,要达成让PC2(IP:10.1.1.1) ping 通 PC3(IP:20.1.1.1),不在一个局域网的配置,以证明路由器真正起作用。
实验拓扑
主机配置
PC2:
IP:10.1.1.1
MAC:10:c3:7b:b1:1f:5b
掩码:255.255.255.0
网关:10.1.1.2
PC3:
IP:20.1.1.1
MAC:90:2b:34:ba:72:8b
掩码:255.255.255.0
网关:20.1.1.2
PC1网卡IP配置
开启网卡驱动
cd <path>/NetFPGA-1G-CML-live/projects/reference_nic_nf1_cml/sw/host/driver
sudo insmod nf10.ko
sudo ifconfig nf0 up
sudo ifconfig nf1 up
sudo ifconfig nf2 up
sudo ifconfig nf3 up
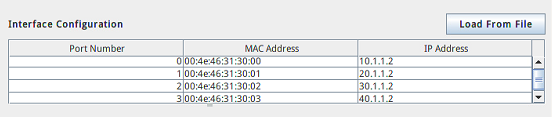
sudo ifconfig nf0 10.1.1.2 netmask 255.255.255.0
sudo ifconfig nf1 20.1.1.2 netmask 255.255.255.0
保证PC2可以Ping通10.1.1.2,PC3可以Ping通20.1.1.2
开启GUI,并对路由表、ARP表,端口设置
开启GUI
cd <path>/NetFPGA-1G-CML-live/projects/reference_router_nf1_cml/sw/host/gui
sudo ./router
- 端口设置
- 路由表设置
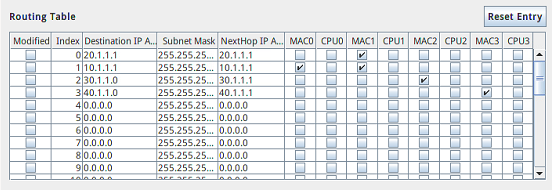
-
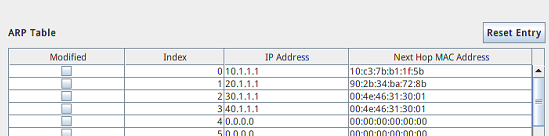
ARP表设置
注:各台主机的Mac
实验结果
从PC2执行ping 20.1.1.1可以成功Ping通,跨不同网段,体现路由器作用。