数值选择器用于让用户输入数值,用户既可以通过键盘输入数值,也可以通过拖动来选择数值。使用该组件常用如下三个方法。
- setMinValue(int minVal):设置该组件支持的最小值。
- setMaxValue(int maxVal):设置该组件支持的最大值。
- setValue(int value):设置该组件的当前值。
下面通过一个实例来介绍NumberPicker的功能与用法。
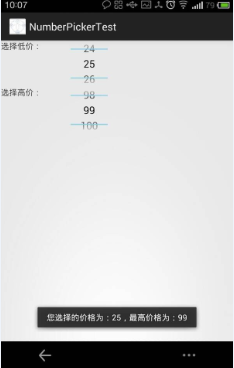
实例:选择您意向的价格范围
在该实例中,程序将使用两个NumberPicker来让用户选择价格,第一个NumberPicker用于选择低价,第二个NumberPicker用于选择高价。下面是该实例的布局文件。
布局文件如下:
<TableLayout xmlns:android="http://schemas.android.com/apk/res/android"
    android:layout_width="match_parent"
    android:layout_height="match_parent"
    >
<TableRow android:layout_width="fill_parent"
    android:layout_height="wrap_content" >
    <TextView android:text="选择低价:"
        android:layout_width="120dp"
        android:layout_height="wrap_content"/>
    <NumberPicker android:id="@+id/np1"
        android:layout_width="match_parent"
        android:layout_height="80dp"
        android:focusable="true"
        android:focusableInTouchMode="true"/>
    </TableRow>
    <TableRow android:layout_width="fill_parent"
        android:layout_height="wrap_content">
        <TextView android:text="选择高价:"
            android:layout_width="120dp"
            android:layout_height="wrap_content"/>
        <NumberPicker android:id="@+id/np2"
            android:layout_width="match_parent"
            android:layout_height="80dp"
            android:focusable="true"
            android:focusableInTouchMode="true"/>
    </TableRow>
</TableLayout>
上面的布局文件中定义了两个NumberPicker,接下来Activity代码需要为这两个NumberPicker设置最小值、最大值,并为他们绑定事件监听器。下面是该Activity的后台代码。
package org.crazyit.helloworld;

import android.os.Bundle;
import android.app.Activity;
import android.view.Menu;
import android.widget.NumberPicker;
import android.widget.NumberPicker.OnValueChangeListener;
import android.widget.Toast;

public class NumberPickerTest extends Activity {

    NumberPicker np1,np2;
    //定义最低价格、最高价格的初始值
    int minPrice=25,maxPrice=75;
    @Override
    protected void onCreate(Bundle savedInstanceState) {
        super.onCreate(savedInstanceState);
        setContentView(R.layout.number_picker_test);
        np1=(NumberPicker)findViewById(R.id.np1);
        //设置np1的最小值和最大值
        np1.setMinValue(10);
        np1.setMaxValue(50);
        //设置np1的当前值
        np1.setValue(minPrice);
        np1.setOnValueChangedListener(new OnValueChangeListener(){

            @Override
            public void onValueChange(NumberPicker picker, int oldVal,
                    int newVal) {
                // TODO Auto-generated method stub
                minPrice=newVal;
                showSelectedPrice();
            }

        });
        np2=(NumberPicker)findViewById(R.id.np2);
        //设置np2的最小值和最大值
        np2.setMinValue(60);
        np2.setMaxValue(100);
        //设置np2的当前值
        np2.setValue(maxPrice);
        np2.setOnValueChangedListener(new OnValueChangeListener(){

            @Override
            public void onValueChange(NumberPicker picker, int oldVal,
                    int newVal) {
                // TODO Auto-generated method stub
                maxPrice=newVal;
                showSelectedPrice();
            }


        });

    }

    private void showSelectedPrice()
    {
        Toast.makeText(this, "您选择的价格为:"+minPrice+",最高价格为:"+maxPrice
                , Toast.LENGTH_SHORT).show();
    }

    @Override
    public boolean onCreateOptionsMenu(Menu menu) {
        // Inflate the menu; this adds items to the action bar if it is present.
        getMenuInflater().inflate(R.menu.number_picker_test, menu);
        return true;
    }

}
上面两段粗体字代码的控制逻辑基本是相似的,它们都调用了NumberPicker的setMinValue()、setMaxValue()来设置该数值选择器的最小值、最大值和当前值。除此之外,程序还为两个日期选择器绑定了事件监听器:当它们的值发生改变时,将会激发相应的事件处理方法。
运行该程序,并通过NumberPicker选择数值,将可以看到如下效果: