通过ArrayAdapter实现Adapter虽然简单、易用,但ArrayAdapter的功能比较有限。它的每个列表只能是TextView。如果开发者需呀实现更复杂的列表项,则可以考虑使用SimpleAdapter。
不要被SimpleAdapter的名字欺骗,SimpleAdapter并不简单,而且它的功能非常强大。ListView的大部分应用场景,都可以通过SimpleAdapter来提供列表项。
例如:下面定义如下布局文件。
<LinearLayout xmlns:android="http://schemas.android.com/apk/res/android"
    android:orientation="horizontal"
    android:layout_width="match_parent"
    android:layout_height="wrap_content"
    >
   <!-- 定义一个List -->
   <ListView android:id="@+id/mylist"
       android:layout_width="fill_parent"
       android:layout_height="wrap_content"/>
</LinearLayout>
上面的布局文件汇总仅定义了一个ListView,该ListView将会显示有SimpleAdapter提供的列表项。
下面是Activity代码:
package org.crazyit.helloworld;

import java.util.ArrayList;
import java.util.HashMap;
import java.util.List;
import java.util.Map;
import android.os.Bundle;
import android.app.Activity;
import android.view.Menu;
import android.view.View;
import android.widget.AdapterView;
import android.widget.AdapterView.OnItemClickListener;
import android.widget.AdapterView.OnItemSelectedListener;
import android.widget.ListView;
import android.widget.SimpleAdapter;

public class SimpleAdapterTest extends Activity {
   private String[] names=new String[]{"虎头","弄玉","李清照","李白"};
   private String[] descs=new String[]
           {"可爱的小孩","一个擅长音乐的小孩", "一个擅长文学的小孩","浪漫主义诗人"};
   private int[] imageIds=new int[]{R.drawable.tiger,
                                    R.drawable.nongyu,
                                    R.drawable.qingzhao,
                                    R.drawable.libai};

    @Override
    protected void onCreate(Bundle savedInstanceState) {
        super.onCreate(savedInstanceState);
        setContentView(R.layout.simple_adapter_test);
        //创建一个List集合,List集合的元素是Map
        List<Map<String,Object>> listItems=new ArrayList<Map<String,Object>>();

        for(int i=0;i<names.length;i++)
        {
            Map<String,Object> listItem=new HashMap<String,Object>();
            listItem.put("header", imageIds[i]);
            listItem.put("personName",names[i]);
            listItem.put("desc", descs[i]);
            listItems.add(listItem);
        }
        //创建一个SimpleAdapter
        SimpleAdapter simpleAdapter=new SimpleAdapter(this,listItems,R.layout.simple_item,
                new String[]{"personName","header","desc"},
                new int[]{R.id.name,R.id.header,R.id.desc});
        ListView list=(ListView)findViewById(R.id.mylist);
        //为ListView设置Adapter
        list.setAdapter(simpleAdapter);
        //为ListView的列表项的单击事件绑定事件监听器
        list.setOnItemClickListener(new OnItemClickListener(){

            @Override
            public void onItemClick(AdapterView<?> parent, View view, int position,
                    long id) {
                // TODO Auto-generated method stub
                   System.out.println(names[position]+"被点击了");
            }});
        //为ListView的列表项的选中事件绑定事件监听器
        list.setOnItemSelectedListener(new OnItemSelectedListener(){

            @Override
            public void onItemSelected(AdapterView<?> parent, View view,
                    int position, long id) {
                // TODO Auto-generated method stub
                System.out.println(names[position]+"被选中了");
            }

            @Override
            public void onNothingSelected(AdapterView<?> parent) {
                // TODO Auto-generated method stub

            }

        });
    }

    @Override
    public boolean onCreateOptionsMenu(Menu menu) {
        // Inflate the menu; this adds items to the action bar if it is present.
        getMenuInflater().inflate(R.menu.simple_adapter_test, menu);
        return true;
    }

}
上面的程序关键在于粗体字代码,粗体字代码创建了一个SimpleAdapter。使用SimpleAdapter的最大难点在于创建SimpleAdapter对象,它需要创建5个参数,其中后面4个参数十分关键。
- 第2个参数:该参数应该是一个List<?extends Map<String,?>>类型的集合对象,该集合中每个Map<String,?>对象生成一个列表项。
- 第3个参数:该参数指定一个界面布局的ID。例如此处使用R.layout.simple_item,这意味着使用/res/layout/simple_item.xml文件作为列表项组件。
- 第4个参数:该参数应该是一个String[]类型的参数,该参数决定提取Map<String,?>对象中哪些key对应的value来生成列表项。
- 第5个参数:该参数应该是一个int[]类型的参数,该参数决定填充哪些组件。
从上面的程序看,listItems是一个长度为4的集合,这意味着它生成的ListView将会包含4个列表项,每个列表项都是R.layout.simple_item对应的组件(也就是一个LinearLayout组件)。LinearLayout中包含了3个组件:ID为R.id.header的ImageView组件、ID为R.id.name、R.id.desc的TextView组件,这些组件的内容有ListItems集合提供。
R.layout.simple_item对应的布局文件代码如下。
<?xml version="1.0" encoding="utf-8"?>
<LinearLayout xmlns:android="http://schemas.android.com/apk/res/android"
    android:orientation="horizontal"
    android:layout_width="match_parent"
    android:layout_height="wrap_content"
    >
 <!-- 定义一个ImageView,用于作为列表项的一部分 -->
<ImageView android:id="@+id/header"
    android:layout_width="wrap_content"
    android:layout_height="wrap_content"
    android:paddingLeft="10dp"
    />
<LinearLayout android:orientation="vertical"
    android:layout_width="match_parent"
    android:layout_height="wrap_content">
    <!-- 定义一个TextView,用于作为列表项的一部分 -->
    <TextView android:id="@+id/name"
        android:layout_width="wrap_content"
        android:layout_height="wrap_content"
        android:textSize="20dp"
        android:textColor="#f0f"
        android:paddingLeft="10dp" />
    <!-- 定义一个TextView,用于作为列表项的一部分 -->
    <TextView android:id="@+id/desc"
        android:layout_width="wrap_content"
        android:layout_height="wrap_content"
        android:textSize="14dp"
        android:paddingLeft="10dp"/>
</LinearLayout>
</LinearLayout>
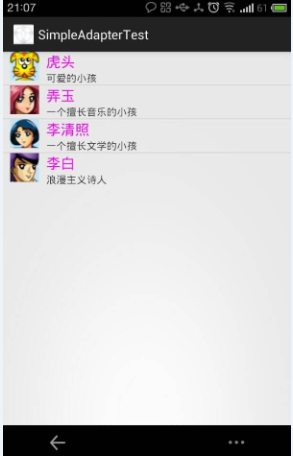
举例来说,上面SimpleAdapter将会生成4个列表项,其中第一个列表项组件是一个LinearLayout组件,第一个列表项的数据是{“personName”="虎头","header"="R.id.tiger","desc"="可爱的小孩"}Map集合。创建SimpleAdapter时第5个参数、第4个参数指定使用ID为R.id.name组件显示personName对应的值、使用ID为R.id.header组件显示header对应的值、使用ID为R.id.desc显示desc对应的值,这样第一个列表项组件所包含的三个组件都有了显示内容。后面的每个列表项依次类推。
运行上面的程序将看到下图所示的效果。
SimpleAdapter同样可以作为ListActivity的内容Adapter,这样可以让用户方便地定制ListActivity所显示的列表项。
如果需要监听用户单击、选中某个列表项的组件,可以通过AdapterView的setOnItemClickListener()方法为单击事件添加监听器,或通过setOnItemSelectedListener()方法为列表项的选中事件添加监听器。
再次运行上面程序,如果单击列表项或选中列表项,将可以看到LogCa控制有如图所示的输出。
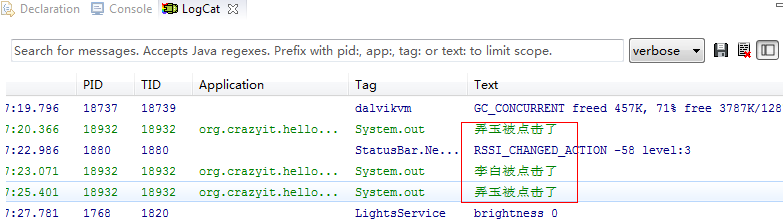
提示:上面的程序为ListView的列表项单击事件、列表项选中事件绑定了事件监听器,但事件监听器只是简单地在LogCat控制台输出一行内容。实际项目中我们可以在事件处理方法中做“任何”事情。不仅如此,上面绑定事件监听器的setOnItemClickListener、setOnItemSelectedListener方法都来自于AdapterView,因此这种事件处理机制完全适用于AdapterView的其他子类。