最近在研究这个,等我有时间来写吧!
终于在端午节给自己放个假,现在就来说说关于android蓝牙ble的
最近的学习成果吧!!
需要材料(写个简单教程吧~~关于小米手环的哦!嘿嘿)
Android 手机一部 要求android 4.3 系统以上
小米手环一个 一代最好 (我手里只有一代的 , 二代有没有修改uuid 我不清楚)
首先说明想要使用android做蓝牙ble的开发首先需要Android 4.3以上的系统哦!这个应该不难,目前大部分Android手机都比这个版本高吧
下面就让我们开始吧~
首先先了解下基础知识!看看系统先帮我们做好了那些事情吧!~
上图!!
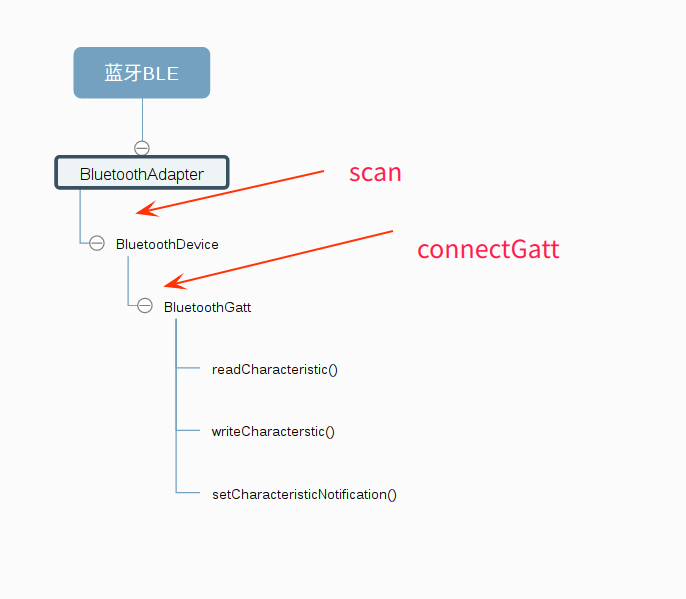
这些是Android 系统为我们做的事
首先看BluetoothAdapter
这是系统提供的蓝牙适配器。在使用手机的蓝牙功能前一定是要先获取的。
该适配器提供了一个扫描方法( bluetoothAdapter.startLeScan(callback) ),可以用它来获取蓝牙设备。是不是很贴心啊~~
扫描完设备之后 回调方法中会得到扫描到的设备信息放在bluetoothdevice中
选择我们需要的设备后可以通过 bluetoothdevice的connectGatt方法连接设备。
哎呀~说的太复杂。还是在项目里说明吧!
先布局:

就简单的做成这样的。
小米手环有震动 和计步的功能,我们就在下面展示下计步和电池电量。
主要玩它的震动功能~嘿嘿~~~
简单的写个线性布局。
activity_main.xml


<?xml version="1.0" encoding="utf-8"?>
<LinearLayout xmlns:android="http://schemas.android.com/apk/res/android"
    xmlns:tools="http://schemas.android.com/tools"
    android:layout_width="match_parent"
    android:layout_height="match_parent"
    android:orientation="vertical"
    tools:context="com.wbnq.shouhuan.MainActivity">

    <Button
        android:id="@+id/saomiao"
        android:layout_width="match_parent"
        android:layout_height="wrap_content"
        android:text="扫描设备"/>
    <Button
        android:id="@+id/zhendong"
        android:layout_width="match_parent"
        android:layout_height="wrap_content"
        android:text="短震 / 嘿嘿嘿"/>
    <Button
        android:id="@+id/changzhen"
        android:layout_width="match_parent"
        android:layout_height="wrap_content"
        android:text="长震 / 呵呵呵"/>
    <Button
        android:id="@+id/buting"
        android:layout_width="match_parent"
        android:layout_height="wrap_content"
        android:text="不要停 / 哈哈哈"/>
    <Button
        android:id="@+id/tingxia"
        android:layout_width="match_parent"
        android:layout_height="wrap_content"
        android:text="停下来 / ~~"/>

    <TextView
        android:id="@+id/jibu"
        android:layout_width="match_parent"
        android:layout_height="wrap_content"
        android:text="走了多少步:"
        android:gravity="center"
        android:textSize="20dp"/>


    <TextView
        android:id="@+id/dianliang"
        android:layout_width="match_parent"
        android:layout_height="wrap_content"
        android:text="电池电量"
        android:gravity="center"
        android:textSize="20dp"/>

    <TextView
        android:id="@+id/lianjiezhuangtai"
        android:layout_width="match_parent"
        android:layout_height="wrap_content"
        android:text="连接状态:未连接"
        android:gravity="center"
        android:textSize="20dp"/>


</LinearLayout>
正戏来啦:
MainActivity.java:
public class MainActivity extends AppCompatActivity implements View.OnClickListener{

    private Button saomiao , duanzhen , changzhen , buting , tingxia;
    private TextView jibu , dianliang , lianjiezhuangtai;

    BluetoothAdapter bluetoothAdapter;
    @Override
    protected void onCreate(Bundle savedInstanceState) {
        super.onCreate(savedInstanceState);
        setContentView(R.layout.activity_main);

        initView();

        //蓝牙管理,这是系统服务可以通过getSystemService(BLUETOOTH_SERVICE)的方法获取实例
        BluetoothManager bluetoothManager = (BluetoothManager) getSystemService(BLUETOOTH_SERVICE);
        //通过蓝牙管理实例获取适配器,然后通过扫描方法(scan)获取设备(device)
        bluetoothAdapter = bluetoothManager.getAdapter();


    }

    private void initView() {
        saomiao = (Button) findViewById(R.id.saomiao);
        duanzhen = (Button) findViewById(R.id.zhendong);
        changzhen = (Button) findViewById(R.id.changzhen);
        buting = (Button) findViewById(R.id.buting);
        tingxia = (Button) findViewById(R.id.tingxia);

        jibu = (TextView) findViewById(R.id.jibu);
        dianliang = (TextView) findViewById(R.id.dianliang);
        lianjiezhuangtai = (TextView) findViewById(R.id.lianjiezhuangtai);


    }

    @Override
    public void onClick(View view) {
        switch (view.getId()){
            case R.id.saomiao:

                break;
            case R.id.zhendong:

                break;
            case R.id.changzhen:

                break;
            case R.id.buting:

                break;
            case R.id.tingxia:

                break;

        }
    }
}
这个是基本框架。
我们看到在onCreate方法中 我们获取了
BluetoothManager实例,并通过该实例获取了系统的蓝牙适配器
bluetoothAdapter
        //蓝牙管理,这是系统服务可以通过getSystemService(BLUETOOTH_SERVICE)的方法获取实例
        BluetoothManager bluetoothManager = (BluetoothManager) getSystemService(BLUETOOTH_SERVICE);
        //通过蓝牙管理实例获取适配器,然后通过扫描方法(scan)获取设备(device)
        bluetoothAdapter = bluetoothManager.getAdapter();
另外,想要正常执行的话还需要添加必须的权限:(目前需要的,后面还会加入新权限)
<uses-permission android:name="android.permission.BLUETOOTH" />
    <uses-permission android:name="android.permission.BLUETOOTH_ADMIN" />
下面我们来实现扫描方法吧!
首先,想要实现扫描功能自然要先打开蓝牙啦!!
请求开启蓝牙的代码:
//开始扫描前开启蓝牙
Intent turn_on = new Intent(BluetoothAdapter.ACTION_REQUEST_ENABLE);
startActivityForResult(turn_on, 0);
Toast.makeText(MainActivity.this, "蓝牙已经开启", Toast.LENGTH_SHORT).show();
因为扫描是个耗时操作,所以最好把它写在线程当中:
Thread scanThread = new Thread(new Runnable() {
                    @Override
                    public void run() {
                        Log.i("TAG", "run: saomiao ...");
                        saomiao();
                    }
                });
扫描方法:
public void saomiao(){
        deviceList.clear();
        bluetoothAdapter.startLeScan(callback);
    }
代码很简单是吧!的确~
deviceList是个bluetoothdevice的数组(List<BluetoothDevice> deviceList = new ArrayList<>();)
用来存放扫描来的所有device。用之前当然要先清理(clear)一下啦~
然后使用 bluetoothAdapter提供的扫描方法扫描蓝牙ble设备(这里当然就是小米手环啦)
扫描方法有个回调:
//扫描回调
public BluetoothAdapter.LeScanCallback callback = new BluetoothAdapter.LeScanCallback() {
    @Override
    public void onLeScan(final BluetoothDevice bluetoothDevice, int i, byte[] bytes) {
        Log.i("TAG", "onLeScan: " + bluetoothDevice.getName() + "/t" + bluetoothDevice.getAddress() + "/t" + bluetoothDevice.getBondState());

        //重复过滤方法,列表中包含不该设备才加入列表中,并刷新列表
        if (!deviceList.contains(bluetoothDevice)) {
            //将设备加入列表数据中
            deviceList.add(bluetoothDevice);
        }

    }
};
将前面扫描到的数据放进deviceList列表中。
这里如果直接运行的话肯定会弹出个要获取位置的错误。不多说
为项目添加位置权限:
    <!-- Android6.0 蓝牙扫描才需要-->
    <uses-permission-sdk-23 android:name="android.permission.ACCESS_COARSE_LOCATION"/>
    <uses-permission android:name="android.permission.ACCESS_COARSE_LOCATION"/>
为啥要位置权限我也不清楚。还需要研究呢。
现在已经可以扫描咯!
看看都扫描到那些设备把:

千万别以为我有那么多蓝牙设备哦!其实仔细看原来只有两个~~
没错~一个是手环另一个是其他蓝牙ble设备,为啥会出来这么多呢?
因为每个开着的蓝牙ble设备一直都在以固定的频率发出服务(例如1s/1次)以便手机搜索到该设备
所以这个扫描我们才要写进线程里啊~~
那如何停止扫描呢?很简单哦!
开启扫描的方法记得么?
bluetoothAdapter.startLeScan(callback);
关闭的方法基本一样,系统也提供了对应的停止方法:
bluetoothAdapter.stopLeScan(callback);
很方便吧?
下一节我们让设备在手机上以列表形式显示出来吧~~
大家加油啦~~~
android 系统调用shell脚本