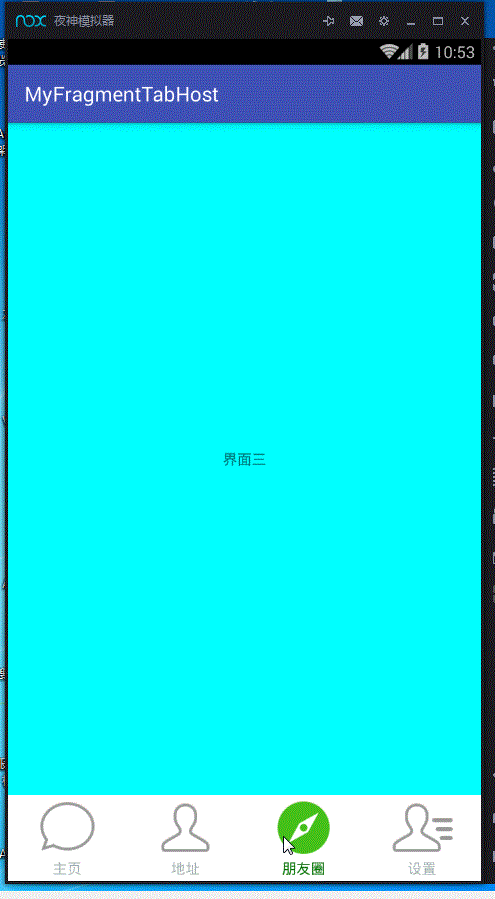
1,在商城类的项目中我们开始一个项目的时候经常出现这样的需求,如下图所示:
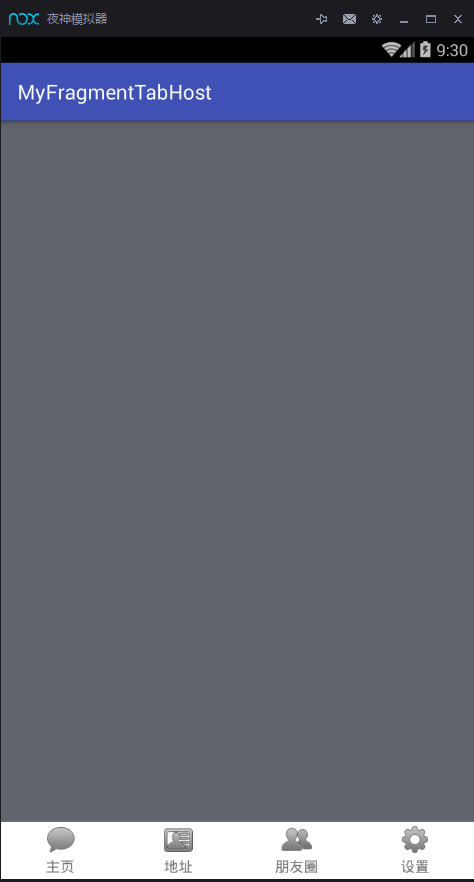
下面使用户可以切换的模块,上面是对应的模块的详细内容,实现这个效果有很多方式,可以使用radiobutton+fragment来实现,也可以用LinearLayout+fragment来实现,但是如何很快速的把我们的ui框架给搭建起来呢,今天就给大家介绍使用Fragment+FragmentTabHost来实现。
2,说一下FragmentTabHost实现的步骤吧:
①、Activity要继承FragmentActivity
②、调用FragmentTabHost的setup()方法
③、添加TabSpec
ok,那让我们一起来实现一下吧
首先,创建布局文件,可以看到,由于我们的fragment要放在FragmentTabHost的上面,所以创建了一个realtabcontent,但是官网给的给的FragmentTabHost的使用方法是必须在这个控件里面放一个fragment,那我们就来放一个假的fragment吧。布局代码如下:
<?xml version="1.0" encoding="utf-8"?>
<LinearLayout
    xmlns:android="http://schemas.android.com/apk/res/android"
    xmlns:tools="http://schemas.android.com/tools"
    android:layout_width="match_parent"
    android:layout_height="match_parent"
    android:orientation="vertical"
    tools:context="com.wangjitao.myfragmenttabhost.MainActivity">

    <FrameLayout
        android:id="@+id/realtabcontent"
        android:layout_width="match_parent"
        android:layout_height="0dp"
        android:layout_weight="1"
        android:background="@color/white"
        />
    <android.support.v4.app.FragmentTabHost
        android:layout_width="match_parent"
        android:layout_height="wrap_content"
        android:id="@+id/tabhost"
        android:background="@color/white"
        >
        <FrameLayout
            android:id="@android:id/tabhost"
            android:layout_width="0dp"
            android:layout_height="0dp"
            android:layout_weight="0"
            />
    </android.support.v4.app.FragmentTabHost>

</LinearLayout>
然后我们要创建一个MainActivity,需要的是继承Fragment ,由于我们的AppCompatActivity是继承Fragment的(不知道的同学可以去看一下源码),所以我们直接去继承一下AppCompatActivity就行,这就实现了我们使用FragmentTabHost使用的第一个要求,然后找到我们的FragmentTabHost,调用其setup()方法
mTabHost.setup(this, getSupportFragmentManager(), R.id.realtabcontent);
可以看到,第一个参数是上下文环境,第二个参数是我们的FragmentManager,第三个参数是要与我们FragmentTabHost切换的同步的Fragment,ok这样我们的第二个要求就写完成了。然后是我们的四三个要求,添加TabSpec,代码如下:
mTabHost.addTab(mTabHost.newTabSpec(getString(mTabs.get(i).getTitle())).setIndicator(view),
                    mTabs.get(i).getFragment(), null);
首先我们要创建一个TabSpec,所以调用TabHost.newTabSpec(我们tab的title).setIndicator(对应的图标和文字的布局)
来看一下我们view的布局,很简单的,就是一个图标和一个textview
<?xml version="1.0" encoding="utf-8"?>
<LinearLayout xmlns:android="http://schemas.android.com/apk/res/android"
              android:layout_width="match_parent"
              android:layout_height="match_parent"
              android:layout_gravity="center"
              android:gravity="center"
              android:orientation="vertical"
              android:paddingBottom="3dp"
              android:paddingTop="3dp"
    >

    <ImageView
        android:id="@+id/icon_tab"
        android:layout_width="wrap_content"
        android:layout_height="wrap_content"
        />

    <TextView
        android:id="@+id/txt_indicator"
        android:layout_width="wrap_content"
        android:layout_height="wrap_content"
        android:layout_marginTop="2dp"
        android:textColor="@color/selector_tab_text"
        />
</LinearLayout>
ok,由于一个Tab对应的有一个title,一个icon,一个对应的fragment,所以我们可以把这个Tab抽出来,创建出来这个对象Tab.java
package com.wangjitao.myfragmenttabhost.bean;

/**
 * Created by jh on 2016/5/10.
 */
public class Tab {
    private int title ;
    private int icon ;
    private Class fragment ;

    public Tab(int title, int icon, Class fragment) {
        this.title = title;
        this.icon = icon;
        this.fragment = fragment;
    }

    public int getTitle() {
        return title;
    }

    public void setTitle(int title) {
        this.title = title;
    }

    public int getIcon() {
        return icon;
    }

    public void setIcon(int icon) {
        this.icon = icon;
    }

    public Class getFragment() {
        return fragment;
    }

    public void setFragment(Class fragment) {
        this.fragment = fragment;
    }
}
ok,这样的话加上我们的选择器和对应的fragment,代码基本上就ok了
就简单的贴一个例子选择器和fragment代码就行了
TabHome.java
package com.wangjitao.myfragmenttabhost.fragment;

import android.os.Bundle;
import android.support.annotation.Nullable;
import android.support.v4.app.Fragment;
import android.view.LayoutInflater;
import android.view.View;
import android.view.ViewGroup;

import com.wangjitao.myfragmenttabhost.R;

/**
 * Created by jh on 2016/5/10.
 */
public class HomeFragment extends Fragment {
    @Nullable
    @Override
    public View onCreateView(LayoutInflater inflater, ViewGroup container, Bundle savedInstanceState) {
        View view = inflater.inflate(R.layout.tab_home, null);
        return view;
    }
}
对应的图片的selector
<?xml version="1.0" encoding="utf-8"?>
<selector xmlns:android="http://schemas.android.com/apk/res/android">

    <item android:drawable="@drawable/weixin_pressed" android:state_selected="true"/>
    <item android:drawable="@drawable/weixin_normal"/>

</selector>
再加上对应的文字的selector
<?xml version="1.0" encoding="utf-8"?>
<selector xmlns:android="http://schemas.android.com/apk/res/android">
   <item android:color="#0c760c" android:state_selected="true"/>
    <item android:color="#0c760c" android:state_active="true"/>
    <item android:color="#a9b7b7" android:state_selected="false"/>
    <item android:color="#a9b7b7" android:state_active="false"/>
</selector>
MainActivity.java
package com.wangjitao.myfragmenttabhost;

import android.content.Context;
import android.media.Image;
import android.support.v4.app.FragmentTabHost;
import android.support.v7.app.AppCompatActivity;
import android.os.Bundle;
import android.view.LayoutInflater;
import android.view.View;
import android.widget.ImageView;
import android.widget.LinearLayout;
import android.widget.TextView;

import com.wangjitao.myfragmenttabhost.bean.Tab;
import com.wangjitao.myfragmenttabhost.fragment.AddressFragment;
import com.wangjitao.myfragmenttabhost.fragment.FindFriendFragment;
import com.wangjitao.myfragmenttabhost.fragment.HomeFragment;
import com.wangjitao.myfragmenttabhost.fragment.SettingsFragment;

import java.util.ArrayList;
import java.util.List;

public class MainActivity extends AppCompatActivity {

    private Context mContext = MainActivity.this ;
    private FragmentTabHost mTabHost ;
    private LayoutInflater mInflater ;
    private List<Tab> mTabs = new ArrayList<>();
    @Override
    protected void onCreate(Bundle savedInstanceState) {
        super.onCreate(savedInstanceState);
        setContentView(R.layout.activity_main);

        //1,activity 继承FragmentActivity  AppCompatActivity本身就是继承的FragmentActivity

        //2,调用FragmentTabHost的setup方法

//        View view = mInflater.inflate(R.layout.tab_indicator,null) ;
//        ImageView img = (ImageView) view.findViewById(R.id.icon_tab);
//        TextView tex = (TextView) view.findViewById(R.id.txt_indicator);
//
//
//        img.setImageResource(R.mipmap.tab_address_normal);
//        tex.setText("主页");
//
//        mTabHost.addTab(mTabHost.newTabSpec("home").setIndicator(view), HomeFragment.class, null);

        initTab();
    }

    private void initTab() {
        mInflater = LayoutInflater.from(this);

        mTabHost = (FragmentTabHost) findViewById(R.id.tabhost);
        mTabHost.setup(this, getSupportFragmentManager(), R.id.realtabcontent);

        Tab tab_nome = new Tab(R.string.home,R.drawable.tab_weixin,HomeFragment.class) ;
        Tab tab_address = new Tab(R.string.address,R.drawable.tab_profile,AddressFragment.class) ;
        Tab tab_find_friend = new Tab(R.string.findfriend,R.drawable.tab_find,FindFriendFragment.class) ;
        Tab tab_setting = new Tab(R.string.setting,R.drawable.tab_contact_list,SettingsFragment.class) ;

        mTabs.add(tab_nome);
        mTabs.add(tab_address);
        mTabs.add(tab_find_friend);
        mTabs.add(tab_setting);

        for (int i = 0 ; i < mTabs.size() ;i++ ){
            View view = mInflater.inflate(R.layout.tab_indicator,null) ;
            ImageView img = (ImageView) view.findViewById(R.id.icon_tab);
            TextView tex = (TextView) view.findViewById(R.id.txt_indicator);


            img.setImageResource(mTabs.get(i).getIcon());
            tex.setText(mTabs.get(i).getTitle());

            mTabHost.addTab(mTabHost.newTabSpec(getString(mTabs.get(i).getTitle())).setIndicator(view),
                    mTabs.get(i).getFragment(), null);
        }

        mTabHost.getTabWidget().setShowDividers(LinearLayout.SHOW_DIVIDER_NONE);
        mTabHost.setCurrentTab(0);
    }
}
ok ,这样就完全实现了,看一下效果图(丑哭了,找不到好的UI图 流泪):