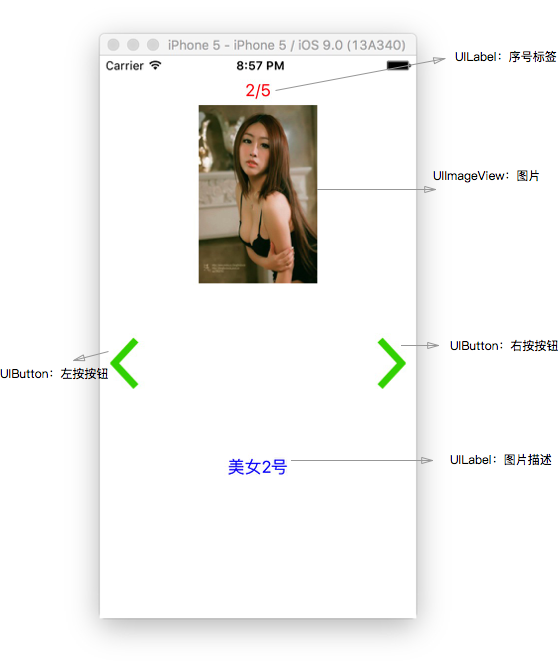
一、程序功能分析
1)点击左右箭头切换图片、序号、描述;
2)如果是首张图片,左边箭头失效;
3)如果是最后一张图片,右边箭头失效。
二、程序实现
定义确定图片位置、大小的常量:
1 //ViewController.m
2 CGFloat const POTOIMAGEWIDTH = 120.0;       //图片宽度
3 CGFloat const POTOIMAGEHEIGHT = 180.0;      //图片高度
4 CGFloat const POTOIMAGEX = 100;             //图片X轴坐标
5 CGFloat const POTOIMAGEY = 50;              //图片Y轴坐标
定义相关的属性:
1 //ViewController.m
2 @interface ViewController ()
3 @property (nonatomic, strong) UILabel *firstLabel;          //显示图片的序号
4 @property (nonatomic, strong) UILabel *lastLabel;           //显示图片内容描述
5 @property (nonatomic, strong) UIImageView *imageIcon;       //图片
6 @property (nonatomic, strong) UIButton *leftButton;         //左翻按钮
7 @property (nonatomic, strong) UIButton *rightButton;        //右翻按钮
8 @property (nonatomic, assign) int i;        //标记所显示图片的序号,从0开始
9 @end
重写 viewDidLoad 方法,用代码创建控件:
 1 //ViewController.m
 2 - (void)viewDidLoad {
 3     [super viewDidLoad];
 4     self.i = 0;
 5
 6     //创建显示图片序号的UILabel控件
 7     UILabel *headLabel = [[UILabel alloc] initWithFrame:CGRectMake(10, 20, 300, 30)];
 8     [headLabel setTextAlignment:NSTextAlignmentCenter];     //居中显示
 9     [headLabel setTextColor:[UIColor redColor]];            //设置字符颜色
10     [self.view addSubview:headLabel];
11     self.firstLabel = headLabel;
12
13     //创建一个装载图片的控件
14     UIImageView *potoImage = [[UIImageView alloc] initWithFrame:CGRectMake(POTOIMAGEX, POTOIMAGEY, POTOIMAGEWIDTH, POTOIMAGEHEIGHT)];
15     UIImage *image = [UIImage imageNamed:@"beauty0"];
16     potoImage.image = image;
17     [self.view addSubview:potoImage];
18     self.imageIcon = potoImage;
19
20     //创建图片下边用来描述图片信息的UILabel控件
21     UILabel *descLabel = [[UILabel alloc] initWithFrame:CGRectMake(10, 400, 300, 30)];
22     [descLabel setTextAlignment:NSTextAlignmentCenter];
23     [descLabel setTextColor:[UIColor blueColor]];
24     [self.view addSubview:descLabel];
25     self.lastLabel = descLabel;
26
27     //创建两个方向键按钮
28     UIButton *leftButton = [UIButton buttonWithType:UIButtonTypeCustom];
29     leftButton.frame = CGRectMake(10, self.view.center.y, 30, 53);
30     [leftButton setBackgroundImage:[UIImage imageNamed:@"leftRow"] forState:UIControlStateNormal];
31     [self.view addSubview:leftButton];
32     self.leftButton = leftButton;
33     [leftButton addTarget:self action:@selector(leftClicked:) forControlEvents:UIControlEventTouchUpInside];
34
35     UIButton *rightButton = [UIButton buttonWithType:UIButtonTypeCustom];
36     rightButton.frame = CGRectMake(280, self.view.center.y, 30, 53);
37     [rightButton setBackgroundImage:[UIImage imageNamed:@"rightRow"] forState:UIControlStateNormal];
38     [self.view addSubview:rightButton];
39     self.rightButton = rightButton;
40     [rightButton addTarget:self action:@selector(rightClicked:) forControlEvents:UIControlEventTouchUpInside];
41
42     [self change];   //初始化界面
43 }
下面实现 change 方法,每次调用该方法,将按照 self.i 的大小显示相应的图片及其他内容:
 1 //视图内容更新与显示
 2 - (void)change {
 3     [self.firstLabel setText:[NSString stringWithFormat:@"%d/5", self.i+1]];
 4     switch (self.i) {
 5         case 0:
 6             self.lastLabel.text = @"美女1号";
 7             self.imageIcon.image = [UIImage imageNamed:@"beauty0"];
 8             break;
 9         case 1:
10             self.lastLabel.text = @"美女2号";
11             self.imageIcon.image = [UIImage imageNamed:@"beauty1"];
12             break;
13         case 2:
14             self.lastLabel.text = @"美女3号";
15             self.imageIcon.image = [UIImage imageNamed:@"beauty2"];
16             break;
17         case 3:
18             self.lastLabel.text = @"美女4号";
19             self.imageIcon.image = [UIImage imageNamed:@"beauty3"];
20             break;
21         case 4:
22             self.lastLabel.text = @"美女5号";
23             self.imageIcon.image = [UIImage imageNamed:@"beauty4"];
24             break;
25     }
26     self.leftButton.enabled = (self.i != 0);        //显示第1张图片时,左翻按钮失效
27     self.rightButton.enabled = (self.i != 4);       //显示第5张图片时,右翻按钮失效
28 }
实现 self.leftButton 的响应事件 leftClicked:
1 - (void)leftClicked:(UIButton *)button {
2     self.i--;
3     [self change];
4 }
实现 self.rightButton 的响应事件 rightClicked:
1 - (void)rightClicked:(UIButton *)button {
2     self.i++;
3     [self change];
4 }
参考博客:iOS开发UI篇—简单的浏览器查看程序