迁移
简介
所谓迁移就像是数据库的版本控制,这种机制允许团队简单轻松的编辑并共享应用的数据库表结构。迁移通常和 Laravel 的 schema 构建器结对从而可以很容易地构建应用的数据库表结构。如果你曾经频繁告知团队成员需要手动添加列到本地数据库表结构以维护本地开发环境,那么这正是数据库迁移所致力于解决的问题。
Laravel 的 Schema 门面提供了与数据库系统无关的创建和操纵表的支持,在 Laravel 所支持的所有数据库系统中提供一致的、优雅的、流式的 API。
生成迁移
使用 Artisan 命令 make:migration 就可以创建一个新的迁移:
php artisan make:migration create_users_table
新的迁移位于 database/migrations 目录下,每个迁移文件名都包含时间戳从而允许 Laravel 判断其顺序。
--table 和 --create 选项可以用于指定表名以及该迁移是否要创建一个新的数据表。这些选项只需要简单放在上述迁移命令后面并指定表名:
php artisan make:migration create_users_table --create=users
php artisan make:migration add_votes_to_users_table --table=users
如果你想要指定生成迁移的自定义输出路径,在执行 make:migration 命令时可以使用 --path 选项,提供的路径应该是相对于应用根目录的。
迁移结构
迁移类包含了两个方法:up 和 down。up 方法用于新增表,列或者索引到数据库,而 down 方法就是 up 方法的逆操作,和 up 里的操作相反。
数据库迁移
配置数据库连接
首先在 .env 中配置数据库连接信息
DB_CONNECTION=mysql
DB_HOST=127.0.0.1
DB_PORT=3306
DB_DATABASE=news
DB_USERNAME=root
DB_PASSWORD=root
创建数据库迁移文件
运行如下命令,创建数据库迁移文件
php artisan make:migration create_post_table
编辑数据库迁移文件
 public function up()
    {
        Schema::create('post', function (Blueprint $table) {
            $table->increments('id');
            $table->string("title")->default('');
            $table->string("content")->default('');
            $table->timestamps();
        });
    }
运行数据库迁移文件
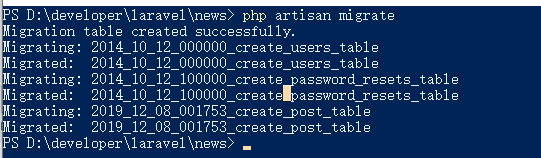
运行如下命令,执行数据库迁移文件
php artisan migrate
可能会出现如下的错误提示

错误原因在于laravel 框架赋予字段你的默认长度超过了mysql数据库允许的字段的最大长度,解决方法是设置 laravel 框架中字段的默认长度不要超过mysql 的长度
在 appproviders 目录下的 AppServiceProvider 文件中的 boot 函数中,加入如下代码
 public function boot()
    {
        // 设置字段默认长度
        Schema::defaultStringLength(200);
    }
重新运行如下的命令
php artisan migrate
又出现错误如下
SQLSTATE[42S01]: Base table or view already exists: 1050 Table 'users' already exists
原因在于数据库中已经存在响应的表了,删除这些表,然后重新执行数据库迁移文件
如何添加新的字段
现在想为 Post 表添加一个字段

代码修改好后,重新运行数据库迁移
php artisan migrate
提示没有迁移任何内容
解决方案是在数据库中删除 post 表,并将 migrations 表中的对应数据删除,然后重新运行数据库迁移即可
再创建新的表
创建数据库迁移文件
php artisan make:migration post_type_table
修改数据库迁移文件
class PostTypeTable extends Migration
{
    /**
     * Run the migrations.
     *
     * @return void
     */
    public function up()
    {
        Schema::create('post_type', function (Blueprint $table) {
            $table->increments('id');
            $table->string("title")->default('');
            $table->timestamps();
        });
    }

    /**
     * Reverse the migrations.
     *
     * @return void
     */
    public function down()
    {
        Schema::dropIfExists('post_type');
    }
}
执行数据库迁移
php artisan migrate
7.2 梳理步骤
创建数据库
news
配置数据库连接信息
.env 中配置
DB_CONNECTION=mysql
DB_HOST=127.0.0.1
DB_PORT=3306
DB_DATABASE=news
DB_USERNAME=root
DB_PASSWORD=root
创建数据库迁移文件
 public function up()
    {
        // 创建数据库
        Schema::create('post', function (Blueprint $table) {
            // 创建 id 字段,并设置为主键,且自动增长
            $table->increments('id');
            // 创建title字段,类型为varchar类型,长度100,且默认值为空字符串
            $table->string('title',100)->default('');
            $table->string('content')->default('');
            $table->integer('user_id')->default(0);
            $table->timestamps();
        });
    }
设置默认长度
AppProvidersAppServiceProvder.php 中设置

 public function boot()
    {
        // 设置字段默认长度
        Schema::defaultStringLength(200);
    }
运行数据库迁移
php artisan migrate
展示文章新闻
创建模型
php artisan make:model Post
创建控制器
php artisan make:controller PostController
编写控制器中的 index 方法
展示文章列表
public function index()
{
    $posts=Post::all();
    return view('post/index',['posts'=>$posts]);
}
配置路由
use IlluminateSupportFacadesRoute;
Route::get('/posts','AppHttPControllersPostController@index');
创建视图
在 views 目录下创建 post 目录,然后再post目录下创建 index.blade.php 文件
<div class="container">
<a href="/posts/add">添加文章</a>

<h2>文章列表</h2>
<table class="table">
<tr>
  <th>编号</th>
  <th>标题</th>
  <th>内容</th>
  <th>创建时间</th>
  <th>操作</th>
</tr>
@foreach($posts as $item)
<tr>
  <td>{{$item->id}}</td>
  <td>{{$item->title}}</td>
  <td>{{$item->content}}</td>
  <td>{{$item->created_at}}</td>
  <td>
  <a href="" class="btn btn-info">编辑</a>
  <a href="" class="btn btn-danger">删除</a>
  </td>
</tr>

@endforeach
</table>
</div>
新增数据
注意:以后新增数据要分两个方法进行,一个方法用于展示新增数据的视图;一个方法用于将表达数据源保存到数据库中
add方法
此 方法用于展示新增数据的视图
// 展示添加文章的界面
public function add(){
    return view('post/add');
}
配置路由
// 展示用于添加文章的界面
Route::get('/posts/add','AppHttPControllersPostController@add');
创建视图 add
<!DOCTYPE html>
<html lang="en">
<head>
  <meta charset="UTF-8">
  <meta name="viewport" content="width=device-width, initial-scale=1.0">
  <meta http-equiv="X-UA-Compatible" content="ie=edge">
  <title>Document</title>
  <link href="https://cdn.bootcss.com/twitter-bootstrap/3.3.7/css/bootstrap.min.css" rel="stylesheet">
  <style>
  .box{
    margin-top: 100px;
  }

  </style>
</head>
<body>
<div class="container box">
<form action="/posts" method="post" class="form-horizontal">
  <div class="form-group">
    <label for="title" class="col-sm-2 control-label">标题</label>
    <div class="col-sm-10">
      <input type="text" name="title" id="title" class="form-control">
    </div>
  </div>
  <div class="form-group">
    <label for="content" class="col-sm-2 control-label">内容</label>
    <div class="col-sm-10">
    <textarea class="form-control" name="content" id="content" rows="3"></textarea>
    </div>
  </div>
  <div class="form-group">
    <div class="col-sm-offset-2 col-sm-10">
      <button type="submit" class="btn btn-default">保 存</button>
    </div>
  </div>
</form>
</div>

</body>
</html>
store方法
此方法用于新增数据
// 新增文章
public function store(){
    return 'store';
}
配置路由
// 新增文章数据
Route::post('/posts','AppHttPControllersPostController@stroe');
CSRF
表单中数据如数据,点击保存后,会出现如下错误

解决方案,在新增文章的表单中,加入如下代码

解释:
CSRF:跨站请求伪造,是一种利用服务器对客户端的信任,发起攻击方式
然后修改 store 方法代码,实现新增数据
 public function store()
    {
        $model = new Post();
        $model->title = request('title');
        $model->content = request('content');
        $res = $model->save();
        if ($res) {
            return redirect('/posts');
        } else {
            return redirect('/posts/add');
        }
    }
编辑文章
两个方法
展示待编辑ide数据
更新数据
展示待编辑数据
创建 edite 方法
// 展示待编辑的数据
public function edite(Post $post){
    return view('post/edite',['post'=>$post]);
}
配置路由
// 展示待编辑数据
Route::get('/posts/{post}/edite','AppHttPControllersPostController@edite');
更新 index 视图

创建 edite 视图
直接将 add 视图拷贝过来,为表单控件设置 value 属性即可
<!DOCTYPE html>
<html lang="en">
<head>
  <meta charset="UTF-8">
  <meta name="viewport" content="width=device-width, initial-scale=1.0">
  <meta http-equiv="X-UA-Compatible" content="ie=edge">
  <title>Document</title>
  <link href="https://cdn.bootcss.com/twitter-bootstrap/3.3.7/css/bootstrap.min.css" rel="stylesheet">
  <style>
  .box{
    margin-top: 100px;
  }

  </style>
</head>
<body>
<div class="container box">
<form action="/posts" method="post" class="form-horizontal">
{{csrf_field()}}
  <div class="form-group">
    <label for="title" class="col-sm-2 control-label">标题</label>
    <div class="col-sm-10">
      <input type="text" name="title" id="title" class="form-control" value="{{$post->title}}">
    </div>
  </div>
  <div class="form-group">
    <label for="content" class="col-sm-2 control-label">内容</label>
    <div class="col-sm-10">
    <textarea class="form-control" name="content" id="content" rows="3">
{{$post->content}}
    </textarea>
    </div>
  </div>
  <div class="form-group">
    <div class="col-sm-offset-2 col-sm-10">
      <button type="submit" class="btn btn-default">保 存</button>
    </div>
  </div>
</form>
</div>

</body>
</html>
更新数据
请求方式:
- get:获取数据
- post:新增数据
- put:更新数据
- delete:删除数据
通过form 的 method 属性只能设置 get 和 post 请求,如果设置 put 和 delete 请求
如果确实想发送 put 或者 delete 请求,需要使用表单伪造的方式

创建 update 方法
// 更新数据
public function update(){
    $id=request('id');
    $model=Post::find($id);
    $model->title=request('title');
    $model->content=request('content');
    $res=$model->save();
    if ($res) {
        return redirect('/posts');
    } else {
        return redirect('/posts/'.$id.'/edite');
    }

}
配置路由
// 更新文章数据
Route::put('/posts','AppHttPControllersPostController@update');
7.6 删除文章信息
创建方法
// 删除文章数据
public function delete(Post $post)
{
    $res = $post->delete();
    return redirect('/posts');

    // $model=Post::find($post);
    // $model->delete();
}
配置路由
// 删除数据
Route::get('/posts/{post}/delete','AppHttPControllersPostController@delete');
修改 index.blade.php 中的 删除 按钮
