前面讲的是处理简单类型,今天这里来讲下CXF处理JavaBean以及复合类型,比如集合;
这里实例是客户端传一个JavaBean,服务器端返回集合类型;
在原来的项目实例基础上,我们先创建一个实体类User:
package com.wishwzp.entity;

/**
 * 用户实体类
 * @author Administrator
 *
 */
public class User {

    private Integer id; // 编号
    private String userName; // 用户名
    private String password; // 密码

    public Integer getId() {
        return id;
    }
    public void setId(Integer id) {
        this.id = id;
    }
    public String getUserName() {
        return userName;
    }
    public void setUserName(String userName) {
        this.userName = userName;
    }
    public String getPassword() {
        return password;
    }
    public void setPassword(String password) {
        this.password = password;
    }
}
再创建一个Role实体类:
package com.wishwzp.entity;

/**
 * 角色实体
 * @author Administrator
 *
 */
public class Role {

    private Integer id; // 编号
    private String roleName; // 角色名称

    public Role() {
        super();
        // TODO Auto-generated constructor stub
    }

    public Role(Integer id, String roleName) {
        super();
        this.id = id;
        this.roleName = roleName;
    }

    public Integer getId() {
        return id;
    }
    public void setId(Integer id) {
        this.id = id;
    }
    public String getRoleName() {
        return roleName;
    }
    public void setRoleName(String roleName) {
        this.roleName = roleName;
    }
}
然后HelloWorld再加一个接口方法getRoleByUser,通过用户查找角色:
package com.wishwzp.webservice;

import java.util.List;

import javax.jws.WebService;

import com.wishwzp.entity.Role;
import com.wishwzp.entity.User;

@WebService
public interface HelloWorld {

    public String say(String str);

    public List<Role> getRoleByUser(User user);
}
然后HelloWorld接口实现类 HelloWorldImpl写下新增的方法的具体实现,我们这里写死,模拟下即可:
package com.wishwzp.webservice.impl;

import java.util.ArrayList;
import java.util.List;

import javax.jws.WebService;

import com.wishwzp.entity.Role;
import com.wishwzp.entity.User;
import com.wishwzp.webservice.HelloWorld;

@WebService
public class HelloWorldImpl implements HelloWorld{

    public String say(String str) {
        return "hello " + str;
    }

    public List<Role> getRoleByUser(User user) {
        // TODO Auto-generated method stub
         List<Role> roleList=new ArrayList<Role>();
            // 模拟 直接写死
            if(user!=null){
                if(user.getUserName().equals("wishwzp") && user.getPassword().equals("123456")){
                    roleList.add(new Role(1,"技术总监"));
                    roleList.add(new Role(2,"架构师"));
                }else if(user.getUserName().equals("jack") && user.getPassword().equals("123456")){
                    roleList.add(new Role(3,"程序员"));
                }
                return roleList;
            }else{
                return null;
            }
    }

}
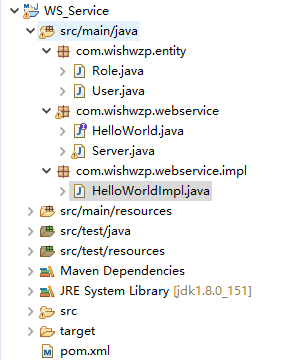
服务端其他地方不用动;
下面我们来处理下客户端,和前面讲的一样。我们用wsdl2java工具重新生成代码,这里就不再讲;
如:
我的地址是:D:eclipse_workspaceWS_Clientsrcmainjava 你们的可能和我不一样:
然后我们进入dos,进入上面的本地硬盘地址,然后执行命令:wsdl2java http://192.168.0.110/helloWorld?wsdl
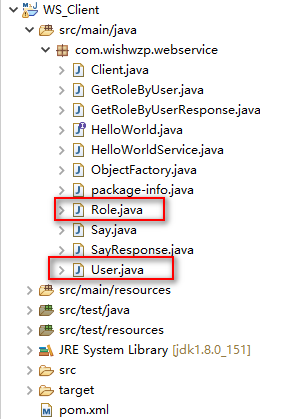
这里我看到,实体类,以及接口实现,代码都生成了。
我们改下Client类:
package com.wishwzp.webservice;

import java.util.List;

public class Client {

    public static void main(String[] args) {
        HelloWorldService service=new HelloWorldService();
        HelloWorld helloWorld=service.getHelloWorldPort();
        //System.out.println(helloWorld.say("wishwzp测试"));
        User user=new User();
        user.setUserName("jack");
        user.setPassword("123456");
        List<Role> roleList=helloWorld.getRoleByUser(user);
        for(Role role:roleList){
            System.out.println(role.getId()+","+role.getRoleName());
        }
    }

}
运行截图:
