公司需要用到备份文件,因此整理了一篇文章,希望对读者有所帮助。
工作环境:
| 主机名 | IP | 操作系统 | 版本 |
| openstack | 192.168.199.7 | rhel7.4 | rsync version 3.0.9 |
| node2 | 192.168.199.8 | rhel7.4 | rsync version 3.0.9 |
rhel7版本已经默认装了rsync。
编译rsync服务的主配置文件:
[root@openstack ~]# vim /etc/rsyncd.conf
1 # /etc/rsyncd: configuration file for rsync daemon mode
2
3 # See rsyncd.conf man page for more options.
4
5 # configuration example:
6
7 uid = nobody
8 gid = nobody
9 address = 192.168.199.7
10 port = 873
11 hosts allow = 192.168.199.8
12 use chroot = yes #用户登录进来只在固定的目录里
13 max connections = 4
14 pid file = /var/run/rsyncd.pid
15 lock file = /var/run/rsyncd.lock
16 log file = /var/run/rsyncd.log
17 motd file = /etc/rsyncd.motd
18 [wwwroot]
19 path = /essfiles/
20 comment = database
21 read only = yes
22 list = yes
23 auth users = rsyncuser
24 secrets file = /etc/rsync.password
[root@openstack ~]# vim /etc/rsync.password
rsyncuser:passwd123
[root@openstack ~]# chmod 600 /etc/rsync.password
[root@openstack ~]# vim /etc/rsyncd.motd
welcome to back zjbq_file
[root@openstack ~]# rsync --daemon
[root@openstack ~]# ps -aux|grep rsync
root 6405 0.0 0.0 114652 312 ? Ss 10:40 0:00 rsync --daemon
root 58231 0.0 0.0 112680 984 pts/2 S+ 13:46 0:00 grep --color=auto rsync
创建需要备份的目录
[root@openstack ~]# mkdir /essfiles/
创建测试数据:
[root@openstack ~]# mkdir /essfiles/{1..10}.txt
[root@openstack ~]# ll /essfiles/
总用量 0
drwxr-xr-x. 2 root root 6 11月 18 13:51 10.txt
drwxr-xr-x. 2 root root 6 11月 18 13:51 1.txt
drwxr-xr-x. 2 root root 6 11月 18 13:51 2.txt
drwxr-xr-x. 2 root root 6 11月 18 13:51 3.txt
drwxr-xr-x. 2 root root 6 11月 18 13:51 4.txt
drwxr-xr-x. 2 root root 6 11月 18 13:51 5.txt
drwxr-xr-x. 2 root root 6 11月 18 13:51 6.txt
drwxr-xr-x. 2 root root 6 11月 18 13:51 7.txt
drwxr-xr-x. 2 root root 6 11月 18 13:51 8.txt
drwxr-xr-x. 2 root root 6 11月 18 13:51 9.txt
然后在备份服务器上进行备份:
[root@node2 ~]# mkdir /essfiles-back/ 创建备份的目录
[root@node2 essfiles-back]# rsync -avz rsyncuser@192.168.199.7::wwwroot /essfiles-back/ 进行备份,此时是需要输入密码的。
welcome to back zjbq_file
Password:
receiving incremental file list
./
1.txt/
10.txt/
2.txt/
3.txt/
4.txt/
5.txt/
6.txt/
7.txt/
8.txt/
9.txt/
sent 105 bytes received 299 bytes 62.15 bytes/sec
total size is 0 speedup is 0.00
[root@node2 essfiles-back]#
[root@node2 essfiles-back]# ll 查看文件已经备份过来了。
总用量 0
drwxr-xr-x. 2 root root 6 11月 18 2018 10.txt
drwxr-xr-x. 2 root root 6 11月 18 2018 1.txt
drwxr-xr-x. 2 root root 6 11月 18 2018 2.txt
drwxr-xr-x. 2 root root 6 11月 18 2018 3.txt
drwxr-xr-x. 2 root root 6 11月 18 2018 4.txt
drwxr-xr-x. 2 root root 6 11月 18 2018 5.txt
drwxr-xr-x. 2 root root 6 11月 18 2018 6.txt
drwxr-xr-x. 2 root root 6 11月 18 2018 7.txt
drwxr-xr-x. 2 root root 6 11月 18 2018 8.txt
drwxr-xr-x. 2 root root 6 11月 18 2018 9.txt
上面的备份是需要输入密码的,此时在本地设置一个密码文件,然后指定密码文件就可以免密了。
[root@node2 ~]# vim /etc/rsync.password
passwd123
[root@node2 essfiles-back]# rm -rf * 删掉之前的数据
[root@node2 essfiles-back]# ll
总用量 0
[root@node2 essfiles-back]# rsync -avz rsyncuser@192.168.199.7::wwwroot --password-file=/etc/rsync.password /essfiles-back/
welcome to back zjbq_file
receiving incremental file list
./
1.txt/
10.txt/
2.txt/
3.txt/
4.txt/
5.txt/
6.txt/
7.txt/
8.txt/
9.txt/
sent 105 bytes received 299 bytes 808.00 bytes/sec
total size is 0 speedup is 0.00
[root@node2 essfiles-back]# ll
总用量 0
drwxr-xr-x. 2 root root 6 11月 18 13:51 10.txt
drwxr-xr-x. 2 root root 6 11月 18 13:51 1.txt
drwxr-xr-x. 2 root root 6 11月 18 13:51 2.txt
drwxr-xr-x. 2 root root 6 11月 18 13:51 3.txt
drwxr-xr-x. 2 root root 6 11月 18 13:51 4.txt
drwxr-xr-x. 2 root root 6 11月 18 13:51 5.txt
drwxr-xr-x. 2 root root 6 11月 18 13:51 6.txt
drwxr-xr-x. 2 root root 6 11月 18 13:51 7.txt
drwxr-xr-x. 2 root root 6 11月 18 13:51 8.txt
drwxr-xr-x. 2 root root 6 11月 18 13:51 9.txt
此时就可以免密备份了。
使用脚本自动备份:
[root@node2 ~]# vim rsync.sh
#!/bin/bash
rsync -avz rsyncuser@192.168.199.7::wwwroot --password-file=/etc/rsync.password /essfiles-back/
[root@node2 ~]# chmod +x rsync.sh
然后加入计划任务就可以实现自动备份了。
rsync+inotify实时同步
Linux 内核从 2.6.13 版本开始提供了 inotify 通知接口,用来监控文件系统的各种变化情况,如文件存取、删除、移动等。利用这一机制,可以非常方便地实现文件异动告警、增量备份,并针对目录或文件的变化及时作出响应。
[root@openstack ~]# uname -r 查看内核版本
3.10.0-693.el7.x86_64
安装inotify-tools工具
可以yum安装也可以进行编译安装
这里进行编译安装
[root@openstack ~]# tar zxvf inotify-tools-3.13.tar.gz -C /usr/local/src/
[root@openstack src]# cd inotify-tools-3.13/
[root@openstack inotify-tools-3.13]# ./configure --prefix=/usr/local/inotify-tools && nake && make install
设置软连接或者加入到环境变量中,这样方便调用。
[root@openstack ~]# tail -n 1 /etc/profile
export PATH=/usr/local/inotify-tools/bin:$PATH
[root@openstack ~]# source /etc/profile 使生效。
或者设置软链接
[root@openstack ~]# ln -s /usr/local/inotify-tools/bin/* /usr/bin/
inotifywait常用参数:
-e 用来指定要监控哪些事件。这些事件包括: create 创建,move 移动,delete 删除,modify 修改文件内容,attrib 属性更改。
-m 表示持续监控
-r 表示递归整个目录
-q 表示简化输出信息。
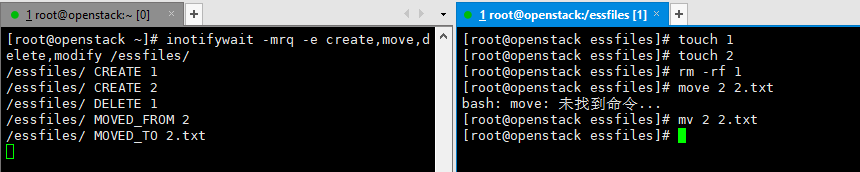
[root@openstack ~]# inotifywait -mrq -e create,move,delete,modify /essfiles/
首先进行一下监测:创建,删除,更改都可以监测到。
使用监本进行自动监测:
先解决免密登录的问题,和备份服务器之间做双机互信
[root@openstack ~]# ssh-keygen
Generating public/private rsa key pair.
Enter file in which to save the key (/root/.ssh/id_rsa):
Enter passphrase (empty for no passphrase):
Enter same passphrase again:
Your identification has been saved in /root/.ssh/id_rsa.
Your public key has been saved in /root/.ssh/id_rsa.pub.
The key fingerprint is:
SHA256:de+jPX1m6c7ycwcgtmCvLhplvv9Y6xV7QG0wJhw1sAE root@openstack
The key's randomart image is:
+---[RSA 2048]----+
| Eo=+* |
| .= = |
| o o o |
| o.oo.o |
| o.S+ oo.. |
| + o =. |
| . . .. o +o.|
| ....o o =o+B|
| ...++o+ . *O=|
+----[SHA256]-----+
[root@openstack ~]# ssh-copy-id 192.168.199.8
/usr/bin/ssh-copy-id: INFO: Source of key(s) to be installed: "/root/.ssh/id_rsa.pub"
The authenticity of host '192.168.199.8 (192.168.199.8)' can't be established.
ECDSA key fingerprint is SHA256:WkwmW0ea32S6aePjAp6PsRwKDPCnGVsnfAhnNzXHr2I.
ECDSA key fingerprint is MD5:a9:66:50:e4:c9:95:5a:cb:50:48:2a:2d:fb:1c:65:d9.
Are you sure you want to continue connecting (yes/no)? yes
/usr/bin/ssh-copy-id: INFO: attempting to log in with the new key(s), to filter out any that are already installed
/usr/bin/ssh-copy-id: INFO: 1 key(s) remain to be installed -- if you are prompted now it is to install the new keys
root@192.168.199.8's password:
Number of key(s) added: 1
Now try logging into the machine, with: "ssh '192.168.199.8'"
and check to make sure that only the key(s) you wanted were added.
[root@openstack ~]#
[root@openstack ~]# vim inotify.sh
#!/bin/bash
SRC=/essfiles/
DST=root@192.168.199.8:/essfiles-back/
/usr/local/inotify-tools/bin/inotifywait -mrq -e create,move,delete ${SRC}| while read file
do
rsync -avz --delete $SRC $DST #若是在生产中,在服务器中删掉文件的话,备份服务器上也会删掉,去掉--delete参数就不会了。
done
[root@openstack ~]# chmod +x inotify.sh
[root@openstack ~]# crontab -e
* * * * * bash /root/inotify.sh
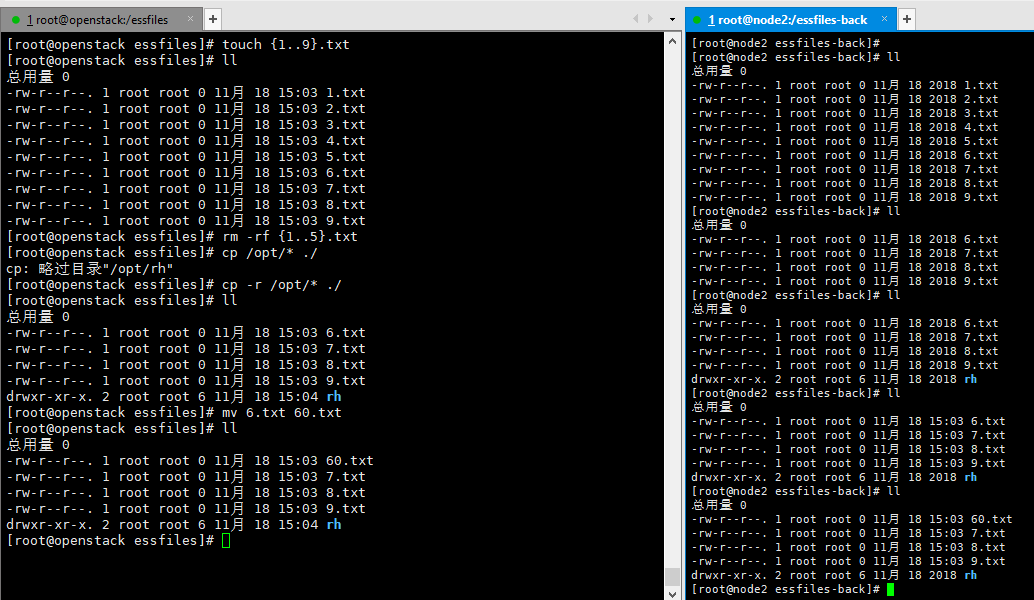
然后运行这个脚本,然后触发动作。
让脚本在后台运行也可以实现该功能。
rsync -avz --delete $SRC $DST >/dev/null 2>&1
nohup /bin/bash inotify.sh 2>1&[root@openstack ~]# ./inotify.sh
[root@openstack essfiles]# touch {1..9}.txt
无论是创建,复制还是修改,备份服务器上都进行了修改。