mysql主从同步原理:
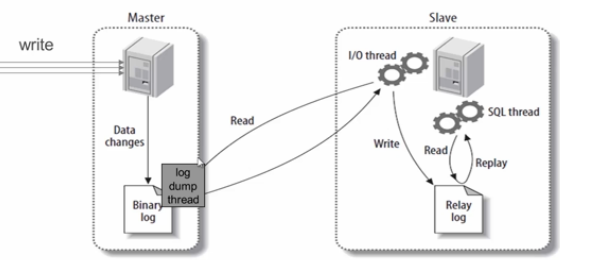
从库生成两个线程,一个I/O线程,一个SQL线程;
I/O线程请求主库的binlog,并将得到的binlog日志写到relay log(中继日志)文件中;
主库会产生一个log dump线程,用来给从库I/O线程传binlog;
SQL线程会读取relay log文件中的日志,并解析成具体的操作,来实现主从的操作一致,而最终数据一致。
mysql主从的用途:
实时灾备,用于故障切换
读写分离,用户查询服务
备份,避免影响业务
环境:
| 主机名 | IP | 系统/数据库 | 角色 |
| tiandong | 192.168.199.3 | centos6.5/5.6.26 | master |
| winter | 192.168.199.4 | centos6.5/5.6.26 | slave |
在主库上创建数据库、数据:
[root@tiandong ~]# mysql -uroot -p123456
Warning: Using a password on the command line interface can be insecure.
Welcome to the MySQL monitor. Commands end with ; or g.
Your MySQL connection id is 6
Server version: 5.6.26-log Source distribution
Copyright (c) 2000, 2015, Oracle and/or its affiliates. All rights reserved.
Oracle is a registered trademark of Oracle Corporation and/or its
affiliates. Other names may be trademarks of their respective
owners.
Type 'help;' or 'h' for help. Type 'c' to clear the current input statement.
mysql>create database HA;
mysql> use HA;
Database changed
mysql> create table T1(id int,name varchar(20));
Query OK, 0 rows affected (0.13 sec)
mysql> insert into T1 values(1,'冬天');
Query OK, 1 row affected (0.04 sec)
mysql> insert into T1 values(1,'winter');
Query OK, 1 row affected (0.00 sec)
mysql> select * from T1;
+------+--------+
| id | name |
+------+--------+
| 1 | 冬天 |
| 1 | winter |
+------+--------+
2 rows in set (0.00 sec)
修改配置文件:
[root@tiandong ~]# vim /etc/my.cnf
7 [mysqld]
8 log-bin=mysql-bin-master
9 server-id = 1
10 binlog-do-db=HA
11 binlog-ignore-db=mysql
[root@tiandong ~]# /etc/init.d/mysqld restart 重启数据库
[root@tiandong ~]# mysql -uroot -p123456
mysql> grant replication slave on *.* to slave@192.168.199.4 identified by "123456";
mysql> flush privileges;
mysql> show master status;
+-------------------------+----------+--------------+------------------+-------------------+
| File | Position | Binlog_Do_DB | Binlog_Ignore_DB | Executed_Gtid_Set |
+-------------------------+----------+--------------+------------------+-------------------+
| mysql-bin-master.000002 | 531 | HA | mysql | |
+-------------------------+----------+--------------+------------------+-------------------+
1 row in set (0.00 sec)
mysql> show binlog eventsG; 查看binlog事件
做主从复制之前让主从库之间的数据一致,因此把主库上的数据导出来,然后导入到从库中
[root@tiandong ~]# mysqldump -uroot -p123456 HA >HA.sql
[root@tiandong ~]# scp HA.sql 192.168.199.4:`pwd`
从库上操作:
[root@winter ~]# mysql -uslave -p123456 -h 192.168.199.3 在从库上测试在主库上创建的用户是否能登录到主库。
mysql> create database HA;
mysql> use HA;
[root@winter ~]# mysql -uroot -p123456
[root@winter ~]# mysql -uroot -p123456 HA < HA.sql
在从库上查看数据是否和主库上一致。
mysql> select * from HA.T1;
+------+--------+
| id | name |
+------+--------+
| 1 | 冬天 |
| 1 | winter |
+------+--------+
2 rows in set (0.00 sec)
修改从库的配置文件:
[root@winter ~]# vim /etc/my.cnf
7 [mysqld]
8 server-id = 2
[root@winter ~]# /etc/init.d/mysqld restart 重启数据库
[root@winter ~]# mysql -uroot -p123456
mysql> stop slave
mysql> change master to master_host='192.168.199.3',master_user='slave',master_password='123456'; 指定主库IP,使用的用户,密码。
mysql> start slave;
mysql> show slave statusG; 查看从的状态
*************************** 1. row ***************************
Slave_IO_State: Waiting for master to send event
Master_Host: 192.168.199.3
Master_User: slave
Master_Port: 3306
Connect_Retry: 60
Master_Log_File: mysql-bin-master.000002
Read_Master_Log_Pos: 531
Relay_Log_File: winter-relay-bin.000003
Relay_Log_Pos: 701
Relay_Master_Log_File: mysql-bin-master.000002
Slave_IO_Running: Yes
Slave_SQL_Running: Yes 当这两个都是YES的时候说明主从已经建立了。
Replicate_Do_DB:
Replicate_Ignore_DB:
Replicate_Do_Table:
Replicate_Ignore_Table:
Replicate_Wild_Do_Table:
Replicate_Wild_Ignore_Table:
Last_Errno: 0
Last_Error:
Skip_Counter: 0
Exec_Master_Log_Pos: 531
Relay_Log_Space: 1335
Until_Condition: None
Until_Log_File:
Until_Log_Pos: 0
Master_SSL_Allowed: No
Master_SSL_CA_File:
Master_SSL_CA_Path:
Master_SSL_Cert:
Master_SSL_Cipher:
Master_SSL_Key:
Seconds_Behind_Master: 0
Master_SSL_Verify_Server_Cert: No
Last_IO_Errno: 0
Last_IO_Error:
Last_SQL_Errno: 0
Last_SQL_Error:
Replicate_Ignore_Server_Ids:
Master_Server_Id: 1
Master_UUID: 539b9c3a-73db-11e8-9102-000c29f08828
Master_Info_File: /usr/local/mysql/data/master.info
SQL_Delay: 0
SQL_Remaining_Delay: NULL
Slave_SQL_Running_State: Slave has read all relay log; waiting for the slave I/O thread to update it
Master_Retry_Count: 86400
Master_Bind:
Last_IO_Error_Timestamp:
Last_SQL_Error_Timestamp:
Master_SSL_Crl:
Master_SSL_Crlpath:
Retrieved_Gtid_Set:
Executed_Gtid_Set:
Auto_Position: 0
1 row in set (0.00 sec)
ERROR:
No query specified
Slave_IO_Running: Yes
Slave_SQL_Running: Yes 当这两个都是YES的时候说明主从已经建立了。
然后进行测试:
在主库上操作:
插入数据:
mysql> insert into T1 values(2,'thunder'),(3,'forever');
Query OK, 2 rows affected (0.00 sec)
Records: 2 Duplicates: 0 Warnings: 0
mysql> select * from T1;
+------+---------+
| id | name |
+------+---------+
| 1 | 冬天 |
| 1 | winter |
| 2 | thunder |
| 3 | forever |
+------+---------+
4 rows in set (0.00 sec)
在从库上查看:
mysql> select * from T1;
+------+---------+
| id | name |
+------+---------+
| 1 | 冬天 |
| 1 | winter |
| 2 | thunder |
| 3 | forever |
+------+---------+
4 rows in set (0.00 sec)
删除数据:
主库上操作:
mysql> delete from T1 where id=1;
Query OK, 2 rows affected (0.01 sec)
mysql> select * from T1;
+------+---------+
| id | name |
+------+---------+
| 2 | thunder |
| 3 | forever |
+------+---------+
2 rows in set (0.00 sec)
在从库上查看:
mysql> select * from T1;
+------+---------+
| id | name |
+------+---------+
| 2 | thunder |
| 3 | forever |
+------+---------+
2 rows in set (0.00 sec)
更新数据:
在主库上操作:
mysql> update T1 set name='winter' where id=3;
Query OK, 1 row affected (0.00 sec)
Rows matched: 1 Changed: 1 Warnings: 0
mysql> select * from T1;
+------+---------+
| id | name |
+------+---------+
| 2 | thunder |
| 3 | winter |
+------+---------+
2 rows in set (0.00 sec)
在从库上查看:
mysql> select * from T1;
+------+---------+
| id | name |
+------+---------+
| 2 | thunder |
| 3 | winter |
+------+---------+
2 rows in set (0.01 sec)
如有问题烦请和博主讨论:
QQ:1127000483
微信二维码: