一、html
其实html是非常简单的一门前端语言,我们学习html的过程实际上就是去记住html标签的用法,这就跟你去记忆英文单词一样的,首先我们先整体了解一下html语言的结构,一个基本的html结构如下
<!DOCTYPE html>  <!-- 表示使用标准的html规则 -->
<html lang="en"> <!-- 表示英语页面 -->
<head>           <!-- 表示html的头-->
</head>
<body>          <!-- 表示html的身体 -->
</body>
</html>
html主要由head和body组成,head中主要定义了一些与页面自身的信息相关的标签,就跟人的大脑一样我们是看不到head中的内容的(除了title标签)。body中的标签就是为了展示整个页面的内容,而我们在写页面时,基本都是在body中进行coding。在html中,标签分为自闭和标签(<meta charset="UTF-8"/>)和主动闭合标签(<a></a>)。
1、head中的标签
<meta charset="utf-8"> 设置编码格式为utf-8
<meta http-equiv="Refresh" content="30;url = http://www.baidu.com"> 30s后自动刷新并跳转
<meta name="keyword" content="python learn"> 提供给搜索引擎搜索,即搜索引擎可以通过python learn搜索到该页面
<meta name="descript" content="this is python learn"> 页面的描述信息
<link rel="shortcut icon" href="title.ico"> 设置页面的图标
<title>python_html</title> 设置页面的标题
<link rel="stylesheet" href="css/common.css"> 导入css文件
<style> </style> 编写样式
<script> </script> 编写js脚本
2、body中的标签
---图标 > <
---p标签 段落
---br标签 换行
---div标签 白板
---H系列(h1--h6) 字体加大加粗
---span 白板
如果你都尝试的使用了上面的标签,你会发现有的标签独占一行,有的标签只占一小块,我们说在html中所有的标签分为2类:
1、块级标签(div、H系列、p)
2、行内标签(span)
input系列+form标签
input type='text' ---- name属性,value='test'
input type='password' ------ name属性,value='test'
input type = 'button' -------- value='提交' 提交按钮,表单
input type = 'button' ----------value = '登录' 按钮
input type = 'radio' - 单选框 value,checked="checked",name属性(name相同则互斥)
input type='checkbox' - 复选框 value, checked="checked",name属性(批量获取数据)
input type='file' - 依赖form表单的一个属性 enctype="multipart/form-data"
input type='rest' - 重置
<textarea >默认值</textarea> - name属性
select标签 - name,内部option value, 提交到后台,size,multiple
- a标签
- 跳转
- 锚 href='#某个标签的ID' 标签的ID不允许重复
- img
src - 图片的地址
alt - 图标资源不存在时候显示
title - 鼠标移动到图片上显示文字
- 列表
ul
li
ol
li
dl
dt
dd
- 表格
table
thead
tr
th
tbody
tr
td
colspan = '' 跨列
rowspan = '' 跨行
- fieldset 文件
下面的代码中,包含上面标签的实例。


<!DOCTYPE html> <html lang="en"> <head> <meta charset="UTF-8"> <title>Title</title> </head> <body> <a href="http://www.baidu.com">牛 B</a> <h1>高文祥</h1> <h2>高文祥</h2> <h3>高文祥</h3> <h4>高文祥</h4> <p>p标签</p> <h5>高文祥</h5> <span>span标签</span> <h6>高文祥</h6> <div> <div style="background-color: #ff6600;height: 48px">ddds</div> <div></div> <div></div> </div> <div> <fieldset> <legend>登录</legend> <label for="username">用户名:</label> <br/> <input id = "username" type="text" name="user"/> </fieldset> </div> <div> <div> <span> </span> </div> </div> <form action="index.html" method="GET" enctype="multipart/form-data"> <input type="text" name="user"/> <input type="password" name="pwd"/> <input type="button" value="登录"> <input type="submit" value="提交"> <input type="reset" value="重置"> <div> <table border="1"> <tr> <th>主机</th> <th>端口</th> <th>操作</th> </tr> <tr> <td>192.168.12.1</td> <td>8080</td> <td> <a href="http://www.baidu.com">查看详情</a> </td> </tr> </table> <table border="1"> <thead> <tr> <th>主机</th> <th>端口号</th> <th>操作</th> </tr> </thead> <tbody> <tr> <!--跨列,跨行--> <td rowspan="2">1</td> <td colspan="2">2</td> <td>3</td> </tr> <tr> <td>1</td> <td>2</td> <td>3</td> </tr> <tr> <td>1</td> <td>2</td> <td>3</td> </tr> </tbody> </table> </div> <div> <ol> <li>dds</li> </ol> <ul> <li>ddsd</li> </ul> <dl> <dt>dssd</dt> <dd>dsdd</dd> <dd>dsdd</dd> <dd>dsdd</dd> <dd>dsdd</dd> </dl> </div> <div> <a href="http://www.baidu.com"> <img src="1.png" style="height: 200px; 200px" alt="图片消失了" title="快点点击我"> </a> </div> <div> <p>请选择性别:</p> 男:<input type="radio" name="sex" value="1" checked="checked"> 女: <input type="radio" name="sex" value="0"> <p>爱好</p> 篮球:<input type="checkbox" name="favor" value="0"/> 足球:<input type="checkbox" name="favor" value="1"> <p>技能</p> 撩妹:<input type="checkbox" name="skill" value="0"/> 写代码:<input type="checkbox" name="skill" value="1"> <p>上传文件</p> <input type="file" name="fname"/> </div> <div> <textarea name="meno">文本框</textarea> <select name="city" size="1" multiple="multiple"> <optgroup label="中国"> <option value="0" selected="selected">北京</option> <option value="1">上海</option> <option value="2">南京</option> <option value="3">成都</option> </optgroup> </select> </div> <div> <a href="http://www.baidu.com" target="_blank">百度</a> <a href="#i1">第一章</a><!--锚--> <a href="#i2">第二章</a> <a href="#i3">第三章</a> <a href="#i4">第四章</a> <div id="i1" style="height: 600px">第一章的内容</div> <div id="i2" style="height: 600px">第二章的内容</div> <div id="i3" style="height: 600px">第三章的内容</div> <div id="i4" style="height: 600px">第四章的内容</div> </div> </form> </body> </html>
二、CSS基础
1、css样式的三种写法
css就是来描述页面的展现方式,可以有以下三种方式来作用于标签。
1、直接写在要作用的标签上,举例 <div style="border: 1px solid red; 100px;height: 200px;"></div>
2、写在head标签中,使用选择器进行标识 举例
<div id="div_01"></div> <style>
#div_01
{
border: 1px solid red;
100px;height: 200px;
}
</style>
3、写在css文件中,然后在当前页面中导入css文件。
这3种方式的优先级是从上到下依次降低。
2、css中的几种选择器
- id选择区
        #i1{

        height: 48px;
        }

- class选择器 ******

        .名称{
        ...
        }

        <标签 class='名称'> </标签>

- 标签选择器
        div{
        ...
        }

        所有div设置上此样式

- 层级选择器(空格) ******
        .c1 .c2 div{

        }
- 组合选择器(逗号) ******
        #c1,.c2,div{

        }

- 属性选择器 ******
        对选择到的标签再通过属性再进行一次筛选
        .c1[n='alex']{ 100px; height:200px; }
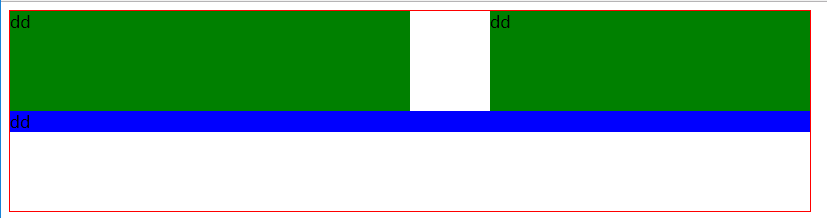
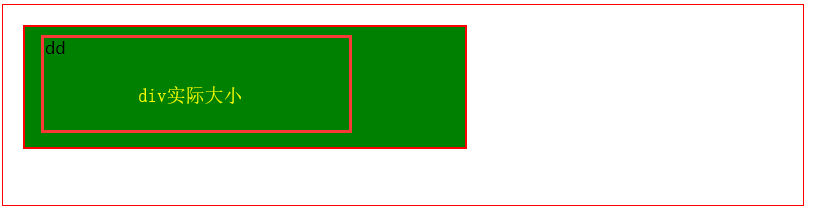
3、float 让块级标签浪起来。该属性使得块级别标签可以堆叠起来
  <div style="border: 1px solid red; 800px;height: 200px;">
      <div style="height: 100px;50%;background-color: green;float: left">dd</div><!-- 往左飘-->
      <div style="height: 100px;40%;background-color: green;float: right">dd</div><!-- 往右飘-->
      <div style="clear: both;"></div><!-- 清除float-->
      <div style="background-color: blue">dd</div><!-- 正常显示 -->
  </div>
正常显示如下,即第一个div和第二个div共享一行,第三个div独占一行。
4、display 可以改变块级标签和行内标签的属性,
display: none; -- 让标签消失
display: inline;
display: block;
display: inline-block;
具有inline,默认自己有多少占多少
具有block,可以设置无法设置高度,宽度,padding margin
5、padding和margin
  <div style="border: 1px solid red; 800px;height: 200px;">
      <div style="height: 100px;50%;border:2px solid red;background-color: green;padding:10px 20px;margin: 20px 20px">dd</div>
  </div>
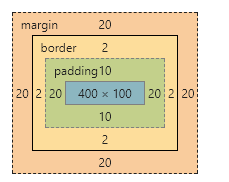
上图中实际的div的大小为400*100,内边距(padding增量为10*20),随后是border的厚度为2px,最后是margin(外边距)的厚度20*20。
6、positon
在网页设计中,position属性的使用是非常重要的。有时如果不能认识清楚这个属性,将会给我们带来很多意想不到的困难。position属性共有四种不同的定位方法,分别是static、fixed、relative、absolute,sticky。最后将会介绍和position属性密切相关的z-index属性。
1、static定位是HTML元素的默认值,即没有定位,元素出现在正常的流中,因此,这种定位就不会收到top,bottom,left,right的影响。
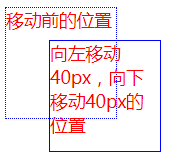
2、fixed定位是指元素的位置相对于浏览器窗口是固定位置,即使窗口是滚动的它也不会滚动,且fixed定位使元素的位置与文档流无关,因此不占据空间,且它会和其他元素发生重叠。
演示代码如下:
<!DOCTYPE html>
<html lang="en">
<head>
    <meta charset="UTF-8">
    <title>Title</title>
    <style>
        .id1
        {
            height: 100px;
            width: 100px;
            background: blue;
            color: red;
            position: fixed;
            bottom: 0px;
            right: 0px;
        }
    </style>
</head>
<body style="height: 5000px">
    <div class="id1">我是固定不变的</div>
</body>
</html>
效果图如下:
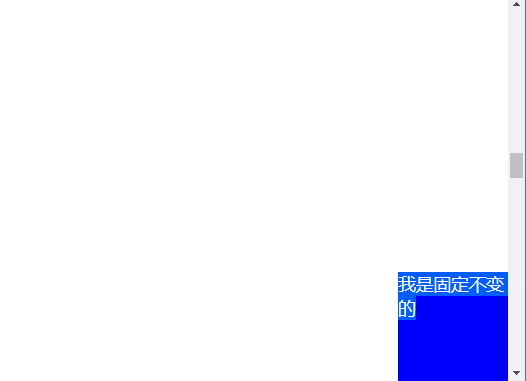
这个就是我们浏览某些不可描述的网页时,弹出的框。
很多场景下,我们使用position:fixed来做遮罩层,这次种场景下需要明确2个问题,1是叠放顺序(z-index),2是遮罩层的透明度(opacity),一个简单的代码实例如下:
<!DOCTYPE html>
<html lang="en">
<head>
    <meta charset="UTF-8">
    <title>Title</title>
    <style>
        .id1
        {
            height: 300px;
            width: 300px;
            border: 1px  solid blue;
            color: red;
            position: fixed;
            top: 50px;
            left:  50px;
            /*重叠的顺序,值越大越显示在前端*/
            z-index: 5;
        }
        .id2
        {
            background: black;
            /*设置透明度*/
            opacity: 0.05;
            z-index: 1;
        }
    </style>
</head>
<body style="height: 5000px;margin: 0 auto">

    <div class="id1">遮罩层实例演示</div>
    <div class="id1 id2"></div>

</body>
</html>
3、relative相对定位元素的定位是相对它自己的正常位置的定位。这里的重点是相对于自己原来的位置。
4、绝对定位的元素相对于最近的已定位(具有position样式的)父元素,如果元素没有已定位的父元素,那么它的位置相对于<html>。看一个实例
<!DOCTYPE html>
<html lang="en">
<head>
    <meta charset="UTF-8">
    <title>Title</title>
    <style>
        .id1
        {
            height: 300px;
            width: 300px;
            border: 1px  solid blue;
            color: red;
            position: relative;
            top: 50px;
            left:  50px;
        }

        .id2
        {
            height: 100px;
            width: 100px;
            border: 1px  dotted blue;
            color: red;
            position: absolute;
            top: 30px;
            left:  30px;
        }
    </style>
</head>
<body style="height: 5000px;margin: 0 auto">

    <div class="id1">父窗口
        <div class="id2">子窗口
        </div>
    </div>
</body>
</html>
效果图如下:
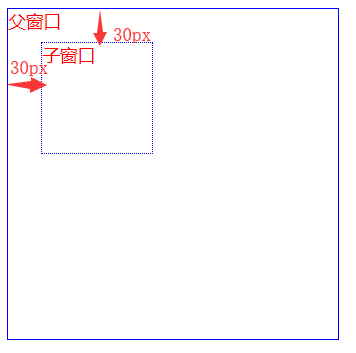
综上所述,当某个absolute定位元素的父元素具有position:relative/absolute/fixed时,定位元素都会依据父元素而定位,而父元素没有设置position属性或者设置了默认属性,那么定位属性会依据html元素来定位。
然鹅,当窗口出现滚动条时,其位置会随着页面的滚动而移动。
7、hover
hover的主要作用就是当鼠标移到某个标签时,可以改变标签的样式。一个简单的示例如下:
<!DOCTYPE html>
<html lang="en">
<head>
    <meta charset="UTF-8">
    <title>Title</title>
    <style>
        .id1
        {
            height: 100px;
            width: 100px;
            background: #ff5230;
        }
        .id1:hover
        {
            background: blue;
            height: 200px;
            width: 200px;
        }
    </style>
</head>
<body>
    <div class="id1">

    </div>
</body>
</html>
8、其他.....
给标签加上图片背景, background-image:url('image/4.gif'); # 默认,div大,图片重复访,background-repeat用来表示背景图片是否重复展示。
<div style="height: 400px;height: 400px;overflow: auto"><img src="1.png"/></div> 图片展示大方式 使用overflow。
9、实例演示,登录。
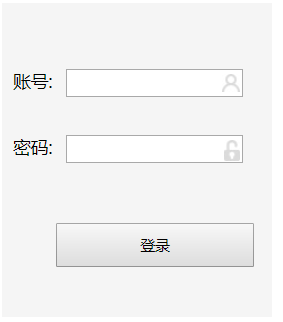
代码:
<!DOCTYPE html>
<html lang="en">
<head>
    <meta charset="UTF-8">
    <title>登录</title>
    <style>
        .bg-header
        {
            height: 28px;
        }

        .bg-header .left
        {
            height: 28px;
            width: 66%;
            background: black;
            float: left;
            color: white;
            line-height: 28px;
            padding-left: 4%;
        }
        .bg-header .right
        {
            height: 28px;
            width: 30%;
            background: black;
            float: right;
            color: white;
            line-height: 28px;
        }
        a
        {
            text-decoration-line: none;
            color: white;
        }
        span
        {
            display: inline-block;
            width: 8px;
        }

        .bg-body
        {

            background-image: url(bg-login.jpg);
            position: fixed;
            left: 0px;
            right: 0px;
            top: 28px;
            bottom: 0;
            background-size: 100% 100%;
            background-repeat: no-repeat;

        }

        .login
        {
            z-index: 2;
            position: absolute;

            height:286px;
            width: 245px;
            margin-left: 70%;
            margin-top: 10%;
        }

        .bg-div
        {
            margin-left: 70%;
            margin-top: 10%;
            z-index: 1;
            position: absolute;
            height:286px;
            width: 245px;
            background: #dddddd;
            opacity: 0.3;
        }

        .login_button
        {
            position: absolute;
            left: 20%;
            top: 70%;
        }

        /*.pic*/
        /*{*/
            /*!*position: fixed;*!*/

          /*background-size: 100% 100%;*/
          /*float: left;*/

        /*}*/
    </style>
</head>
<body style="margin: 0px auto;">
    <div class="bg-header">
        <div class="left">
            <a href="http://www.baidu.com">支付宝App</a>
        </div>
        <div class="right">
            <a href="">支付宝首页</a>
            <span></span>
            <a href="">服务大厅</a>
            <span></span>
            <a href="">提建议</a>
            <span></span>
        </div>
        <div >

        </div>
    </div>

    <div class="bg-body">
        <!--<div class="pic">-->
            <!--<img  src="bg-login.jpg"/>-->
        <!--</div>-->
        <div class="bg-div"></div>
        <div class="login">
            <div style=" 210px;height: 60px;position: relative;margin-top: 60px;margin-left: 10px">
                <label for="userid">账号:</label>
                <input id='userid' type="text" style=" 135px;height: 20px;padding-right: 22px;margin-left: 8px;"/>
                <label for = 'userid'><span style="background-image: url(i_name.jpg);display: inline-block; 16px;height: 16px;
                position:absolute;right: 4px;top: 5px;"></span></label>
            </div>
            <div style=" 210px;height: 60px;position: relative;margin-left: 10px">
                <label for="pwd">密码:</label>
                <input id="pwd" type="password" style=" 135px;height: 20px;padding-right: 22px;margin-left: 8px;"/>
                <label for='pwd'><span  style="background-image: url(i_pwd.jpg);display: inline-block; 14px;height: 19px;
          position:absolute;right: 4px;top: 5px;"></span></label>
            </div>
            <div class="login_button">
                <input type="button" value="登录" style=" 180px;height: 40px;">
            </div>
        </div>
    </div>
</body>
</html>