一、RabbitMQ队列
rabbitMQ是一个第三方工具,需要先安装Erlang,然后再安装rabbitMQ,安装方法,请自行百度。安装好后打开:http://localhost:15672即可进入rabbitMQ的管理界面,默认已有的账号和密码都为guest/guest。
在python中使用模块,pika对rabbitMQ进行操作。
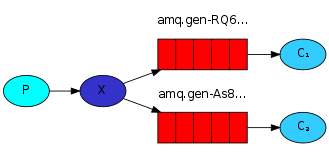
1、最简单的通信。我们知道MQ就是一个消息队列,那么咱们现在就用python来实现下图的一个最简单的通信。P端负责把消息扔进队列,C端负责从队列中取消息。

P端的代码如下:


 1 import pika
 2
 3 credential = pika.PlainCredentials('test','test123')#认证信息
 4 #创建连接对象
 5 connection = pika.BlockingConnection(pika.ConnectionParameters(host='192.168.12.1',credentials=credential))
 6 #创建渠道
 7 channel = connection.channel()
 8 #申明队列
 9 channel.queue_declare(queue="Test_Queue",durable=True)#durable=True将队列设置为持久化,否则MQ重启后队列丢失
10 message = "hi,I am sender" #要发送的数据
11 channel.basic_publish(exchange='',#暂时忽略
12                       routing_key='Test_Queue',
13                       body=message,
14                       properties=pika.BasicProperties(delivery_mode=2,))#delivery_mode=2将消息设置为持久化
15 connection.close()
C端的代码如下:
 1 import pika,time
 2
 3 credential = pika.PlainCredentials('test','test123')
 4 connection = pika.BlockingConnection(pika.ConnectionParameters(host='192.168.12.1',credentials=credential))
 5
 6 channel = connection.channel()
 7 #申明队列
 8 channel.queue_declare(queue="Test_Queue",durable=True)#将队列设置为持久化
 9 channel.basic_qos(prefetch_count = 1)#每次只取一条消息
10 def callback(channel,method,property,body):
11     print("开始处理消息.....")
12     time.sleep(2)
13     print("[x] Received %r" % body)
14     print("消息处理结束......")
15     channel.basic_ack(delivery_tag=method.delivery_tag) #确认消息已经消费
16     '''处理后续逻辑'''
17 channel.basic_consume(callback,
18                       queue='Test_Queue',
19                       no_ack=False)#说明消息被消费后,需要确认
20 channel.start_consuming()
2、PublishSubscribe(消息发布订阅)。有些时候你想让你的消息被所有的Queue收到,类似广播的效果,这时候就要用到exchange了,Exchange在定义的时候是有类型的,以决定到底是哪些Queue符合条件,可以接收消息。
fanout: 所有bind到此exchange的queue都可以接收消息
direct: 通过routingKey和exchange决定的那个唯一的queue可以接收消息
topic:所有符合routingKey(此时可以是一个表达式)的routingKey所bind的queue可以接收消息
图解如下,下面针对这三种类型分别演示。
python的实现如下:
exchange_type为fanout的时,表示只要绑定到exchange的队列都会收到消息。
P端代码:
 1 import pika
 2
 3 credential = pika.PlainCredentials('test','test123')
 4 conn = pika.BlockingConnection(pika.ConnectionParameters(host='192.168.12.1',
 5                                                          credentials=credential))
 6
 7 channel = conn.channel()
 8
 9 channel.exchange_declare(exchange="logs",exchange_type='fanout')#所有绑定到logs上的队列都能收到消息
10
11 message = "class is over"
12
13 channel.basic_publish(exchange='logs',
14                       routing_key='',
15                       body=message,)
16
17 conn.close()
C端代码
 1 import  pika,time
 2
 3 credential = pika.PlainCredentials('test','test123')
 4 conn = pika.BlockingConnection(pika.ConnectionParameters(host='192.168.12.1',
 5                                                          credentials=credential))
 6
 7 channel = conn.channel()
 8
 9 channel.exchange_declare(exchange='logs',exchange_type='fanout')
10
11 result = channel.queue_declare(exclusive=True)#随机生成一个队列
12
13 queue_name = result.method.queue #获取队列的名字
14
15 channel.queue_bind(exchange='logs',queue=queue_name)
16
17 def callback(conn,method,properties,body):
18     print("开始接收消息")
19     print("接收到的消息是:%s" % body)
20     print("消息接收完成")
21
22     # conn.basic_ack(delivery_tag=1)
23
24 channel.basic_consume(consumer_callback=callback,queue=queue_name,no_ack=True)#no_ack=True不需要确认消息是否收到
25 channel.start_consuming()
exchange_type为direct时,通过routing_key这个字段进行消息过滤,也就是说只有routing_key的值和发送消息的routing_key的值一样才能收到消息。
P端代码:
 1 # -*- coding:utf-8 -*-
 2 import  sys,pika
 3
 4
 5 conn = pika.BlockingConnection(pika.ConnectionParameters(host='localhost'))
 6
 7 channel = conn.channel()
 8
 9 channel.exchange_declare(exchange='direct_logs',
10                          exchange_type='direct')
11
12 severity = sys.argv[1] if len(sys.argv)>1 else 'info'
13 message = '[%s]:send a logger message' % severity
14 channel.basic_publish(exchange='direct_logs',
15                       routing_key=severity,
16                       body=message)
17
18 conn.close()
C端代码:
 1 # -*- coding:utf-8 -*-
 2 import sys,pika
 3
 4 conn = pika.BlockingConnection(pika.ConnectionParameters('localhost'))
 5
 6 channel = conn.channel()
 7
 8 channel.exchange_declare(exchange='direct_logs',exchange_type='direct')
 9
10 result = channel.queue_declare(exclusive=True)
11
12 queue_name = result.method.queue
13 def callback(conn,method,properties,body):
14     print("开始接收数据")
15     print(body.decode())
16     print("接收完毕")
17 severities = sys.argv[1:]
18 if not severities:
19     sys.stderr.write("Usage:%s[info][warning][error]
" % sys.argv[0])
20     sys.exit(1)
21 for severity in severities:
22     channel.queue_bind(exchange='direct_logs', queue=queue_name, routing_key=severity)
23
24 channel.basic_consume(consumer_callback=callback,queue=queue_name,no_ack=True)
25
26 channel.start_consuming()
exchange_type为topic时,对routing_key进行了细分,支持其用表达式的方式进行消息过滤。消息过滤的规则如下:
To receive all the logs run:(匹配所有)
python receive_logs_topic.py "#"
To receive all logs from the facility "kern":(匹配kern开头的队列的消息)
python receive_logs_topic.py "kern.*"
Or if you want to hear only about "critical" logs:(以.critical结尾的队列消息)
python receive_logs_topic.py "*.critical"
You can create multiple bindings:(可以写多个队列名)
python receive_logs_topic.py "kern.*" "*.critical"
And to emit a log with a routing key "kern.critical" type:(使用一个精确的匹配)
python emit_log_topic.py "kern.critical" "A critical kernel error"
实现一个简单的RPC(remote procedure call)
服务端代码:
 1 import pika,time
 2 import threading
 3 class RPC_Server(threading.Thread,object):
 4     def fib(self,n):
 5         if n == 0:
 6             return 0
 7         elif n == 1:
 8             return 1
 9         else:
10             return self.fib(n-1) + self.fib(n-2)
11
12     def on_request(self,channel,method,properties,body):
13         print("收到消息.....",properties.correlation_id)
14         n = int(body)
15         try:
16             response = self.fib(n)
17         except RecursionError as e:
18             print(e)
19             response = 0
20         print("处理中........")
21         time.sleep(1)
22         print('发送执行结果.......')
23         channel.basic_ack(delivery_tag=method.delivery_tag)
24         # channel.queue_declare(queue=properties.reply_to)
25         print(properties.reply_to)
26         channel.basic_publish(exchange='',
27                               routing_key=properties.reply_to,
28                               properties=pika.BasicProperties(correlation_id=properties.correlation_id),
29                               body=str(response))
30
31         print("消息处理完成.......",properties.correlation_id)
32
33
34     def run(self):
35         connection = pika.BlockingConnection(pika.ConnectionParameters(host="localhost"))
36         print(connection)
37         channel = connection.channel()
38
39         channel.queue_declare(queue='rpc_queue')
40
41         channel.basic_qos(prefetch_count=1)
42
43         channel.basic_consume(consumer_callback=self.on_request,queue='rpc_queue',no_ack=False)
44
45         channel.start_consuming()
46 for i in range(5):
47     rpc_server = RPC_Server()
48     rpc_server.start()
客户端代码:
 1 import pika
 2 import  time
 3 import uuid #唯一识别码
 4 import selectors
 5 class FibonacciRpcClient(object):
 6     def __init__(self):
 7         self.__conn = pika.BlockingConnection(pika.ConnectionParameters(host='localhost'))
 8         self.__channel = self.__conn.channel()
 9         self.__channel.queue_declare(queue='rpc_queue')#申明请求消息队列
10         #
11         self.callback_queue = 'rpc_back_queue'  # 数据返回队列
12         # result = self.__channel.queue_declare(exclusive=True)  # 随机生成一个返回队列
13         # self.callback_queue = result.method.queue #获取队列的名字
14         # print(self.callback_queue)
15         self.__channel.queue_declare(queue=self.callback_queue) #申明响应消息队列
16         #设置响应消息基本信息
17         self.__channel.basic_consume(consumer_callback=self.on_response,
18                                      no_ack=False,
19                                      queue=self.callback_queue)
20
21         self.__channel.basic_qos(prefetch_count=1)
22     def on_response(self,ch,method,props,body):
23         print(self.corr_id,props.correlation_id)
24         print(method.delivery_tag)
25         if self.corr_id == props.correlation_id:
26             self.__response = body
27             print("确认收到!",method.delivery_tag)
28             self.__channel.basic_ack(delivery_tag=method.delivery_tag)
29
30             print("确认收到!===")
31         else:
32             self.__response = None
33             print("拒绝该消息!",method.delivery_tag)
34             self.__channel.basic_nack(delivery_tag=method.delivery_tag)
35             print("拒绝该消息!====" )
36
37
38     def call(self,n):
39         self.__response = None
40         self.corr_id = str(uuid.uuid4())#生成随机码
41         print("随机id",self.corr_id)
42         self.__channel.basic_publish(exchange='',
43                                     routing_key='rpc_queue',
44                                     body=str(n),
45                                     properties=pika.BasicProperties(reply_to=self.callback_queue,
46                                                                     correlation_id=self.corr_id))
47         while self.__response is None:
48             time.sleep(1)
49             print("等待消费........")
50             self.__conn.process_data_events(time_limit=None)  # 开始消费,不阻塞
51
52
53         return self.__response
54
55
56
57 fibonacci_rpc = FibonacciRpcClient()
58 while True:
59     n = input(">>")
60     if n == 'exit':
61         break
62     response = fibonacci_rpc.call(int(n))
63     print("计算结果:",response)
二、redis
1、介绍
redis是业界主流的key-value nosql 数据库之一。和Memcached类似,它支持存储的value类型相对更多,包括string(字符串)、list(链表)、set(集合)、zset(sorted set --有序集合)和hash(哈希类型)。这些数据类型都支持push/pop、add/remove及取交集并集和差集及更丰富的操作,而且这些操作都是原子性的。在此基础上,redis支持各种不同方式的排序。与memcached一样,为了保证效率,数据都是缓存在内存中。区别的是redis会周期性的把更新的数据写入磁盘或者把修改操作写入追加的记录文件,并且在此基础上实现了master-slave(主从)同步。
2、redis的安装(自行百度)
3、redis API的使用
3.1、连接方式
1、直连
redis-py提供两个类Redis和StrictRedis用于实现Redis的命令,StrictRedis用于实现大部分官方的命令,并使用官方的语法和命令,Redis是StrictRedis的子类,用于向后兼容旧版本的redis-py,在python
中连接redis的代码如下:
1 import  redis
2
3 r = redis.Redis(host='192.168.12.1',port = 6379,password=123)
4
5 r.set("name",'高文祥')
6
7 print(r.get("name").decode())
2、连接池
redis-py使用connection pool来管理对一个redis server的所有连接,避免每次建立、释放连接的开销。默认,每个Redis实例都会维护一个自己的连接池。可以直接建立一个连接池,然后作为参数Redis, 这样就可以实现多个Redis实例共享一个连接池。代码如下:
1 import  redis
2 pool = redis.ConnectionPool(host='192.168.12.1',port=6379,password=123)
3 r = redis.Redis(connection_pool=pool)
4 r.set('sex','男')
5 print(r.get("sex").decode())
上面是连接redis的2种方式,连接成功后,就可以开始对redis进行操作了。
3.2、操作
1、字符串操作
redis中的String在在内存中按照一个name对应一个value来存储。如图:

 1 import  redis
 2
 3 r = redis.Redis(host='192.168.12.1',port = 6379,password=123)
 4
 5 '''set(self, name, value, ex=None, px=None, nx=False, xx=False)
 6 在Redis中设置值,默认,不存在则创建,存在则修改
 7 参数:
 8      ex,过期时间(秒)
 9      px,过期时间(毫秒)
10      nx,如果设置为True,则只有name不存在时,当前set操作才执行
11      xx,如果设置为True,则只有name存在时,岗前set操作才执行'''
12 # r.set("name",'高文祥')  #
13 # r.setnx("name","gaowenxiang") #设置值,只有name不存在时,执行设置操作(添加)
14 # r.setex("name","test",time=3) #设置过期时间 3s
15 # r.mset(name='gaowenx',age='18',sex='男')  #批量设置
16 # r.mset({'name':'gwx','age':'30','sex':'boy'})#批量设置
17
18 # r.get("name")#获取值
19 # r.mget("name","age",'sex') #批量获取值
20 # r.getset("name","helen") #设置新值并获取原来的值
21 #r.getrange('name',1,2)#获取子串
22 '''# 修改字符串内容,从指定字符串索引开始向后替换(新值太长时,则向后添加)
23 # 参数:
24     # offset,字符串的索引,字节(一个汉字三个字节)
25     # value,要设置的值'''
26 # r.setrange("name", 1, "cc")
27 # r.setbit("age",5,1) #将值转为二进制后,再将第5位的值设置为1
28 # r.getbit('age',5) #获取对应位的2进制的值
29 # r.strlen('name')# 返回name对应值的字节长度(一个汉字3个字节)
30 # r.incr('age',1) #自增
31 # r.incrbyfloat('age',1.0)
32 # r.decr('age',2)
33 # r.append('name','gex')#在redis name对应的值后面追加内容
2、Hash操作
hash表现形式上有些像pyhton中的dict,可以存储一组关联性较强的数据 , redis中Hash在内存中的存储格式如下图:

 1 import  redis
 2
 3 r = redis.Redis(host='192.168.12.1',port = 6379,password=123)
 4
 5 # r.hset('has_name','name','gaowenxiang')# name对应的hash中设置一个键值对(不存在,则创建;否则,修改)
 6 # r.hsetnx("has_name", 'age', '21')#当name对应的hash中不存在当前key时则创建(相当于添加)
 7 # r.hmset('info',{'id':'1','name':'gwx','age':'19'}) #在name对应的hash中批量设置键值对 有点意思
 8 # r.hget('info','name')#获取key值
 9 # r.hmget('info','id','name')#批量获取key值
10 # r.hgetall('info')#获取name对应hash的所有键值
11 # r.hlen("info") # 获取name对应的hash中键值对的个数
12 # r.hkeys('info')# 获取name对应的hash中所有的key的值
13 # r.hvals('info')#获取name对应的hash中所有的value的值
14 # r.hexists("info", "name") # 检查name对应的hash是否存在当前传入的key
15 # r.hdel("info",'name')# 将name对应的hash中指定key的键值对删除
3、List List操作,redis中的List在内存中按照一个name对应一个List来存储。如图:

 1 import  redis
 2
 3 r = redis.Redis(host='192.168.12.1',port = 6379,password=123)
 4
 5 # r.lpush('l1',1,2,3,4,5)#保存顺序为5 4 3 2 1
 6 # r.rpush('l2',1,2,3,4,5)#报错顺序为 1 2 3 4 5
 7 # r.lpushx('l1',10)
 8 # r.rpushx('l2',11)
 9 '''
10 llen(name)
11 # name对应的list元素的个数
12 linsert(name, where, refvalue, value))
13
14
15 # 在name对应的列表的某一个值前或后插入一个新值
16
17 # 参数:
18     # name,redis的name
19     # where,BEFORE或AFTER
20     # refvalue,标杆值,即:在它前后插入数据
21     # value,要插入的数据
22 r.lset(name, index, value)
23
24 # 对name对应的list中的某一个索引位置重新赋值
25
26 # 参数:
27     # name,redis的name
28     # index,list的索引位置
29     # value,要设置的值
30 r.lrem(name, value, num)
31
32 # 在name对应的list中删除指定的值
33
34 # 参数:
35     # name,redis的name
36     # value,要删除的值
37     # num,  num=0,删除列表中所有的指定值;
38            # num=2,从前到后,删除2个;
39            # num=-2,从后向前,删除2个
40 lpop(name)
41
42 # 在name对应的列表的左侧获取第一个元素并在列表中移除,返回值则是第一个元素
43
44 # 更多:
45     # rpop(name) 表示从右向左操作
46 lindex(name, index)
47
48 1
49 在name对应的列表中根据索引获取列表元素
50 lrange(name, start, end)
51
52 # 在name对应的列表分片获取数据
53 # 参数:
54     # name,redis的name
55     # start,索引的起始位置
56     # end,索引结束位置
57 ltrim(name, start, end)
58
59 # 在name对应的列表中移除没有在start-end索引之间的值
60 # 参数:
61     # name,redis的name
62     # start,索引的起始位置
63     # end,索引结束位置
64 rpoplpush(src, dst)
65
66 # 从一个列表取出最右边的元素,同时将其添加至另一个列表的最左边
67 # 参数:
68     # src,要取数据的列表的name
69     # dst,要添加数据的列表的name
70 blpop(keys, timeout)
71
72 # 将多个列表排列,按照从左到右去pop对应列表的元素
73
74 # 参数:
75     # keys,redis的name的集合
76     # timeout,超时时间,当元素所有列表的元素获取完之后,阻塞等待列表内有数据的时间(秒), 0 表示永远阻塞
77
78 # 更多:
79     # r.brpop(keys, timeout),从右向左获取数据
80 brpoplpush(src, dst, timeout=0)
81
82 # 从一个列表的右侧移除一个元素并将其添加到另一个列表的左侧
83
84 # 参数:
85     # src,取出并要移除元素的列表对应的name
86     # dst,要插入元素的列表对应的name
87     # timeout,当src对应的列表中没有数据时,阻塞等待其有数据的超时时间(秒),0 表示永远阻塞
88 '''
4、Set,集合就是不允许重复的列表,具体操作如下:
  1 import  redis
  2
  3 r = redis.Redis(host='192.168.12.1',port = 6379,password=123)
  4
  5 '''
  6 sadd(name,values)
  7
  8 # name对应的集合中添加元素
  9 scard(name)
 10
 11 获取name对应的集合中元素个数
 12 sdiff(keys, *args)
 13
 14 在第一个name对应的集合中且不在其他name对应的集合的元素集合
 15 sdiffstore(dest, keys, *args)
 16
 17 # 获取第一个name对应的集合中且不在其他name对应的集合,再将其新加入到dest对应的集合中
 18 sinter(keys, *args)
 19
 20 # 获取多一个name对应集合的并集
 21 sinterstore(dest, keys, *args)
 22
 23 # 获取多一个name对应集合的并集,再讲其加入到dest对应的集合中
 24 sismember(name, value)
 25
 26 # 检查value是否是name对应的集合的成员
 27 smembers(name)
 28
 29 # 获取name对应的集合的所有成员
 30 smove(src, dst, value)
 31
 32 # 将某个成员从一个集合中移动到另外一个集合
 33 spop(name)
 34
 35 # 从集合的右侧(尾部)移除一个成员,并将其返回
 36 srandmember(name, numbers)
 37
 38 # 从name对应的集合中随机获取 numbers 个元素
 39 srem(name, values)
 40
 41 # 在name对应的集合中删除某些值
 42 sunion(keys, *args)
 43
 44 # 获取多一个name对应的集合的并集
 45 sunionstore(dest,keys, *args)
 46
 47 # 获取多一个name对应的集合的并集,并将结果保存到dest对应的集合中
 48 sscan(name, cursor=0, match=None, count=None)
 49 sscan_iter(name, match=None, count=None)
 50
 51 # 同字符串的操作,用于增量迭代分批获取元素,避免内存消耗太大
 52
 53
 54 有序集合,在集合的基础上,为每元素排序;元素的排序需要根据另外一个值来进行比较,所以,对于有序集合,每一个元素有两个值,即:值和分数,分数专门用来做排序。
 55
 56 zadd(name, *args, **kwargs)
 57
 58 # 在name对应的有序集合中添加元素
 59 # 如:
 60      # zadd('zz', 'n1', 1, 'n2', 2)
 61      # 或
 62      # zadd('zz', n1=11, n2=22)
 63 zcard(name)
 64
 65 # 获取name对应的有序集合元素的数量
 66 zcount(name, min, max)
 67
 68 # 获取name对应的有序集合中分数 在 [min,max] 之间的个数
 69 zincrby(name, value, amount)
 70
 71 # 自增name对应的有序集合的 name 对应的分数
 72 r.zrange( name, start, end, desc=False, withscores=False, score_cast_func=float)
 73
 74 # 按照索引范围获取name对应的有序集合的元素
 75
 76 # 参数:
 77     # name,redis的name
 78     # start,有序集合索引起始位置(非分数)
 79     # end,有序集合索引结束位置(非分数)
 80     # desc,排序规则,默认按照分数从小到大排序
 81     # withscores,是否获取元素的分数,默认只获取元素的值
 82     # score_cast_func,对分数进行数据转换的函数
 83
 84 # 更多:
 85     # 从大到小排序
 86     # zrevrange(name, start, end, withscores=False, score_cast_func=float)
 87
 88     # 按照分数范围获取name对应的有序集合的元素
 89     # zrangebyscore(name, min, max, start=None, num=None, withscores=False, score_cast_func=float)
 90     # 从大到小排序
 91     # zrevrangebyscore(name, max, min, start=None, num=None, withscores=False, score_cast_func=float)
 92 zrank(name, value)
 93
 94 # 获取某个值在 name对应的有序集合中的排行(从 0 开始)
 95
 96 # 更多:
 97     # zrevrank(name, value),从大到小排序
 98
 99
100 zrem(name, values)
101
102 # 删除name对应的有序集合中值是values的成员
103
104 # 如:zrem('zz', ['s1', 's2'])
105 zremrangebyrank(name, min, max)
106
107 # 根据排行范围删除
108 zremrangebyscore(name, min, max)
109
110 # 根据分数范围删除
111
112
113 zscore(name, value)
114
115 # 获取name对应有序集合中 value 对应的分数
116 zinterstore(dest, keys, aggregate=None)
117
118 # 获取两个有序集合的交集,如果遇到相同值不同分数,则按照aggregate进行操作
119 # aggregate的值为:  SUM  MIN  MAX
120 zunionstore(dest, keys, aggregate=None)
121
122 # 获取两个有序集合的并集,如果遇到相同值不同分数,则按照aggregate进行操作
123 # aggregate的值为:  SUM  MIN  MAX
124 zscan(name, cursor=0, match=None, count=None, score_cast_func=float)
125 zscan_iter(name, match=None, count=None,score_cast_func=float)
126
127 # 同字符串相似,相较于字符串新增score_cast_func,用来对分数进行操作
128
129
130
131
132 其他常用操作
133 delete(*names)
134
135 # 根据删除redis中的任意数据类型
136 exists(name)
137
138 # 检测redis的name是否存在
139 keys(pattern='*')
140
141 # 根据模型获取redis的name
142
143 # 更多:
144     # KEYS * 匹配数据库中所有 key 。
145     # KEYS h?llo 匹配 hello , hallo 和 hxllo 等。
146     # KEYS h*llo 匹配 hllo 和 heeeeello 等。
147     # KEYS h[ae]llo 匹配 hello 和 hallo ,但不匹配 hillo
148 expire(name ,time)
149
150 # 为某个redis的某个name设置超时时间
151 rename(src, dst)
152
153 # 对redis的name重命名为
154 move(name, db))
155
156 # 将redis的某个值移动到指定的db下
157 randomkey()
158
159 # 随机获取一个redis的name(不删除)
160 type(name)
161
162 # 获取name对应值的类型
163 scan(cursor=0, match=None, count=None)
164 scan_iter(match=None, count=None)
165
166 # 同字符串操作,用于增量迭代获取key
167 '''
5、管道 redis-py默认在执行每次请求都会创建(连接池申请连接)和断开(归还连接池)一次连接操作,如果想要在一次请求中指定多个命令,则可以使用pipline实现一次请求指定多个命令,并且默认情况下一次pipline 是原子性操作。
1 import  redis
2
3 pool =  redis.ConnectionPool(host='192.168.12.1',port = 6379,password=123)
4 r = redis.Redis(connection_pool=pool)
5 pipe = r.pipeline(transaction=True)
6
7 pipe.set('name', 'helen')
8 pipe.set('role', 'sb')
9 pipe.execute()
6、发布和订阅
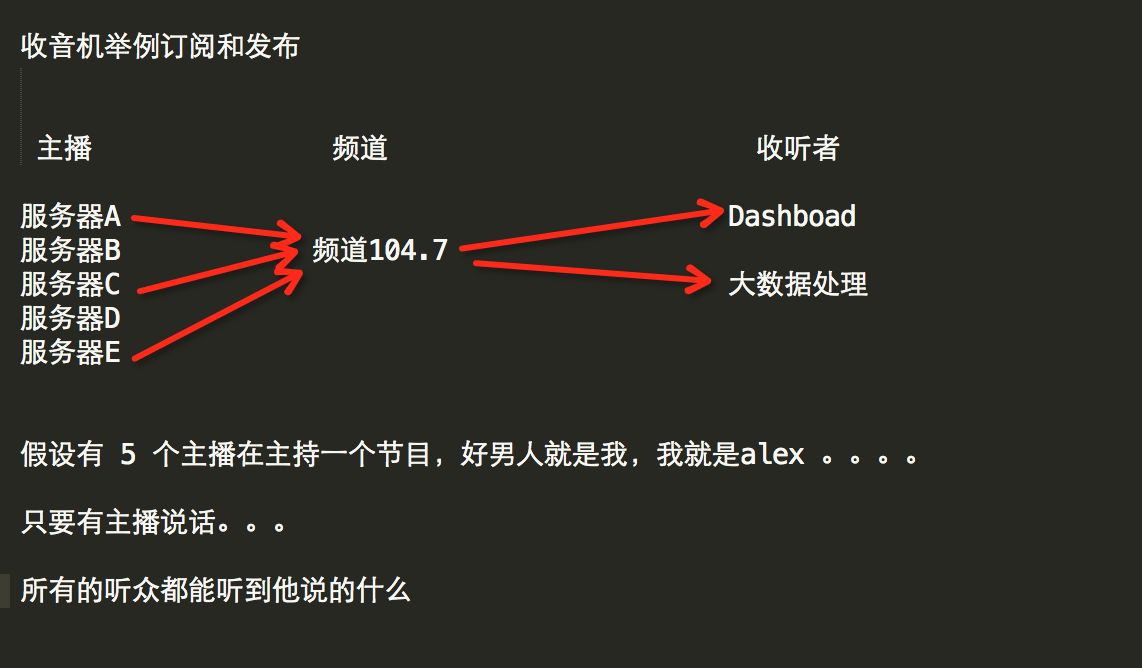
订阅发布工具类:
 1 import redis
 2
 3
 4 class RedisHelper:
 5
 6     def __init__(self):
 7         self.__conn = redis.Redis(host='192.168.12.1',port = 6379,password=123)
 8
 9
10     def public(self, chan_pub,msg):#发布者
11         self.__conn.publish(chan_pub, msg)#发布消息 在渠道 self.chan_pub = 'fm104.5'
12         return True
13
14     def subscribe(self,chan_sub):#订阅者
15         pub = self.__conn.pubsub() #返回订阅对象
16         pub.subscribe(chan_sub) #订阅self.chan_sub
17         pub.parse_response()#等待消息
18         return pub
订阅者:
1 from 订阅和发布 import RedisHelper
2 import  threading
3
4 obj = RedisHelper()
5 redis_sub = obj.subscribe("fm10")
6 while True:
7     msg = redis_sub.parse_response()
8     print(msg)
发布者:
1 from 订阅和发布 import RedisHelper
2
3 obj = RedisHelper()
4
5 obj.public("fm10",'hello')
我擦,最近这学的有点费脑,继续坚持吧!