AuthorizeAttribute是asp.net MVC的几大过滤器之一,俗称认证和授权过滤器,也就是判断登录与否,授权与否。当为某一个Controller或Action附加该特性时,没有登录或授权的账户是不能访问这些Controller或Action的。
在进入一个附加了Authorize特性的Controller或Action之前,首先执行的是AuthorizeAttribute类的OnAuthorization(AuthorizationContext filterContext)方法,接着OnAuthorization方法会去调用其他的诸如AuthorizeCore方法。
在将AuthorizeAttribute类反编译之后得到如下代码,一看就清晰明了:
using System;
using System.Collections.Generic;
using System.Linq;
using System.Security.Principal;
using System.Web.Mvc.Properties;
namespace System.Web.Mvc
{
    /// <summary>Specifies that access to a controller or action method is restricted to users who meet the authorization requirement.</summary>
    [AttributeUsage(AttributeTargets.Class | AttributeTargets.Method, Inherited = true, AllowMultiple = true)]
    public class AuthorizeAttribute : FilterAttribute, IAuthorizationFilter
    {
        private static readonly char[] _splitParameter = new char[]
        {
            ','
        };
        private readonly object _typeId = new object();
        private string _roles;
        private string[] _rolesSplit = new string[0];
        private string _users;
        private string[] _usersSplit = new string[0];
        /// <summary>Gets or sets the user roles that are authorized to access the controller or action method.</summary>
        /// <returns>The user roles that are authorized to access the controller or action method.</returns>
        public string Roles
        {
            get
            {
                return this._roles ?? string.Empty;
            }
            set
            {
                this._roles = value;
                this._rolesSplit = AuthorizeAttribute.SplitString(value);
            }
        }
        /// <summary>Gets the unique identifier for this attribute.</summary>
        /// <returns>The unique identifier for this attribute.</returns>
        public override object TypeId
        {
            get
            {
                return this._typeId;
            }
        }
        /// <summary>Gets or sets the users that are authorized to access the controller or action method.</summary>
        /// <returns>The users that are authorized to access the controller or action method.</returns>
        public string Users
        {
            get
            {
                return this._users ?? string.Empty;
            }
            set
            {
                this._users = value;
                this._usersSplit = AuthorizeAttribute.SplitString(value);
            }
        }
        /// <summary>When overridden, provides an entry point for custom authorization checks.</summary>
        /// <returns>true if the user is authorized; otherwise, false.</returns>
        /// <param name="httpContext">The HTTP context, which encapsulates all HTTP-specific information about an individual HTTP request.</param>
        /// <exception cref="T:System.ArgumentNullException">The <paramref name="httpContext" /> parameter is null.</exception>
        protected virtual bool AuthorizeCore(HttpContextBase httpContext)
        {
            if (httpContext == null)
            {
                throw new ArgumentNullException("httpContext");
            }
            IPrincipal user = httpContext.User;
            return user.Identity.IsAuthenticated && (this._usersSplit.Length <= 0 || this._usersSplit.Contains(user.Identity.Name, StringComparer.OrdinalIgnoreCase)) && (this._rolesSplit.Length <= 0 || this._rolesSplit.Any(new Func<string, bool>(user.IsInRole)));
        }
        private void CacheValidateHandler(HttpContext context, object data, ref HttpValidationStatus validationStatus)
        {
            validationStatus = this.OnCacheAuthorization(new HttpContextWrapper(context));
        }
        /// <summary>Called when a process requests authorization.</summary>
        /// <param name="filterContext">The filter context, which encapsulates information for using <see cref="T:System.Web.Mvc.AuthorizeAttribute" />.</param>
        /// <exception cref="T:System.ArgumentNullException">The <paramref name="filterContext" /> parameter is null.</exception>
        public virtual void OnAuthorization(AuthorizationContext filterContext)
        {
            if (filterContext == null)
            {
                throw new ArgumentNullException("filterContext");
            }
            if (OutputCacheAttribute.IsChildActionCacheActive(filterContext))
            {
                throw new InvalidOperationException(MvcResources.AuthorizeAttribute_CannotUseWithinChildActionCache);
            }
            bool flag = filterContext.ActionDescriptor.IsDefined(typeof(AllowAnonymousAttribute), true) || filterContext.ActionDescriptor.ControllerDescriptor.IsDefined(typeof(AllowAnonymousAttribute), true);
            if (flag)
            {
                return;
            }
            if (this.AuthorizeCore(filterContext.HttpContext))
            {
                HttpCachePolicyBase cache = filterContext.HttpContext.Response.Cache;
                cache.SetProxyMaxAge(new TimeSpan(0L));
                cache.AddValidationCallback(new HttpCacheValidateHandler(this.CacheValidateHandler), null);
                return;
            }
            this.HandleUnauthorizedRequest(filterContext);
        }
        /// <summary>Processes HTTP requests that fail authorization.</summary>
        /// <param name="filterContext">Encapsulates the information for using <see cref="T:System.Web.Mvc.AuthorizeAttribute" />. The <paramref name="filterContext" /> object contains the controller, HTTP context, request context, action result, and route data.</param>
        protected virtual void HandleUnauthorizedRequest(AuthorizationContext filterContext)
        {
            filterContext.Result = new HttpUnauthorizedResult();
        }
        /// <summary>Called when the caching module requests authorization.</summary>
        /// <returns>A reference to the validation status.</returns>
        /// <param name="httpContext">The HTTP context, which encapsulates all HTTP-specific information about an individual HTTP request.</param>
        /// <exception cref="T:System.ArgumentNullException">The <paramref name="httpContext" /> parameter is null.</exception>
        protected virtual HttpValidationStatus OnCacheAuthorization(HttpContextBase httpContext)
        {
            if (httpContext == null)
            {
                throw new ArgumentNullException("httpContext");
            }
            if (!this.AuthorizeCore(httpContext))
            {
                return HttpValidationStatus.IgnoreThisRequest;
            }
            return HttpValidationStatus.Valid;
        }
        internal static string[] SplitString(string original)
        {
            if (string.IsNullOrEmpty(original))
            {
                return new string[0];
            }
            IEnumerable<string> source =
                from piece in original.Split(AuthorizeAttribute._splitParameter)
                let trimmed = piece.Trim()
                where !string.IsNullOrEmpty(trimmed)
                select trimmed;
            return source.ToArray<string>();
        }
    }
}
通过以上描述,我们可以在自己的MVC程序中使用AuthorizeAttribute类或者其派生的子类来达到用户认证和授权的目的。
一、新建一个MVC项目
新建一个MVC项目,选择不用身份验证。
二、添加Model
为了达到演示目的,添加了一个简单的StudentViewModel,用来显示业务数据:
public class StudentViewModel {
        public int ID { get; set; }
        public string Name { get; set; }
        public string Tel { get; set; }
    }
添加一个UserViewModel,用来进行登录和角色授权:
    public class UserViewModel {
        [DisplayName("用户名")]
        public string UserName { get; set; }
        [DisplayName("密  码")]
        public string Pwd { get; set; }
        public Role Role { get; set; }
    }

    public enum Role {
        Admin=1,
        Normal=2,
        System=3
    }
OK,本篇讲述就不去访问数据库了,直接用业务数据。然后我们再新建一个Data类,存放业务数据:
    public class Data {
        public static List<StudentViewModel> students = new List<StudentViewModel> {
            new StudentViewModel { ID=1, Name="张三", Tel="15808038502" },
            new StudentViewModel { ID=2, Name="李四", Tel="15708032302" },
            new StudentViewModel { ID=3, Name="王五", Tel="15562438502" },
            new StudentViewModel { ID=4, Name="赵六", Tel="15064534502" },
            new StudentViewModel { ID=5, Name="孙琦", Tel="15185465402" }
        };

        public static List<UserViewModel> users = new List<UserViewModel> {
            new UserViewModel { UserName="admin", Pwd="1", Role=Role.Admin },
            new UserViewModel { UserName="normal", Pwd="1", Role=Role.Normal},
            new UserViewModel { UserName="system", Pwd="1", Role=Role.System}
        };
    }
三、创建Controller控制器和视图
1、新建StudentController
Index视图是显示全部的Student数据,FindOne是显示一条Student数据。:
    public class StudentController : Controller {

        public ActionResult Index() {
            return View(Data.Data.students);
        }
        public ActionResult FindOne(int? id) {
            return View("Index", Data.Data.students.Where(s => s.ID == id));
        }
    }
现在没有对Student控制器做任何的身份和授权访问限制。接下来我们创建一个登陆用的控制器。
2、新建AccountController
    public class AccountController : Controller {
        //用于获取登录页面
        [HttpGet]
        public ActionResult Login() {
            return View();
        }

        //用于登录验证
        [HttpPost]
        public ActionResult Login(LoginViewModel login) {
            if (ModelState.IsValid) {
                UserViewModel clogin = Data.Data.users.Where(u => u.UserName == login.UserName && u.Pwd == login.Pwd).FirstOrDefault();
                if (clogin != null) {
                    //FormsAuthentication.SetAuthCookie有两个参数
                    //第一个参数:设置当前登录用户的标识,可以自定义
                    //第二个参数:
                    //true:设置永久的。可以在web.config中设置过期时间,喏,下面的timeout就是过期时间,以分钟为单位。如下所示:
                    //     < system.web >
                    //         < authentication mode = "Forms" >
                    //           < forms loginUrl = "~/Account/Login" timeout = "2" />
                    //        </ authentication >
                    //     </ system.web >
                    //false:设置当前会话时间为有效时间,浏览器或页面已关闭就需要重新登录。
                    FormsAuthentication.SetAuthCookie(clogin.UserName, false);
                    return RedirectToAction("FindOne", "Student", new { id = 1 });
                }
            }
            return View();
        }

        //用于注销登录
        [Authorize]
        [NoCache]
        public ActionResult LoginOut() {
            FormsAuthentication.SignOut();
            return RedirectToAction("Login", "Account");
        }

        //用于显示无权限消息
        public ActionResult NoPemission() {
            return View();
        }
    }
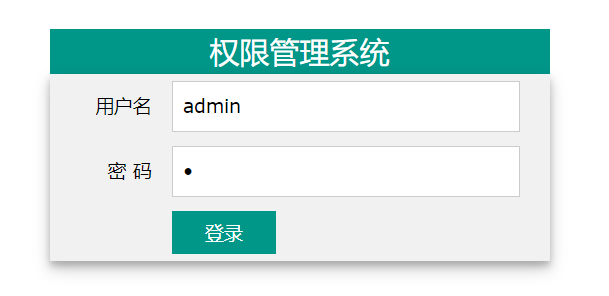
登陆页面如下:
@model MVCDemo2.ViewModels.UserViewModel
@{
    Layout = null;
}

<!DOCTYPE html>
<html>
<head>
    <meta name="viewport" content="width=device-width" />
    <title>Login</title>
    <link href="~/Content/w3.css" rel="stylesheet" />
    <style>
        html, body {
            margin: 0;
            padding: 0;
        }

        .main {
             400px;
            height: 300px;
            position: absolute;
            left: 0;
            top: 0;
            right: 0;
            bottom: 0;
            margin: auto;
        }
    </style>
</head>
<body>

    <div class="main">
        <h3 class="w3-teal w3-center w3-margin-0" style="100%;">权限管理系统</h3>
        @using (Html.BeginForm("Login", "Account", FormMethod.Post, new { @class = "w3-container w3-card-4 w3-light-grey", style = "100%;" })) {
                <table class="w3-table">
                    <tr>
                        <td style="20%; vertical-align:middle;text-align:right;">@Html.LabelFor(x => x.UserName)</td>
                        <td style="80%;">@Html.TextBoxFor(x => x.UserName, new { @class = "w3-input w3-border", placeholder = "用户名" })</td>
                    </tr>
                    <tr class="w3-padding">
                        <td style="vertical-align:middle;text-align:right;">@Html.LabelFor(x => x.Pwd)</td>
                        <td>@Html.PasswordFor(x => x.Pwd, new { @class = "w3-input w3-border", placeholder = "密  码" })</td>
                    </tr>
                    <tr style="display:none;">
                        <td><input type="text" id="returnUrl" name="returnUrl" value="@Url.Encode(Request.Url.ToString())"/></td>
                    </tr>
                    <tr>
                        <td></td>
                        <td style="text-align:left;">
                            <div style="30%;"><button type="submit" class="w3-btn-block w3-teal">登录</button></div>
                        </td>
                    </tr>
                </table>
        }
    </div>
    @*<script>
        function login() {

        }
    </script>*@
</body>
</html>
无权限提示页面如下,也就是NoPemission:
@{
    Layout = null;
}
<!DOCTYPE html>
<html>
<head>
    <meta name="viewport" content="width=device-width" />
    <title>NoPemission</title>
</head>
<body>
    <div>
        您无权限操作该页面!
    </div>
</body>
</html>
四、创建MyAuthorizeAttribute权限验证类
创建MyAuthorizeAttribute类的目的是需要做身份验证和权限验证所用,通过继承AuthorizeAttribute类来达到目的:
    public class MyAuthorizeAttribute : AuthorizeAttribute {
        //设置是否拥有某些权限的状态码
        private int _status = 0;
        protected override bool AuthorizeCore(HttpContextBase httpContext) {
            //切记:一定要在设置_status的方法的第一行初始化该字段,否则会出现问题。因为针对同一Action来说,上一次访问后完成后,下一次不同权限的账户又来访问,如果不初始化该_status字段,那么该_status字段值还是上一次的旧值。
            //估计绑定的Action的Controller实例还存在,没有被回收,等到下一次调用该Controller时,就是会激活该Controller实例
            _status=0;
            //判断当前登录的用户 是否已经登录过且身份认证被通过
            if (httpContext.User.Identity.IsAuthenticated) {
                //判断当前的Roles字段是否是空,是空的,则说明该控制器或Action不需要角色权限控制
                if (string.IsNullOrWhiteSpace(Roles)) return true;
                //通过半角逗号去获取一个权限数组
                string[] roles = Roles.Split(new string[] { "," }, StringSplitOptions.RemoveEmptyEntries);
                if (roles.Length <= 0) return true;
                //找到当前登录的用户
                //httpContext.User.Identity.Name就是我们在Login验证登录时候设置的clogin.UserName。设置代码为FormsAuthentication.SetAuthCookie(clogin.UserName, false);
                UserViewModel user = Data.Data.users.Where(u => u.UserName == httpContext.User.Identity.Name).SingleOrDefault();
                //判断当前登录用户是否拥有访问该控制器或Action的权限,如果有,则返回true,可以访问;如果没有,则返回false,需要在OnAuthorization方法中设置该滤过器的Result。
                if (roles.Contains(((int)user.Role).ToString()))
                    return true;
                else {
                    //无角色权限 通过设置_status,可以在OnAuthorization方法中做出相应的判断,并设置相应的filterContext.Result
                    _status = 10;
                    //授权失败
                    return false;
                }
            }
            //没有登录,则返回false,表明身份认证未通过,程序直接会跳转到登录页面,登录页面可在web.config中设置
            //  < system.web >
            //      < authentication mode = "Forms" >
            //         < forms loginUrl = "~/Account/Login" timeout = "2" />
            //      </ authentication >
            //  </ system.web >
            else return false;
        }

        public override void OnAuthorization(AuthorizationContext filterContext) {
            //执行父类的OnAuthorization方法
            base.OnAuthorization(filterContext);
            //如果当前的_status有状态变化,则返回相应的ActionResult。当前返回的是无权限查看的提示界面。
            if (_status == 10)
                filterContext.Result = new RedirectToRouteResult(new System.Web.Routing.RouteValueDictionary(new {
                    //需要跳转的Controller
                    controller = "Account",
                    //需要跳转的Action
                    action = "NoPemission",
                    //返回的字段说明
                    returnUrl = filterContext.HttpContext.Request.Url,
                    returnMessage = "您无权限查看!"
                }));
        }
    }
接着将MyAuthorizeAttribute特性类附加到StudentController的Action中,代码如下:
    public class StudentController : Controller {

        //只要登录成功,即可访问
        [MyAuthorize]
        public ActionResult Index() {
            return View(Data.Data.students);
        }

        //需要登录成功,且该用户角色为 1:Admin 3:System 的才可访问
        [MyAuthorize(Roles = "1,3")]
        public ActionResult FindOne(int? id) {
            return View("Index", Data.Data.students.Where(s => s.ID == id));
        }
    }
五、测试结果
首先我们将该站点的默认页面设置为StudentIndex,设置方法如下:
    public class RouteConfig {
        public static void RegisterRoutes(RouteCollection routes) {
            routes.IgnoreRoute("{resource}.axd/{*pathInfo}");

            routes.MapRoute(
                name: "Default",
                url: "{controller}/{action}/{id}",
                defaults: new { controller = "Student", action = "Index", id = UrlParameter.Optional }
            );
        }
    }
接着运行程序:
因为站点启动的时候,默认访问的是Student控制器的Index行为方法,但我们在该Index行为方法附加了一个需要授权的特性MyAuthorize。因此,在没有登录之前去访问Index行为方法的话,就会跳转到我们在web.config配置文件中设置的登录地址。因此,第一次出现在我们眼前的是一个登录界面:
当我们输入正确的用户名和密码,并点击“登录”按钮后,就能进入Student控制器的Index行为方法了。如下图所示:

因为我们是用admin账号登录的,该账户的权限是Admin,因此我们也可以访问Student的FindOne行为方法。如下图所示:

接下来让我们点击“退出”,注销权限为Admin的admin账户,改用权限为Normal的normal账户试一下,看能否访问被权限控制的Student的FindOne行为方法。
输入账户名为normal,密码为1的账户信息,并点击“登录”按钮:

因为我们在Account的登录验证方法Login行为方法中标注登录验证成功后,就会跳转到Student的FindOne行为方法,因此只要账户名和密码输入正确就能验证是否能成功访问FindOne。请看如下结果:

果然,因为我们在FindOne方法中标注了只有1(Admin)和3(System)权限才能访问该方法,而Normal不在这些访问权限之内。
由此可见,我们可以通过继承AuthorizeAttribute类轻松地来达到身份验证和授权的目的,如果不在权限之内,就是不让你操作。