- 这个例子还是比较简单的,独立完成后,能大概知道vue是干嘛的,可以写个todoList的小例子。
- 开始写例子之前,先对环境的部署做点简单的介绍,其实和Vue官方的差不多。
#如若没有安装过vue-cli,先全局安装一下vue-cli
$ cnpm i -g vue-cli
#到自己喜欢的目录下创建一个基于 webpack 模板的新项目
$ vue init webpack my-project
#
#
#之后会有如下询问
? Project name (my-project) #回车
? Project description  #回车,也可以写点项目描述
? Author #回车,或者输入作者
? Vue build standalone #回车
? Install vue-router? (Y/n) #这里是官方推荐的路由,果断yes
? Use ESLint to lint your code? #No
? Set up unit tests #No
? Setup e2e tests with Nightwatch? #No
? Should we run `npm install` for you after the project has been created? (recommended)
> Yes, use NPM #可以按上下方向键选择,这里我选第一个NPM,按回车确认
  Yes, use Yarn
  No, I will handle that myself
#等待完成- 1
- 2
- 3
- 4
- 5
- 6
- 7
- 8
- 9
- 10
- 11
- 12
- 13
- 14
- 15
- 16
- 17
- 18
- 19
- 20
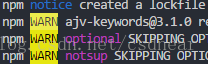
完成后可能会有警告,没事,不是ERR就好
$ cd my-project #进入刚新建的文件夹
$ cnpm install  #这里用的是淘宝的NPM镜像,不懂可以自行搜索cnpm
$ npm run dev
###I Your application is running here: http://localhost:8080- 1
- 2
- 3
- 4
确保端口没被占用,打开localhost:8080 see see
打开我们的项目可见如下:
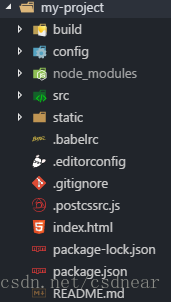
| 名称 | 说明 |
|---|---|
| build | 项目构建的一些代码 |
| config | 开发环境的配置 |
| node_modules | 一些依赖包 |
| src | 源码,我们就在这个文件夹内写代码 |
| static | 静态文件 |
| .babelrc | ES6编译的一些配置 |
| .editorconfig | 代码风格配置文件 |
| .gitignore | git上传时忽略的一些文件,比如node_modules这个文 |
| .postcssrc.js | 听说是转换CSS样式的 |
| index.html | 入口页面 |
| package-lock.json | 听说是更详细的package.json |
| package.json | 项目信息,项目名称,开发的依赖的记录等,一个JSON文件 |
现在打开srccomponnetsHelloWorld.vue 把大部分代码删除,剩余如下:
<template>
    <h1>{{ msg }}</h1>
</template>
<script>
export default { //ES6语法,用于输出到外部,这样就可以在其他文件内用import输入
  name: 'HelloWorld',
  data () {    //由于是组件,data必须是个函数,这是ES6写法,data后面加括号相当于data: function () {}
    return {   //记得return不然接收不到数据
      msg: 'Welcome' //上面的 msg 就是这里输出的
    }
  }
}
</script>
<style>
h1 {
  font-weight: normal;
}
a {
  color: #42b983;
}
</style>- 1
- 2
- 3
- 4
- 5
- 6
- 7
- 8
- 9
- 10
- 11
- 12
- 13
- 14
- 15
- 16
- 17
- 18
- 19
- 20
- 21
到这里用了点ES6语法,如果对export和import不了解的,建议看看相关的介绍,暂时不想看也可以照着敲代码。不过建议还是看看,只需10分钟了解下export和import就好—— 阮一峰ECMAScript 6 入门
- 可以看到,之前打开的页面变了样:

现在我们来安装一下element-ui(关于element-ui详细情况请自行搜索)
- 可以按照官方方法使用
npm i element-ui -S命令进行安装- 也可以在package.json中添加,后通过
cnpm install进行安装
这里我们选择2,打开package.json,找到devDependencies并在最后加上”element-ui”: “^2.2.1”
"devDependencies": {
...
...
"element-ui": "^2.2.1"- 1
- 2
- 3
- 4
打开命令行停止服务,再通过cnpm install进行安装,安装完成后npm run dev启动
打开main.js在里面添加三行内容
import ElementUI from 'element-ui' //新添加
import 'element-ui/lib/theme-chalk/index.css' //新添加,避免后期打包样式不同,要放在import App from './App';之前
import Vue from 'vue'
import App from './App'
import router from './router'


Vue.use(ElementUI)   //新添加
Vue.config.productionTip = false

/* eslint-disable no-new */
new Vue({
  el: '#app',
  router,
  components: { App },
  template: '<App/>'
})
- 1
- 2
- 3
- 4
- 5
- 6
- 7
- 8
- 9
- 10
- 11
- 12
- 13
- 14
- 15
- 16
- 17
- 18
添加了这三行,我们就可以使用element-ui了
接下来在components文件夹内新建一个NewContact.vue 文件,添加如下代码
<template>
  <el-row>
    <el-button type="success">1</el-button>
  </el-row>
</template>
<script>

</script>
<style>

</style>
- 1
- 2
- 3
- 4
- 5
- 6
- 7
- 8
- 9
- 10
- 11
- 12
打开之前的HelloWorld.vue对内容进行修改(router是官方路由插件,router-link to是router的语法):
<template>
<!-- 这里router-link to="newcontact"会把路由导航到http://localhost:8080/#/newcontact   -->
    <router-link to="newcontact"><h1>{{ msg }}</h1></router-link>
</template>- 1
- 2
- 3
- 4
打开router/index.js,添加新路由(router是官方路由插件,深入学习请查看文档)
import Vue from 'vue'
import Router from 'vue-router'
import HelloWorld from '@/components/HelloWorld'
import NewContact from '@/components/NewContact'//新添加,之后在下方的component: NewContact才会生效
Vue.use(Router)
export default new Router({
  routes: [
    {
      path: '/',
      name: 'HelloWorld',
      component: HelloWorld
    },
    {
      path: '/newcontact',//和router-link to相呼应,导航到/newcontact
      name: 'NewContact',
      component: NewContact
    }
  ]
})- 1
- 2
- 3
- 4
- 5
- 6
- 7
- 8
- 9
- 10
- 11
- 12
- 13
- 14
- 15
- 16
- 17
- 18
- 19
保存后打开页面可以看到如下: 
之前的welcome变成了可点击的链接,点击后跳转看到如下页面 

至此,已经我们已经把该引入的依赖,和路由的简单配置,简单组件的使用给完成了
接下来我们把精力都放到NewContact.vue这个组件,后面的代码几乎都在这个组件
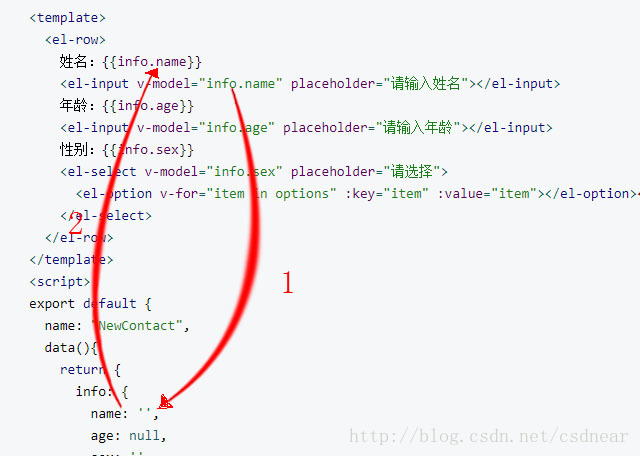
打开NewContact.vue键入如下代码:
<template>
  <el-row>
    姓名:{{info.name}}
    <el-input v-model="info.name" placeholder="请输入姓名"></el-input>
    年龄:{{info.age}}
    <el-input v-model="info.age" placeholder="请输入年龄"></el-input>
    性别:{{info.sex}}
    <el-select v-model="info.sex" placeholder="请选择">
      <el-option v-for="item in options" :key="item" :value="item"></el-option><!-- 这里的key官方推荐在v-for时使用,不然会警告,但不影响使用 -->
    </el-select>
  </el-row>
</template>
<script>
export default {
  name: "NewContact",
  data(){
    return {
      info: {
        name: '',
        age: null,
        sex: ''
      },
      options: [
        '女','男','保密'
      ]
    }
  }
}
</script>
<style>

</style>- 1
- 2
- 3
- 4
- 5
- 6
- 7
- 8
- 9
- 10
- 11
- 12
- 13
- 14
- 15
- 16
- 17
- 18
- 19
- 20
- 21
- 22
- 23
- 24
- 25
- 26
- 27
- 28
- 29
- 30
- 31
- 32
<el-input v-model="info.name"></el-input> el-input是element-ui的组件,以el-开头的是element-ui的组件 v-model这里的v-model是Vue的指令,官方说法是——在表单控件或者组件上创建双向绑定。 ="info.name"就是v-model绑定的数据,在data中return的内容里看到info.name对应的是'';info.age对应的是null
return {
      info: {
        name: '',
        age: null,
        sex: ''
}- 1
- 2
- 3
- 4
- 5
- 6
当我们打开http://localhost:8080/#/newcontact
在输入框输入内容时可见,姓名:{{info.name}}双花括号里的内容也跟着改变,这就是双向绑定 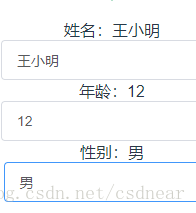
<el-option v-for="item in options" :key="item" :value="item"> v-for="item in options"就是循环options这个数组的内容
options: [
        '女','男','保密'
]- 1
- 2
- 3
如果在里面添加内容,那么下拉菜单的内容会一起变化,一 一对应 :value="item"会把你选的(’女’,’男’,’保密’)传给<el-select v-model="info.sex"> v-model="info.sex"会传给data中的info.sex
return {
      info: {
        name: '',
        age: null,
        sex: ''
}- 1
- 2
- 3
- 4
- 5
- 6
接下来在加入新代码,NewContact.vue目前的代码如下:
.....
    </el-select>
    <el-button @click="create">创建</el-button>
    <template>
      <el-table :data="tabledata" align="left">
        <el-table-column prop="name" label="姓名"></el-table-column>
        <el-table-column prop="age" label="年龄"></el-table-column>
        <el-table-column prop="sex" label="性别"></el-table-column>
        <el-table-column label="操作">
          <template slot-scope="a">
            <el-button size="mini" type="danger" @click="del(a.$index)">删除</el-button>
          </template>
        </el-table-column>
      </el-table>
    </template>
  </el-row>
</template>
<script>
export default {
  name: "NewContact",
  data(){
    return {
      info: {
        name: '',
        age: null,
        sex: ''
      },
      options: [
        '女','男','保密'
      ],
      tabledata:[
        {name: 'Leo', age: 12, sex: 'man'},
        {name: 'Lei', age: 22, sex: 'women'},
        {name: 'Lii', age: 65, sex: 'men'}
      ]
    }
  }
}
</script>
<style>

</style>
- 1
- 2
- 3
- 4
- 5
- 6
- 7
- 8
- 9
- 10
- 11
- 12
- 13
- 14
- 15
- 16
- 17
- 18
- 19
- 20
- 21
- 22
- 23
- 24
- 25
- 26
- 27
- 28
- 29
- 30
- 31
- 32
- 33
- 34
- 35
- 36
- 37
- 38
- 39
- 40
- 41
- 42
- 43
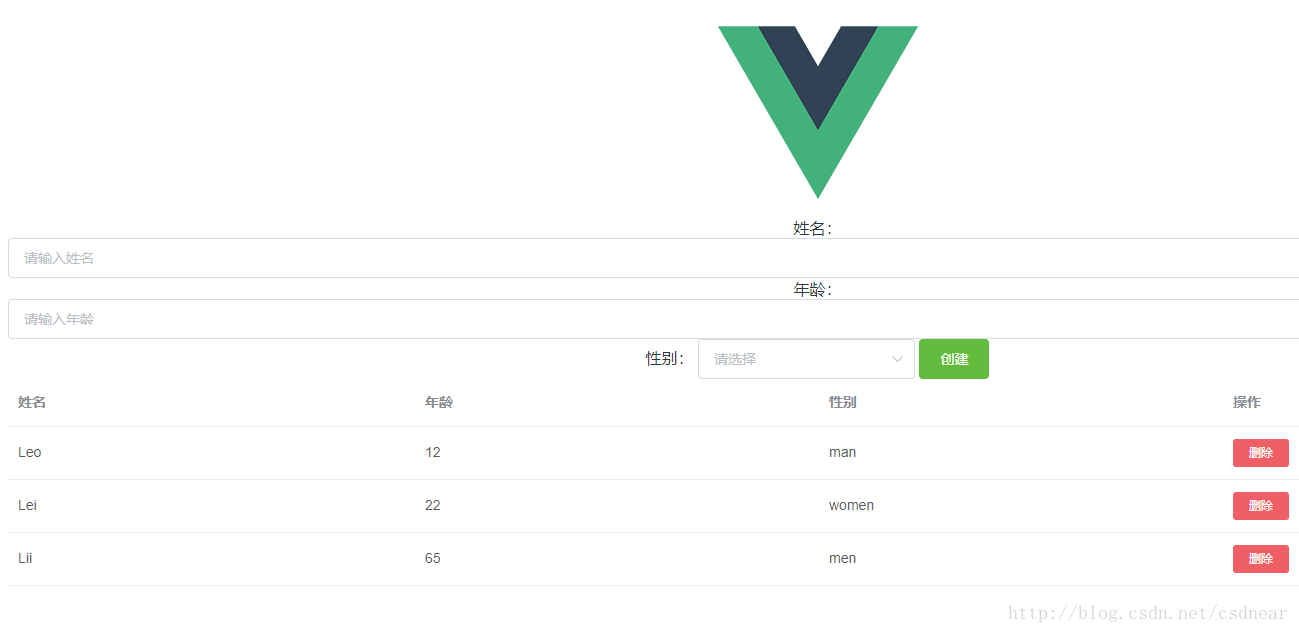
<el-button @click="create" type="success">创建</el-button>
这里就是创建了一个按钮,@是v-on的缩写,点击后会出发create这个函数
<el-table :data="tabledata">
就是表格要绑定的数据
<el-table-column prop="name">
在表格绑定数据情况下prop用于数据传递,tabeldata里的name
<template slot-scope="a">
是Vue2.5.0后替代之前scope的作用域插槽,”a”是随便的名字,就用用来后去table的状态,可以获取的row, column, $index和store,这里我们只需要获取index就行了,相关具体内容点这里
@click="del(a.$index)
@是v-on的缩写,表示点击后调用del函数,a.$index表示slot-scope获取到的index值
tabledata:[//这里的内容是方便我们看到table的变化,可见页面上的table有了如下的内容
        {name: 'Leo', age: 12, sex: 'man'},
        {name: 'Lei', age: 22, sex: 'women'},
        {name: 'Lii', age: 65, sex: 'men'}
]- 1
- 2
- 3
- 4
- 5
打开页面可以看到
我们点击创建和删除按钮并没有反应,所以我们要添加methods,在它内部添加两个方法,一个是创建,一个是删除
data(){
...
},
  methods: {//添加在data(){...},的后面
    create(){
      this.tabledata.push(this.info)//给tabledata添加一个对象(之前我们创建的info)
      this.info =  {name: '', age: null, sex: ''}//点击创建后,让option还原,而不是停留在所选的项
    },
    del(index){
      this.tabledata.splice(index,1)//删除点击的对象,index是lot-scope="a" a.$index传过来的
    }
}- 1
- 2
- 3
- 4
- 5
- 6
- 7
- 8
- 9
- 10
- 11
- 12
到这里已经完成了添加和删除,为了在我们刷新页面后,数据依然保存着,我们可以用localStorage本地存储数据
关于localStorage可以点击这里了解
接下来我们在src内新建一个store文件夹,和App.vue、components同一个层级,在里面新建一个store.js,内容如下
const STORAGE_KEY = 'tabale-vuejs'//名字随便起
export default {//向往输出,以便组件接收
    fetch() {//我们定义的获取数据的方法
        return JSON.parse(window.localStorage.getItem(STORAGE_KEY)
         || '[]')
    },
    save(items) {//我们定义的保存数据的方法
        window.localStorage.getItem(STORAGE_KEY, JSON.stringify(items))
    }
}- 1
- 2
- 3
- 4
- 5
- 6
- 7
- 8
- 9
- 10
getItem和getItem是window.localStorage的获取和保存数据的方法
我们用JSON.stringify和JSON.parse把数据转成字符串和解析,这样就方便我们写入tabledata
接下来我们添加新代码
<script>
import Storage from '../store/store'//新添加,把刚写的localStorage导入
export default {
name: "NewContact",
  data(){
    return {
      info: {
        name: '',
        age: null,
        sex: ''
      },
      options: [
        '女','男','保密'
      ],
      tabledata: Storage.fetch()//把之前的删除,写入这个获取数据的方法
    }
  },
  methods: {
    create(){
      this.tabledata.push(this.info)
      this.info =  {name: '', age: null, sex: ''}
    },
    del(index){
      this.tabledata.splice(index,1)
    }
  },
  watch:{//新添加,watch是vue的监听,一旦监听对象有变化就会执行相应操作
    tabledata{//新添加,被监听的对象
      handler(items){Storage.save(items)},//新添加,监听对象变化后所做的操作,一个函数,保存数据
      deep: true//深度监听,避免数据的嵌套层数太多,我们要使用深度监听,这样即使数据层级过多监听不到
    }
}- 1
- 2
- 3
- 4
- 5
- 6
- 7
- 8
- 9
- 10
- 11
- 12
- 13
- 14
- 15
- 16
- 17
- 18
- 19
- 20
- 21
- 22
- 23
- 24
- 25
- 26
- 27
- 28
- 29
- 30
- 31
- 32
tabledata:由于fetch()得到的是数组,所以直接tabledata: 后写入就行类似于
tabledata:[{...},{...}]- 1
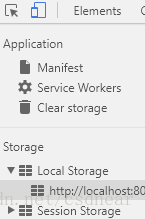
当我们添加删除数据时,可以打开chrmoe浏览器的F12>Application>Local Storage进行查看
总的来说就是我们点击页面上的创建按钮,watch监听到tabledata有变化,就执行savedata(items){Storage.save(items)}进行数据保存,点击删除时,tabledata也有变化,同样会执行保存
可能之前写的内容会有不小心写错字母的情况,最后把NewContact.vue稍稍修改样式后,把完整的内容拷贝到下方:
NewContact.vue
<template>
  <el-row>
    <el-col :xs="24" :sm="18" :md="14" :lg="10" id="main">
    <label>姓名:</label>
    <el-input v-model="info.name" placeholder="请输入姓名"></el-input>
    <label>年龄:</label>
    <el-input v-model="info.age" placeholder="请输入年龄"></el-input>
    <label>性别:</label>
    <el-select v-model="info.sex" placeholder="请选择">
      <el-option v-for="item in options" :key="item" :value="item"></el-option><!-- 这里的key官方推荐在v-for时使用,不然会警告,但不影响使用 -->
    </el-select>
    <el-button  class="btn-auto" @click="create" type="success">创建</el-button>
    <template>
      <el-table :data="tabledata" align="left">
        <el-table-column prop="name" label="姓名"></el-table-column>
        <el-table-column prop="age" label="年龄"></el-table-column>
        <el-table-column prop="sex" label="性别"></el-table-column>
        <el-table-column label="操作">
          <template slot-scope="a">
            <el-button size="mini" type="danger" @click="del(a.$index)">删除</el-button>
          </template>
        </el-table-column>
      </el-table>
    </template>
    </el-col>
  </el-row>
</template>
<script>
import Storage from '../store/store'
export default {
  name: "NewContact",
  data(){
    return {
      info: {
        name: '',
        age: null,
        sex: ''
      },
      options: [
        '女','男','保密'
      ],
      tabledata: Storage.fetch()
    }
  },
  methods: {
    create(){
      this.tabledata.push(this.info)
      this.info =  {name: '', age: null, sex: ''}
    },
    del(index){
      this.tabledata.splice(index,1)
    }
  },
  watch:{
    tabledata:{
      handler(items){Storage.save(items)},
      deep: true
    }
  }
}
</script>
<style>
    #main{
      float: none;
      margin: 0 auto;
  }
  .el-input{
    padding-bottom: 5px;
  }
  .el-select {
      display: block;
  }
  .btn-auto{
       100%;
      margin-top: 12px;
  }
</style>
- 1
- 2
- 3
- 4
- 5
- 6
- 7
- 8
- 9
- 10
- 11
- 12
- 13
- 14
- 15
- 16
- 17
- 18
- 19
- 20
- 21
- 22
- 23
- 24
- 25
- 26
- 27
- 28
- 29
- 30
- 31
- 32
- 33
- 34
- 35
- 36
- 37
- 38
- 39
- 40
- 41
- 42
- 43
- 44
- 45
- 46
- 47
- 48
- 49
- 50
- 51
- 52
- 53
- 54
- 55
- 56
- 57
- 58
- 59
- 60
- 61
- 62
- 63
- 64
- 65
- 66
- 67
- 68
- 69
- 70
- 71
- 72
- 73
- 74
- 75
- 76
- 77
- 78
这里是localStorage:
const STORAGE_KEY = 'tabale-vuejs'
export default {
    fetch() {
        return JSON.parse(window.localStorage.getItem(STORAGE_KEY)
         || '[]')
    },
    save(items) {
        window.localStorage.setItem(STORAGE_KEY, JSON.stringify(items))
    }
}- 1
- 2
- 3
- 4
- 5
- 6
- 7
- 8
- 9
- 10
完成后我们要进行打包,方便直接在浏览器中运行
打开/config/index.js
  build: {
    // Template for index.html
    index: path.resolve(__dirname, '../dist/index.html'),

    // Paths
    assetsRoot: path.resolve(__dirname, '../dist'),
    assetsSubDirectory: 'static',
    assetsPublicPath: './',//加了个. 避免生产路径的错误

    /**
     * Source Maps
     */

    productionSourceMap: false, //改为false