主要功能:
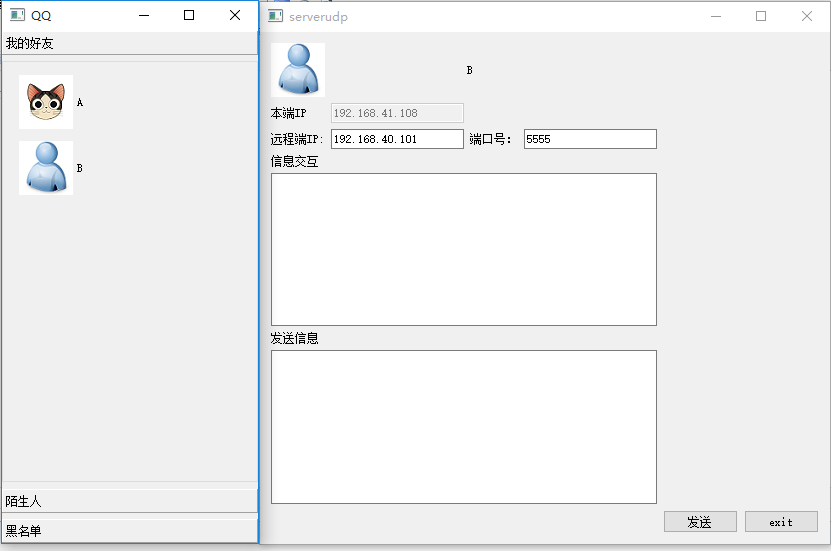
1.实现QQ好友界面;
2.点击QQ好友图标,可以打开对应的聊天对话框;
说明:聊天对话框的界面即为上次所描述的UDP的实现界面,略有改动;
整体程序操作分析:
1.qq好友界面作为主操作界面,从数据类中添加好友头像,好友名字等信息,点击主操作界面上的好友,能够打开聊天对话框类;
2.添加好友头像,好友名字等信息的行为是相同的,建立一个新的类,只需要留出接口即可;
3.聊天对话框类中,好友信息不一致以外,聊天的连接是一致的,同样可以留出接口,建立新的类;
qq好友界面:
1.目前分组是固定的;

#include "drawer.h"
#include<QGroupBox>
#include<QVBoxLayout>
#include<QHBoxLayout>
#include<QPixmap>
#include<QIcon>
#include<QMouseEvent>
#include<perinfo.h>
#include<QDebug>
#include<mychat.h>
Drawer::Drawer()

{
    setWindowTitle("QQ");

    QGroupBox  *groupBox1=new QGroupBox;
    QVBoxLayout *layout1 =new QVBoxLayout(groupBox1);
    layout1->setMargin(10);
    layout1->setAlignment(Qt::AlignLeft);
    layout1->addWidget(Getmodecontain());//
    layout1->addWidget(Getmodecontain());
    layout1->addStretch();


    QGroupBox *groupBox2=new QGroupBox;
    QVBoxLayout *layout2=new QVBoxLayout(groupBox2);
    layout2->setMargin(10);
    layout2->setAlignment(Qt::AlignLeft);
    layout2->addWidget(Getmodecontain());
    layout2->addWidget(Getmodecontain());
    layout2->addStretch();

    QGroupBox *groupBox3=new QGroupBox;
    QVBoxLayout *layout3=new QVBoxLayout(groupBox3);
    layout3->setMargin(10);
    layout3->setAlignment(Qt::AlignLeft);
    layout3->addWidget(Getmodecontain());
    layout3->addWidget(Getmodecontain());
    layout3->addStretch();

    resize(256,512);
    this->addItem((QWidget*)groupBox1,QIcon("right.png"),"我的好友");
    this->addItem((QWidget*)groupBox2,QIcon("right.png"),"陌生人");
    this->addItem((QWidget*)groupBox3,QIcon("right.png"),"黑名单");

}


MyChat* Drawer:: showchat(int index)  //点击得到index,给MyChat类
 {
    qDebug()<<"showchat:::"<<index;
    MyChat *chatDialog = new MyChat;   //创建聊天对话框

    chatDialog->setPerInfo(lst->per.at(index));
    chatDialog->show();

    return chatDialog;

 }

perInfo* Drawer::Getmodecontain()   //创建好友(ToolButton)且写入相关信息
{

//    perList *lst=new perList;  //新建一个对象 ,lst中存放好友信息
       while(num_per<lst->perlist_size())
        {
           perInfo *person1=new perInfo;
          person1->setpersonMessage((lst->per).at(num_per)); //得到每个结构体中的内容

          // qDebug()<<lst->per.at(num_per).name;//显示查看信息
           connect(person1,SIGNAL(myclicked(int)),this,SLOT(showchat(int)));
          num_per++;
          return person1;
        }
       return 0;  //不能丢
}
perInfo是一个基于QToolButton的类, Drawer是主界面,成员函数Getmodecontain()是指从链表中获取好友数量,将好友对应的信息加载到perInfo(实质上是含有好友信息的QToolButton)中,每一个都是新建的,被添加到不同的位置,就形成了 上面的qq界面;
showchat(int index)是槽函数,对应点击好友操作;
2.perInfo类
#include "perinfo.h"
#include<QtDebug>
#include<QMouseEvent>
perInfo::perInfo()
{

}
void perInfo:: setpersonMessage(PersonMessage person)//给ToolButton写入参数
{
       {
           this->setText(person.name);
           this->setIcon((QPixmap(person.HeadImage)));
           this->setIconSize((QPixmap(person.HeadImage)).size());
           this->setAutoRaise(true);
           this->setToolButtonStyle(Qt::ToolButtonTextBesideIcon);
       }
         index=person.numer;
}

void perInfo::mousePressEvent(QMouseEvent *e) // 点击动作
{

    if(e->button()==Qt::LeftButton)
    {
        qDebug()<<this->index;  //可以得到对应按钮的index,便于查看
    }
}

void perInfo::mouseReleaseEvent(QMouseEvent *e)  //发送
{
    if(e->button()==Qt::LeftButton)
    {
//        qDebug()<<this->index;  //可以得到对应按钮的index
       emit myclicked(index); //发送对应按钮的index
    }
}
成员函数 setpersonMessage(PersonMessage person)就是从链表中获取信息,写入ToolButton中;
咳咳,写文的功底还是木有提高,希望每次都能进步,将自己所学的,所想表达的描述清楚,哈哈!qq功能持续更新中......