---恢复内容开始---
1.概念
Spring Boot是由Pivotal团队提供的全新框架,其设计目的是用来简化Spring应用的初始搭建以及开发过程。 -使用springboot以后,搭建一个spring应用和开发变得很简单.
该框架使用了特定的方式(继承starter,约定优先于配置)来进行配置,从而使开发人员不再需要定义样板化的配置。通过这种方式,Boot致力于在蓬勃发展的快速应用开发领域(rapid application development)成为领导者。
Spring Boot并不是一个框架,从根本上将,它就是一些maven库的集合,maven或者gradle项目导入相应依赖即可使用Spring Boot,而且无需自行管理这些库的版本。
Springboot就是一些写好了maven的模块,我们在使用SPring就不需以传统的方式来用,只需要以maven导入对应的springboot模块,就能完成一大堆操作。简单的说,它使用maven的方式对Spring应用开发进行进一步封装和简化。
2.入门
在父类的pom.xml中引入
<!--引入springboot的starter
maven单继承
  -->
  <dependencyManagement>
      <dependencies>
          <dependency>
              <groupId>org.springframework.boot</groupId>
              <artifactId>spring-boot-starter-parent</artifactId>
              <version>2.0.5.RELEASE</version>
              <type>pom</type>
              <scope>import</scope>
          </dependency>
      </dependencies>
  </dependencyManagement>

在子模块中引入
<!--springboot对web的支持-->
<dependency>
    <groupId>org.springframework.boot</groupId>
    <artifactId>spring-boot-starter-web</artifactId>
</dependency>

代码测试
1.入口
@SpringBootApplication//标注为springboot项目
public class App {
    /*
    这是springboot的入口
    自动扫面当前包和包下的注解
     */
    public static void main(String[] args) {
        SpringApplication.run(App.class);
    }
}
2.controller
@RestController//包含了controller和ResponseBody
@RequestMapping("/hello")
public class HelloController {
    @RequestMapping("index")
    public String index(){
        return "springboot hello...";
    }

}

3.测试

4.热部署
即使修改了输出内容也要重启APP,非常麻烦!可以使用spring-boot-devtools来实现热部署!
其深层原理是使用了两个ClassLoader,一个Classloader加载那些不会改变的类(第三方Jar包),另一个ClassLoader加载会更改的类(自己写的),称为 restart ClassLoader
<!--热部署-->
    <dependency>
        <groupId>org.springframework.boot</groupId>
        <artifactId>spring-boot-devtools</artifactId>
        <optional>true</optional>
        <scope>true</scope>
    </dependency>

</dependencies>
<!--热部署的插件-->
<build>
    <plugins>
        <plugin>
            <groupId>org.springframework.boot</groupId>
            <artifactId>spring-boot-maven-plugin</artifactId>
            <configuration>
                <!--fork :  如果没有该项配置,可能devtools不会起作用,即应用不会restart -->
                <fork>true</fork>
            </configuration>
        </plugin>
    </plugins>
</build>
5.springboot+mybatis
--json数据展示
-- 子类pom.xml
  <!-- mysql 数据库驱动. -->
     <dependency>
         <groupId>mysql</groupId>
         <artifactId>mysql-connector-java</artifactId>
     </dependency>
     <!--mybatis的依赖-->
     <!--
spring-boot mybatis依赖:

请不要使用1.0.0版本,因为还不支持拦截器插件,
   1.1.1 是博主写帖子时候的版本,大家使用最新版本即可
   -->
     <dependency>
         <groupId>org.mybatis.spring.boot</groupId>
         <artifactId>mybatis-spring-boot-starter</artifactId>
         <version>1.1.1</version>
     </dependency>
     <!--
             MyBatis提供了拦截器接口,我们可以实现自己的拦截器,
             将其作为一个plugin装入到SqlSessionFactory中。
             Github上有位开发者写了一个分页插件,我觉得使用起来还可以,挺方便的。
             Github项目地址: https://github.com/pagehelper/Mybatis-PageHelper
          -->
     <dependency>
         <groupId>com.github.pagehelper</groupId>
         <artifactId>pagehelper</artifactId>
         <version>4.1.0</version>
     </dependency>

     <!--热部署依赖-->
     <dependency>
         <groupId>org.springframework.boot</groupId>
         <artifactId>spring-boot-devtools</artifactId>
         <optional>true</optional>
         <scope>true</scope>
     </dependency>
 </dependencies>

 <build>
     <plugins>
         <plugin>
             <groupId>org.springframework.boot</groupId>
             <artifactId>spring-boot-maven-plugin</artifactId>
             <version>2.0.5.RELEASE</version>
             <configuration>
                 <!--fork :  如果没有该项配置,可能devtools不会起作用,即应用不会restart -->
                 <fork>true</fork>
             </configuration>
             <executions>
                 <execution>
                     <goals>
                         <goal>repackage</goal>
                     </goals>
                 </execution>
             </executions>
         </plugin>
         <plugin>
             <groupId>org.apache.maven.plugins</groupId>
             <artifactId>maven-compiler-plugin</artifactId>             <configuration>                 <source>1.6</source>
 <target>1.6</target>
</configuration>
 </plugin>
</plugins>
</build>
--application.uml
spring:
  datasource:
    url: jdbc:mysql://localhost:3306/wg
    username: root
    password: 123456
    driver-class-name: com.mysql.jdbc.Driver

mybatis:
  type-aliases-package: cn.ddd.domain
server:
  port: 80
--pom.xml分页插件依赖
<!--
        MyBatis提供了拦截器接口,我们可以实现自己的拦截器,
        将其作为一个plugin装入到SqlSessionFactory中。
        Github上有位开发者写了一个分页插件,我觉得使用起来还可以,挺方便的。
        Github项目地址: https://github.com/pagehelper/Mybatis-PageHelper
     -->
<dependency>
    <groupId>com.github.pagehelper</groupId>
    <artifactId>pagehelper</artifactId>
    <version>4.1.0</version>
</dependency>

--自定义一个分页类
/**
 * 分页
 */
@Configuration
public class MyBatisConfiguration {

    @Bean
    public PageHelper pageHelper() {
        System.out.println("MyBatisConfiguration.pageHelper()");
        PageHelper pageHelper = new PageHelper();
        Properties p = new Properties();
        p.setProperty("offsetAsPageNum", "true");
        p.setProperty("rowBoundsWithCount", "true");
        p.setProperty("reasonable", "true");
        pageHelper.setProperties(p);
        return pageHelper;
    }
}
--测试
在service层修改list方法
@Override
public List<Employee> list() {
PageHelper.startPage(1, 1);
return employeeMapper.list();
}
--springboot挑战页面测试
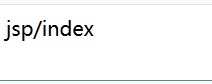
--当controller层使用了restcontroller注解时,启动服务访问地址后,不会跳转到对应的界面,如下图:
因为@restcontroller包含了controller和responsebody,所以不能直接这样写;
@RestController
@RequestMapping("/jsp")
public class JspController {

    @RequestMapping("/index")
    public String index(){
        return "jsp/index";
    }
}
--正确的写法
启动方式不能直接启动main方法,需要使用maven的插件启动:
原因在:需要在你的电脑上产生文件,把jsp编译为java:
在pom.xml中插入springboot的插件
<plugin>
<groupId>org.springframework.boot</groupId>
<artifactId>spring-boot-maven-plugin</artifactId>
<version>2.0.5.RELEASE</version>
<configuration>
<!--fork : 如果没有该项配置,可能devtools不会起作用,即应用不会restart -->
<fork>true</fork>
</configuration>
</plugin>
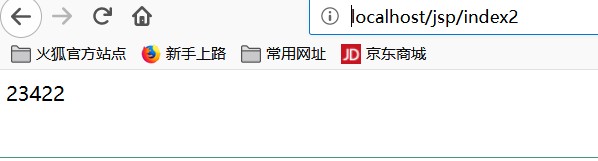
--controller方法
@RequestMapping("/index2")
public ModelAndView index2(){
    //  创建视图对象
    ModelAndView modelAndView = new ModelAndView();
    modelAndView.setViewName("/jsp/index2");

    return modelAndView;
}


--测试
springboot运行方式
--通过main函数直接运行:开发中使用
--非web项目,可以直接通过jar包方式发布运行,以后我们就可以使用这种方式发布很多的服务。项目上线 java -jar xxx.jar 只依赖jdk
非web项目打包:
<plugin>
<!--springboot的maven插件-->
<groupId>org.springframework.boot</groupId>
<artifactId>spring-boot-maven-plugin</artifactId>
<version>1.4.1.RELEASE</version>
<executions>
<execution>
<goals>
<goal>repackage</goal>
</goals>
</execution>
</executions>
</plugin>
cmd
mvn clean package ---在项目的根目录下运行cmd
运行:
java -jar xxx.jar
----针对web项目,应该以war包,在web容器(tomcat)中发布:
<plugin>
<!--springboot的maven插件-->
<groupId>org.springframework.boot</groupId>
<artifactId>spring-boot-maven-plugin</artifactId>
<version>1.4.1.RELEASE</version>
<executions>
<execution>
<goals>
<goal>repackage</goal>
</goals>
</execution>
</executions>
</plugin>
cmd
mvn clean package ---在项目的根目录下运行cmd
--再把war包放在tomcat服务器中
然后启动服务
--在项目app启动类中增加红色部分
@SpringBootApplication
public class App extends SpringBootServletInitializer {
@Override
protected SpringApplicationBuilder configure(SpringApplicationBuilder builder) {
return builder.sources(App.class);
}
public static void main(String[] args) {
SpringApplication.run(App.class,args);
}
}
--访问路径时要增加项目名


---恢复内容结束---
<plugin>
<!--springboot的maven插件-->
<groupId>org.springframework.boot</groupId>
<artifactId>spring-boot-maven-plugin</artifactId>
<version>1.4.1.RELEASE</version>
<executions>
<execution>
<goals>
<goal>repackage</goal>
</goals>
</execution>
</executions>
</plugin>
cmd
mvn clean package ---在项目的根目录下运行cmd