| Session概念 |
上一篇文章写了会话跟踪技术—Cookie,这篇文章记录一下另外一种会话跟踪技术–Seesion。
Cookie是存放在客户端的,而Session是存放在服务器端的。相较而言,Session更加的安全。Session依赖于Cookie。
1.Session示意图
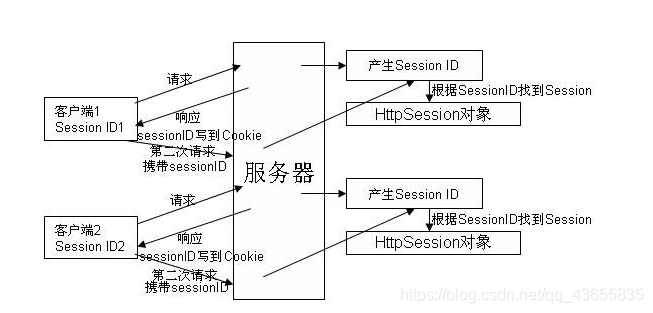
1. 客户端发起一个请求到服务器端,因为Session依赖于Cookie,所以第一次访问服务器的时候,服务器会在内存中生成一个SessionID,然后再将此ID写到Cookie中,响应回客户端。
2. 客户端再次请求的时候,Cookie将携带此ID到服务器端,服务器端获取到此ID后,会去找内存中是否有此ID,由此识别多个请求是否属于是同一个会话。
2.Session特点
1. session用于存储一次会话的多次请求的数据。
2. session可以存储任意类型、任意大小的数据。
3.Session和Cookie的区别
1. session存储的数据在服务器端,而cookie的数据存储在客户端。
2. session没有数据大小的限制,而cookie有数据大小的限制(4kb)
4.Session常用方法
1.获取Seesion对象:HttpSession session = request.getSession();
2.向Session中存数据:session.setAttribute("key","value");
3.从Session中取数据:session.getAttribute("time");
4.删除Session中的数据:session.removeAttribute("time");
5.常见问题
1.客户端关闭,服务器不关闭,两次请求的SessionID是同一个吗?
如果没有设置Cookie的存活时间,则两次请求的SessionID不同同一个;
如果设置了Cookie的存活时间,并且两次请求的时候该Cookie未过期,则SessionID是同一个;
2.客户端不关闭,服务器关闭,两次请求的SessionID是同一个吗?
不是同一个,因为SessionID的分配是随机的。如果想要数据不丢失,需要涉及到Session的钝化和活化;
钝化:如果服务器非正常关闭,Tomcat服务器将会把Session序列化到硬盘上
活化:服务器启动之后,Tomcat服务器会将此Session再反序列化,这样保证Session不会丢失。
3.Seesion的存活时间?
Session在以下几种情况下,会被销毁:
1.浏览器关闭的时候
2.session对象调用session.invalidate();-----使Session失效
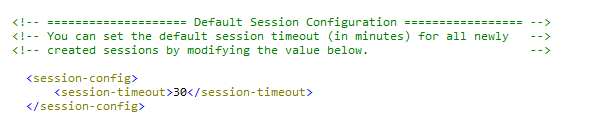
3.默认Session的存活时间为30分钟,30分钟后该Session失效。
Session的存活时间可以在 Tomcat的conf/web.xml中进行配置
| Session案例 |
前提:本案例是在springboot项目中使用了jsp作为视图,由于springboot默认不是将jsp设置为默认的视图,所以想要使用jsp需要额外使用一些依赖以及额外做一些配置(Springboot项目集成jsp):
- 先新建一个controller来生成
随机验证码,并将验证码存到session中
@Controller
@RequestMapping("/check")
public class CheckController {

	@RequestMapping("/checkCode")
	public void checkCode(HttpServletRequest request, HttpServletResponse response) throws IOException {

		int width = 100;
		int height = 50;
		//创建一个对象,在内存中图片(验证码图片对象)
		BufferedImage image = new BufferedImage(width, height, BufferedImage.TYPE_INT_RGB);

		//美化图片
		//填充背景色
		Graphics graphics = image.getGraphics();
		graphics.setColor(Color.green);
		Font font = new Font("黑体", Font.PLAIN, 20);
		graphics.setFont(font);
		graphics.fillRect(0, 0, width, height);

		//画边框
		graphics.setColor(Color.black);
		graphics.drawRect(0, 0, width - 1, height - 1);

		String str = "ABCDEFGHIJKLMNOPQRSTUVWXYZabcdefghijklmnopqrstuvwxyz0123456789";

		Random random = new Random();
		StringBuilder code = new StringBuilder();
		for (int i = 0; i < 4; i++) {
			int index = random.nextInt(str.length());
			//随机字符
			char charAt = str.charAt(index);
			//写验证码
			graphics.drawString(charAt + "", width / 5 * i, height / 2);
			code.append(charAt);
		}
		String session_code = code.toString();
		request.getSession().setAttribute("checkCode", session_code);

		//画干扰线
		graphics.setColor(Color.GREEN);
		//随机生成坐标点
		for (int i = 0; i < 10; i++) {
			int x1 = random.nextInt(width);
			int x2 = random.nextInt(width);

			int y1 = random.nextInt(height);
			int y2 = random.nextInt(height);
			graphics.drawLine(x1, y1, x2, y2);

			//将图片输出到页面上
			ImageIO.write(image, "jpg", response.getOutputStream());
		}
	}
}
- 新建一个
login.jsp文件,做一个简单的登录界面
<%@ page language="java" contentType="text/html; charset=utf-8" pageEncoding="utf-8" %>
<%
    String path = request.getContextPath();
    String basepath = request.getScheme() + "://" + request.getServerName() + ":" + request.getServerPort() + path + "/";

%>
<!DOCTYPE html PUBLIC "-//W3C//DTD HTML 4.01 Transitional//EN" "http://www.w3.org/TR/html4/loose.dtd">
<html>
<head>
    <%--    <base href="<%=basepath %>"/>--%>
    <meta http-equiv="Content-Type" content="text/html; charset=utf-8"/>
    <title>Insert title here</title>

        <script>
          window.onload = function () {
            document.getElementById("img").onclick = function () {
              this.src = "/check/checkCode?time=" + new Date().getTime();
            }
          }
        </script>

        <style>
            div {
                color: red;
            }
        </style>

</head>
<body>
<form action="/login/loginController" method="post">
    <table>
        <tr>
            <td>用户名</td>
            <td><input type="text" name="username"></td>
        </tr>

        <tr>
            <td>密码</td>
            <td><input type="password" name="password"></td>
        </tr>

        <tr>
            <td>验证码</td>
            <td><input type="text" name="checkImgCode"></td>
        </tr>

        <tr>
            <td colspan="2"><img id="img" src="/check/checkCode"></td>
        </tr>

        <tr>
            <td colspan="2"><input type="submit" value="登录"></td>
        </tr>
    </table>
</form>

<div><%=request.getAttribute("cc_error")%>
</div>
<div><%=request.getAttribute("login_error")%>
</div>
</body>
</html>
- 新建一个
success.jsp文件,作为登录成功之后要跳转的页面
<%@ page language="java" contentType="text/html; charset=utf-8" pageEncoding="utf-8" %>
<%
    String path = request.getContextPath();
    String basepath = request.getScheme() + "://" + request.getServerName() + ":" + request.getServerPort() + path + "/";

%>
<!DOCTYPE html PUBLIC "-//W3C//DTD HTML 4.01 Transitional//EN" "http://www.w3.org/TR/html4/loose.dtd">
<html>
<head>
    <base href="<%=basepath %>"/>
    <meta http-equiv="Content-Type" content="text/html; charset=utf-8"/>
    <title>Insert title here</title>
</head>
<body>
<h3><%= request.getSession().getAttribute("userName")%>,欢迎您!</h3>
</body>
</html>
- 新建一个controller用来验证
用户名、用户密码、验证码
@Controller
@RequestMapping("/login")
public class LoginController {

	@RequestMapping("/loginController")
	public void loginIndex(HttpServletRequest request, HttpServletResponse response) throws IOException, ServletException {
		//1.设置字符集
		request.setCharacterEncoding("utf-8");
		//获取参数
		String username = request.getParameter("username");
		String password = request.getParameter("password");
		String checkCode = request.getParameter("checkImgCode");
		//先从session中获取验证码
		HttpSession session = request.getSession();
		String session_code = (String) session.getAttribute("checkCode");
		//4.判断验证码是否正确
		if (session_code.equalsIgnoreCase(checkCode)) {
			//忽略大小写比较equalsIgnoreCase
			//如果验证码正确
			//合适用户名和密码是否正确(项目中此处应该从数据库中查询用户名和密码出来进行比较)
			if ("张三".equals(username) && "123".equals(password)) {
				//登录成功
				//存户用户信息
				session.setAttribute("userName", username);
				//重定向到success.html
				System.out.println("验证码和密码正确");
				response.sendRedirect(request.getContextPath() + "/success.jsp");
			} else {
				//登录失败
				request.setAttribute("login_error", "用户名或密码错误");
				//转发到登录页面
				request.getRequestDispatcher("/login.jsp").forward(request, response);
			}
		} else {
			//验证码不正确
			request.setAttribute("cc_error", "验证码错误");
			//转发到登录页面
			request.getRequestDispatcher("/login.jsp").forward(request, response);
		}
	}
}
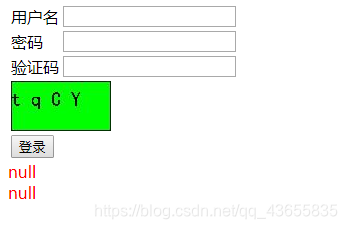
创建好上面4个文件之后,我们就可以启动访问项目了:localhost:8083/login.jsp:
当用户名、密码、验证码三个参数都正确的时候,点击登录,页面跳转到success.jsp:
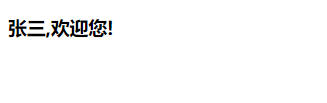
案例中,我们将验证码存入到会话session中,将用户输入的验证码和服务器中的验证码进行比较。实现了简单的登录验证功能。