原英文文档地址:点击这里
8. 根据配置文档配置路由
Spring Cloud Gateway的配置由一系列的“ RouteDefinitionLocator”接口实现类控制,此接口如下所示:
public interface RouteDefinitionLocator {
	Flux<RouteDefinition> getRouteDefinitions();
}
默认情况下,通过Spring Boot的@ConfigurationProperties机制,Spring Cloud Gateway 使用PropertiesRouteDefinitionLocator从配置文件中加载路由的配置信息。之前的路由配置中,使用了一种快捷的配置方式,也可以指定具体的参数名,如下面的两种配置方式效果是完全一样的:
spring:
  cloud:
    gateway:
      routes:
      - id: setstatus_route
        uri: http://example.org
        filters:
        - name: SetStatus
          args:
            status: 401
      - id: setstatusshortcut_route
        uri: http://example.org
        filters:
        - SetStatus=401
在一些网关的应用场景中,使用属性配置的方式就可以了,但是在一些生产环境中,有一些路由配置信息可能是来自别的地方,比如数据库。在将来的Spring Cloud Gateway版本中,也会添加一些基于数据库的RouteDefinitionLocator实现类,比如Redis,MongoDB。
8.1 Fluent Java Routes API (使用Java 路由API 代码添加路由配置)
在RouteLocatorBuilder中定义的一些 Fluent API,使用它可以在Java代码中配置相关的路由信息,如下面代码所示:
// static imports from GatewayFilters and RoutePredicates
@Bean
    public RouteLocator customRouteLocator(RouteLocatorBuilder builder, AddRequestHeaderGatewayFilterFactory throttle) {
        NameValueConfig requestHeader = new NameValueConfig();
        requestHeader.setName("routes-a");
        requestHeader.setValue("yes");
        return builder.routes()
                .route(r -> r.host("localhost:8080").and().path("/routes-api/a/**")
                    .filters(f ->{
                            f.addResponseHeader("X-TestHeader", "foobar");
                            return f.redirect(HttpStatus.MOVED_PERMANENTLY.value(), "http://www.xinyues.com");
                            })
                    .uri("http://localhost:8080").id("custom-1")
                )
                .route(r -> r.path("/routes-api/b/**")
                    .filters(f ->
                            f.addResponseHeader("X-AnotherHeader", "baz"))
                    .uri("http://localhost:8080").id("custom-2")
                )
                .route(r -> r.order(0)
                    .host("localhost:8080").and().path("/routes-api/c/**")
                    .filters(f -> f.filter(throttle.apply(requestHeader)))
                    .uri("http://localhost:8080").id("custom-3")
                )
                .build();
    }
这段代码是我自己参考原文档实现的,原文档上面那个ThrottleGatewayFilterFactory找不到。这里我添加了自定义 的routes Id,可以从源码中查看:https://gitee.com/wgslucky/SpringCloud,启动源码项目,在浏览器中输入:http://localhost:8080/actuator/gateway/routes,可以看到网关加载的所有的路由信息,可以看到代码中路由id为custom-x的路由信息,说明在Java添加的路由配置与在配置文件中添加的路由配置都被加载到了。如果浏览器安装了Json插件更直观一些。这是一个路由的配置Json数组。根据上面代码中的路由配置,在浏览器中输入:http://localhost:8080/routes-api/a/test,可以看到成功跳转到了目标网站,说明路由配置成功了。
这种形式也可以添加一些自定义的Predicate判断,在RouteDefinitionLocator中定义的Predicates可以使用逻辑and。使用Fluent Java Api,可以使用and(),or()和negate()操作Predicate类。例如上面代码中的第一个路由就使用and()添加了两个Predicate。
8.2 DiscoveryClient Route Definition Locator 使用服务发现客户端定义路由信息
Spring Cloud Gateway可以使用服务发现客户端接口DiscoveryClient,从服务注意中心获取服务注册信息,然后配置相应的路由。注意,需要在配置中添加如下配置开启这个功能:
spring.cloud.gateway.discovery.locator.enabled=true
然后确保已引入DiscoveryClient的实现类的服务发现客户端依赖,比如Eureka,Consul或Zookeeper。
8.2.1 Configuring Predicates and Filters For DiscoveryClient Routes 为路由信息配置断言和过滤器
默认情况下,通过服务发现客户端DiscoveryClient自动配置的路由信息中,只包括一个默认的Predicate和Filter。默认的Predicate是一个Path Predicate,模式是 /serviceId/**,serviceId就是从服务发现客户端中获取的服务ID。默认的Filter是一个重写路径过滤器,它的正则表达式为:/serviceId/(?<remaining>.*),它的作用是将请求路径中的serviceId去掉,变为/(?<remaining>.*),如果想要添加自定义的Predicate和Filters,可以这样配置:spring.cloud.gateway.discovery.locator.predicates[x]和spring.cloud.gateway.discovery.locator.filters[y],当使用这种配置方式时,不会再保留原来默认的Predicate和Filter了,如果你还需要原来的配置,需要手动添加到配置中,如下面所示:
application.properties
spring.cloud.gateway.discovery.locator.predicates[0].name: Path
spring.cloud.gateway.discovery.locator.predicates[0].args[pattern]: "'/'+serviceId+'/**'"
spring.cloud.gateway.discovery.locator.predicates[1].name: Host
spring.cloud.gateway.discovery.locator.predicates[1].args[pattern]: "'**.foo.com'"
spring.cloud.gateway.discovery.locator.filters[0].name: Hystrix
spring.cloud.gateway.discovery.locator.filters[0].args[name]: serviceId
spring.cloud.gateway.discovery.locator.filters[1].name: RewritePath
spring.cloud.gateway.discovery.locator.filters[1].args[regexp]: "'/' + serviceId + '/(?<remaining>.*)'"
spring.cloud.gateway.discovery.locator.filters[1].args[replacement]: "'/${remaining}'"
application.yml
spring:
  cloud:
    gateway:
      discovery:
        locator:
          enabled: true
          predicates:
          - name: Path
            args:
              pattern: "'/'+serviceId+'/test'"
          filters:
          - name: RedirectTo
            args:
              status: 301
              url: "'http://www.xinyues.com'"
需要注意的是,在这些配置中,所有的配置的值都是会被Spel解析的,所以如果是字符串的话,需要使用引号。比如,application.yml中,如果配置成这样:url: http://www.xinyues.com会报错的,详细见:https://www.cnblogs.com/wgslucky/p/11743740.html
application.yml 这种配置是保留原来的默认的Predicate和Filter
spring:
  cloud:
    gateway:
      discovery:
        locator:
          enabled: true
          predicates:
          - name: Path
            args:
              pattern: "'/'+serviceId+'/**'"
          filters:
          - name: AddRequestHeader
            args:
             name: "'foo'"
             value: "'bar'"
          - name: RewritePath
            args:
              regexp: "'/' + serviceId + '/(?<remaining>.*)'"
              replacement: "'/${remaining}'"
可以看到所有的字符串必须在引号的单引号内。

手机支架懒人支架桌面ipad平板电脑创意便携式支架多功能直播抖音拍照落地床头直播车载折叠支撑架
8.2.2 源码实现
到这里下载源码:https://gitee.com/wgslucky/SpringCloud
- 修改application.yml,激活discoveryclient配置文件
spring:
  profiles:
    active:
    - discoveryclient
- 启动spring-cloud-gateway项目
- 启动spring-cloud-app-a项目
然后浏览器中输入:http://localhost:8080/actuator/gateway/routes,可以看到已添加成功定义好到spring-cloud-app-a服务的路由信息了,如下所示:
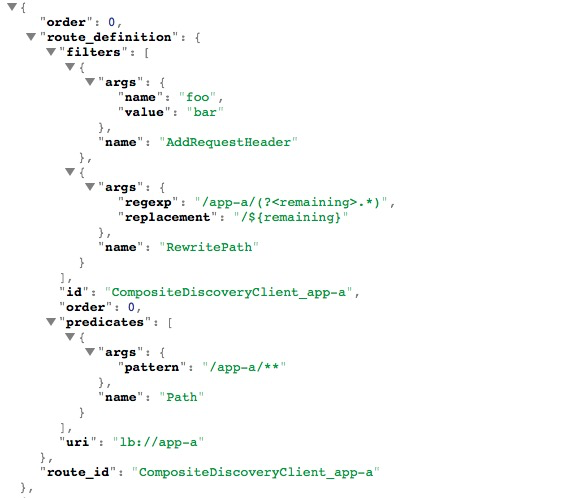
可以看到里面有一个默认的filter和predicate。而且可以看出,在配置文件中配置的路由信息,java代码中添加的路由配置信息,都加载到网关中,说明这三种配置路由信息的方式是可以一起使用的。
关注左上角公众号,了解更多