上篇文章http://www.cnblogs.com/wenjingu/p/3822989.html我们使用Gradle构建了一个简单的Spring MVC Web应用程序,
本篇将在上篇的基础上将jsp页面改为velocity模板,并集成到Spring MVC框架中。使用Velocity开发视图的好处是在团队开发中,将
java代码从web页面中分离出来,使得页面开发人员和业务逻辑开发人员的工作解耦,更有利于团队分工合作和web站点的长期维护。
1、修改gradle文件,增加依赖包,代码如下:
apply plugin: 'idea'
apply plugin: 'java'

repositories {
    mavenCentral()
    maven { url "http://repo.spring.io/release" }
}

dependencies {
    compile(
            "org.springframework:spring-context:4.0.5.RELEASE",
            "org.springframework:spring-web:4.0.5.RELEASE",
            "org.springframework:spring-webmvc:4.0.5.RELEASE",
            "org.springframework:spring-context-support:4.0.5.RELEASE",
            "org.apache.velocity:velocity:1.7",
            "org.apache.velocity:velocity-tools:2.0",
            "org.anarres.gradle:gradle-velocity-plugin:1.0.0"
    )
    testCompile("org.springframework:spring-test:4.0.5.RELEASE")
    runtime("jstl:jstl:1.2")
}

task copyJars(type: Copy) {
    from configurations.runtime
    into 'lib' // 目标位置
}
运行命令:gradle copyJars。
2、修改spring-web-servlet.xml配置文件,完整代码如下:
<?xml version="1.0" encoding="UTF-8"?>
<beans xmlns="http://www.springframework.org/schema/beans"
       xmlns:xsi="http://www.w3.org/2001/XMLSchema-instance"
       xmlns:context="http://www.springframework.org/schema/context"
       xsi:schemaLocation="http://www.springframework.org/schema/beans
       http://www.springframework.org/schema/beans/spring-beans-4.0.xsd
       http://www.springframework.org/schema/context
       http://www.springframework.org/schema/context/spring-context-4.0.xsd">

    <context:component-scan base-package="controller"/>

    <bean id="velocityConfig" class="org.springframework.web.servlet.view.velocity.VelocityConfigurer">
        <property name="resourceLoaderPath" value="/WEB-INF/vm"/>
        <property name= "velocityProperties">
            <props>
                <prop key= "input.encoding">utf-8</prop>
                <prop key= "output.encoding">utf-8</prop>
            </props>
        </property>
    </bean>

    <bean id="viewResolver" class="org.springframework.web.servlet.view.velocity.VelocityViewResolver">
        <!--<property name="prefix" value="/WEB-INF/vm/"/>-->
        <property name="suffix" value=".vm"/>
        <property name="contentType" value="text/html;charset=utf-8"></property> <!-- 设置编码格式 -->
    </bean>

    <!-- 扫描web包,应用Spring的注解 -->
    <!--<context:component-scan base-package="controller"/>-->

    <!--<bean id="viewResolver" class="org.springframework.web.servlet.view.InternalResourceViewResolver">-->
    <!--<property name="prefix" value="/WEB-INF/view/"/>-->
    <!--<property name="suffix" value=".jsp"/>-->
    <!--</bean>-->
</beans>
LoginController代码不变。
并在WEB-INF目录下新建目录vm,将所有的Velocity文件放在该目录下。
3、新建login.vm文件,代码如下:
<html>
<head>
    <title>登录VelocityDemo</title>
</head>
<body>
<form action="/loginCheck.html" method="post">
    用户名:
    <input type="text" name="userName">
    <br>
    密 码:
    <input type="password" name="password">
    <br>
    <input type="submit" value="登录"/>
</form>
    #foreach ($error in $errors)
    <br>$error
    #end
</body>
</html>
上述页面的中文显示有乱码。
4、velocity中文乱码解决方案
在spring-web-servlet.xml配置文件中的添加如下代码:
<property name= "velocityProperties">
           <props>
               <prop key= "input.encoding">utf-8</prop>
               <prop key= "output.encoding">utf-8</prop>
           </props>
 </property>

 <property name="contentType" value="text/html;charset=utf-8"></property> <!-- 设置编码格式 -->
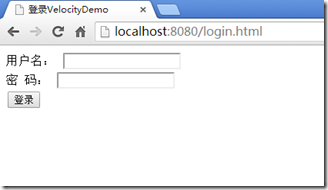
5、测试结果
Demo源码下载:VelocityDemo2.0.zip ,lib中的jar包上传时删除了,运行前请先运行命令:gradle copyJars下载jar包。
