在前面的技术文章中已经很系统的介绍了UI自动化测试的技术栈的知识体系,但是在维护的成本而言
还是需要考虑进一步的优化,那么我们可以使用页面对象设计模式,它的优势具体可以总结为如下:
- 创建可以跨多个测试用例共享的代码
- 减少重复代码的数量
- 如果用户界面发生了维护,我们只需要维护一个地方,这样修改以及维护的成本相对而言是比较低的
一、目录结构设计
下面我们具体针对这部分的目录进行设计,具体的目录结构为:
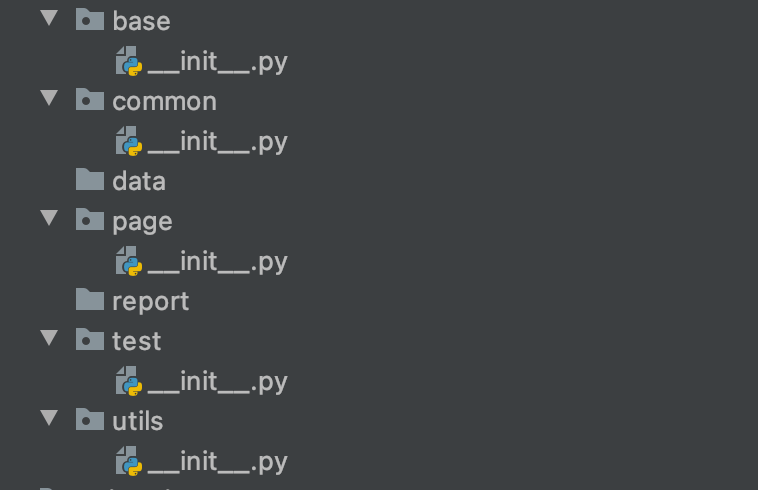
下面我详细的解释下每个目录的是干什么的,具体总结为如下:
- base的包下主要编写基础的代码,可以理解为基础层
- page包下主要存放对象层的代码,可以理解为对象层
- test报下主要存放编写的测试模块的代码,可以理解为测试层
- utils下存放的主要是工具类的代码,比如针对JSON文件,YAML文件的处理
- common下主要存放的是公共类的代码,比如文件目录的处理
- data主要存放测试过程中使用到的数据
- report主要存储的是测试报告这部分
二、页面对象设计模式
上面已经很详细的解释了页面对象设计模式它的优势,以及目录结构的设计,下面依次来实现各个部分的
代码。
2.1、基础层
下面主要实现基础层的代码,在base包下创建模块为basePage.py的文件,里面的源码信息为:
#! /usr/bin/env python
# -*- coding:utf-8 -*-
#author:无涯

from selenium import  webdriver
from selenium.webdriver.support.expected_conditions import NoSuchElementException
from selenium.webdriver.common.by import By
import  time as t

class WebDriver(object):
   def __init__(self,driver):
      self.driver=driver


   def findElement(self,*loc):
      '''单个元素的定位方式'''
      try:
         return self.driver.find_element(*loc)
      except NoSuchElementException as e:
         return e.args[0]

   def findElements(self,*loc):
      '''多个元素的定位方式'''
      try:
         return self.driver.find_elements(*loc)
      except NoSuchElementException as e:
         return e.args[0]
2.2、对象层
下面以sina的邮箱为案例来编写具体的代码,在page包下创建login.py的文件,里面的源码具体为:
#! /usr/bin/env python
# -*- coding:utf-8 -*-
#author:无涯

from base.basePage import WebDriver
from selenium.webdriver.common.by import By

class Login(WebDriver):
   username=(By.ID,'freename')
   password=(By.ID,'freepassword')
   loginButton=(By.LINK_TEXT,'登录')
   divText=(By.XPATH,'/html/body/div[3]/div/div[2]/div/div/div[4]/div[1]/div[1]/div[1]/span[1]')


   def setUsername(self,username):
      '''用户名输入框'''
      self.findElement(*self.username).send_keys(username)

   def setPassword(self,password):
      '''密码输入框'''
      self.findElement(*self.password).send_keys(password)

   @property
   def clickLogin(self):
      '''点击登录按钮'''
      self.findElement(*self.loginButton).click()

   @property
   def getDivText(self):
      '''获取错误信息'''
      return self.findElement(*self.divText).text
2.3、测试层
下来在测试层,也就是test包下创建test_sina_login.py的模块,原代码具体为:
#! /usr/bin/env python
# -*- coding:utf-8 -*-
#author:无涯

from page.login import Login
from selenium import  webdriver
import  unittest
import  time as t


class TestSinaLogin(unittest.TestCase,Login):
   def setUp(self) -> None:
      self.driver=webdriver.Chrome()
      self.driver.maximize_window()
      self.driver.implicitly_wait(30)
      self.driver.get('https://mail.sina.com.cn/#')

   def tearDown(self) -> None:
      self.driver.quit()


   def test_login_null(self):
      '''登录验证:用户名密码为空的错误信息验证'''
      self.setUsername('')
      self.setPassword('')
      self.clickLogin
      self.assertEqual(self.getDivText,'请输入邮箱名')

   def test_login_email_format(self):
      '''登录验证:邮箱名格式不正确的验证'''
      self.setUsername('aertydrty')
      self.setPassword('erstytry')
      self.clickLogin
      self.assertEqual(self.getDivText,'您输入的邮箱名格式不正确')

   def test_login_username_password_error(self):
      '''登录验证:用户名和密码不匹配的错误信息验证'''
      self.setUsername('srtyua@sina.com')
      self.setPassword('sertysrty')
      self.clickLogin
      self.assertEqual(self.getDivText,'登录名或密码错误')

if __name__ == '__main__':
   unittest.main(verbosity=2)
切记,需要执行验证下我们编写的具体的测试用例。
2.4、公共方法
下来在common包下创建public.py的模块,里面主要编写针对文件路径的处理,具体源码如下:
#! /usr/bin/env python
# -*- coding:utf-8 -*-
#author:无涯

import  os

def base_dir():
   return os.path.dirname(os.path.dirname(__file__))


def filePath(directory='data',fileName=None):
   return os.path.join(base_dir(),directory,fileName)
2.5、数据驱动
下来在data的文件夹下创建sina.json的文件,把登录使用到的数据分离到sina.json的文件里面,该文件
的具体内容为:
{
  "login":
  {
    "null": "请输入邮箱名",
    "format": "您输入的邮箱名格式不正确",
    "loginError": "登录名或密码错误"
  }
}
2.6、工具类
下来在具体的工具类中编写针对JSON文件的处理,创建的模块名称为:operationJson.py,具体源码为:
#! /usr/bin/env python
# -*- coding:utf-8 -*-
#author:无涯


from common.public import filePath
import  json

def readJson():
   return json.load(open(filePath(fileName='sina.json')))

print(readJson()['login']['null'])
2.7、测试固件分离
我们已经达到了数据驱动的分离,下来针对测试固件进行分离,在page包下创建init.py文件,来具体
分离我们的测试固件,源码信息为:
#! /usr/bin/env python
# -*- coding:utf-8 -*-
#author:无涯


from selenium import  webdriver
import  unittest

class Init(unittest.TestCase):
   def setUp(self) -> None:
      self.driver=webdriver.Chrome()
      self.driver.maximize_window()
      self.driver.implicitly_wait(30)
      self.driver.get('https://mail.sina.com.cn/#')

   def tearDown(self) -> None:
      self.driver.quit()
2.8、完善测试层
已经针对测试固件和数据都做了分离,下来完善测试模块里面的代码,完善后的代码具体为:
#! /usr/bin/env python
# -*- coding:utf-8 -*-
#author:无涯

from page.login import Login
from selenium import  webdriver
from page.init import Init
import  unittest
import  time as t
from utils.operationJson import readJson


class TestSinaLogin(Init,Login):

   def test_login_null(self):
      '''登录验证:用户名密码为空的错误信息验证'''
      self.setUsername('')
      self.setPassword('')
      self.clickLogin
      self.assertEqual(self.getDivText,readJson()['login']['null'])

   def test_login_email_format(self):
      '''登录验证:邮箱名格式不正确的验证'''
      self.setUsername('aertydrty')
      self.setPassword('erstytry')
      self.clickLogin
      self.assertEqual(self.getDivText,readJson()['login']['format'])

   def test_login_username_password_error(self):
      '''登录验证:用户名和密码不匹配的错误信息验证'''
      self.setUsername('srtyua@sina.com')
      self.setPassword('sertysrty')
      self.clickLogin
      self.assertEqual(self.getDivText,readJson()['login']['loginError'])

if __name__ == '__main__':
   unittest.main(verbosity=2)
三、引人等待机制
下面我们在基础层的代码中引入等待的机制,也就是显式的等待记住,那么完善后的基础层代码具体就为:
#! /usr/bin/env python
# -*- coding:utf-8 -*-
#author:无涯

from selenium import  webdriver
from selenium.webdriver.support.expected_conditions import NoSuchElementException
from selenium.webdriver.common.by import By
from selenium.webdriver.support.wait import WebDriverWait
import  time as t

class WebDriver(object):
   def __init__(self,driver):
      self.driver=driver


   def findElement(self,*loc):
      '''单个元素的定位方式'''
      try:
         return WebDriverWait(self.driver,20).until(lambda x:x.find_element(*loc))
      except NoSuchElementException as e:
         return e.args[0]

   def findElements(self,*loc):
      '''多个元素的定位方式'''
      try:
         return WebDriverWait(self.driver,20).until(lambda x:x.find_elements(*loc))
      except NoSuchElementException as e:
         return e.args[0]
四、引人工厂设计模式
在移动的测试框架Appium的源码中,我们可以看到它的元素定位的类继承了Selenium中的By类,具体
源码为:
#!/usr/bin/env python

# Licensed under the Apache License, Version 2.0 (the "License");
# you may not use this file except in compliance with the License.
# You may obtain a copy of the License at
#
#     http://www.apache.org/licenses/LICENSE-2.0
#
# Unless required by applicable law or agreed to in writing, software
# distributed under the License is distributed on an "AS IS" BASIS,
# WITHOUT WARRANTIES OR CONDITIONS OF ANY KIND, either express or implied.
# See the License for the specific language governing permissions and
# limitations under the License.

from selenium.webdriver.common.by import By


class MobileBy(By):
    IOS_PREDICATE = '-ios predicate string'
    IOS_UIAUTOMATION = '-ios uiautomation'
    IOS_CLASS_CHAIN = '-ios class chain'
    ANDROID_UIAUTOMATOR = '-android uiautomator'
    ANDROID_VIEWTAG = '-android viewtag'
    ANDROID_DATA_MATCHER = '-android datamatcher'
    ANDROID_VIEW_MATCHER = '-android viewmatcher'
    WINDOWS_UI_AUTOMATION = '-windows uiautomation'
    ACCESSIBILITY_ID = 'accessibility id'
    IMAGE = '-image'
    CUSTOM = '-custom'
根据这样的一个继承思想,我们完全可以把Appium测试框架和Selenium3的测试框架整合起来,这样
不管是移动的平台还是WEB的平台,我们可以使用一套元素定位的方法,那么这个过程中我们可以引人
设计模式中的工厂设计模式,引人工厂设计模式后,这对基础层的代码进行完善,完善后的代码为:
#! /usr/bin/env python
# -*- coding:utf-8 -*-
#author:无涯

from selenium import  webdriver
from selenium.webdriver.support.expected_conditions import NoSuchElementException
from selenium.webdriver.common.by import By
from selenium.webdriver.support.wait import WebDriverWait
from appium.webdriver.common.mobileby import MobileBy
import  time as t


class Factory(object):
   def __init__(self,driver):
      self.driver=driver

   def createDriver(self,driver):
      if driver=='web':
         return WEB(self.driver)
      elif driver=='app':
         return APP(self.driver)

class WebDriver(object):
   def __init__(self,driver):
      self.driver=driver


   def findElement(self,*loc):
      '''单个元素的定位方式'''
      try:
         return WebDriverWait(self.driver,20).until(lambda x:x.find_element(*loc))
      except NoSuchElementException as e:
         return e.args[0]

   def findElements(self,*loc):
      '''多个元素的定位方式'''
      try:
         return WebDriverWait(self.driver,20).until(lambda x:x.find_elements(*loc))
      except NoSuchElementException as e:
         return e.args[0]


class WEB(WebDriver):
   def __str__(self):
      return 'web'

class APP(WebDriver):
   def __str__(self):
      return 'app'
下来我们需要针对对象层的代码进行改造和维护,也就是继承WEB的类,而不再是WebDriver,具体修改后的
源码为:
#! /usr/bin/env python
# -*- coding:utf-8 -*-
#author:无涯

from base.basePage import WebDriver,WEB
from selenium.webdriver.common.by import By

class Login(WEB):
   username=(By.ID,'freename')
   password=(By.ID,'freepassword')
   loginButton=(By.LINK_TEXT,'登录')
   divText=(By.XPATH,'/html/body/div[3]/div/div[2]/div/div/div[4]/div[1]/div[1]/div[1]/span[1]')


   def setUsername(self,username):
      '''用户名输入框'''
      self.findElement(*self.username).send_keys(username)

   def setPassword(self,password):
      '''密码输入框'''
      self.findElement(*self.password).send_keys(password)

   @property
   def clickLogin(self):
      '''点击登录按钮'''
      self.findElement(*self.loginButton).click()

   @property
   def getDivText(self):
      '''获取错误信息'''
      return self.findElement(*self.divText).text
五、整合持续集成平台
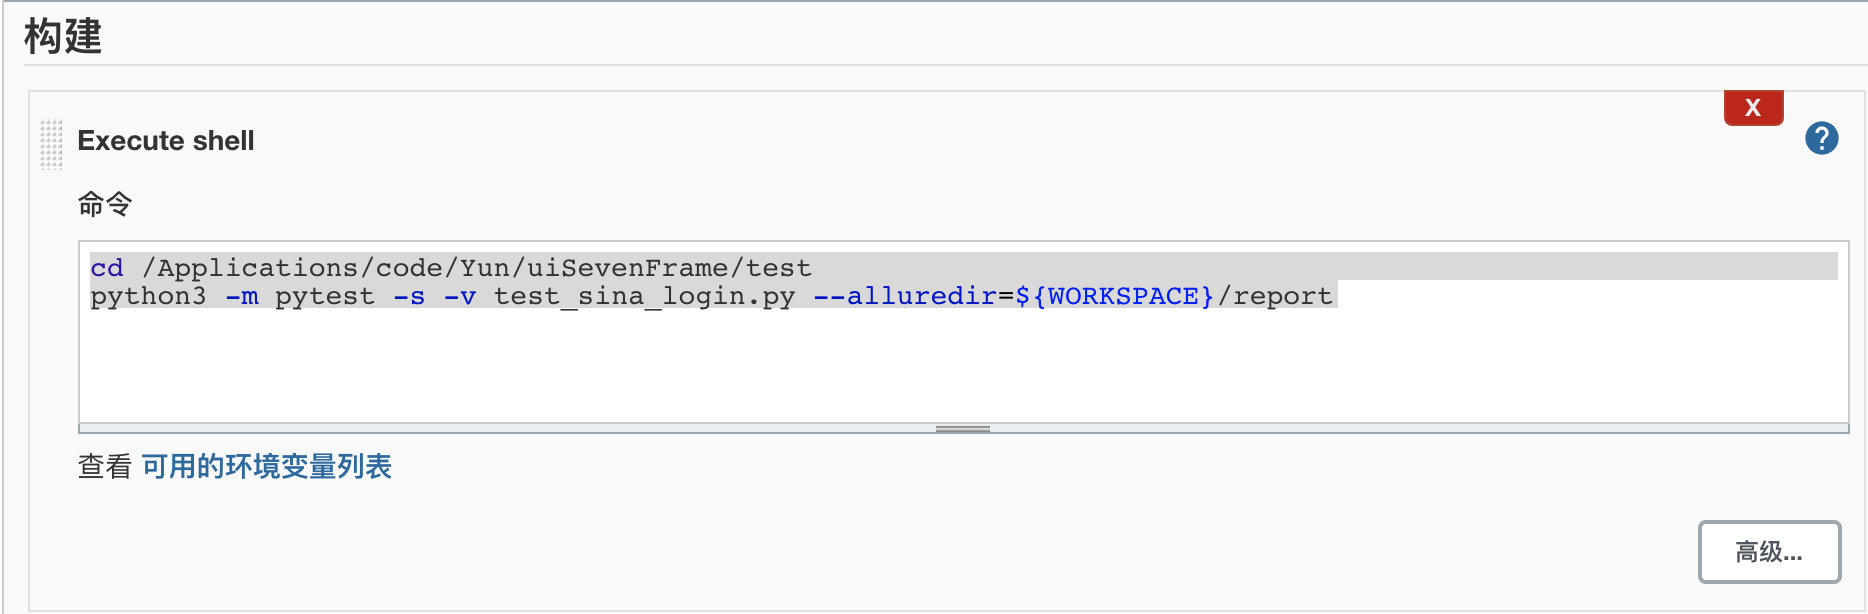
最后我们把编写的测试框架整合到C I的持续集成平台,以及结合Pytest测试框架和第三方的测试工具
Allure来生成测试报告,具体Execute Sehll里面输入的内容为:
cd /Applications/code/Yun/uiSevenFrame/test
python3 -m pytest -s -v test_sina_login.py --alluredir=${WORKSPACE}/report
构建后操作步骤选择Allure Report,具体如下所示:
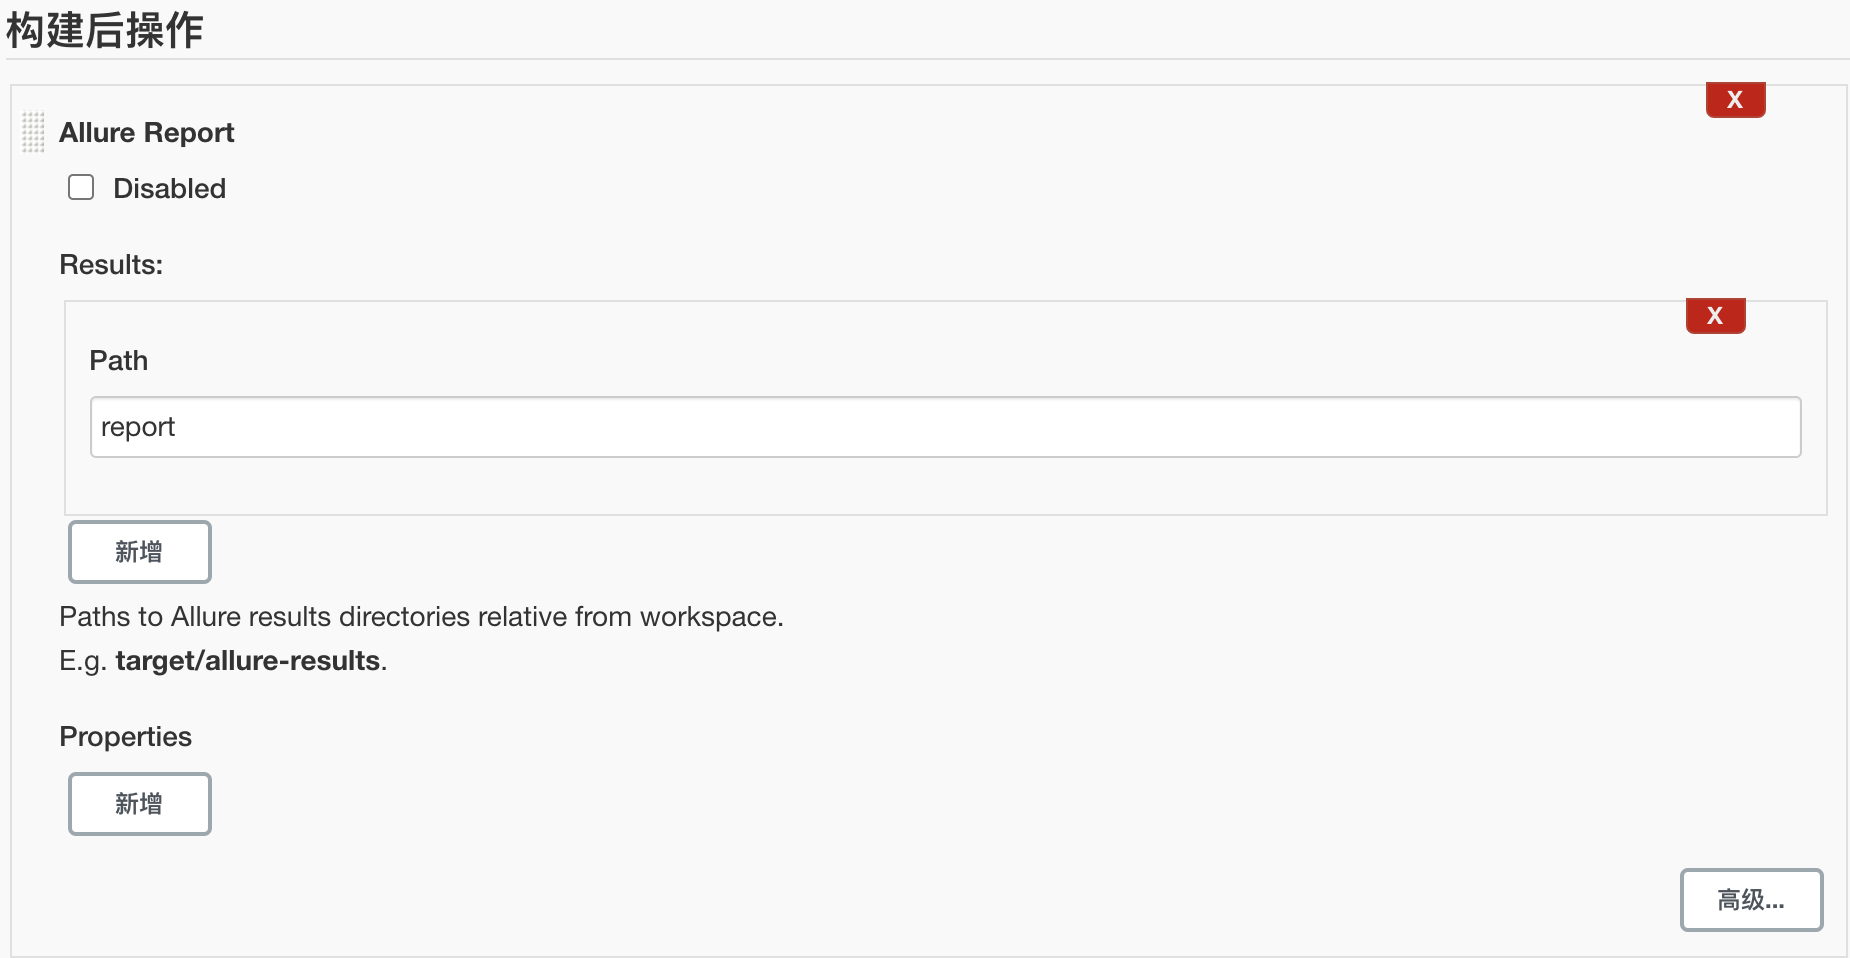
点击构建后,执行的结果信息如下所示:
Started by user 无涯
Running as SYSTEM
Building in workspace /Users/liwangping/.jenkins/workspace/uiSeven
[uiSeven] $ /bin/sh -xe /Applications/devOps/CICD/apache-tomcat/temp/jenkins7666607542083974346.sh
+ cd /Applications/code/Yun/uiSevenFrame/test
+ python3 -m pytest -s -v test_sina_login.py --alluredir=/Users/liwangping/.jenkins/workspace/uiSeven/report
============================= test session starts ==============================
platform darwin -- Python 3.7.4, pytest-6.2.5, py-1.9.0, pluggy-0.13.1 -- /Library/Frameworks/Python.framework/Versions/3.7/bin/python3
cachedir: .pytest_cache
sensitiveurl: .*
metadata: {'Python': '3.7.4', 'Platform': 'Darwin-20.6.0-x86_64-i386-64bit', 'Packages': {'pytest': '6.2.5', 'py': '1.9.0', 'pluggy': '0.13.1'}, 'Plugins': {'instafail': '0.4.1.post0', 'forked': '1.0.2', 'asyncio': '0.15.1', 'variables': '1.9.0', 'emoji': '0.2.0', 'tavern': '1.12.2', 'sugar': '0.9.4', 'timeout': '1.3.3', 'xdist': '2.3.0', 'dependency': '0.5.1', 'mock': '3.6.1', 'base-url': '1.4.1', 'html': '2.1.1', 'django': '3.7.0', 'cov': '2.7.1', 'nameko': '2.13.0', 'repeat': '0.9.1', 'selenium': '2.0.1', 'trio': '0.7.0', 'Faker': '4.14.0', 'allure-pytest': '2.8.11', 'metadata': '1.8.0', 'rerunfailures': '10.0'}, 'BUILD_NUMBER': '3', 'BUILD_ID': '3', 'BUILD_URL': 'http://localhost:8080/jenkins/job/uiSeven/3/', 'NODE_NAME': 'master', 'JOB_NAME': 'uiSeven', 'BUILD_TAG': 'jenkins-uiSeven-3', 'EXECUTOR_NUMBER': '1', 'JENKINS_URL': 'http://localhost:8080/jenkins/', 'JAVA_HOME': '/Library/Java/JavaVirtualMachines/jdk1.8.0_241.jdk/Contents/Home', 'WORKSPACE': '/Users/liwangping/.jenkins/workspace/uiSeven', 'Base URL': '', 'Driver': None, 'Capabilities': {}}
rootdir: /Applications/code/Yun/uiSevenFrame/test
plugins: instafail-0.4.1.post0, forked-1.0.2, asyncio-0.15.1, variables-1.9.0, emoji-0.2.0, tavern-1.12.2, sugar-0.9.4, timeout-1.3.3, xdist-2.3.0, dependency-0.5.1, mock-3.6.1, base-url-1.4.1, html-2.1.1, django-3.7.0, cov-2.7.1, nameko-2.13.0, repeat-0.9.1, selenium-2.0.1, trio-0.7.0, Faker-4.14.0, allure-pytest-2.8.11, metadata-1.8.0, rerunfailures-10.0
collecting ... 请输入邮箱名
collected 3 items

test_sina_login.py::TestSinaLogin::test_login_email_format PASSED
test_sina_login.py::TestSinaLogin::test_login_null PASSED
test_sina_login.py::TestSinaLogin::test_login_username_password_error PASSED

=============================== warnings summary ===============================
../../../../../Library/Frameworks/Python.framework/Versions/3.7/lib/python3.7/site-packages/eventlet/patcher.py:1
  /Library/Frameworks/Python.framework/Versions/3.7/lib/python3.7/site-packages/eventlet/patcher.py:1: DeprecationWarning: the imp module is deprecated in favour of importlib; see the module's documentation for alternative uses
    import imp

../../../../../Library/Frameworks/Python.framework/Versions/3.7/lib/python3.7/site-packages/dns/hash.py:25
  /Library/Frameworks/Python.framework/Versions/3.7/lib/python3.7/site-packages/dns/hash.py:25: DeprecationWarning: dns.hash module will be removed in future versions. Please use hashlib instead.
    DeprecationWarning)

../../../../../Library/Frameworks/Python.framework/Versions/3.7/lib/python3.7/site-packages/dns/namedict.py:35
  /Library/Frameworks/Python.framework/Versions/3.7/lib/python3.7/site-packages/dns/namedict.py:35: DeprecationWarning: Using or importing the ABCs from 'collections' instead of from 'collections.abc' is deprecated, and in 3.8 it will stop working
    class NameDict(collections.MutableMapping):

-- Docs: https://docs.pytest.org/en/stable/warnings.html
======================== 3 passed, 3 warnings in 16.89s ========================
[uiSeven] $ /Users/liwangping/.jenkins/tools/ru.yandex.qatools.allure.jenkins.tools.AllureCommandlineInstallation/Allure/bin/allure generate /Users/liwangping/.jenkins/workspace/uiSeven/report -c -o /Users/liwangping/.jenkins/workspace/uiSeven/allure-report
Report successfully generated to /Users/liwangping/.jenkins/workspace/uiSeven/allure-report
Allure report was successfully generated.
Creating artifact for the build.
Artifact was added to the build.
Finished: SUCCESS
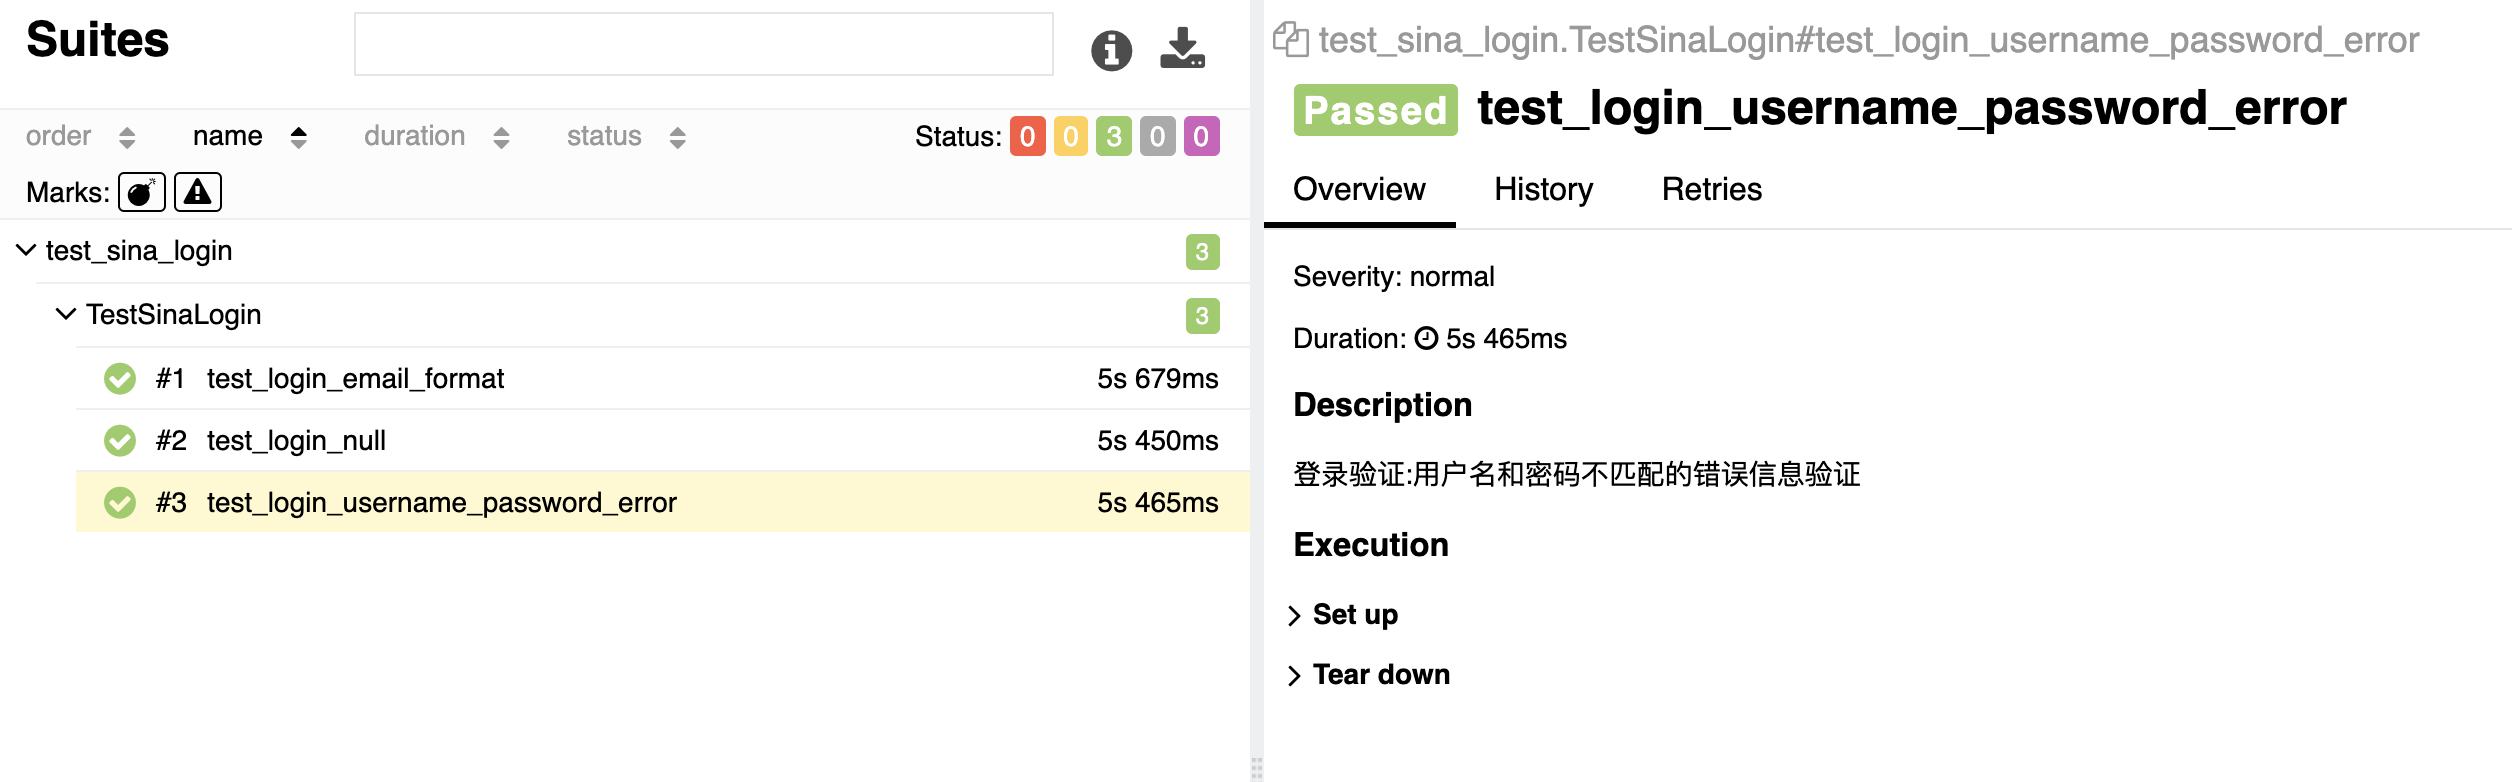
点击Allure Report的图标,显示的是测试报告信息,具体如下所示:
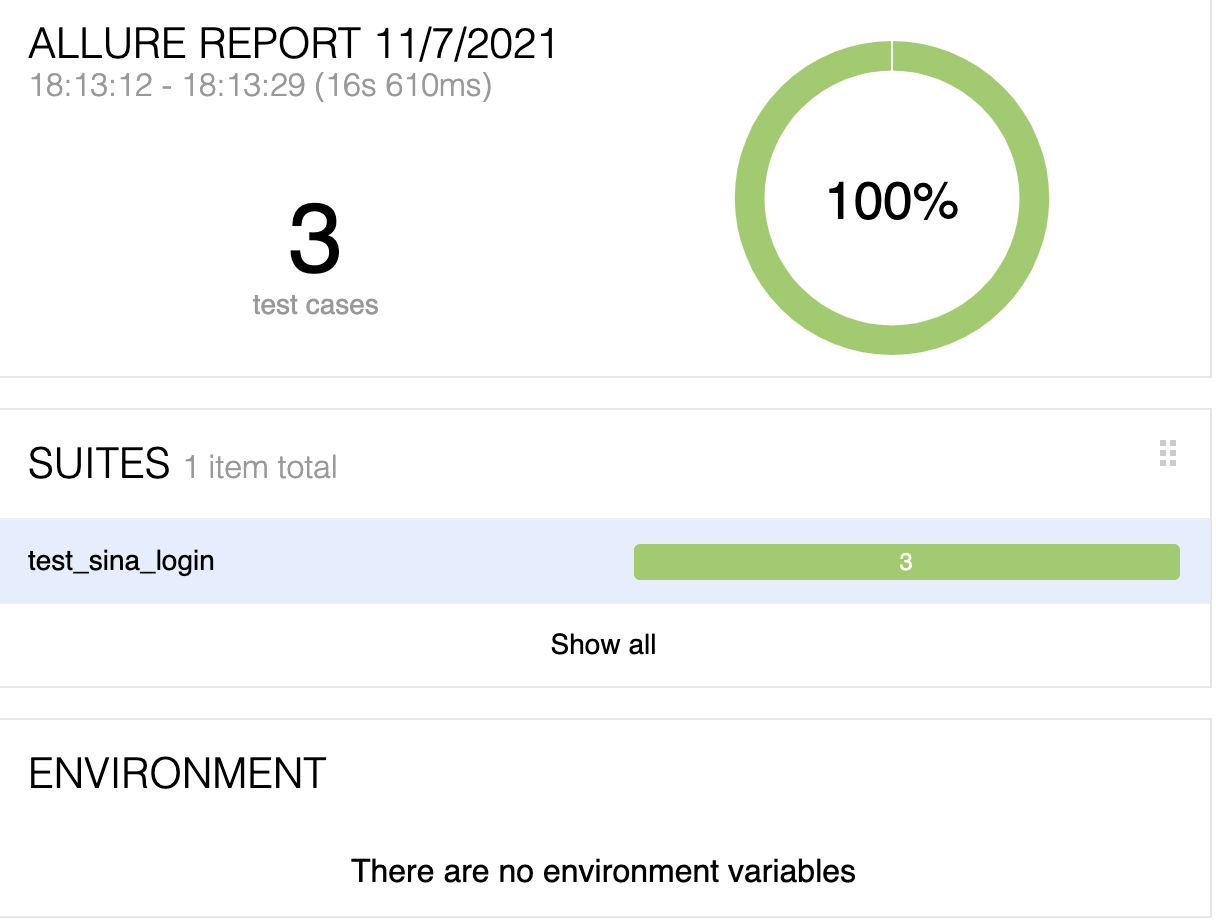
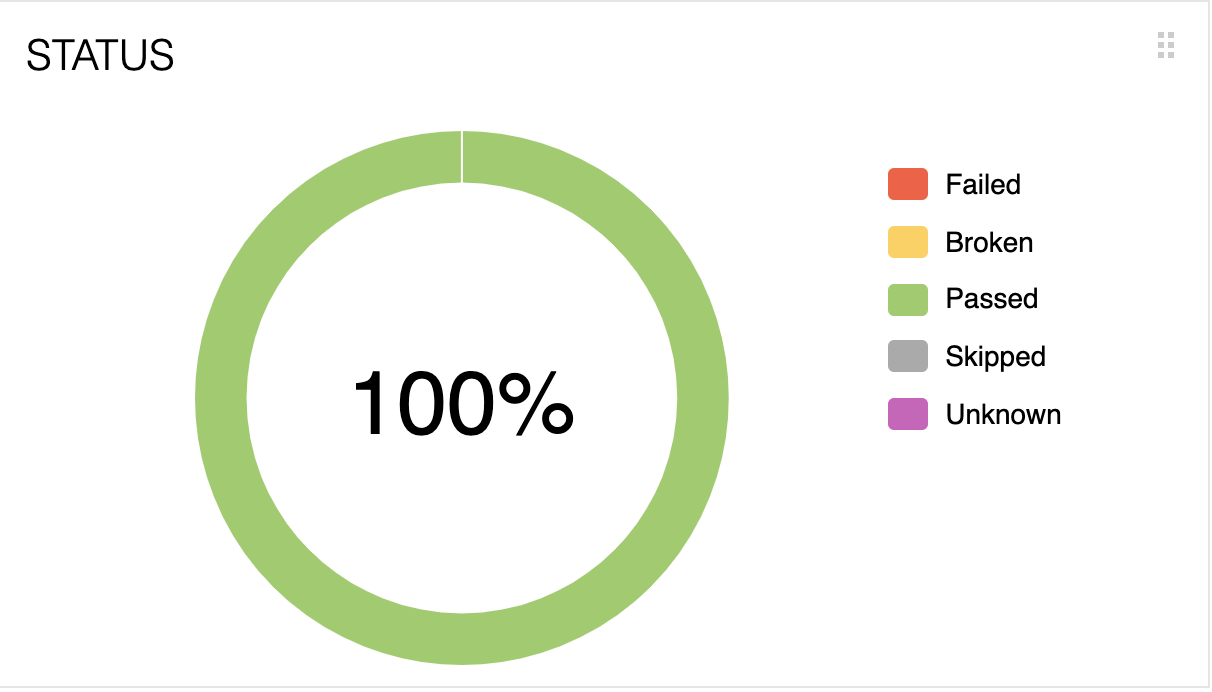
至此,一个完整的测试框架完成,可以完整的应用于企业的实际案例中。
感谢您的阅读和关注!想参加服务端测试开发的同学可以加我的微信私聊,在进行招生中