好记性不如烂笔头,闲来无事,自己搭建了一个基于struts2+spring+hibernate+oracle的框架,以备查阅。如果你看到了,且感兴趣,欢迎交流。
使用的环境以及版本如下:
Windows 7、Eclipse4.6、Tomcat8.0、JDK1.8、数据库oracle11g
Struts-2.3.30、Spring-4.2.2、Hibernate5.2.2
代码结构目录

一、搭建环境
1、新建web项目
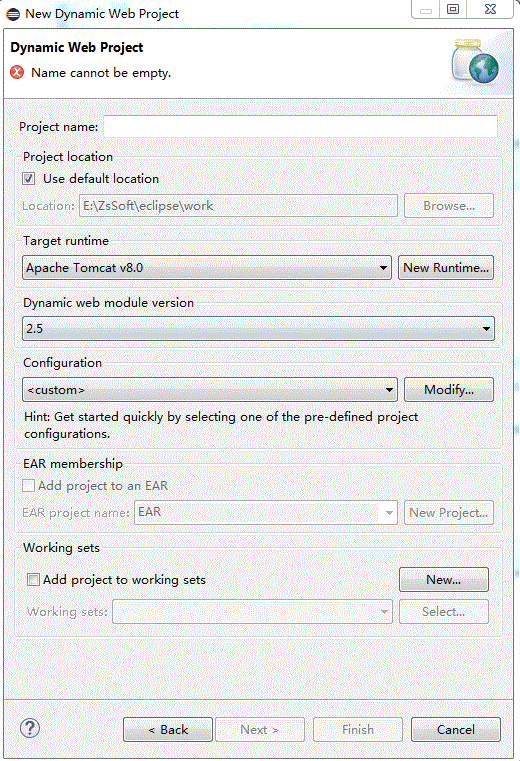
1.1、打开Eclipse,点击File-->new-->other-->web-->Dynamic Web Project 点击next,进入项目新建页面如图所示:
project name 我的是ssh,其他的targer runtime和Dynamic web module version根据自己的配置环境可以修改。我这里用的是tomcat8.0和2.5
1.2、然后一直next,当走到Web Module时, 选中Generate web.xml deployment descriptor,点击完成,项目新建成功。
如果不选中Generate web.xml deployment descriptor,那么新建的项目中就没有web.xml文件,需要手动添加。

2、导入jar包
2.1、导入struts2 所需的jar包
把下载好的Struts-2.3.30解压后,找到struts-2.3.30apps struts2-blank.war WEB-INFlib的jar包,复制到项目的WebContentWEB-INFlib目录下
2.2、导入spring 所需的jar包
把下载好的Spring-4.2.2解压后,找到spring-framework-4.2.2.RELEASElibs的jar包,复制到项目的WebContentWEB-INFlib目录下
2.3、导入hibernate所需的jar包
把下载好的Hibernate5.2.2解压后,找到hibernate-release-5.2.2.Finallib equired的jar包,复制到项目的WebContentWEB-INFlib目录下(注意:本例使用是ORACLE,记得导入对应的数据库驱动包)
2.4、导入oracle所需的jar包
我用的是classes12.jar,复制到项目的WebContentWEB-INFlib目录下
3、新建jsp文件,login.jsp、index.jsp、error.jsp
3.1、在WebContent下新建login.jsp文件,配置如下:
   <%@ page language="java" contentType="text/html; charset=UTF-8"
    pageEncoding="UTF-8"%>
    <!DOCTYPE html PUBLIC "-//W3C//DTD HTML 4.01 Transitional//EN" "http://www.w3.org/TR/html4/loose.dtd">
    <html>
      <head>
        <meta http-equiv="Content-Type" content="text/html; charset=UTF-8">
        <title>Insert title here</title>
      </head>
      <body>
        <form action="loginAction.action" method="post">
          用户名:<input type="text" name="username"><br>
          <input type="submit" value="提交">
        </form>
      </body>
    </html>
3.2、在WebContent下新建error.jsp文件,配置如下:
  <%@ page language="java" contentType="text/html; charset=UTF-8"
    pageEncoding="UTF-8"%>
    <!DOCTYPE html PUBLIC "-//W3C//DTD HTML 4.01 Transitional//EN" "http://www.w3.org/TR/html4/loose.dtd">
    <html>
      <head>
        <meta http-equiv="Content-Type" content="text/html; charset=UTF-8">
        <title>Insert title here</title>
      </head>
      <body>
        error
      </body>
    </html>
3.3、在WEB-INF下新建page/index.jsp文件,配置如下:
  <%@ page language="java" contentType="text/html; charset=UTF-8"
    pageEncoding="UTF-8"%>
    <!DOCTYPE html PUBLIC "-//W3C//DTD HTML 4.01 Transitional//EN" "http://www.w3.org/TR/html4/loose.dtd">
    <html>
      <head>
        <meta http-equiv="Content-Type" content="text/html; charset=UTF-8">
        <title>Insert title here</title>
      </head>
      <body>
        index
      </body>
    </html>
4、配置struts2
4.1、在web.xml配置过滤器filter,filter-mapping,配置如下:
  <?xml version="1.0" encoding="UTF-8"?>
  <web-app xmlns:xsi="http://www.w3.org/2001/XMLSchema-instance"
	xmlns="http://java.sun.com/xml/ns/javaee"
	xsi:schemaLocation="http://java.sun.com/xml/ns/javaee http://java.sun.com/xml/ns/javaee/web-app_2_5.xsd"
	id="WebApp_ID" version="2.5">
	<display-name>ssh</display-name>

	<!-- struts2配置过滤器 -->
	<filter>
		<filter-name>struts2</filter-name>
		<filter-class>org.apache.struts2.dispatcher.ng.filter.StrutsPrepareAndExecuteFilter</filter-class>
	</filter>
	<filter-mapping>
		<filter-name>struts2</filter-name>
		<url-pattern>/*</url-pattern>
	</filter-mapping>

      <welcome-file-list>
          <welcome-file>index.htm</welcome-file>
          <welcome-file>index.jsp</welcome-file>
          <welcome-file>default.htm</welcome-file>
          <welcome-file>default.jsp</welcome-file>
      </welcome-file-list>
  </web-app>
4.1、在struts.xml配置action,配置如下:
  <?xml version="1.0" encoding="UTF-8"?>
  <!DOCTYPE struts PUBLIC
    "-//Apache Software Foundation//DTD Struts Configuration 2.3//EN"
    "http://struts.apache.org/dtds/struts-2.3.dtd">
  <struts>
     <!-- 告知struts2运行时使用spring来创建对象 -->
     <!--  <constant name="struts.objectFactory" value="spring" /> -->
      <!-- 定义一个包 -->
    <package name="test" extends="struts-default">
    <!-- 通过action连接spring -->
      <action name="loginAction" class="loginAction" method="login">
        <!-- 成功时,跳转到index.jsp页面 -->
	   <result name="success">/WEB-INF/page/index.jsp</result>
	   <!-- 失败时,跳转到error.jsp页面 -->
	   <result name="error">/error.jsp</result>
	  </action>
	</package>
</struts>
5、配置spring
5.1、在web.xml配置监听器filter,filter-mapping,配置如下:
   <!--Spring配置监听器 -->
    <context-param>
    <param-name>contextConfigLocation</param-name>
    <!-- 加载application.xml文件 -->
    <param-value>classpath:application.xml</param-value>
    </context-param>
    <listener>
    <listener-class>org.springframework.web.context.ContextLoaderListener</listener-class>
    </listener>
5.2、在src下新建application.xml,在property 中ref的值和bean中的id值一致。配置如下:
  <?xml version="1.0" encoding="UTF-8"?>
    <beans xmlns="http://www.springframework.org/schema/beans"
    xmlns:xsi="http://www.w3.org/2001/XMLSchema-instance"
    xmlns:aop="http://www.springframework.org/schema/aop"
    xmlns:tx="http://www.springframework.org/schema/tx"
    xsi:schemaLocation="
    http://www.springframework.org/schema/beans
    http://www.springframework.org/schema/beans/spring-beans-4.2.xsd
    http://www.springframework.org/schema/tx
    http://www.springframework.org/schema/tx/spring-tx-4.2.xsd
    http://www.springframework.org/schema/aop
    http://www.springframework.org/schema/aop/spring-aop-4.2.xsd">

    <!--把service注入action中 -->
    <bean id="loginAction" class="com.ssh.action.LoginAction" scope="prototype">
      <property name="loginService" ref="loginService" />
    </bean>

    <!-- 把dao注入service中 -->

    <bean id="loginService" class="com.ssh.serviceImpl.LoginServiceImpl"  scope="prototype">

      <property name="loginDao" ref="loginDao" />
    </bean>

    <!-- 把sessionFactory注入到dao中 -->
    <bean id="loginDao" class="com.ssh.daoImpl.LoginDaoImpl" scope="prototype">
      <property name="factory">
        <ref bean="sessionFactory" />
      </property>
    </bean>

    <!-- 加载hibernate.cfg.xml文件 -->
    <bean id="sessionFactory" class="org.springframework.orm.hibernate5.LocalSessionFactoryBean">
      <property name="configLocation">
        <value>classpath:hibernate.cfg.xml</value>
      </property>
    </bean>
  </beans>
5、配置hibernate
5.1、在src下新建hibernate.cfg.xml,配置如下:
  <!DOCTYPE hibernate-configuration PUBLIC "-//Hibernate/Hibernate Configuration DTD 3.0//EN" "http://www.hibernate.org/dtd/hibernate-configuration-3.0.dtd">
  <hibernate-configuration>
	<session-factory>
	  <property name="hibernate.show_sql">true</property>
	  <!-- 配置Oracle方言 -->
          <property name="hibernate.dialect">org.hibernate.dialect.OracleDialect</property>
          <!-- 加载Oracle驱动 -->
          <property name="hibernate.connection.driver_class">oracle.jdbc.driver.OracleDriver</property>
          <!-- 配置Oracle的url路径,连接数据库, ORCL数据库名-->
          <property name="hibernate.connection.url">jdbc:oracle:thin:@127.0.0.1:1521:ORCL</property>
          <!-- 配置Oracle的用户名-->
          <property name="hibernate.connection.username">zs</property>
          <!-- 配置Oracle的密码-->
          <property name="hibernate.connection.password">123456</property>

          <property name="hibernate.hbm2ddl.auto">update</property>
          <!-- 映射hibernate.hbm.xml文件 -->
          <mapping resource="com/ssh/entity/hibernate.hbm.xml"/>
	</session-factory>
  </hibernate-configuration>
5.2、在com.ssh.entity包下新建hibernate.hbm.xml,配置如下:
  <?xml version="1.0" encoding="UTF-8"?>
  <!DOCTYPE hibernate-mapping PUBLIC
      "-//Hibernate/Hibernate Mapping DTD 3.0//EN"
      "http://hibernate.sourceforge.net/hibernate-mapping-3.0.dtd">

  <!--用户Hibernate映射文件,用户属性和数据库表结构相互映射 -->
  <hibernate-mapping>
	<class name="com.ssh.entity.User" table="shop_user">
	  <id name="userid" type="java.lang.Integer">
        <column name="userid" />
        <generator class="native"/>
       </id>
       <property name="username" type="java.lang.String">
         <column name="username" length="20" not-null="true" />
       </property>
	 </class>
  </hibernate-mapping>
6、各层的代码显示
6.1、action层,也是控制层
  package com.ssh.action;

  import com.opensymphony.xwork2.ActionSupport;
  import com.ssh.service.LoginService;

  public class LoginAction extends ActionSupport {

	//序列号
	private static final long serialVersionUID = 1L;
	//定义用户名
	private String username;
	//定义service
	private LoginService loginService;

    public String getUsername() {
		return username;
	}

	public void setUsername(String username) {
		this.username = username;
	}

	public void setLoginService(LoginService loginService) {
		this.loginService = loginService;
	}
    /**
     * 获取username的目的是为了dubug测试跳转,除此之外没有其他操作。
     * @return SUCCESS/ERROR
     */
	public String login() {
		if ("1".equals(username)) {
			int num = loginService.getUser();
			if(num > 0){
				return SUCCESS;
			}else{
				return ERROR;
			}
		} else {
			return ERROR;
		}
	}
}
6.2、service层,分别建立接口和实现类
  package com.ssh.service;
  /**
   * LoginService接口类
   * @author wei
   */
  public interface LoginService {
	public int getUser();
  }
  package com.ssh.serviceImpl;

  import com.ssh.dao.LoginDao;
  import com.ssh.service.LoginService;
  /**
   * LoginServiceImpl实现类
   * @author wei
   */
  public class LoginServiceImpl implements LoginService{

	//dao实例的使用注入方式
	private LoginDao loginDao;

	public void setLoginDao(LoginDao loginDao) {
		this.loginDao = loginDao;
	}

	@Override
	public int getUser() {
		int num = loginDao.getUser();
		return num;
	}
  }
6.3、dao层,分别建立接口和实现类
  package com.ssh.dao;

  /**
   * LoginDao接口
   * @author wei
   */
  public interface LoginDao {
	public int getUser();
  }
  package com.ssh.daoImpl;

  import java.util.List;

  import org.hibernate.Session;
  import org.hibernate.SessionFactory;
  import org.hibernate.Transaction;
  import org.hibernate.query.Query;

  import com.ssh.dao.LoginDao;
  import com.ssh.entity.User;

  /**
   * LoginDaoImpl实现类
   * @author wei
   */
  public class LoginDaoImpl implements LoginDao {

	// 要使用某个实例,就定义声明一个对象,然后给它添加set方法,实现spring注入方式
	private SessionFactory factory;
	public void setFactory(SessionFactory factory) {
		this.factory = factory;
	}

	@Override
	public int getUser() {
		// 获取session getCurrentSession:先查找,没有则创建新的;openSession:每次都创建
		Session session = factory.openSession();
		//开启事务
		Transaction tx = session.beginTransaction();

		//插入
		User user = new User();
		user.setUsername("wangwu");
		session.save(user);

		//查询
		String sqlSel = "from User";
		Query<User> query = session.createQuery(sqlSel,User.class);
		List<User> list = query.getResultList();
		for(User user1:list){
			System.out.println(user1.getUsername()+":"+user1.getUserid());
		}

		//关闭事务
		tx.commit();
		session.close();

		//修改
		Session session2 = factory.openSession();
		//开启事务
		Transaction tx2 = session2.beginTransaction();
		String sqlup="update User set username = 'test' where userid = '47'";
		session2.createQuery(sqlup).executeUpdate();

		String sqDel="delete from  User  where userid = '47'";
		int size = session2.createQuery(sqDel).executeUpdate();
		//关闭事务
		tx2.commit();
		session2.close();
		return size;
	}
  }
6.4、entity层
  package com.ssh.entity;

  /**
   * 用户实体类
   * @author wei
   */
  public class User {
	// 用户id
	private int userid;
	//用户名称
	private String username;

	public int getUserid() {
		return userid;
	}

	public void setUserid(int userid) {
		this.userid = userid;
	}

	public String getUsername() {
		return username;
	}

	public void setUsername(String username) {
		this.username = username;
	}

	public User() {
	}
  }
7、总结
Struts:
优点:1、开源的,使开发者可以更深了解他的原理和内部实现机制;2、可扩展性采用MVC模式分离业务逻辑层 显示层 模型层 低耦合,结构清晰,使开发者专注于业务逻辑;3、丰富的标签库供使用;4、支持国际化;5、很高的重用性。
缺点:1、Struts将MVC中的控制层 一分为三 在获得结构更加清晰的同时,也增加了系统的复杂度;2、ActionForms使用不便、无法进行单元测试;3、对servlet依赖性过强,struts在处理action时 必须要依赖 httprequest和 HttpResponse 对象。
Hibernate
优点:1、数据库连接的中间件,而且对程序的依赖性很小 透明性 使用了java的反射机制;2、轻量级 他对jdbc进行了轻量级的封装 而且可以在程序中取代EJB的cmp,完成持久化;3、性能很好,而且还是轻量级 很灵活;4、支持多种数据库的1对多的复杂关系;5、可
以 完全使用面向对象的思想去编程,使用了JTA JDBC 和 JNDI技术。
缺点:1、一个持久化类不能映射多个表;2、相对内存消耗JDBC是最省内存的,hibernate次之 ejb Bean 最差。
Spring
优点:1、spring 是基于ioc(控制反转)和aop(面向切面编程) 的框架,而且封装了所有的事务,不需要程序员自己去提交事务,一切都由web容器去控制,省去了很多代码。2、spring采用了单态和工厂模式 采用mvc模式下的java程序 尽管已经把层与层之间的关系耦
合度降低,但还是有联系,这时候使用spring 把所有bean都交由web容器去控制 创建和销毁,这样才真正的降低了耦合度, 而且bean的创建的生命周期都在web容器 里控制,而且他从工厂里实例的bean都是单态的,当然可以加一个属性让他不是单态;3、面
向接口编程,只需要知道要实现的接口就可以,不需要知道他的具体实现,使用spring框架有利于单元测试
总结:ssh(spring+struts2+hibernate)是基于MVC三层架构的基础上,进行的优化,目的为了便于项目管理,提高项目开发效率。但是随着近几年来,ssh框架暴露出来的弊端,也是令人堪忧,所以现在人们大多采用ssm(spring+springMVC+mybitis),不仅拥有ssh的优点,而且避免了ssh的弊端。
参考链接: http://www.cnblogs.com/sharpest/p/7362364.html