之前的文章我们介绍了 React 创建组件、JSX 语法、绑定数据和绑定对象。接下来我们将介绍 React 绑定属性( 绑定class 绑定style)、引入图片 循环数组渲染数据。
上一篇中我们在 components 目录中创建了 Home.js 组件并将其挂在到了 App.js 的根组建中,接下来我们接着在 Home 组件中进行操作。
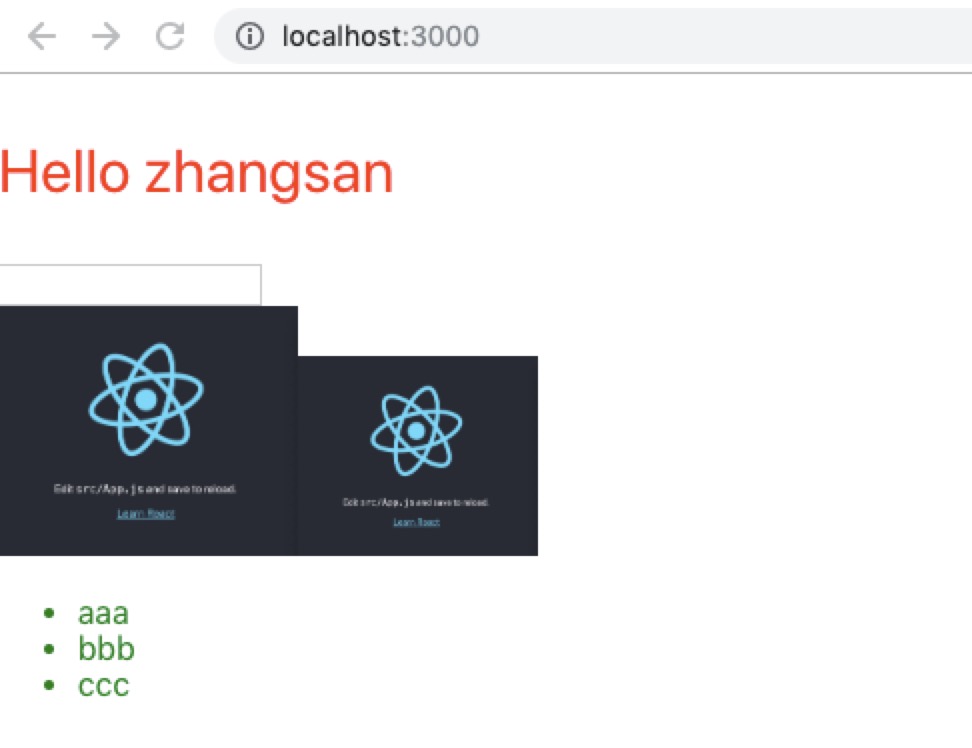
 1 import React, {Component} from 'react';
 2 import img from '../static/img/react.jpg';
 3
 4 class Home extends Component {
 5     constructor(props) {
 6         super(props);
 7         this.state = {
 8             name: "zhangsan",
 9             title: "this is a title",
10             className: "home_title",
11             style: {
12                 color: "red",
13                 fontSize: "30px"
14             },
15             list: ["aaa", "bbb", "ccc"]
16         }
17     }
18
19     render() {
20         return (
21             <div>
22                 <p
23                     title={this.state.title}
24                     className={this.state.className}
25                     style={this.state.style}
26                 >
27                     Hello {this.state.name}
28                 </p>
29
30                 <div>
31                     <label htmlFor="name">
32                         <input type="text" id="name"/>
33                     </label>
34                 </div>
35
36                 <img style={{ "150px"}} src={img} alt=""/>
37                 <img style={{ "120px"}} src={require('../static/img/react.jpg')} alt=""/>
38
39                 <ul style={{color: "green"}}>
40                     {this.state.list.map((val, key) => {
41                         return (<li key={key}>{val}</li>)
42                     })}
43                 </ul>
44
45             </div>
46         );
47     }
48 }
49
50 export default Home;
以上代码中我们需要注意的是:
* 绑定的数据要放在 this.state 中,
* HTML 的 class 类名改成 className,
* label 中 for 属性改成 htmlFor,
* 行内样式 style 的写法为 {{ }},
* 图片 img 的引入方式:
1、通过模块的方式引入:
import img from '../static/img/react.jpg';
<img style={{"150px"}} src={img} alt=""/>
2、通过 require 的方式引入:
<img style={{"120px"}} src={require('../static/img/react.jpg')} alt=""/>
* 数组数据利用循环的形式进行输出,需要注意的是每一个输出 HTML 中都要指定一个 key 值。
最后的运行结果为: