一、介绍
参照官网部署:https://docs.openstack.org/cinder/pike/install/index-rdo.html
继续上一博客进行部署:http://www.cnblogs.com/weijie0717/p/8641493.html
二、部署cinder 服务(controller 节点)
按照博客部署:https://docs.openstack.org/cinder/pike/install/cinder-controller-install-rdo.html
1、 需要作出修改的地方:(避免配置Haproxy 后 端口冲突。)
# vim /etc/cinder/cinder.conf

2、配置 Haproxy
博客:http://www.cnblogs.com/weijie0717/p/8530102.html
配置:cinder 服务。
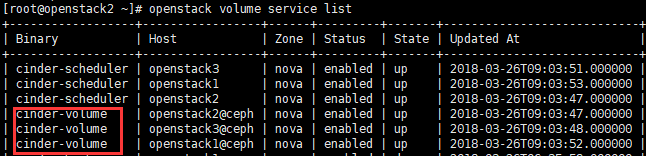
三、验证配置
# openstack volume service list

基础服务到此处。配置完成。
四、部署cinder-volumes + ceph cluster
1、安装ceph包 (所有controller 节点)
# yum -y install ceph-common
2、 拷贝ceph集群配置文件到所有controller 节点 /etc/ceph/ceph.conf (ceph 集群 任意节点)
之前在配置 glance 时已经操作,在此处不在操作,具体命令如下:
# scp /etc/ceph/ceph.conf root@controller1:/etc/ceph/ceph.conf
# scp /etc/ceph/ceph.conf root@controller2:/etc/ceph/ceph.conf
# scp /etc/ceph/ceph.conf root@controller3:/etc/ceph/ceph.conf
3、 创建 Cinder 所需要的ceph 存储池:volumes (任意ceph-mon 节点 )
# ceph osd pool create volumes 128 128
4、 生成和导出证书到 controller节点 (任意ceph-mon 节点 )
# ceph auth get-or-create client.cinder mon 'allow r' osd 'allow class-read object_prefix rbd_children, allow rwx pool=volumes,allow rwx pool=vms,allow rx pool=images' -o /etc/ceph/ceph.client.cinder.keyring
5、 拷贝keying 文件至所有controller 节点 /etc/ceph/文件中
# scp /etc/ceph/ceph.client.cinder.keyring root@controller-all:/etc/ceph/ceph.client.cinder.keyring
6、controller 的 libvirt也需要这个key,创建Key:
# uuidgen

# cd /root
# vim secret.xml
<secret ephemeral = 'no' private = 'no'>
<uuid>953c13f7-76e1-48b3-a982-cf0ee5c51039</uuid>   #此UUID 为 uuidgen 获取到的ID
<usage type = 'ceph'>
<name>client.cinder secret</name>
</usage>
</secret>
# virsh secret-define --file secret.xml

# virsh secret-set-value --secret 953c13f7-76e1-48b3-a982-cf0ee5c51039 --base64 AQB7TrhaDC6oLBAATxzn5wCRYZeR3XmU0FE9vQ==
# --secret 后的值 为 UUID值。
# base64 后的值为/etc/ceph/ceph.client.cinder.keyring 的KEY 值。生成的key保存在/etc/libvirt/secrets
![]()
Note: UUID 在controller 各节点上保持一致。 拷贝 secret.xml 到其他controller节点,然后继续 uuidgen 命令之后的所有操作。
7、配置 Cinder
# vim /etc/cinder/cinder.conf
[DEFAULT]
enabled_backends = ceph


配置文件最后添加,避免打乱其他标签项配置。
[ceph]
volume_driver = cinder.volume.drivers.rbd.RBDDriver
rbd_pool = volumes
rbd_ceph_conf = /etc/ceph/ceph.conf
rbd_flatten_volume_from_snapshot = false
rbd_max_clone_depth = 5
#rbd_store_chunk_size = 4
#rados_connect_timeout = -1
rbd_user = cinder    # 生成Key是所使用的用户
rbd_secret_uuid = 953c13f7-76e1-48b3-a982-cf0ee5c51039     # UUID
volume_backend_name = ceph
8、重启服务
# systemctl restart openstack-cinder-*
Note : (* 代表以下服务:openstack-cinder-api.service openstack-cinder-scheduler.service openstack-cinder-volume.service)查看 服务是否都正常启动。如果没有启动通过 start 启动,本实验过程中 openstack-cinder-volume.service 未能启动,通过start
# systemctl start openstack-cinder-volume.service
# systemctl enable openstack-cinder-volume.service
9、验证:
1、命令验证
# openstack volume service list
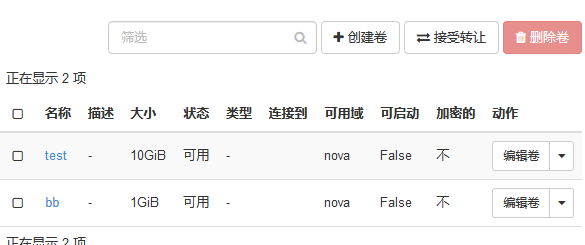
2、web 创建卷
项目--》卷--》卷--》创建卷:

3、ceph 集群查看

ceph 集群中查看到有数据传入。
4、处理ceph 集群告警。参考 配置Glance 时的操作
博客:http://www.cnblogs.com/weijie0717/p/8563294.html
到此处,cinder-volumes + ceph 集群 配置完成。
附加:
1、配置 Volume-type。 (适用场景:具有多种类型的ceph 存储:ceph-sas 、ceph-ssd 集群 等等)
注:如果不指定volume type,cinder-scheduler会忽略volume type,按默认的调度器从所有cinder-volume调度。
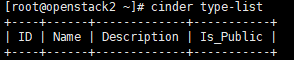
a、查看:
# cinder type-lis
b、配置:
# cinder type-create ceph # ceph 为type-name 自定义
# cinder type-key ceph set volume_backend_name=ceph # volume type关联 cinder.conf 配置文件中的volume_backend_name
c、 验证
# cinder type-lis

另外:web中创建卷。卷的类型中也可以看到。
