一、Scene Delegate
在之前我们对AppDelegate已经很熟悉,它是iOS app的入口,application(_:didFinishLaunchingWithOptions:)是我们app启动后系统调用的第一个函数。AppDelegate类实现了UIKit库中的UIApplicationDelegate 协议。而到了iOS13 AppDelegate的角色将会发生变化,后面我们会详细讨论。
在iOS13之前我们一般会在AppDelegate中做的事情:
1.创建app的第一个view controller也就是 rootViewController
2.配置并启动一些像日志记录和云服务之类的组件
3.注册推送通知处理程序,并响应发送到app的推送通知
4.响应应用程序生命周期事件,例如进入后台,恢复应用程序或退出应用程序(终止)
但是在iOS13后,AppDelegate文件结构也发生变化,在AppDelegate.h文件中没有了window属性,而是在sceneDelegate.h中,可见AppDelegate不管理window而是交给SceneDelegate。
#pragma mark - UISceneSession lifecycle

/*
1.如果没有在APP的Info.plist文件中包含scene的配置数据,或者要动态更改场景配置数据,需要实现此方法。 UIKit会在创建新scene前调用此方法。
2.方法会返回一个UISceneConfiguration对象,其包含其中包含场景详细信息,包括要创建的场景类型,用于管理场景的委托对象以及包含要显示的初始视图控制器的情节提要。 如果未实现此方法,则必须在应用程序的Info.plist文件中提供场景配置数据。

总结下:默认在info.plist中进行了配置, 不用实现该方法也没有关系。如果没有配置就需要实现这个方法并返回一个UISceneConfiguration对象。
配置参数中Application Session Role 是个数组,每一项有三个参数:
Configuration Name:   当前配置的名字;
Delegate Class Name:  与哪个Scene代理对象关联;
StoryBoard name: 这个Scene使用的哪个storyboard。
注意:代理方法中调用的是配置名为Default Configuration的Scene,则系统就会自动去调用SceneDelegate这个类。这样SceneDelegate和AppDelegate产生了关联。
*/

//参数options是一个UISceneConnectionOptions类,官方解释:它包含了为什么要创建一个新的scene的信息。根据参数信息判断是否要创建一个新的scene
- (UISceneConfiguration *)application:(UIApplication *)application configurationForConnectingSceneSession:(UISceneSession *)connectingSceneSession options:(UISceneConnectionOptions *)options {
    // Called when a new scene session is being created.
    // Use this method to select a configuration to create the new scene with.
    return [[UISceneConfiguration alloc] initWithName:@"Default Configuration" sessionRole:connectingSceneSession.role];
}

// 在分屏中关闭其中一个或多个scene时候回调用
- (void)application:(UIApplication *)application didDiscardSceneSessions:(NSSet<UISceneSession *> *)sceneSessions {
    // Called when the user discards a scene session.
    // If any sessions were discarded while the application was not running, this will be called shortly after application:didFinishLaunchingWithOptions.
    // Use this method to release any resources that were specific to the discarded scenes, as they will not return.
}
SceneDelegate 生命周期
- (void)scene:(UIScene *)scene willConnectToSession:(UISceneSession *)session options:(UISceneConnectionOptions *)connectionOptions {
    NSLog(@"场景加载完成");
// iOS 12上的 application(_:didFinishLaunchingWithOptions:) 函数的作用最相似。当将场景添加到app中时scene(_:willConnectTo:options:)函数会被调用的。
}
- (void)sceneDidDisconnect:(UIScene *)scene {
    NSLog(@"场景已经断开连接");
// (注意,以后它可能被重新连接)
}
- (void)sceneDidBecomeActive:(UIScene *)scene {
    NSLog(@"已经从后台进入前台 ");
//(例如从应用切换器中选择场景)
}
- (void)sceneWillResignActive:(UIScene *)scene {
    NSLog(@"即将从前台进入后台");
//(例如通过切换器切换到另一个场景)
}
- (void)sceneWillEnterForeground:(UIScene *)scene {
    NSLog(@"即将从后台进入前台");
}
- (void)sceneDidEnterBackground:(UIScene *)scene {
    NSLog(@"已经从前台进入后台");
}
综合上面所述,我们发现这个新代理只在iOS13之后才会出现,而且也只在iPad中才会用到。如果我们不支持多窗口,所以我们可以移除这个新的代理,并按照之前的习惯进行开发。
1.直接删除Scene Delegate.h/.m文件
2.在AppDelegate.h添加@property (strong, nonatomic) UIWindow * window;属性
3移除Appdelegate中的UIScene代理
4.在info.plist文件中移除Application Scene Manifest
但是如果支持的话,那么老的AppDelegate管理生命周期的方法将不会有效,需要使用SceneDelgate中的UIScene提供的生命周期方法。
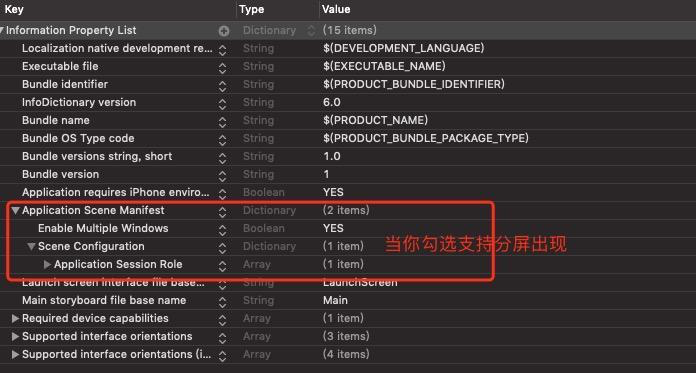
如何开启分屏多窗口显示?
1.第一步:Xcode的配置-开启支持多屏scene
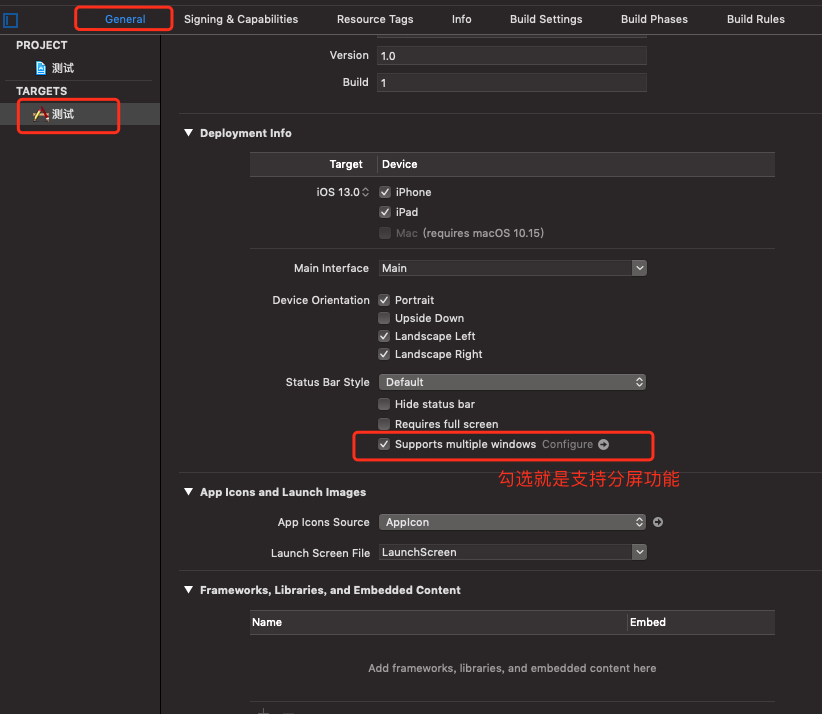
2.info.plist文件进行修改,勾选分屏,enable Multipe Windows 设置为YES.
二、不使用工程自带的Main.storyboard
在Xcode中新建工程,一般都会带有默认的Main.storyboard方便我们进行快捷开发。但是在日常开发中,我们很少使用它。那么如何删除呢?
步骤如下:
(1)在工程配置中移除main的关联
(2)移除main.storuboard中的关联
(3)删除main.storyboard文件
(4)在info.plist中的查看是否有main的残留和删除在scene中的storyboardname
(5)如果是不支持scene就在AppDelegate中添加代码。如果支持就在SceneDelegate中添加代码。
// app delegate
 self.window = [[UIWindow alloc]initWithFrame:[UIScreen mainScreen].bounds];
    self.window.rootViewController = [[MainTabBarController alloc] init];
    [self.window makeKeyAndVisible];


// secnedelegate
if (scene) {
        UIWindowScene *windowSecne = (UIWindowScene*)scene;
        self.window = [[UIWindow alloc] initWithWindowScene:windowSecne];
        self.window.frame = windowSecne.coordinateSpace.bounds;
        self.window.rootViewController = [ViewController new];
        [self.window makeKeyAndVisible];
    }