一、一些废话。
在高三的时候曾经接触过Linux,被其帅气的终端所打动,从此走上了和Linux斗争的道路,其中有辛酸,但更多的是快乐。刚开始之所以接触Linux其实是因为BackTrack,然后学习了一些Linux下面的基本操作。最近这段时间想系统的学一下Linux安全方面的东西,准备把自己在这段时间当中的所学所想记录下来,为折腾Linux的同学提供一些借鉴,当然如果你们看得上的话 ![]()
二、SSH简介。
简单说,SSH是一种网络协议,用于计算机之间的加密登录。
如果一个用户从本地计算机,使用SSH协议登录另一台远程计算机(多用于Linux之间),我们就可以认为,这种登录是安全的,即使被中途截获,密码也不会泄露。 (事实真的是这样吗?)
最早的时候,互联网通信都是明文通信,一旦被截获,内容就暴露无疑。1995年,芬兰学者Tatu Ylonen设计了SSH协议,将登录信息全部加密,成为互联网安全的一个基本解决方案,迅速在全世界获得推广,目前已经成为Linux系统的标准配置。
需要指出的是,SSH只是一种协议,存在多种实现,既有商业实现,也有开源实现。本文针对的实现是OpenSSH,它是自由软件,应用非常广泛。
此外,本文只讨论SSH在Linux Shell中的用法。如果要在Windows系统中使用SSH,会用到另一种软件putty或者xshell之类。
三、简单的使用方法。
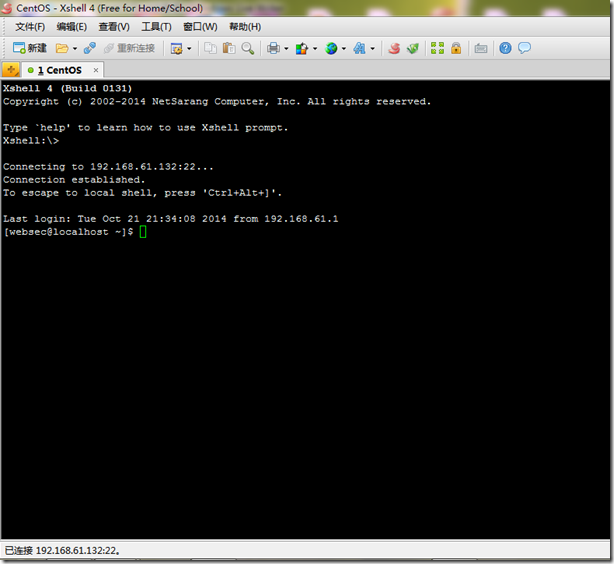
1、如果你是Linux用户,那么很方面的:打开终端,输入:ssh websec@192.168.61.132。其中websec为我的用户名、192.168.61.132为主机地址。具体使用过程中替换相应用户名和主机地址即可即可。接下来,回车,这个时候输入密码再回车就可以登录了。
2、如果你是windows用户,那么你需要使用类似xshell的东西去连接,具体过程不赘述,登录成功后截图如下:
三、ssh配置。
CenOS的ssh配置文件在:/etc/ssh/ssh_config
#       $OpenBSD: ssh_config,v 1.25 2009/02/17 01:28:32 djm Exp $

# This is the ssh client system-wide configuration file.  See
# ssh_config(5) for more information.  This file provides defaults for
# users, and the values can be changed in per-user configuration files
# or on the command line.

# Configuration data is parsed as follows:
#  1. command line options
#  2. user-specific file
#  3. system-wide file
# Any configuration value is only changed the first time it is set.
# Thus, host-specific definitions should be at the beginning of the
# configuration file, and defaults at the end.

# Site-wide defaults for some commonly used options.  For a comprehensive
# list of available options, their meanings and defaults, please see the
# ssh_config(5) man page.

# Host *
#   ForwardAgent no
#   ForwardX11 no
#   RhostsRSAAuthentication no
#   RSAAuthentication yes
#   PasswordAuthentication yes
#   HostbasedAuthentication no
#   GSSAPIAuthentication no
#   GSSAPIDelegateCredentials no
#   GSSAPIKeyExchange no
#   GSSAPITrustDNS no
#   BatchMode no
#   CheckHostIP yes
#   AddressFamily any
#   ConnectTimeout 0
#   StrictHostKeyChecking ask
#   IdentityFile ~/.ssh/identity
#   IdentityFile ~/.ssh/id_rsa
#   IdentityFile ~/.ssh/id_dsa
#   Port 22
#   Protocol 2,1
#   Cipher 3des
#   Ciphers aes128-ctr,aes192-ctr,aes256-ctr,arcfour256,arcfour128,aes128-cbc,3des-cbc
#   MACs hmac-md5,hmac-sha1,umac-64@openssh.com,hmac-ripemd160
#   EscapeChar ~
#   Tunnel no
#   TunnelDevice any:any
#   PermitLocalCommand no
#   VisualHostKey no
Host *
        GSSAPIAuthentication yes
# If this option is set to yes then remote X11 clients will have full access
# to the original X11 display. As virtually no X11 client supports the untrusted
# mode correctly we set this to yes.
        ForwardX11Trusted yes
# Send locale-related environment variables
        SendEnv LANG LC_CTYPE LC_NUMERIC LC_TIME LC_COLLATE LC_MONETARY LC_MESSAGES
        SendEnv LC_PAPER LC_NAME LC_ADDRESS LC_TELEPHONE LC_MEASUREMENT
        SendEnv LC_IDENTIFICATION LC_ALL LANGUAGE
        SendEnv XMODIFIERS

当你想启用某一项配置的时候只需要将前面的#号去掉就可以了。
Host *
表示所有的主机都可以连接

PasswordAuthentication yes
“PasswordAuthentication”设置是否使用口令验证。

BatchMode no
“BatchMode”如果设为“yes”,passphrase/password(交互式输入口令)的提示将被禁止。当不能交互式输入口令的时候,这个选项对脚本文件和批处理任务十分有用。

CheckHostIP yes
“CheckHostIP”设置ssh是否查看连接到服务器的主机的IP地址以防止DNS欺骗。建议设置为“yes”。

Port 22
“Port”设置连接到远程主机的端口。
