创建Post and User模型
php artisan make:model  Post

php artisan make:model  User
创建posts and users 表文件
php artisan make:migration create_users_table --create=users

php artisan make:migration create_users_table --create=posts
在表文件设置表结构
Schema::create('posts', function (Blueprint $table) {
            $table->increments('id');
            $table->string('name');
            $table->timestamps();
        });


 Schema::create('users', function (Blueprint $table) {
            $table->increments('id');
            $table->string('name');
            $table->string('email');
            $table->string('password');
            $table->string('remember_token');
            $table->timestamps();
        });
生成posts and users and notifications表
php artisan notifications:table

php artisan migrate
创建测试数据
先在database/factories/ModelFactoy.php中设置需要的数据类型
$factory->define(AppUser::class, function (FakerGenerator $faker) {
    static $password;

    return [
        'name' => $faker->name,
        'email' => $faker->unique()->safeEmail,
        'password' => $password ?: $password = bcrypt('secret'),
        'remember_token' => str_random(10),
    ];
});

$factory->define(AppPost::class, function (FakerGenerator $faker) {
    return [
        'name' => $faker->name,
    ];
});
再执行命令
php artisan  tinker

namespace App

factory('AppUser',10)->create()
factory('AppPost',10)->create()
创建Notifications目录,以及通知文件
创建之后即可看见InvoicePaid.php and UserSubscrible.php 文件
php artisan make:notification   InvoicePaid

php artisan make:notification   UserSubscrible
Formatting Database Notifications
在 notification class 中可以用 toDatabase or toArray 方法 , 将数据存入到数据库中 ,,同时 这两个方法接受$notifiable entity,并返回一个普通的数组(json 格式)。我的代码如下:
//InvoicPaid
 public function toArray($notifiable)
    {
        return [
            'post_id' => $this->id,
        ];
    }
/// UserSubscribe
public function toArray($notifiable)
    {
        return [
            'subscribe_at'=>Carbon::now(),// 记录时间
        ];
    }
设置路由
Auth::LoginUsingId(2);
Route::get('/', function () {
   // return view('welcome');

    Auth::user()->notify(new AppNotificationsPostPublised());
    Auth::user()->notify(new AppNotificationsUserSubscribed());
});
刷新时即可看见数据库中插入数据了,同时 read_at 字段为 null
Notification 得数据显示
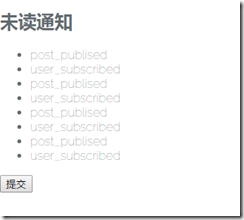
在welcome.php添加如下代码,以驼峰的形式显示数据:
<h2>未读通知</h2>
    <ul>
        @foreach(Auth::user()->unreadNotifications  as $notification)
           {{-- @include('notification.'.snake_case(class_basename($notification->type)))--}}

            <li>{{snake_case(class_basename($notification->type))}}</li>
        @endforeach
    </ul>
<form method="post" action="/user/notification" >
    {{csrf_field()}}
    <button type="submit">提交</button>

</form>
新建 /user/notification 路由, 把未读的通知变为已读的 ,及修改 read_at字段的值 , 第二次刷新页面就不会有数据显示 ,同时可以利用这个对应不同的 用户加载不同的模板
IlluminateSupportFacadesRoute::post('/user/notification',function (){
    IlluminateSupportFacadesAuth::user()->unreadNotifications->markAsRead();
});
