这一次继续来操练Flutter的基础,待这篇写完之后接下来则得用一个小项目来对之前所学的Flutter进行一个综合应用巩固的目的,下面开撸。
自定义View:
概述:
与Flutter自带Widget一样,自定义view也会被Skia引擎编译成原生代码,性能是一样的。它也存在两个元素:
画面Canvas:
- drawLine:画直线
- drawCircle:画圆
- drawOval:画椭圆
- drawRect:画矩形
- drawPoint:画点
- drawCircle:画圆
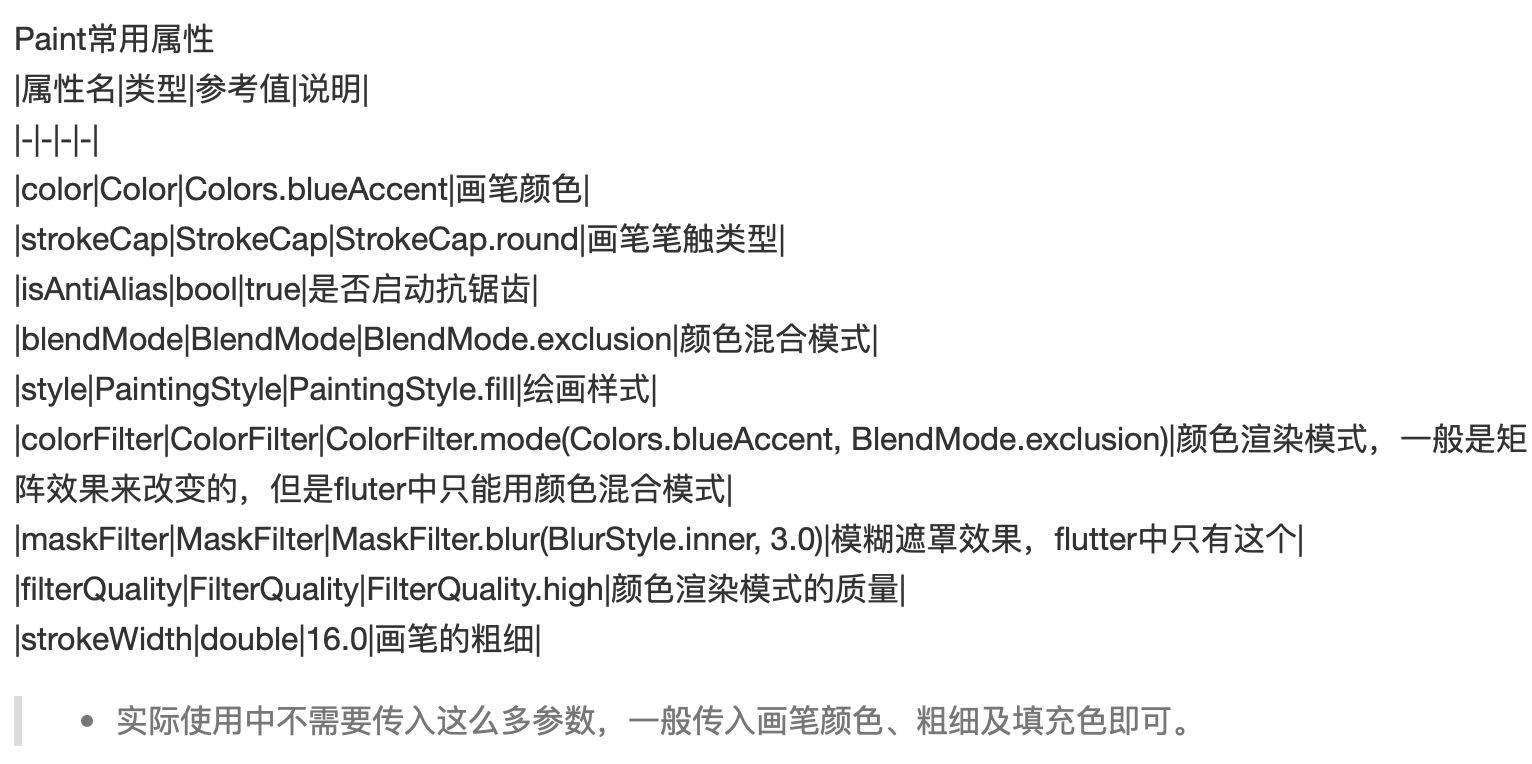
画笔Paint:
案例效果:
具体实现:
1、先来监听按下的坐标点,并存入到集合当中。
import 'package:flutter/material.dart';

void main() => runApp(MyApp());

class MyApp extends StatelessWidget {
  @override
  Widget build(BuildContext context) {
    return MaterialApp(
      title: '自定义画笔',
      theme: ThemeData.light(),
      home: HomePage(),
    );
  }
}

class HomePage extends StatelessWidget {
  @override
  Widget build(BuildContext context) {
    return Container(
        color: Colors.white,
        child: new Scaffold(
          body: CustomPaints(),
        ));
  }
}

class CustomPaints extends StatefulWidget {
  @override
  _CustomPaintState createState() => _CustomPaintState();
}

class _CustomPaintState extends State<CustomPaints> {
  List<Offset> list = new List();

  @override
  Widget build(BuildContext context) {
    return GestureDetector(
      ///按下
      onPanDown: (DragDownDetails details) {
        RenderBox box = context.findRenderObject();
        Offset offset = box.globalToLocal(details.globalPosition);
        print(offset.toString());
        setState(() {
          ///定义一个数组 用来收集点击屏幕的地方
          list.add(offset);
        });
      },
    );
  }
}
运行看一下是否监听到了坐标点了:

嗯,木有问题。
2、自定义一个心形。
这里可以用一个贝塞尔曲线来绘制一个心型,关于这块https://www.cnblogs.com/webor2006/p/7341697.html在当时Android的绘制学习中已经学习过了,所以这里就不啰嗦了,还是比较容易理解的:
import 'package:flutter/material.dart';

void main() => runApp(MyApp());

class MyApp extends StatelessWidget {
  @override
  Widget build(BuildContext context) {
    return MaterialApp(
      title: '自定义画笔',
      theme: ThemeData.light(),
      home: HomePage(),
    );
  }
}

class HomePage extends StatelessWidget {
  @override
  Widget build(BuildContext context) {
    return Container(
        color: Colors.white,
        child: new Scaffold(
          body: CustomPaints(),
        ));
  }
}

class CustomPaints extends StatefulWidget {
  @override
  _CustomPaintState createState() => _CustomPaintState();
}

class _CustomPaintState extends State<CustomPaints> {
  List<Offset> list = new List();

  @override
  Widget build(BuildContext context) {
    return GestureDetector(

        ///按下
        onPanDown: (DragDownDetails details) {
          RenderBox box = context.findRenderObject();
          Offset offset = box.globalToLocal(details.globalPosition);
          print(offset.toString());
          setState(() {
            ///定义一个数组 用来收集点击屏幕的地方
            list.add(offset);
          });
        },
        child: Center(
          child: CustomPaint(
            painter: lovePainter(),
          ),
        ));
  }
}

class lovePainter extends CustomPainter {
  @override
  void paint(Canvas canvas, Size size) {
    Paint paint = Paint()
      ..color = Colors.redAccent
      ..strokeCap = StrokeCap.square
      ..isAntiAlias = true
      ..strokeWidth = 20
      ..strokeJoin = StrokeJoin.bevel; //定义画笔

    //绘制左半边心
    Path path = new Path();
    var width = 50;
    var height = 80;
    path.moveTo(width / 2, height / 4);
    path.cubicTo((width * 6) / 7, height / 9, (width * 13) / 13,
        (height * 2) / 5, width / 2, (height * 7) / 12);
    canvas.drawPath(path, paint);

    //绘制右半边心
    Path path2 = new Path();
    path2.moveTo(width / 2, height / 4);
    path2.cubicTo(width / 7, height / 9, width / 21, (height * 2) / 5,
        width / 2, (height * 7) / 12);
    canvas.drawPath(path2, paint);
  }

  //刷新布局的时候 告诉flutter需要重新绘制
  @override
  bool shouldRepaint(CustomPainter oldDelegate) {
    return true;
  }
}

3、根据集合的坐标来绘制心形。
这一步骤就比较简单了,如下:
import 'package:flutter/material.dart';

void main() => runApp(MyApp());

class MyApp extends StatelessWidget {
  @override
  Widget build(BuildContext context) {
    return MaterialApp(
      title: '自定义画笔',
      theme: ThemeData.light(),
      home: HomePage(),
    );
  }
}

class HomePage extends StatelessWidget {
  @override
  Widget build(BuildContext context) {
    return Container(
        color: Colors.white,
        child: new Scaffold(
          body: CustomPaints(),
        ));
  }
}

class CustomPaints extends StatefulWidget {
  @override
  _CustomPaintState createState() => _CustomPaintState();
}

class _CustomPaintState extends State<CustomPaints> {
  List<Offset> list = new List();

  @override
  Widget build(BuildContext context) {
    return new Stack(
      children: <Widget>[
        GestureDetector(

          ///手势 想要控制手势 直接包裹widget即可
          ///按下
          onPanDown: (DragDownDetails details) {
            RenderBox box = context.findRenderObject();
            Offset offset = box.globalToLocal(details.globalPosition);
            print(offset.toString());
            setState(() {
              ///定义一个数组 用来收集点击屏幕的地方
              list.add(offset);
            });
          },
        ),
        getList(),
      ],
    );
  }

  Stack getList() {
    return new Stack(
      children: _buildItem(),
    );
  }

  ///构建Stack布局的子childern,点击多少下就显示多少个♥布局
  List<Positioned> _buildItem() {
    List<Positioned> lists = new List();
    if (list.length != 0) {
      for (int i = 0; i < list.length; i++) {
        Offset offset = list[i];
        lists.add(Positioned(

          ///这里要减去画笔的宽度 坐标才相对准确
          top: offset.dy - 25,
          left: offset.dx - 20,
          child: CustomPaint(
            painter: lovePainter(),
          ),
        ));
      }
      return lists;
    } else {
      return lists;
      // return new Positioned();
    }
  }
}

}

class lovePainter extends CustomPainter {
  @override
  void paint(Canvas canvas, Size size) {
    Paint paint = Paint()
      ..color = Colors.redAccent
      ..strokeCap = StrokeCap.square
      ..isAntiAlias = true
      ..strokeWidth = 20
      ..strokeJoin = StrokeJoin.bevel; //定义画笔

    //绘制左半边心
    Path path = new Path();
    var width = 50;
    var height = 80;
    path.moveTo(width / 2, height / 4);
    path.cubicTo((width * 6) / 7, height / 9, (width * 13) / 13,
        (height * 2) / 5, width / 2, (height * 7) / 12);
    canvas.drawPath(path, paint);

    //绘制右半边心
    Path path2 = new Path();
    path2.moveTo(width / 2, height / 4);
    path2.cubicTo(width / 7, height / 9, width / 21, (height * 2) / 5,
        width / 2, (height * 7) / 12);
    canvas.drawPath(path2, paint);
  }

  //刷新布局的时候 告诉flutter需要重新绘制
  @override
  bool shouldRepaint(CustomPainter oldDelegate) {
    return true;
  }
}
最终效果就如开头所示。
牛逼动画效果:
效果:

具体实现:
这块实现起来就不是那么容易了,但是如果能搞懂其实现原理对于动画的理解也会更加深刻,所以还是尽量来慢慢理解它。
1、动画实现原理分析:
其实是由八个动画来组成的,下面来拆解一下整个动作:

动画一:
动画二:
动画三:

动画四:
动画五:
动画六:

动画七:
动画八:
然后以这八个动画无限进行轮回,这样的动画效果就出来了。
2、动画定义:
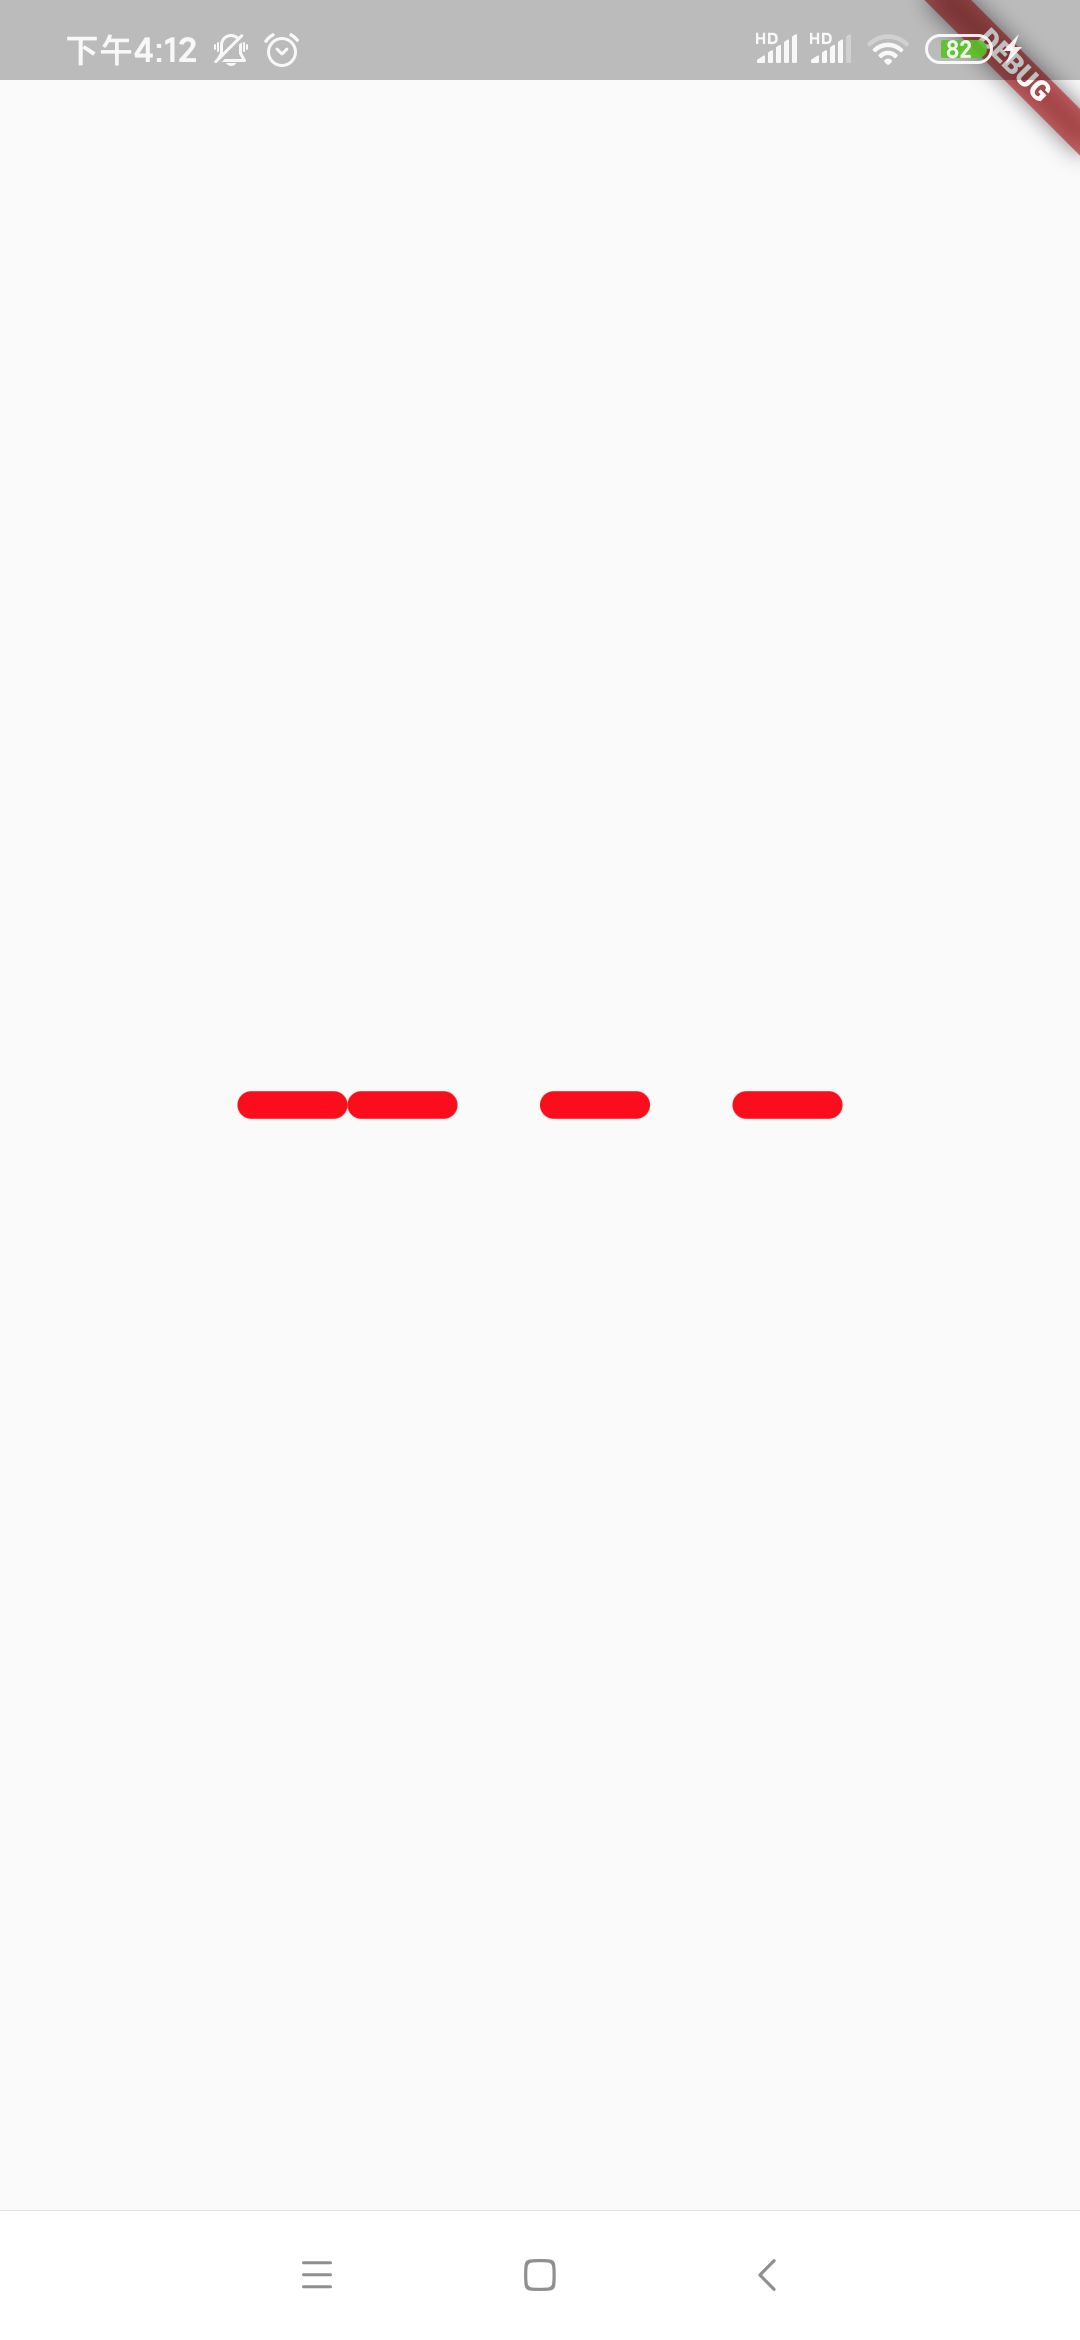
接下来不管其它的,咱们先将这八个动画给定义出来,先来绘制成四个横线,比较简单就不多解释了:
import 'package:flutter/material.dart';

void main() => runApp(MyApp());

class MyApp extends StatelessWidget {
  @override
  Widget build(BuildContext context) {
    return MaterialApp(
      home: HomePage(),
    );
  }
}

class HomePage extends StatefulWidget {
  @override
  _HomePageState createState() => _HomePageState();
}

class _HomePageState extends State<HomePage> {
  @override
  Widget build(BuildContext context) {
    return Scaffold(
      body: Center(
        child: Row(
          mainAxisAlignment: MainAxisAlignment.center,
          children: <Widget>[
            new BrickWidget(
              marginLeft: 0.0,
            ),
            new BrickWidget(
              marginLeft: 0.0,
            ),
            new BrickWidget(
              marginLeft: 30.0,
            ),
            new BrickWidget(
              marginLeft: 30.0,
            ),
          ],
        ),
      ),
    );
  }
}

//横线Widget
class BrickWidget extends StatelessWidget {
  final double marginLeft;

  const BrickWidget({
    Key key,
    this.marginLeft = 15.0,
  }) : super(key: key);

  @override
  Widget build(BuildContext context) {
    return Container(
      margin: EdgeInsets.only(left: marginLeft),
       40.0,
      height: 10.0,
      decoration: BoxDecoration(
        borderRadius: BorderRadius.circular(15.0),
        color: Color(0xffff0000),
      ),
    );
  }
}
运行:
接下来咱们让它按照上面分析的顺序一一动起来:
动画一:
这里采用AnimatedWidget来实现,关于它的使用可以参考:https://www.cnblogs.com/webor2006/p/12649906.html,由于AnimatedWidget是一个抽象类: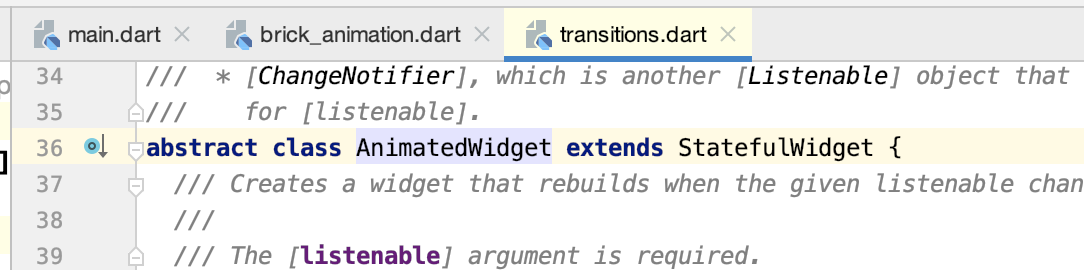
所以需要定义一个具体实现类,关于具体的动画实现就不详细解释了,贴出代码也比较好理解的:
import 'dart:math';

import 'package:flutter/material.dart';

void main() => runApp(MyApp());

class MyApp extends StatelessWidget {
  @override
  Widget build(BuildContext context) {
    return MaterialApp(
      home: HomePage(),
    );
  }
}

class HomePage extends StatefulWidget {
  @override
  _HomePageState createState() => _HomePageState();
}

class _HomePageState extends State<HomePage>
    with SingleTickerProviderStateMixin {
  Tween<double> _tween;
  AnimationController _animationController;

  @override
  void initState() {
    super.initState();
    _animationController = AnimationController(
        vsync: this, duration: Duration(seconds: 5)) //总共动画是执行5秒
      ..forward();
    _tween = Tween<double>(begin: 0.0, end: 1.0);
  }

  @override
  void dispose() {
    super.dispose();
    _animationController.dispose();
  }

  Animation get animOne => _tween.animate(
        CurvedAnimation(
          parent: _animationController,
          curve: Interval(
            //由于会有八个动画,这里就分成8等份从0执行到1
            0.0,
            0.125,
            curve: Curves.linear,
          ),
        ),
      );

  @override
  Widget build(BuildContext context) {
    return Scaffold(
      body: Center(
        child: Row(
          mainAxisAlignment: MainAxisAlignment.center,
          children: <Widget>[
            new AnimatedBrick(
              animation: animOne,
              controller: _animationController,
            ),
            new BrickWidget(
              marginLeft: 0.0,
            ),
            new BrickWidget(
              marginLeft: 30.0,
            ),
            new BrickWidget(
              marginLeft: 30.0,
            ),
          ],
        ),
      ),
    );
  }
}

class AnimatedBrick extends AnimatedWidget {
  final AnimationController controller;
  final Animation animation;

  AnimatedBrick({
    Key key,
    this.controller,
    this.animation,
  }) : super(key: key, listenable: controller);

  Matrix4 clockWise(animation) => Matrix4.rotationZ(
      animation.value * pi * 2.0 * 0.5); //其中pi*2.0*0.5则为180,每次旋转都是180度

  @override
  Widget build(BuildContext context) {
    return Transform(
      //使用平移动画
      alignment: Alignment.centerLeft,
      transform: clockWise(animation),
      child: BrickWidget(
        marginLeft: 0.0,
      ),
    );
  }
}

//横线Widget
class BrickWidget extends StatelessWidget {
  final double marginLeft;

  const BrickWidget({
    Key key,
    this.marginLeft = 15.0,
  }) : super(key: key);

  @override
  Widget build(BuildContext context) {
    return Container(
      margin: EdgeInsets.only(left: marginLeft),
       40.0,
      height: 10.0,
      decoration: BoxDecoration(
        borderRadius: BorderRadius.circular(15.0),
        color: Color(0xffff0000),
      ),
    );
  }
}
其中用到了CurvedAnimation,运行看一下效果:
动画二:
由于动画二跟动画一刚好都是作用在同一个Widget上面的,所以此时咱们将这俩个动画以数组的方式传进来:
import 'dart:math';

import 'package:flutter/material.dart';

void main() => runApp(MyApp());

class MyApp extends StatelessWidget {
  @override
  Widget build(BuildContext context) {
    return MaterialApp(
      home: HomePage(),
    );
  }
}

class HomePage extends StatefulWidget {
  @override
  _HomePageState createState() => _HomePageState();
}

class _HomePageState extends State<HomePage>
    with SingleTickerProviderStateMixin {
  Tween<double> _tween;
  AnimationController _animationController;

  @override
  void initState() {
    super.initState();
    _animationController = AnimationController(
        vsync: this, duration: Duration(seconds: 5)) //总共动画是执行5秒
      ..repeat();
    _tween = Tween<double>(begin: 0.0, end: 1.0);
  }

  @override
  void dispose() {
    super.dispose();
    _animationController.dispose();
  }

  Animation get animOne => _tween.animate(
        CurvedAnimation(
          parent: _animationController,
          curve: Interval(
            //由于会有八个动画,这里就分成8等份从0执行到1
            0.0,
            0.125,
            curve: Curves.linear,
          ),
        ),
      );

  Animation get animTwo => _tween.animate(
        CurvedAnimation(
          parent: _animationController,
          curve: Interval(
            0.125,
            0.25,
            curve: Curves.linear,
          ),
        ),
      );

  @override
  Widget build(BuildContext context) {
    return Scaffold(
      body: Center(
        child: Row(
          mainAxisAlignment: MainAxisAlignment.center,
          children: <Widget>[
            new AnimatedBrick(
              animations: [animOne, animTwo],
              controller: _animationController,
            ),
            new BrickWidget(
              marginLeft: 0.0,
            ),
            new BrickWidget(
              marginLeft: 30.0,
            ),
            new BrickWidget(
              marginLeft: 30.0,
            ),
          ],
        ),
      ),
    );
  }
}

class AnimatedBrick extends AnimatedWidget {
  final AnimationController controller;
  final List<Animation> animations;

  AnimatedBrick({
    Key key,
    this.controller,
    this.animations,
  }) : super(key: key, listenable: controller);

  Matrix4 clockWise(animation) => Matrix4.rotationZ(
      animation.value * pi * 2.0 * 0.5); //其中pi*2.0*0.5则为180,每次旋转都是180度

  @override
  Widget build(BuildContext context) {
    return Transform(
      //使用平移动画
      alignment: Alignment.centerLeft,
      transform: clockWise(animations[0]),
      child: Transform(
          //里面又套一个平移动画
          alignment: Alignment.centerLeft,
          transform: clockWise(animations[1]),
          child: BrickWidget(
            marginLeft: 0.0,
          )),
    );
  }
}

//横线Widget
class BrickWidget extends StatelessWidget {
  final double marginLeft;

  const BrickWidget({
    Key key,
    this.marginLeft = 15.0,
  }) : super(key: key);

  @override
  Widget build(BuildContext context) {
    return Container(
      margin: EdgeInsets.only(left: marginLeft),
       40.0,
      height: 10.0,
      decoration: BoxDecoration(
        borderRadius: BorderRadius.circular(15.0),
        color: Color(0xffff0000),
      ),
    );
  }
}
运行:
动画三、动画八:
目前已经实现了二个动画了,其实接下来的实现思路基本雷同,但是此时是逆时针进行旋转了,所以需要加入一个开关来控制旋转方向了,下面直接看代码:
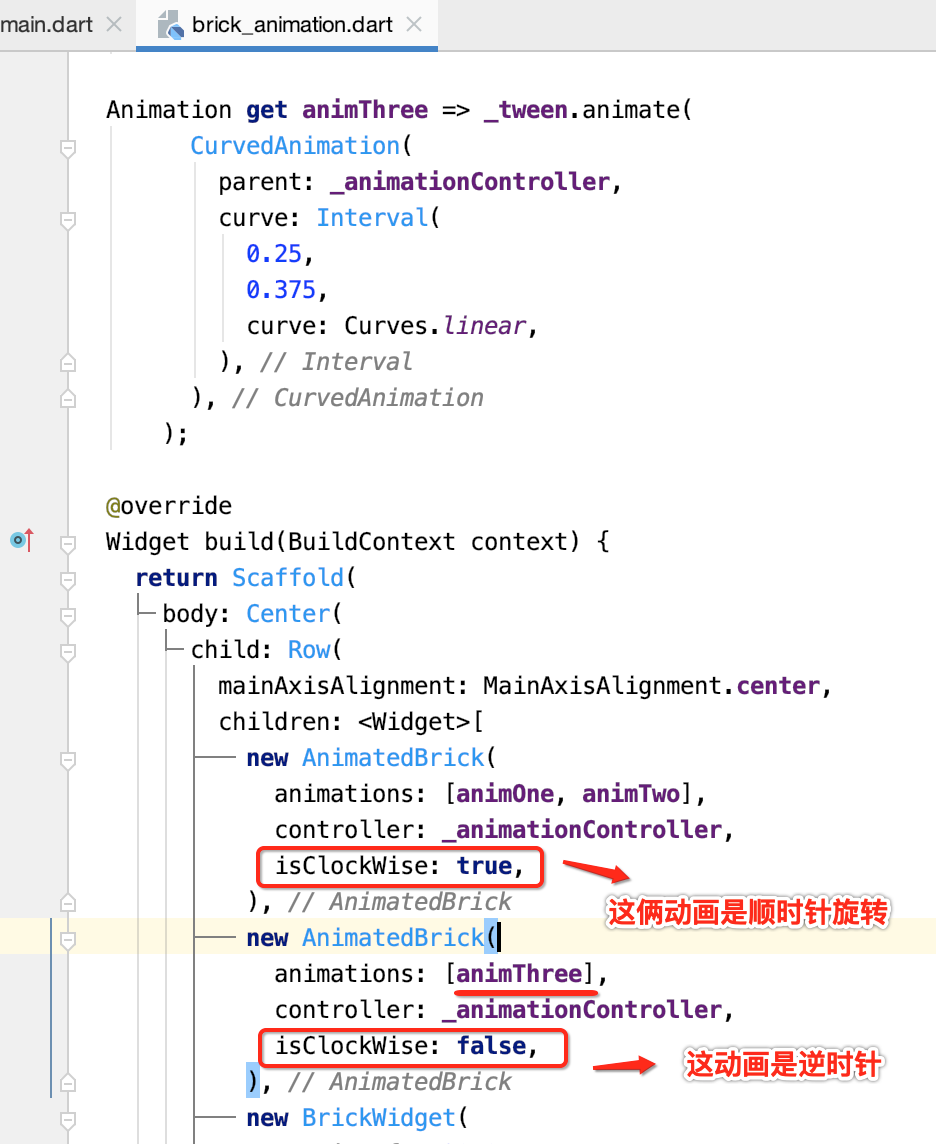
但是此时它只传了一个动画,其实它还有一个对应也是逆时针配套的动画的,也就是动画八:
所以咱们可以先将动画八给定义一下,保持一个模板调用传进去的动画都是2个:

此时咱们就可以将动画八传到数组当中了:
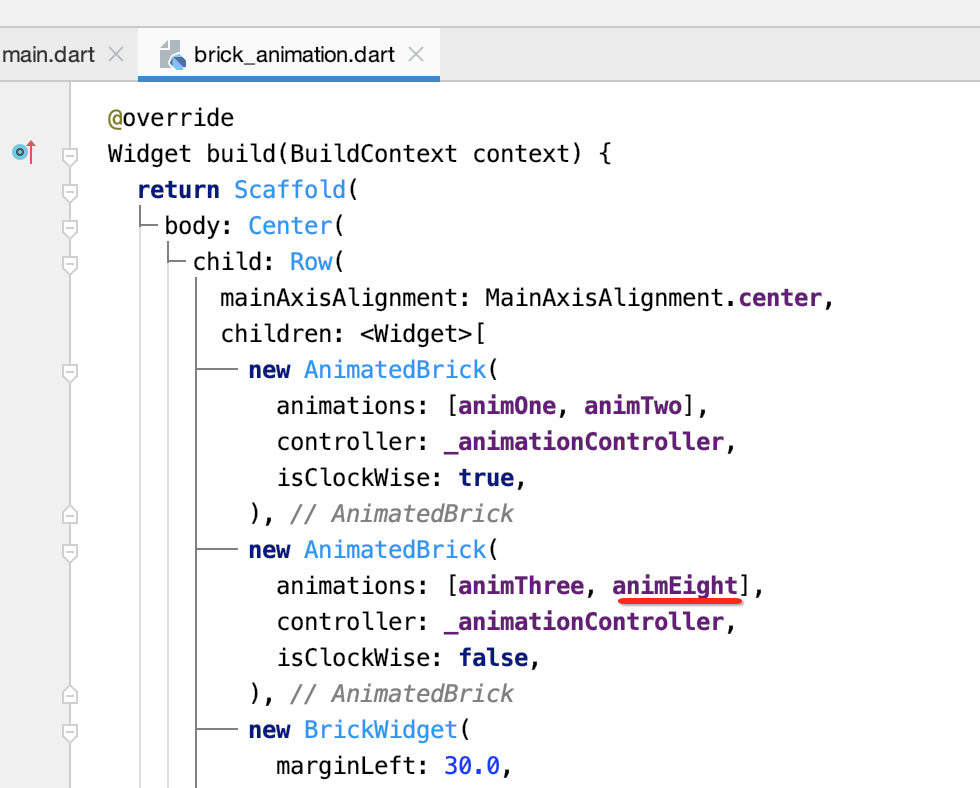
整个代码目前为:
import 'dart:math';

import 'package:flutter/material.dart';

void main() => runApp(MyApp());

class MyApp extends StatelessWidget {
  @override
  Widget build(BuildContext context) {
    return MaterialApp(
      home: HomePage(),
    );
  }
}

class HomePage extends StatefulWidget {
  @override
  _HomePageState createState() => _HomePageState();
}

class _HomePageState extends State<HomePage>
    with SingleTickerProviderStateMixin {
  Tween<double> _tween;
  AnimationController _animationController;

  @override
  void initState() {
    super.initState();
    _animationController = AnimationController(
        vsync: this, duration: Duration(seconds: 5)) //总共动画是执行5秒
      ..repeat();
    _tween = Tween<double>(begin: 0.0, end: 1.0);
  }

  @override
  void dispose() {
    super.dispose();
    _animationController.dispose();
  }

  Animation get animOne => _tween.animate(
        CurvedAnimation(
          parent: _animationController,
          curve: Interval(
            //由于会有八个动画,这里就分成8等份从0执行到1
            0.0,
            0.125,
            curve: Curves.linear,
          ),
        ),
      );

  Animation get animTwo => _tween.animate(
        CurvedAnimation(
          parent: _animationController,
          curve: Interval(
            0.125,
            0.25,
            curve: Curves.linear,
          ),
        ),
      );

  Animation get animThree => _tween.animate(
        CurvedAnimation(
          parent: _animationController,
          curve: Interval(
            0.25,
            0.375,
            curve: Curves.linear,
          ),
        ),
      );

  Animation get animEight => _tween.animate(
        CurvedAnimation(
          parent: _animationController,
          curve: Interval(
            0.875,
            1.0,
            curve: Curves.linear,
          ),
        ),
      );

  @override
  Widget build(BuildContext context) {
    return Scaffold(
      body: Center(
        child: Row(
          mainAxisAlignment: MainAxisAlignment.center,
          children: <Widget>[
            new AnimatedBrick(
              animations: [animOne, animTwo],
              controller: _animationController,
              isClockWise: true,
            ),
            new AnimatedBrick(
              animations: [animThree, animEight],
              controller: _animationController,
              isClockWise: false,
            ),
            new BrickWidget(
              marginLeft: 30.0,
            ),
            new BrickWidget(
              marginLeft: 30.0,
            ),
          ],
        ),
      ),
    );
  }
}

class AnimatedBrick extends AnimatedWidget {
  final AnimationController controller;
  final List<Animation> animations;
  final bool isClockWise; //是否是顺时针旋转

  AnimatedBrick({
    Key key,
    this.controller,
    this.animations,
    this.isClockWise,
  }) : super(key: key, listenable: controller);

  Matrix4 clockWise(animation) => Matrix4.rotationZ(
      animation.value * pi * 2.0 * 0.5); //其中pi*2.0*0.5则为180,每次旋转都是180度,顺时针旋转
  Matrix4 antiClockWise(animation) =>
      Matrix4.rotationZ(-(animation.value * pi * 2.0 * 0.5)); //逆时针旋转

  @override
  Widget build(BuildContext context) {
    var firstTransformation =
        isClockWise ? clockWise(animations[0]) : antiClockWise(animations[0]);
    var secondTransformation =
        isClockWise ? clockWise(animations[1]) : antiClockWise(animations[1]);
    return Transform(
      //使用平移动画
      alignment: Alignment.centerLeft,
      transform: firstTransformation,
      child: Transform(
          //里面又套一个平移动画
          alignment: Alignment.centerLeft,
          transform: secondTransformation,
          child: BrickWidget(
            marginLeft: 0.0,
          )),
    );
  }
}

//横线Widget
class BrickWidget extends StatelessWidget {
  final double marginLeft;

  const BrickWidget({
    Key key,
    this.marginLeft = 15.0,
  }) : super(key: key);

  @override
  Widget build(BuildContext context) {
    return Container(
      margin: EdgeInsets.only(left: marginLeft),
       40.0,
      height: 10.0,
      decoration: BoxDecoration(
        borderRadius: BorderRadius.circular(15.0),
        color: Color(0xffff0000),
      ),
    );
  }
}
此时看一下运行效果是否如预期:
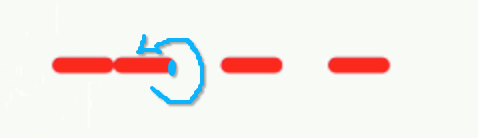
呃,貌似第二根执行的有问题,问题出在旋转轴出问题了:
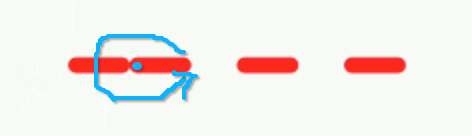
我们应该是按这个轴来进行旋转才行:
为啥是这样呢?因为此时我们将一个属性写死了:
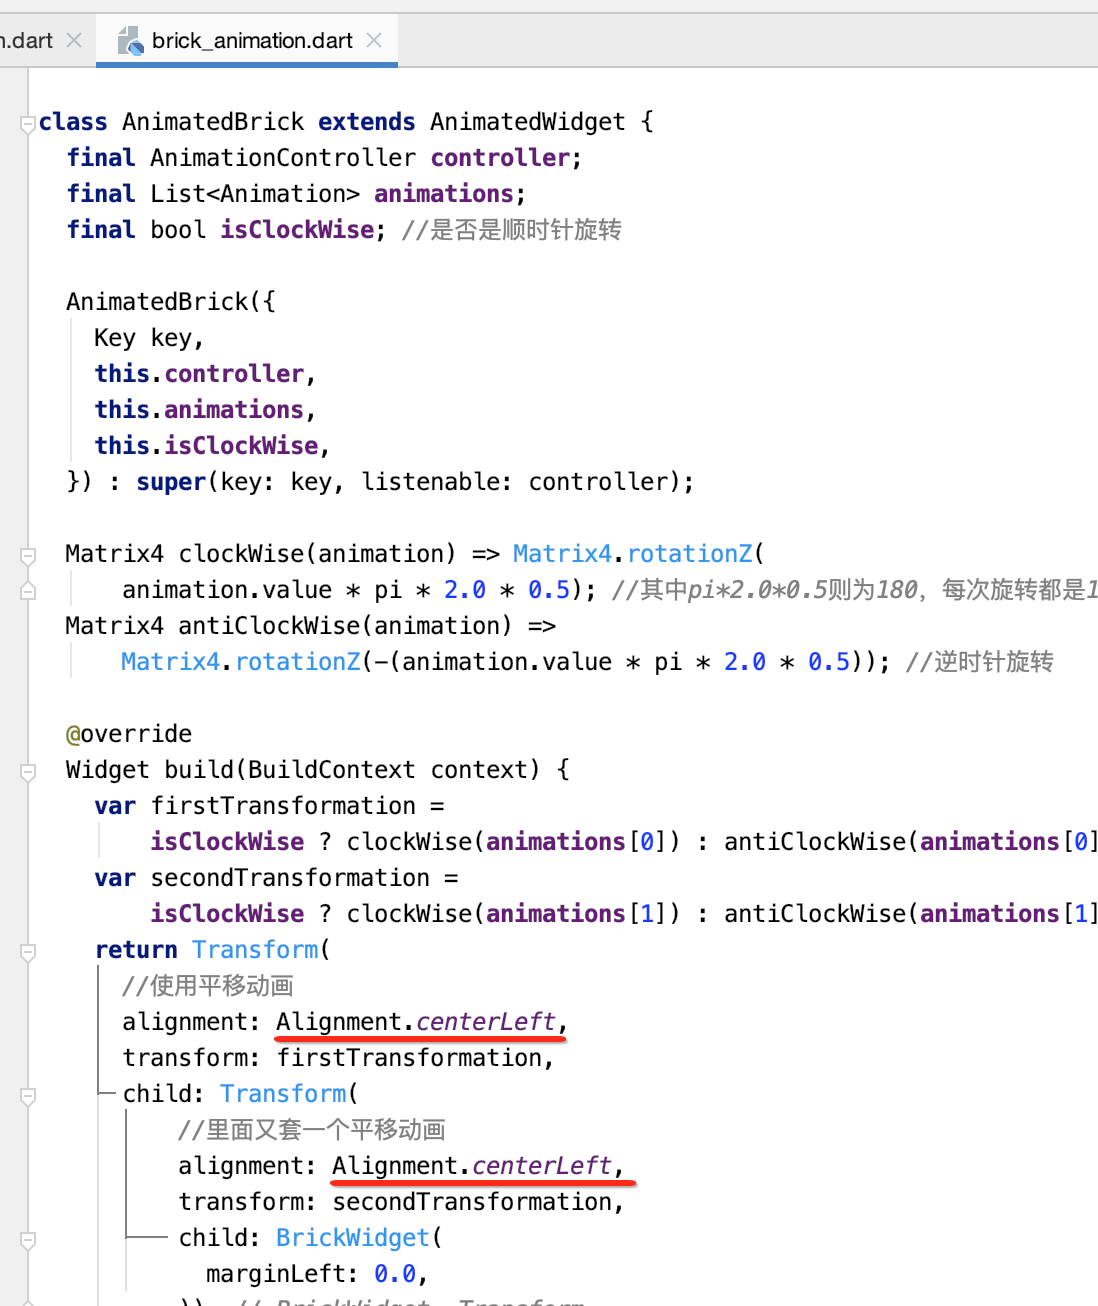
那如何修整呢?此时又需要加一个参数了:
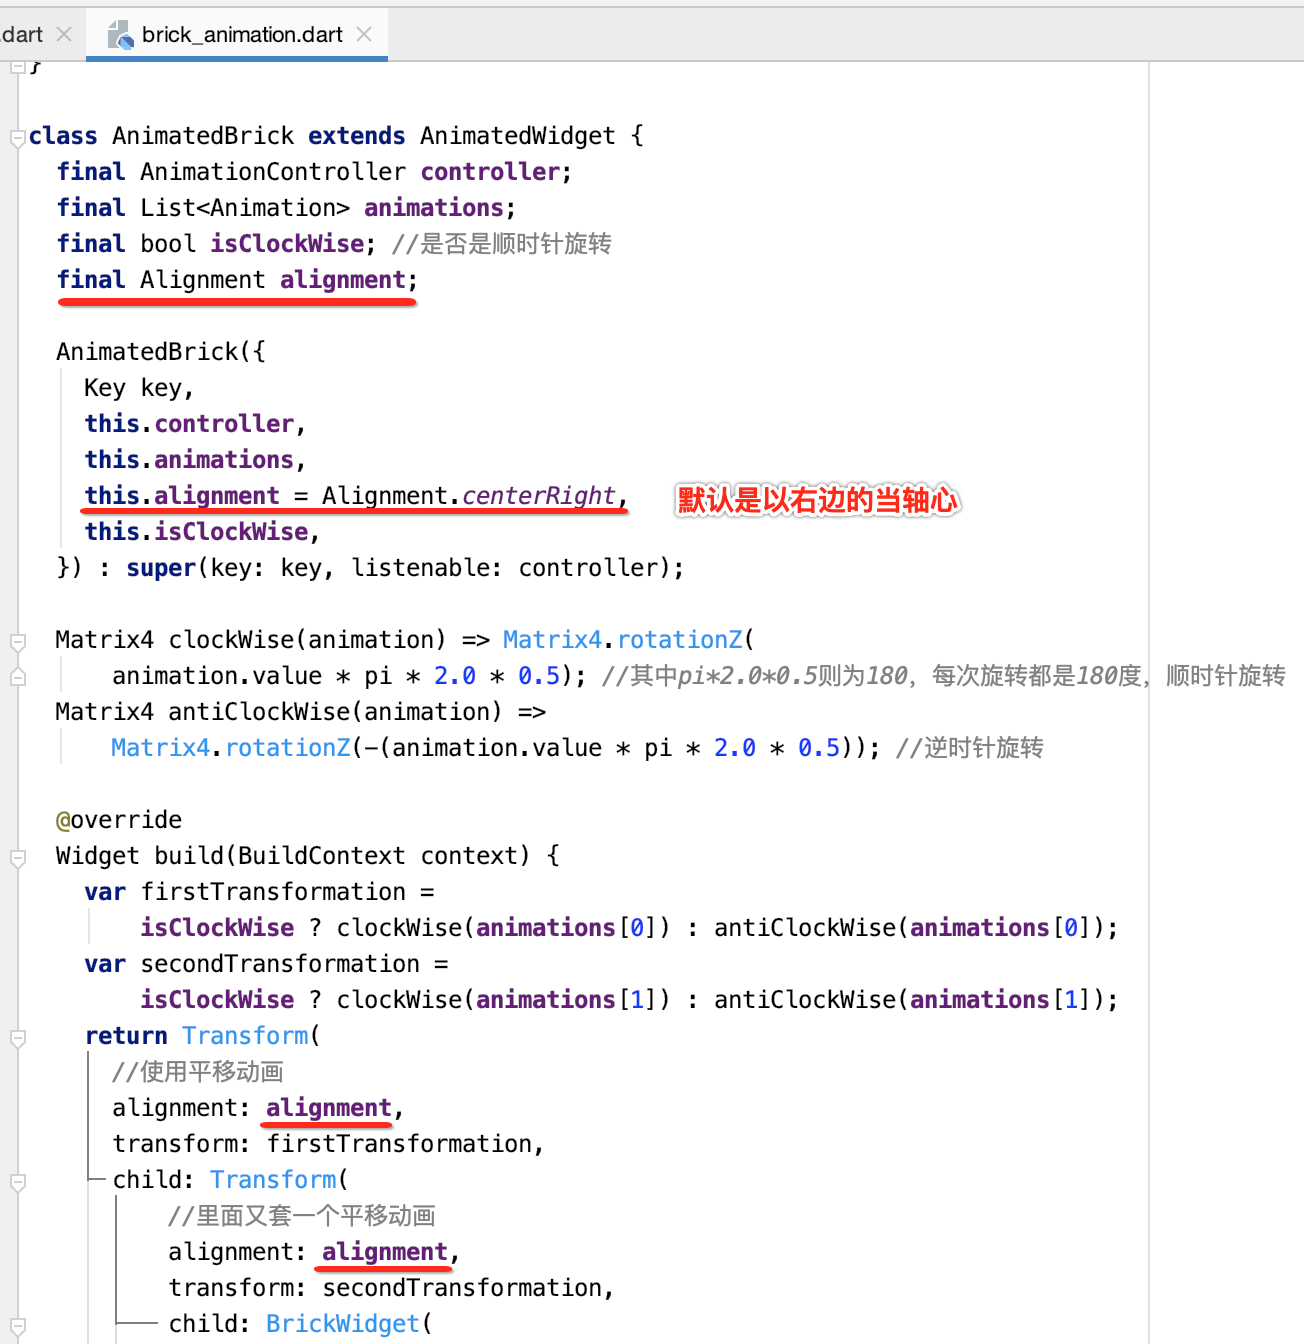
此时在实例化AnimatedWidget时就需要指定这个属性了:
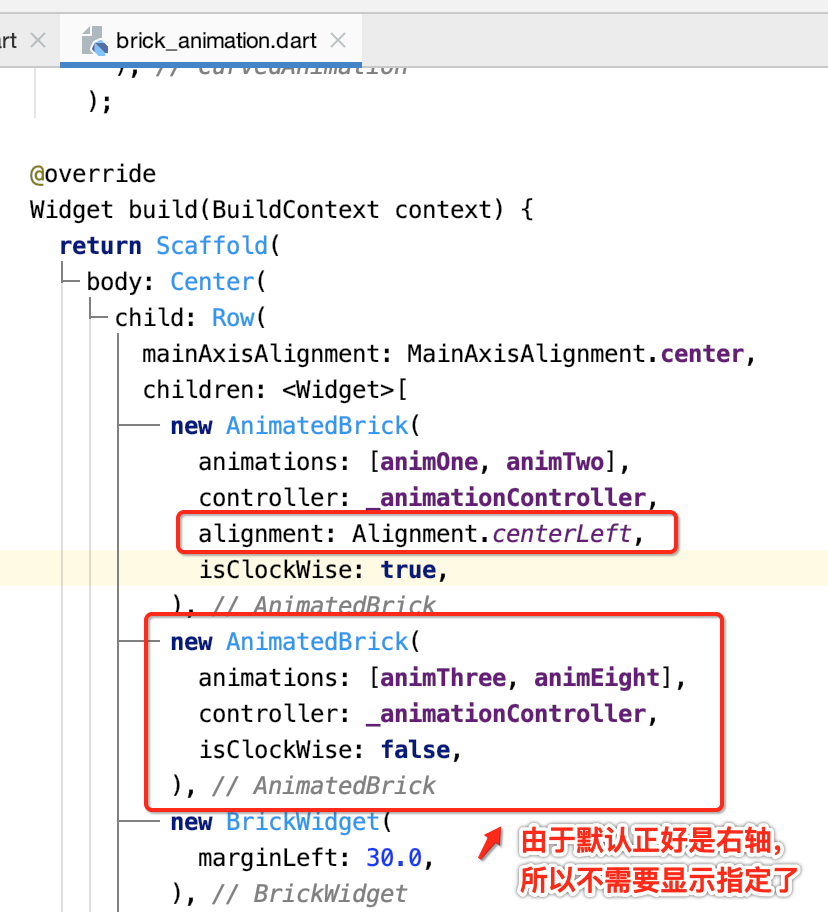
再运行:
动画四、动画七:
有了上面的经验,那么对于作用在一个对象上成套的动画就可以一起写了,也就是动画四和动画七,如下:
代码如下:
import 'dart:math';

import 'package:flutter/material.dart';

void main() => runApp(MyApp());

class MyApp extends StatelessWidget {
  @override
  Widget build(BuildContext context) {
    return MaterialApp(
      home: HomePage(),
    );
  }
}

class HomePage extends StatefulWidget {
  @override
  _HomePageState createState() => _HomePageState();
}

class _HomePageState extends State<HomePage>
    with SingleTickerProviderStateMixin {
  Tween<double> _tween;
  AnimationController _animationController;

  @override
  void initState() {
    super.initState();
    _animationController = AnimationController(
        vsync: this, duration: Duration(seconds: 5)) //总共动画是执行5秒
      ..repeat();
    _tween = Tween<double>(begin: 0.0, end: 1.0);
  }

  @override
  void dispose() {
    super.dispose();
    _animationController.dispose();
  }

  Animation get animOne => _tween.animate(
        CurvedAnimation(
          parent: _animationController,
          curve: Interval(
            //由于会有八个动画,这里就分成8等份从0执行到1
            0.0,
            0.125,
            curve: Curves.linear,
          ),
        ),
      );

  Animation get animTwo => _tween.animate(
        CurvedAnimation(
          parent: _animationController,
          curve: Interval(
            0.125,
            0.25,
            curve: Curves.linear,
          ),
        ),
      );

  Animation get animThree => _tween.animate(
        CurvedAnimation(
          parent: _animationController,
          curve: Interval(
            0.25,
            0.375,
            curve: Curves.linear,
          ),
        ),
      );

  Animation get animFour => _tween.animate(
        CurvedAnimation(
          parent: _animationController,
          curve: Interval(
            0.375,
            0.5,
            curve: Curves.linear,
          ),
        ),
      );

  Animation get animSeven => _tween.animate(
        CurvedAnimation(
          parent: _animationController,
          curve: Interval(
            0.75,
            0.875,
            curve: Curves.linear,
          ),
        ),
      );

  Animation get animEight => _tween.animate(
        CurvedAnimation(
          parent: _animationController,
          curve: Interval(
            0.875,
            1.0,
            curve: Curves.linear,
          ),
        ),
      );

  @override
  Widget build(BuildContext context) {
    return Scaffold(
      body: Center(
        child: Row(
          mainAxisAlignment: MainAxisAlignment.center,
          children: <Widget>[
            new AnimatedBrick(
              animations: [animOne, animTwo],
              controller: _animationController,
              alignment: Alignment.centerLeft,
              isClockWise: true,
              marginLeft: 0.0,
            ),
            new AnimatedBrick(
              animations: [animThree, animEight],
              controller: _animationController,
              isClockWise: false,
              marginLeft: 0.0,
            ),
            new AnimatedBrick(
              animations: [animFour, animSeven],
              controller: _animationController,
              isClockWise: true,
              marginLeft: 30.0,
            ),
            new BrickWidget(
              marginLeft: 30.0,
            ),
          ],
        ),
      ),
    );
  }
}

class AnimatedBrick extends AnimatedWidget {
  final AnimationController controller;
  final List<Animation> animations;
  final bool isClockWise; //是否是顺时针旋转
  final Alignment alignment;
  final double marginLeft;//由于三四个横线跟一二个横线的左间距不一样,所以再增加一个参数

  AnimatedBrick({
    Key key,
    this.controller,
    this.animations,
    this.alignment = Alignment.centerRight,
    this.isClockWise,
    this.marginLeft,
  }) : super(key: key, listenable: controller);

  Matrix4 clockWise(animation) => Matrix4.rotationZ(
      animation.value * pi * 2.0 * 0.5); //其中pi*2.0*0.5则为180,每次旋转都是180度,顺时针旋转
  Matrix4 antiClockWise(animation) =>
      Matrix4.rotationZ(-(animation.value * pi * 2.0 * 0.5)); //逆时针旋转

  @override
  Widget build(BuildContext context) {
    var firstTransformation =
        isClockWise ? clockWise(animations[0]) : antiClockWise(animations[0]);
    var secondTransformation =
        isClockWise ? clockWise(animations[1]) : antiClockWise(animations[1]);
    return Transform(
      //使用平移动画
      alignment: alignment,
      transform: firstTransformation,
      child: Transform(
          //里面又套一个平移动画
          alignment: alignment,
          transform: secondTransformation,
          child: BrickWidget(
            marginLeft: marginLeft,
          )),
    );
  }
}

//横线Widget
class BrickWidget extends StatelessWidget {
  final double marginLeft;

  const BrickWidget({
    Key key,
    this.marginLeft = 15.0,
  }) : super(key: key);

  @override
  Widget build(BuildContext context) {
    return Container(
      margin: EdgeInsets.only(left: marginLeft),
       40.0,
      height: 10.0,
      decoration: BoxDecoration(
        borderRadius: BorderRadius.circular(15.0),
        color: Color(0xffff0000),
      ),
    );
  }
}
运行:
动画五、动画六:
最后一个横线也是对应两套动画,实现已经相当的easy了,完整代码如下:
import 'dart:math';

import 'package:flutter/material.dart';

void main() => runApp(MyApp());

class MyApp extends StatelessWidget {
  @override
  Widget build(BuildContext context) {
    return MaterialApp(
      home: HomePage(),
    );
  }
}

class HomePage extends StatefulWidget {
  @override
  _HomePageState createState() => _HomePageState();
}

class _HomePageState extends State<HomePage>
    with SingleTickerProviderStateMixin {
  Tween<double> _tween;
  AnimationController _animationController;

  @override
  void initState() {
    super.initState();
    _animationController = AnimationController(
        vsync: this, duration: Duration(seconds: 5)) //总共动画是执行5秒
      ..repeat();
    _tween = Tween<double>(begin: 0.0, end: 1.0);
  }

  @override
  void dispose() {
    super.dispose();
    _animationController.dispose();
  }

  Animation get animOne => _tween.animate(
        CurvedAnimation(
          parent: _animationController,
          curve: Interval(
            //由于会有八个动画,这里就分成8等份从0执行到1
            0.0,
            0.125,
            curve: Curves.linear,
          ),
        ),
      );

  Animation get animTwo => _tween.animate(
        CurvedAnimation(
          parent: _animationController,
          curve: Interval(
            0.125,
            0.25,
            curve: Curves.linear,
          ),
        ),
      );

  Animation get animThree => _tween.animate(
        CurvedAnimation(
          parent: _animationController,
          curve: Interval(
            0.25,
            0.375,
            curve: Curves.linear,
          ),
        ),
      );

  Animation get animFour => _tween.animate(
        CurvedAnimation(
          parent: _animationController,
          curve: Interval(
            0.375,
            0.5,
            curve: Curves.linear,
          ),
        ),
      );

  Animation get animFive => _tween.animate(
        CurvedAnimation(
          parent: _animationController,
          curve: Interval(
            0.5,
            0.625,
            curve: Curves.linear,
          ),
        ),
      );

  Animation get animSix => _tween.animate(
        CurvedAnimation(
          parent: _animationController,
          curve: Interval(
            0.625,
            0.75,
            curve: Curves.linear,
          ),
        ),
      );

  Animation get animSeven => _tween.animate(
        CurvedAnimation(
          parent: _animationController,
          curve: Interval(
            0.75,
            0.875,
            curve: Curves.linear,
          ),
        ),
      );

  Animation get animEight => _tween.animate(
        CurvedAnimation(
          parent: _animationController,
          curve: Interval(
            0.875,
            1.0,
            curve: Curves.linear,
          ),
        ),
      );

  @override
  Widget build(BuildContext context) {
    return Scaffold(
      body: Center(
        child: Row(
          mainAxisAlignment: MainAxisAlignment.center,
          children: <Widget>[
            new AnimatedBrick(
              animations: [animOne, animTwo],
              controller: _animationController,
              alignment: Alignment.centerLeft,
              isClockWise: true,
              marginLeft: 0.0,
            ),
            new AnimatedBrick(
              animations: [animThree, animEight],
              controller: _animationController,
              isClockWise: false,
              marginLeft: 0.0,
            ),
            new AnimatedBrick(
              animations: [animFour, animSeven],
              controller: _animationController,
              isClockWise: true,
              marginLeft: 30.0,
            ),
            new AnimatedBrick(
              animations: [animFive, animSix],
              controller: _animationController,
              marginLeft: 30.0,
              isClockWise: false,
            ),
          ],
        ),
      ),
    );
  }
}

class AnimatedBrick extends AnimatedWidget {
  final AnimationController controller;
  final List<Animation> animations;
  final bool isClockWise; //是否是顺时针旋转
  final Alignment alignment;
  final double marginLeft;

  AnimatedBrick({
    Key key,
    this.controller,
    this.animations,
    this.alignment = Alignment.centerRight,
    this.isClockWise,
    this.marginLeft,
  }) : super(key: key, listenable: controller);

  Matrix4 clockWise(animation) => Matrix4.rotationZ(
      animation.value * pi * 2.0 * 0.5); //其中pi*2.0*0.5则为180,每次旋转都是180度,顺时针旋转
  Matrix4 antiClockWise(animation) =>
      Matrix4.rotationZ(-(animation.value * pi * 2.0 * 0.5)); //逆时针旋转

  @override
  Widget build(BuildContext context) {
    var firstTransformation =
        isClockWise ? clockWise(animations[0]) : antiClockWise(animations[0]);
    var secondTransformation =
        isClockWise ? clockWise(animations[1]) : antiClockWise(animations[1]);
    return Transform(
      //使用平移动画
      alignment: alignment,
      transform: firstTransformation,
      child: Transform(
          //里面又套一个平移动画
          alignment: alignment,
          transform: secondTransformation,
          child: BrickWidget(
            marginLeft: marginLeft,
          )),
    );
  }
}

//横线Widget
class BrickWidget extends StatelessWidget {
  final double marginLeft;

  const BrickWidget({
    Key key,
    this.marginLeft = 15.0,
  }) : super(key: key);

  @override
  Widget build(BuildContext context) {
    return Container(
      margin: EdgeInsets.only(left: marginLeft),
       40.0,
      height: 10.0,
      decoration: BoxDecoration(
        borderRadius: BorderRadius.circular(15.0),
        color: Color(0xffff0000),
      ),
    );
  }
}
最终的效果就如最开始效果所演示的那样了,说实话细节还是非常之多的,也不是特别好理解,动画实现的重点就是这八个动画时间的八等分,而且将成套的动画得要组合起来,最终就达成了一个连贯的效果。另外重点是学习如何使用Flutter的自定义动画来实现我们所需要的动画效果,其中AnimationController是非常重要的。