连接拦截器原理剖析:
在上一次https://www.cnblogs.com/webor2006/p/12362710.html文末提到了ConnectInterceptor这个拦截器,因为它比较重要,所以接下来分析一下它的整个流程。
做个小实验:
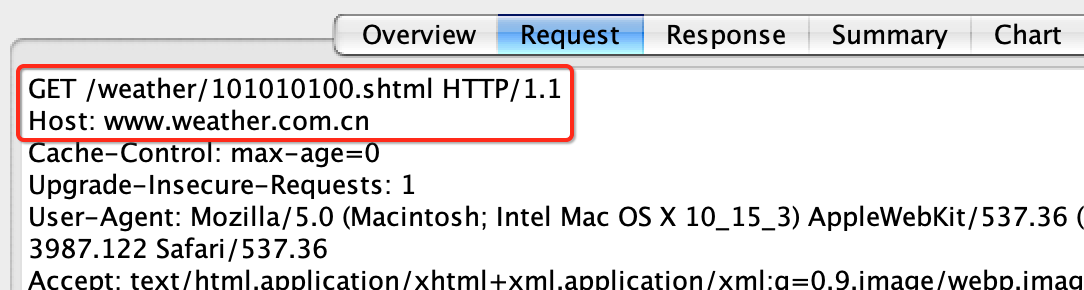
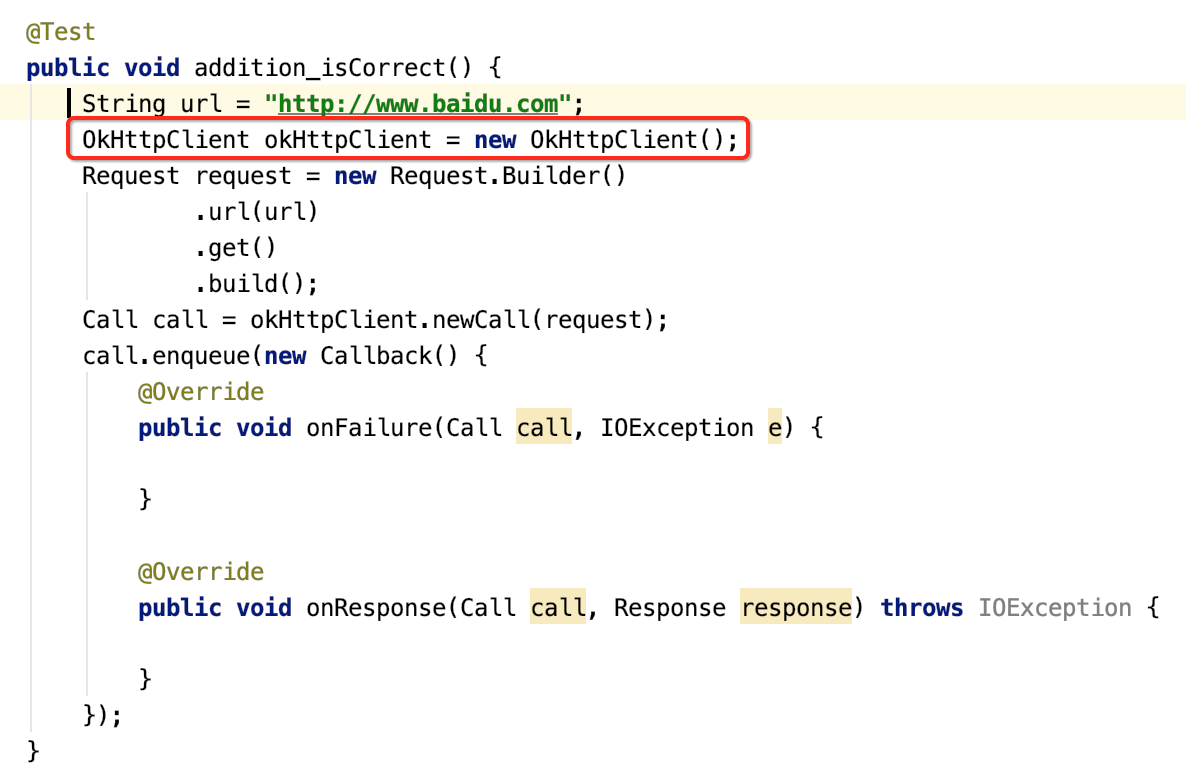
这里做一个socket的小实验,来获取一个网页的返回内容,很简单,就是通过Socket来连接到http://www.weather.com.cn/weather/101010100.shtml中国天气的服务器,将其网页的内容给正常请求下来,这里先用一个请求工具来查看一下整个请求的格式,采用Charles抓包工具【有其它好用的网络请求工具都可以】来查看一下:
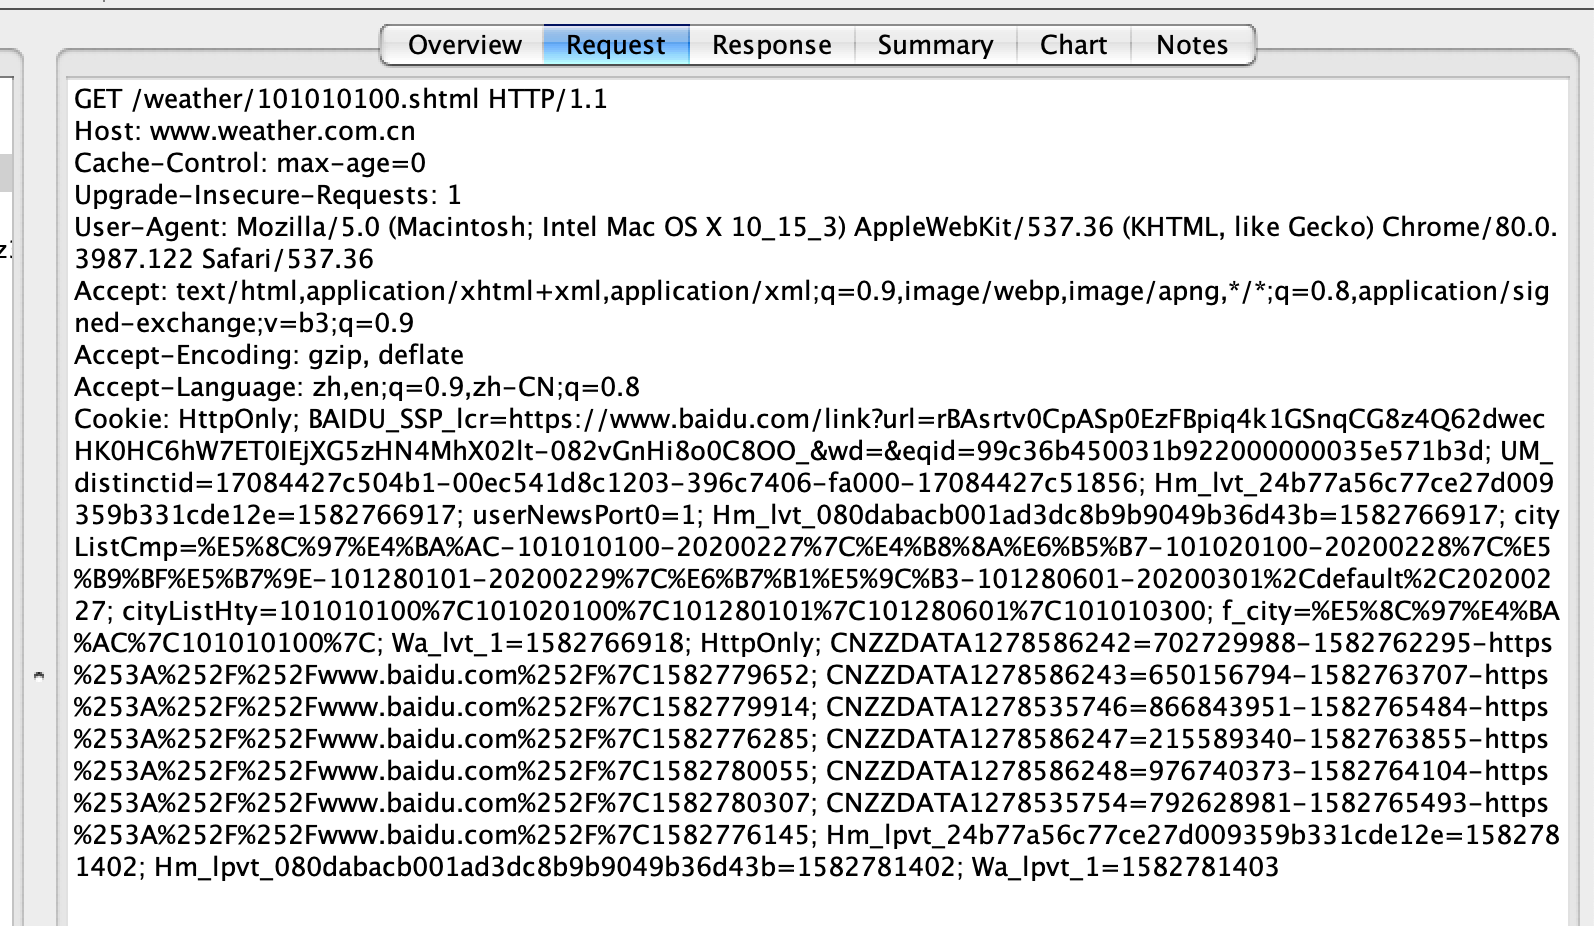
其实我们可以通过Socket来照着这个请求头来请求也能获取这个网页返回的信息:
那咱们来试一下:

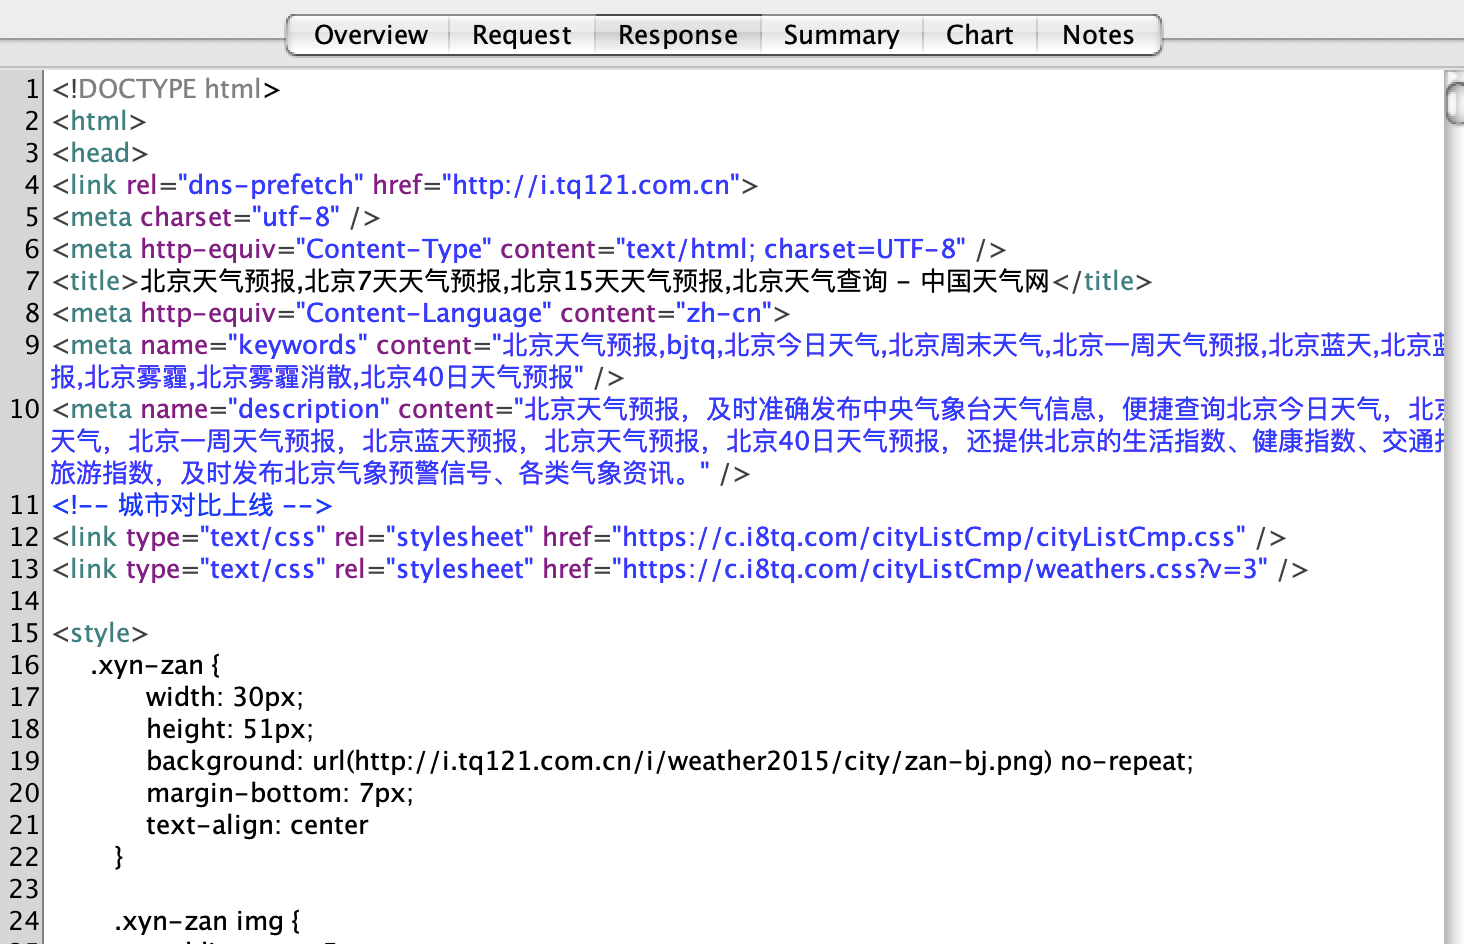
此时运行:

妥妥的,为啥要做这个简单的实验呢?因为OkHttp的底层就是通过Socket的方式来实现的,好,接下来则通过分析这个连接拦截器揭开它神秘的面纱。
正式原理分析:


而它是在我们创建Call的时候生成的:

好,继续往下分析:

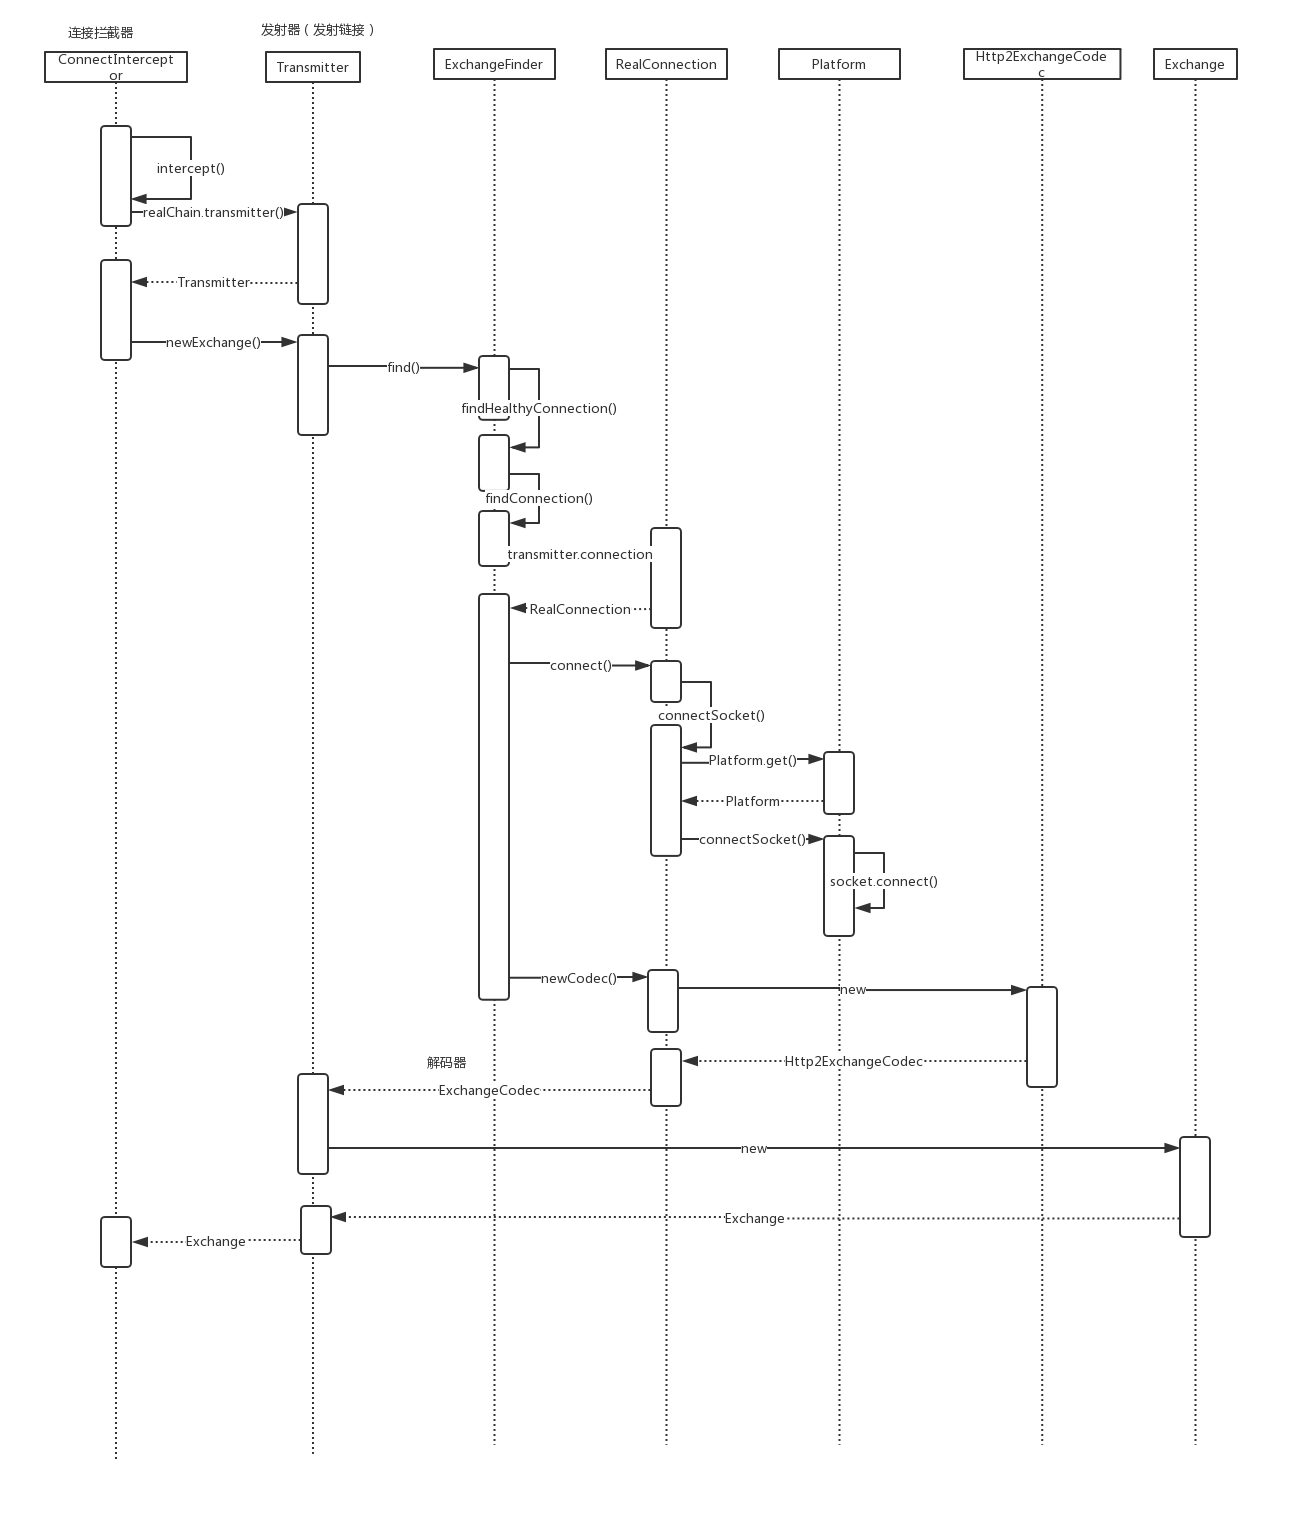
获得一个Exchange对象,具体细节是?

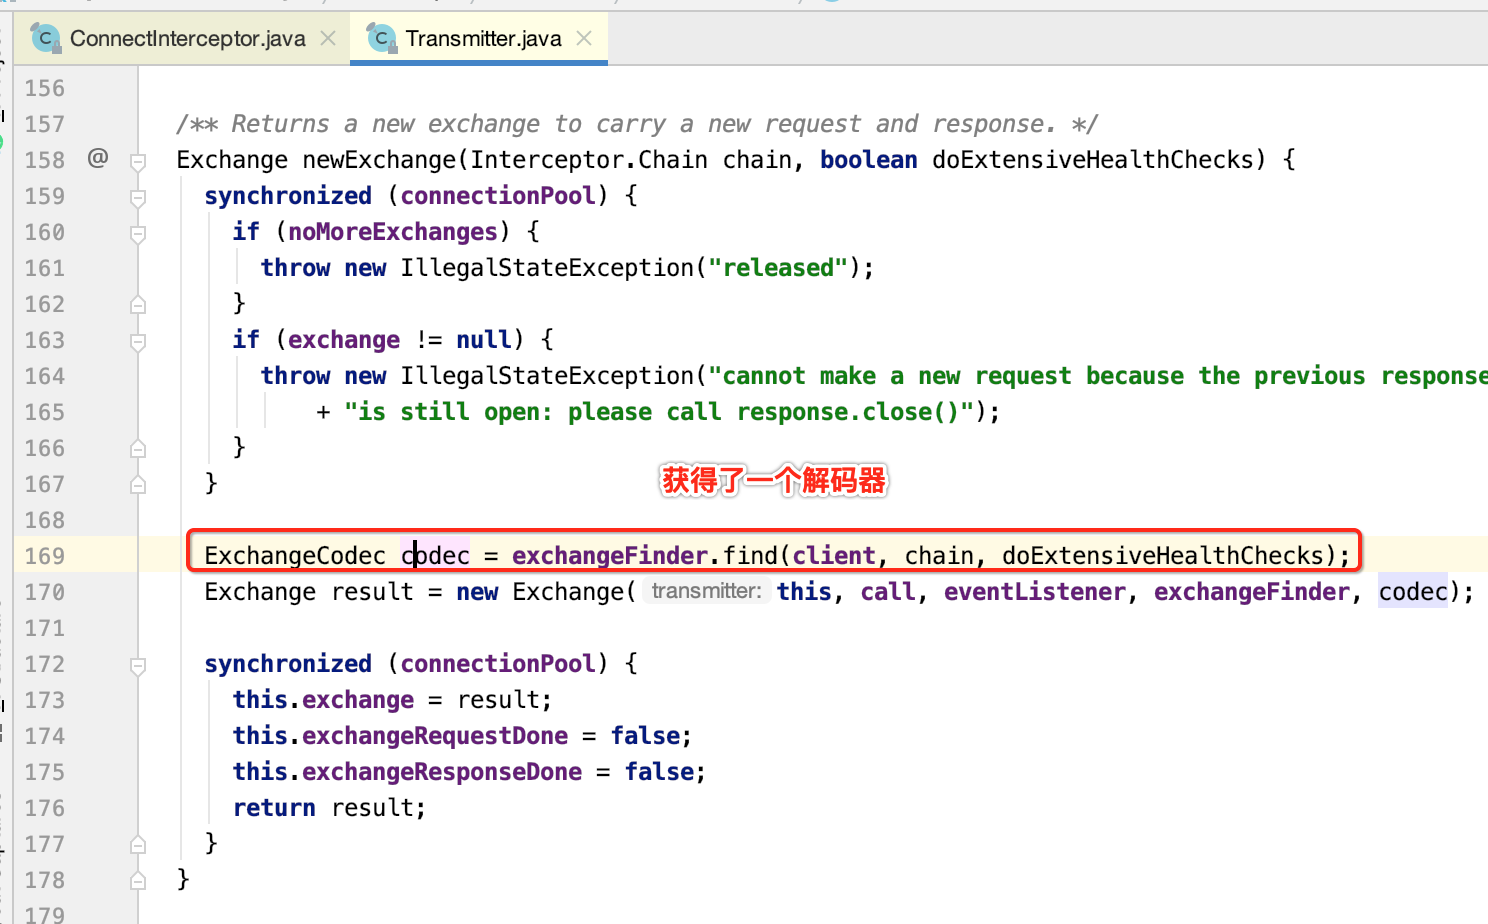
对于请求头和响应数据都需要进行解析,莫非这个解码器是用来干这个的,带着猜测跟进去瞅一下:


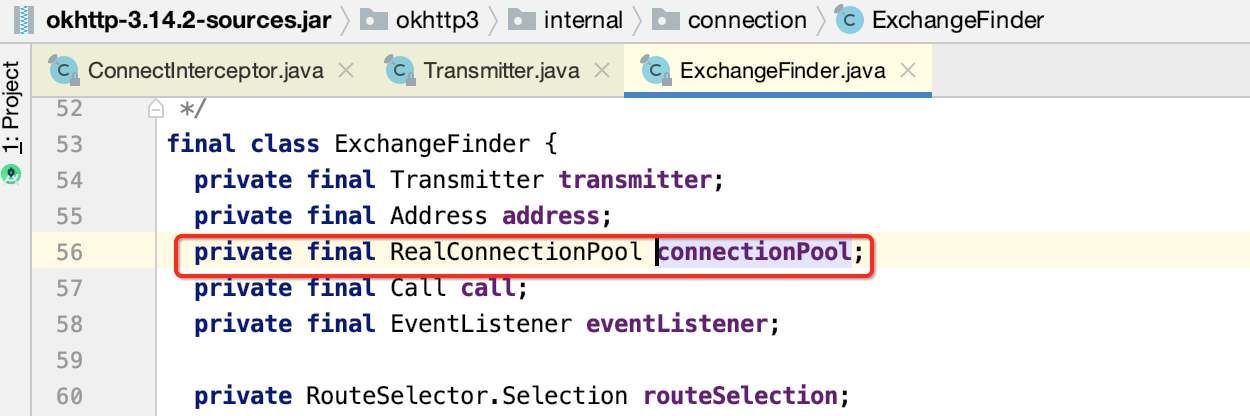
那咱们来看一下这个connectionPool对象是啥?

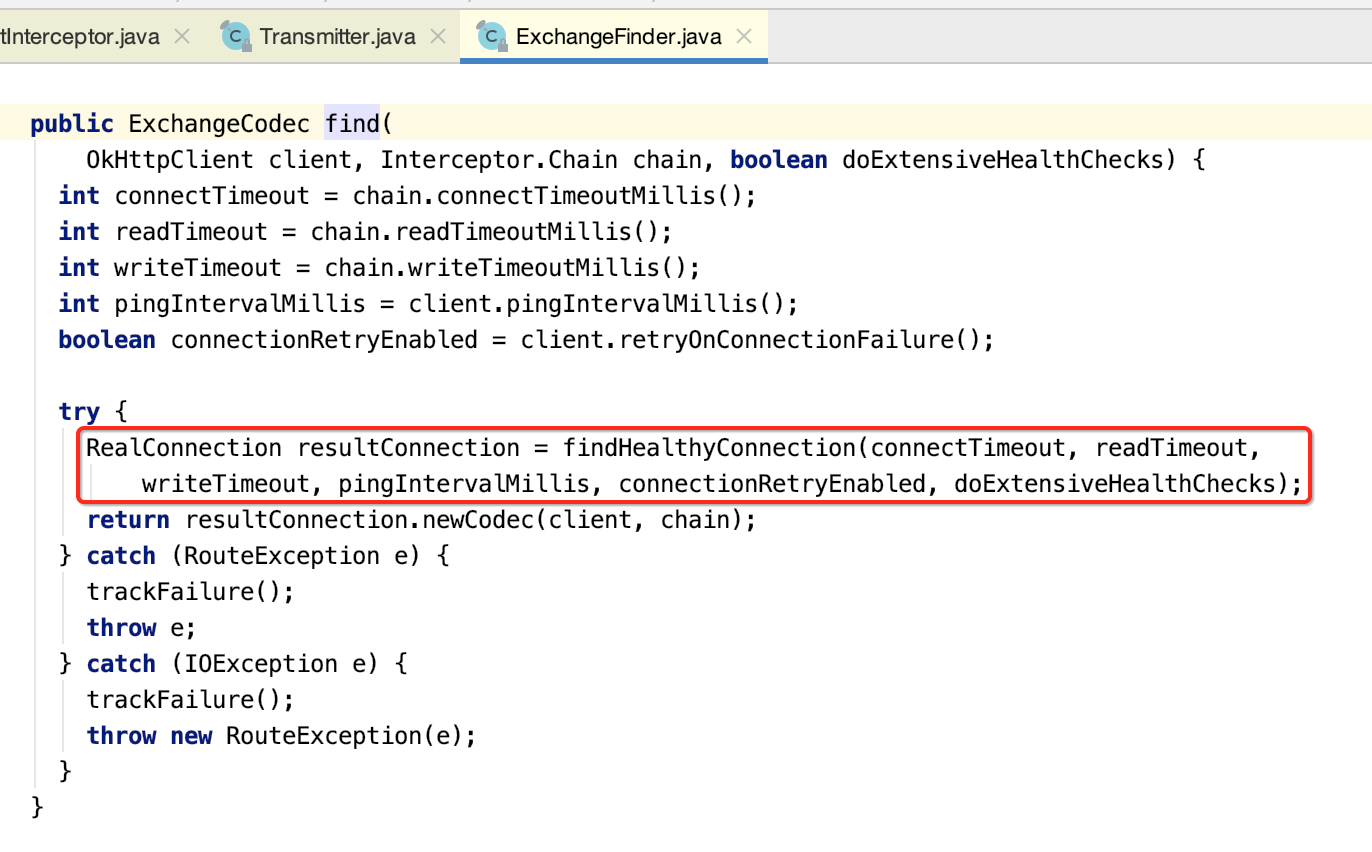
好,回到主流程继续往下看:
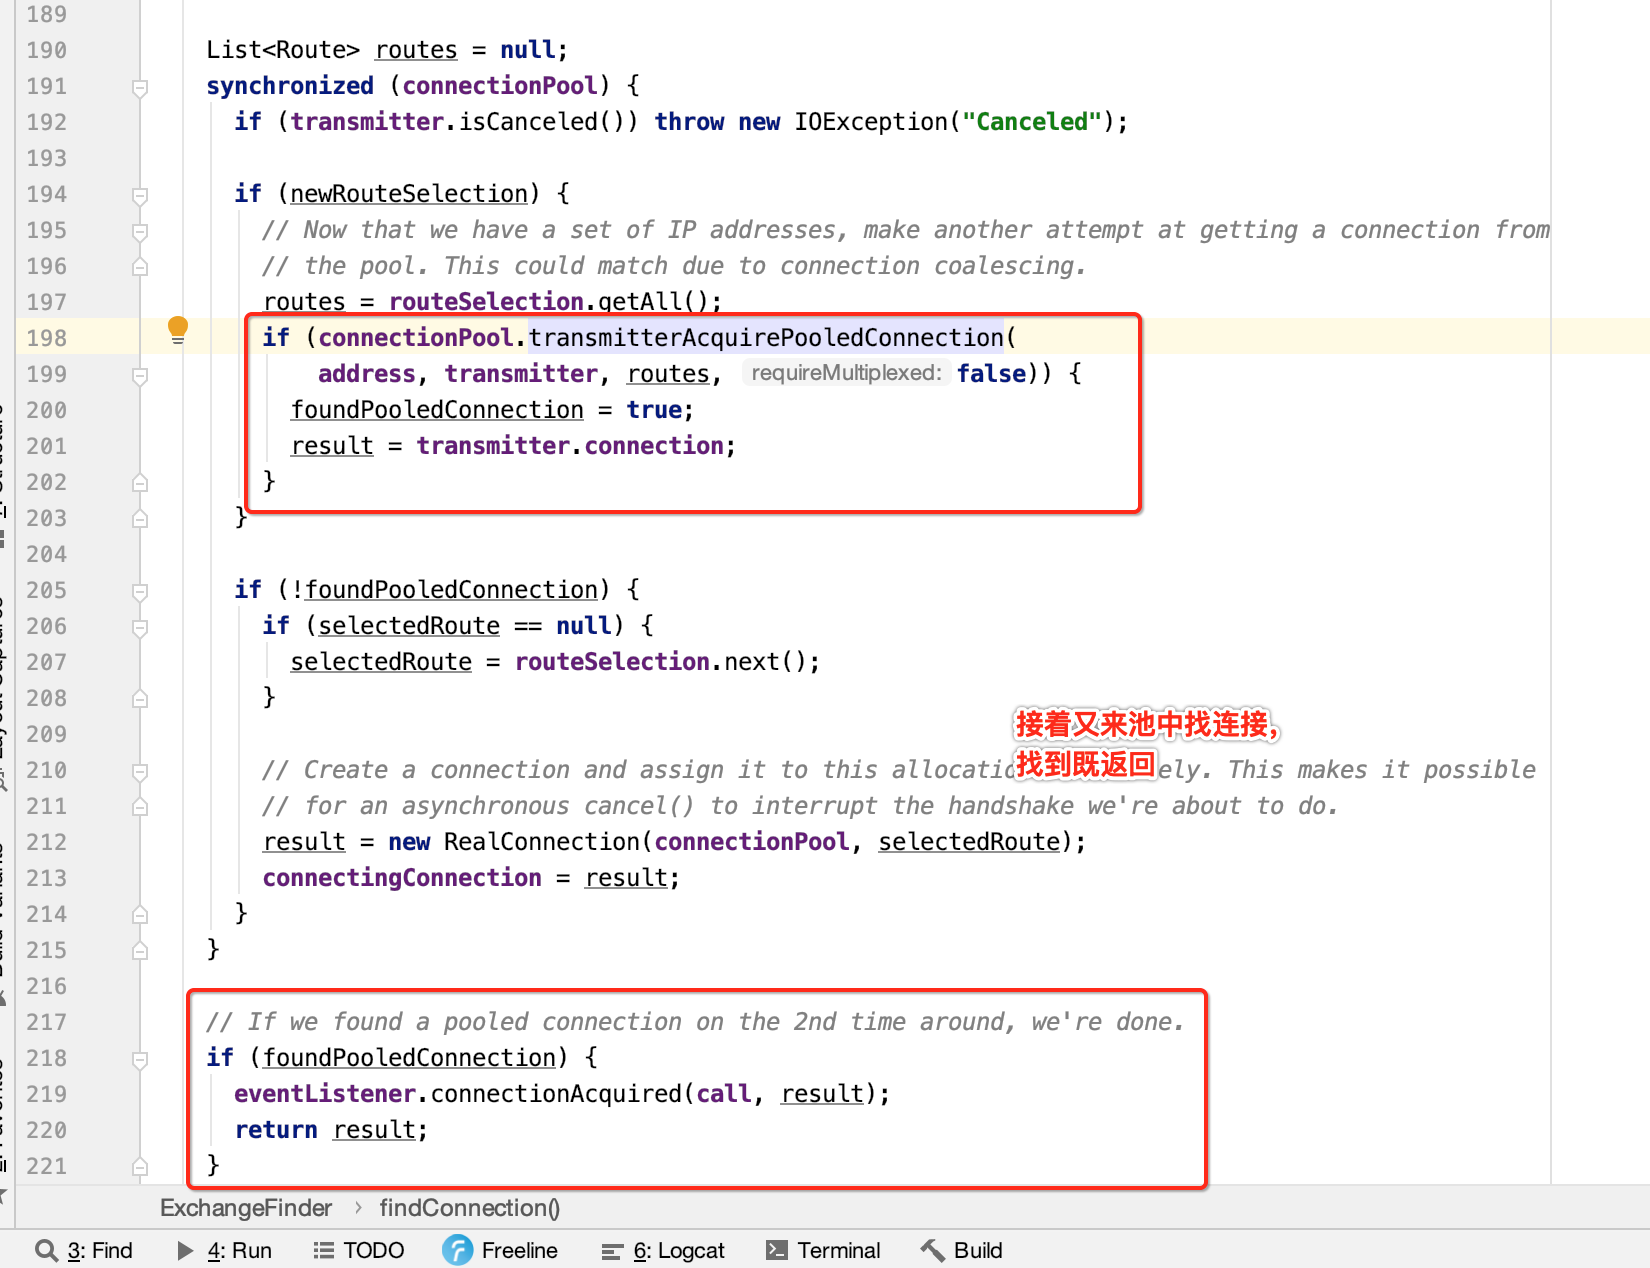
好!!以上两次都没能从复用连接池中找到,接下来则需要发起一次真正的连接了:
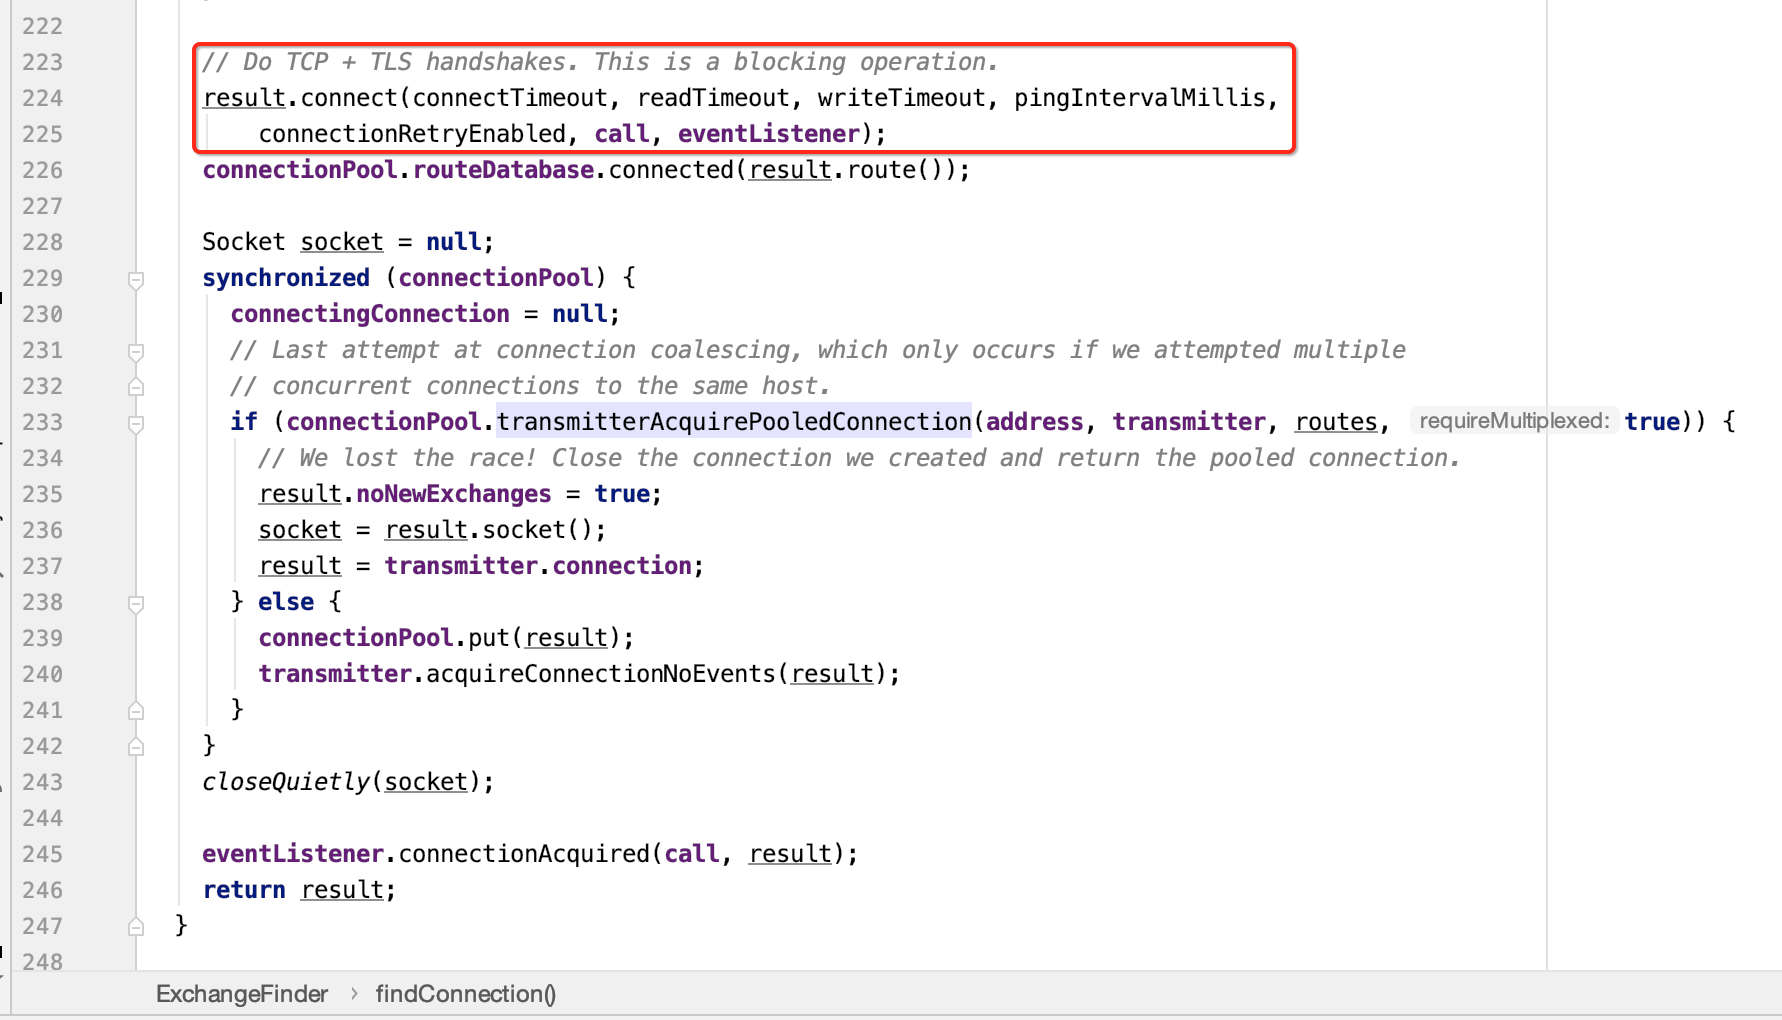
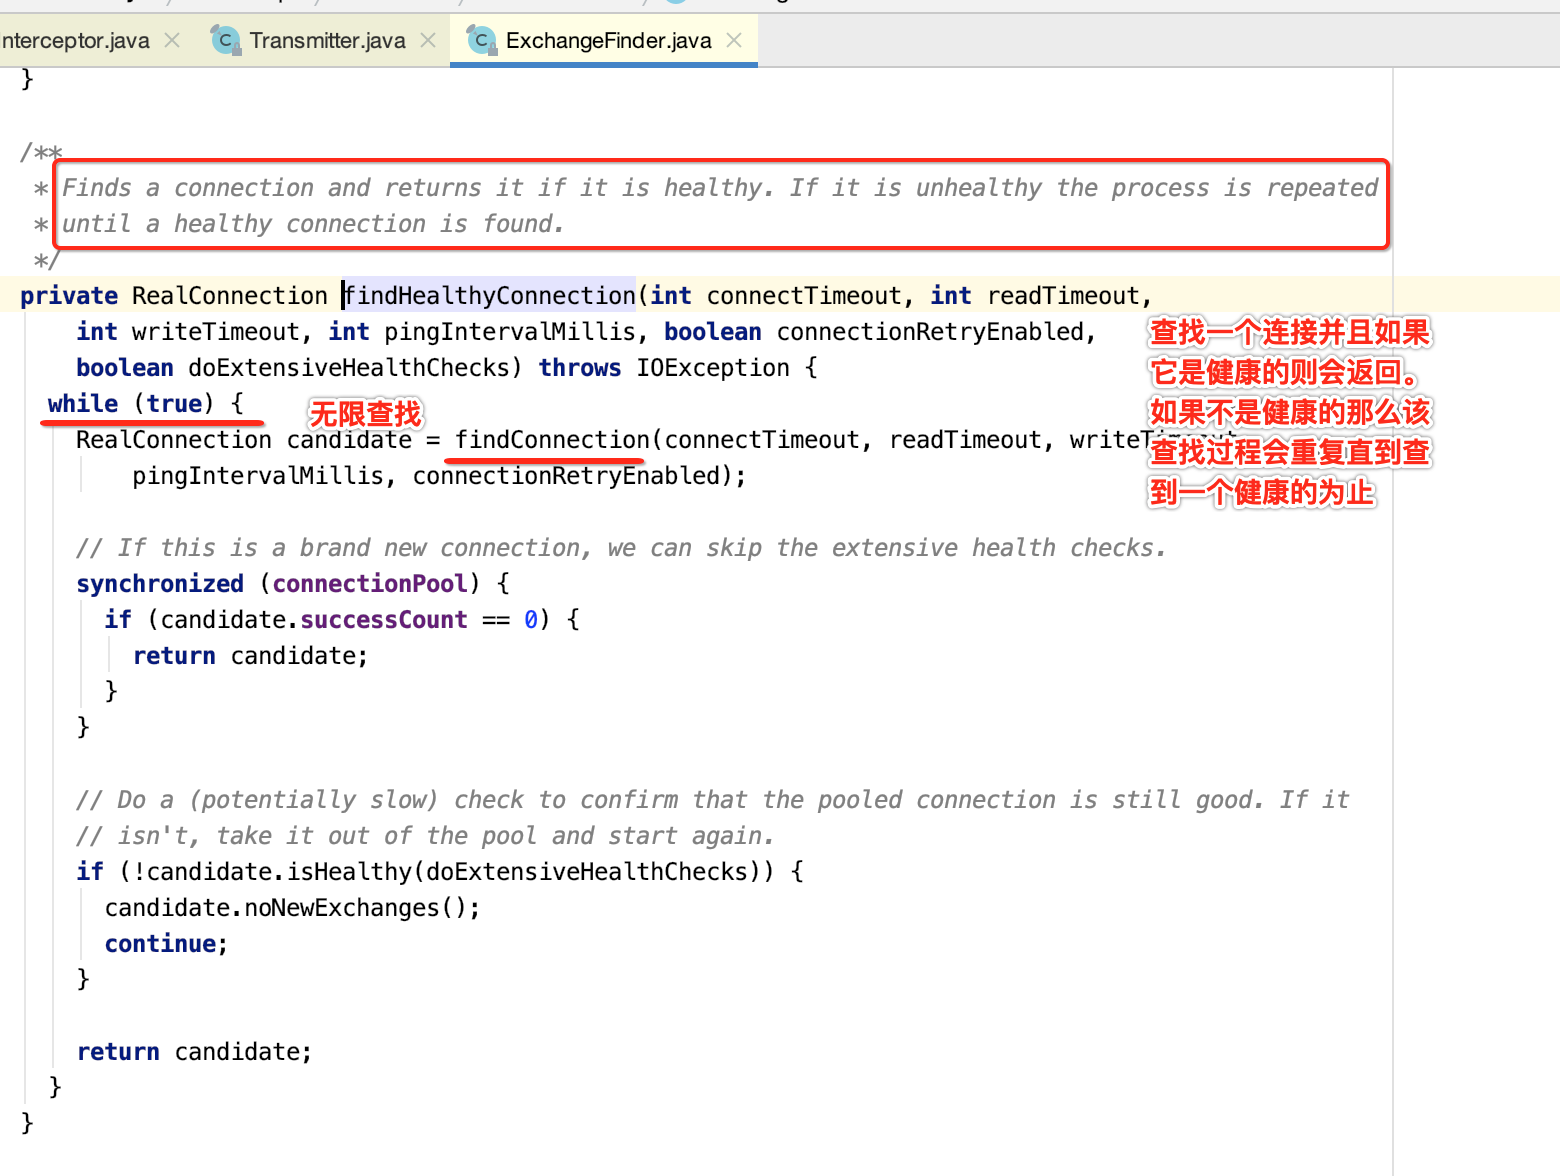
接下来看一下连接的细节:
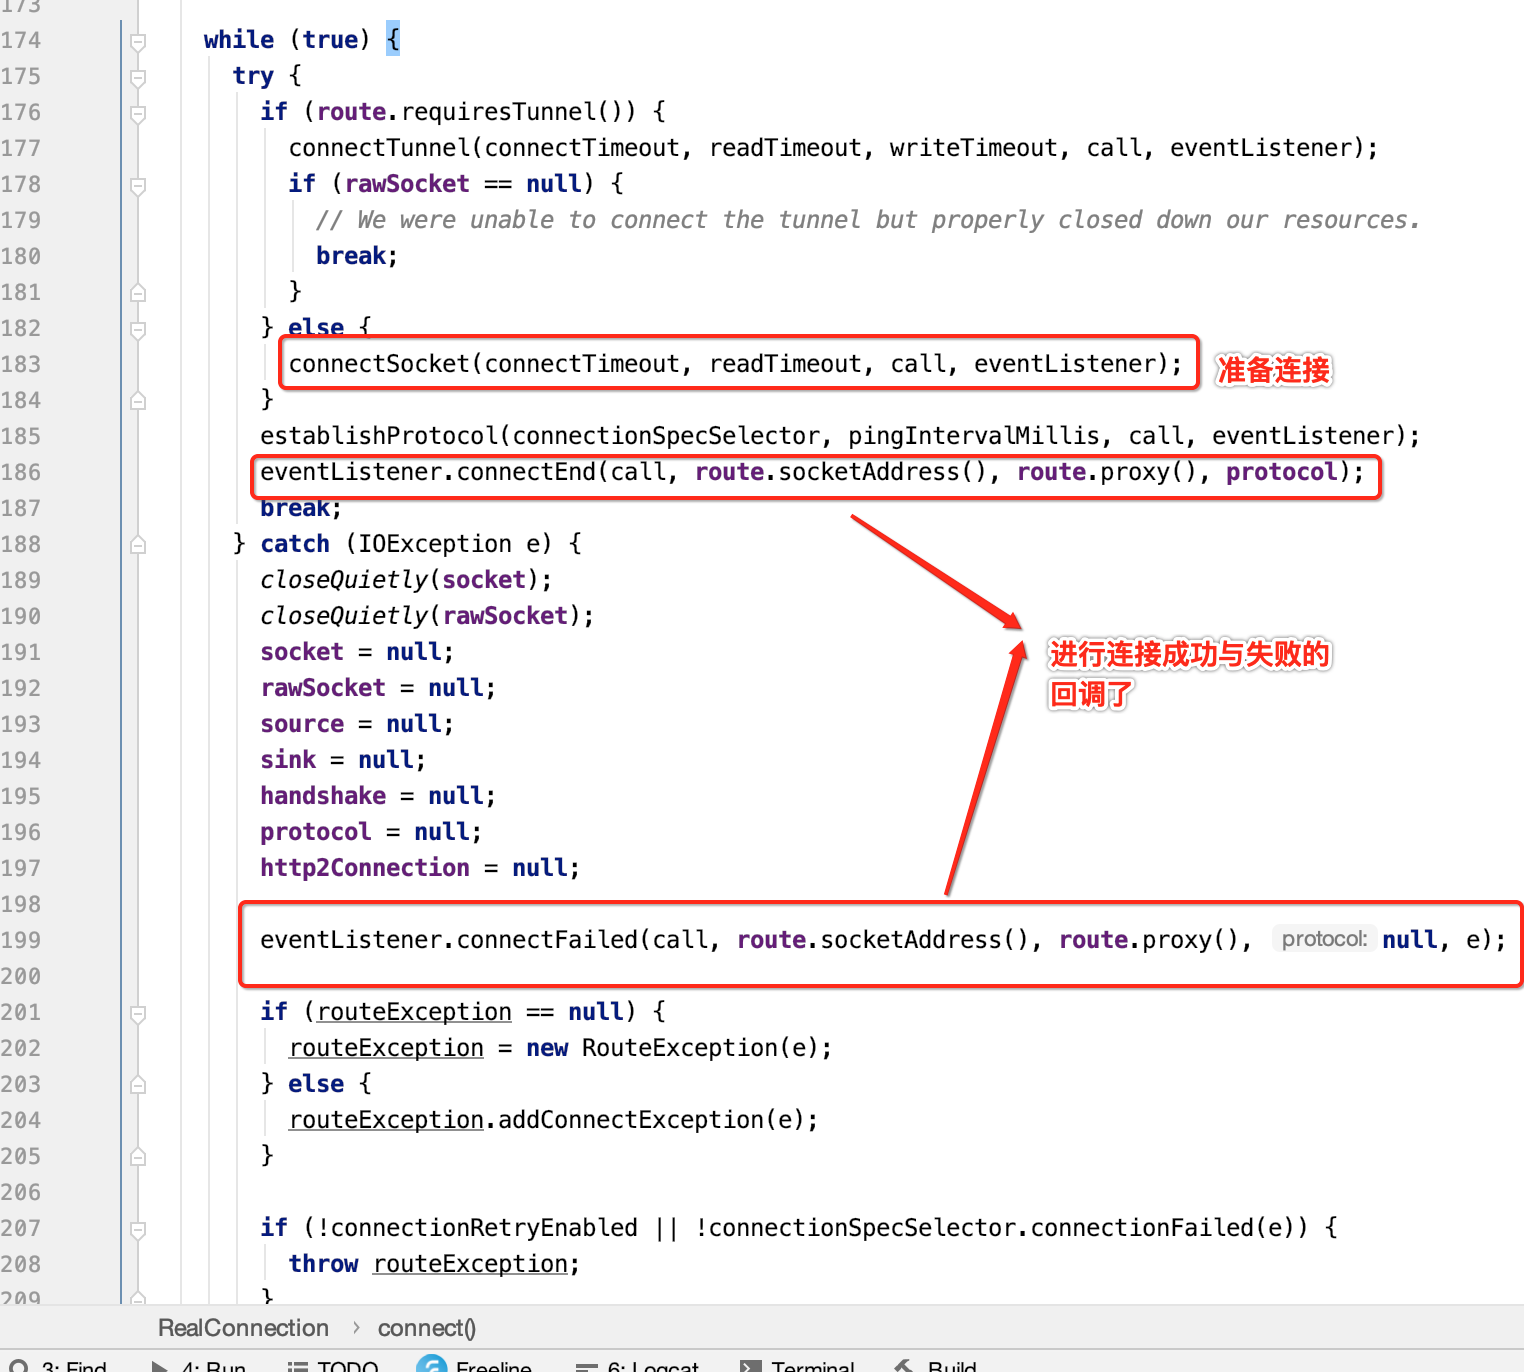
接下来则集中看一下连接的实现代码:
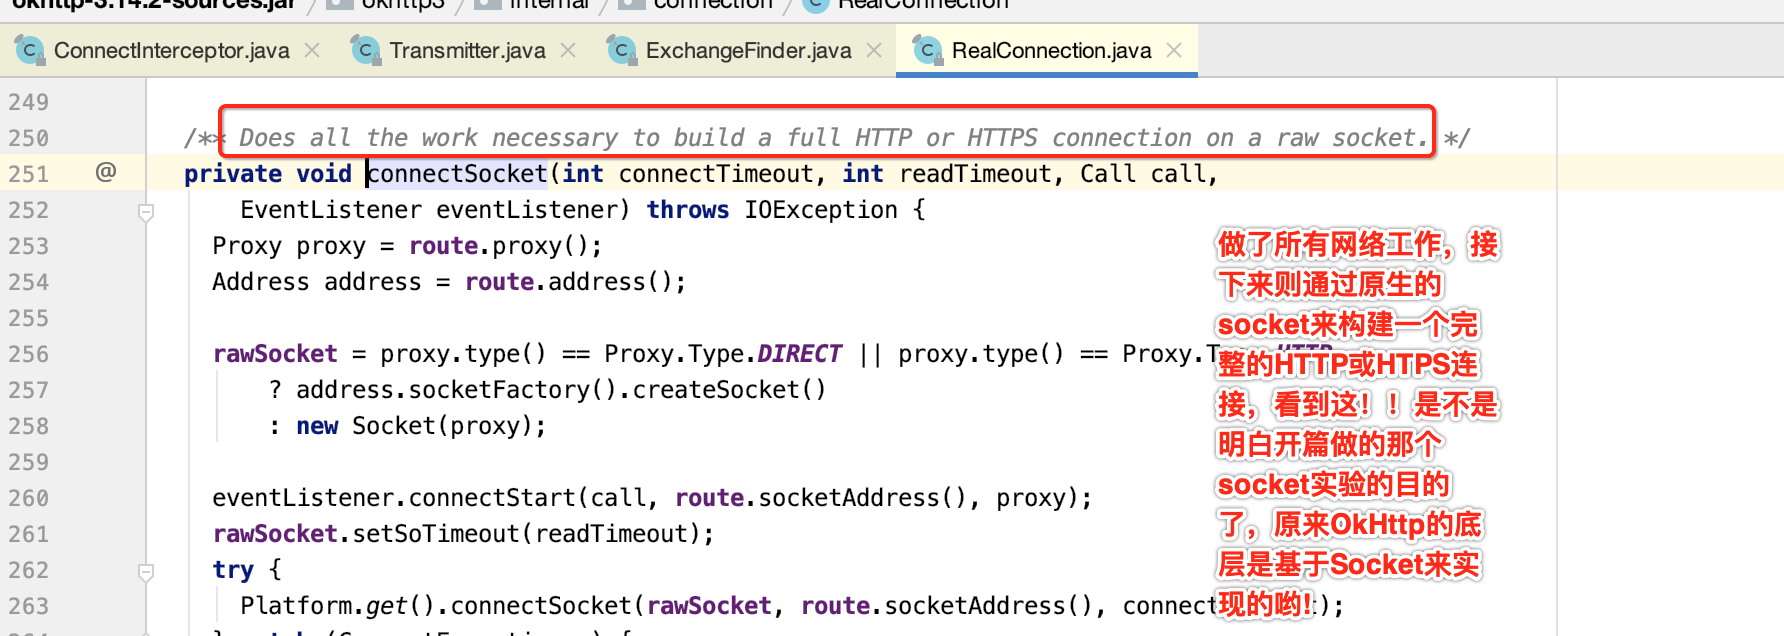
往里再跟一下:
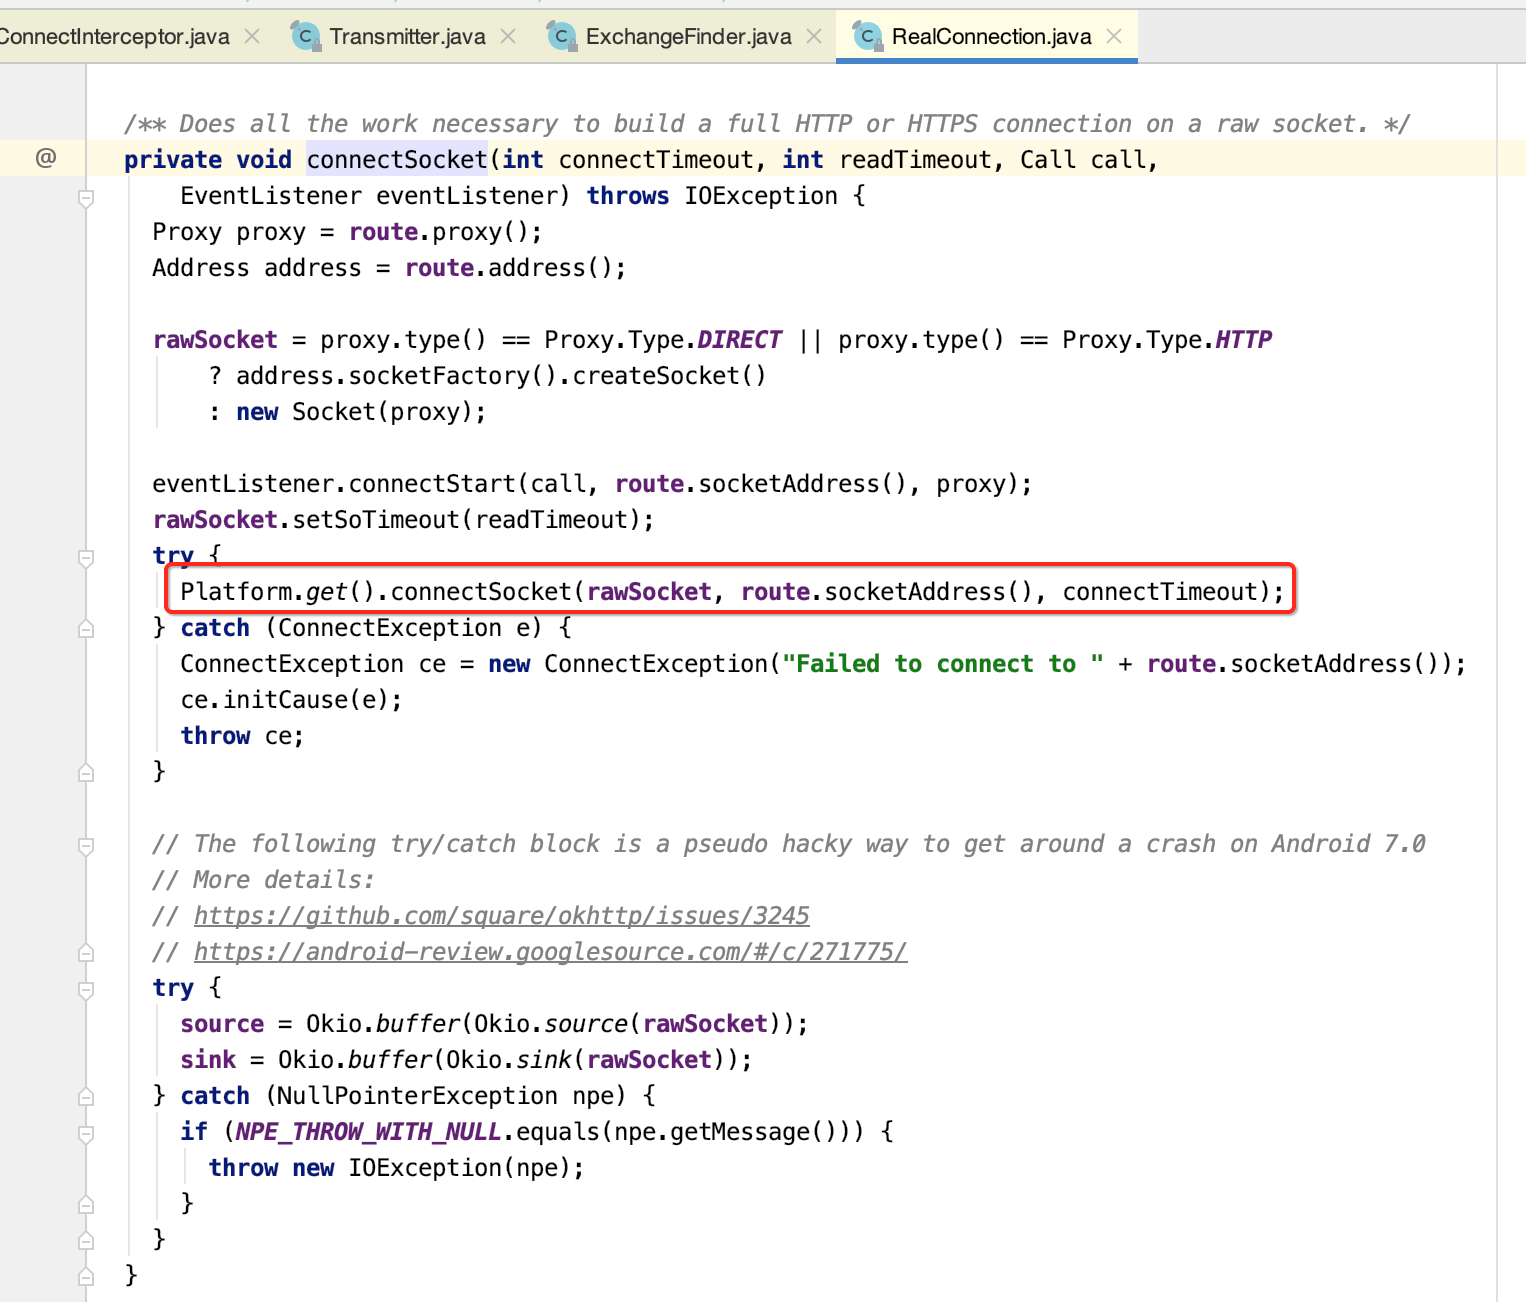


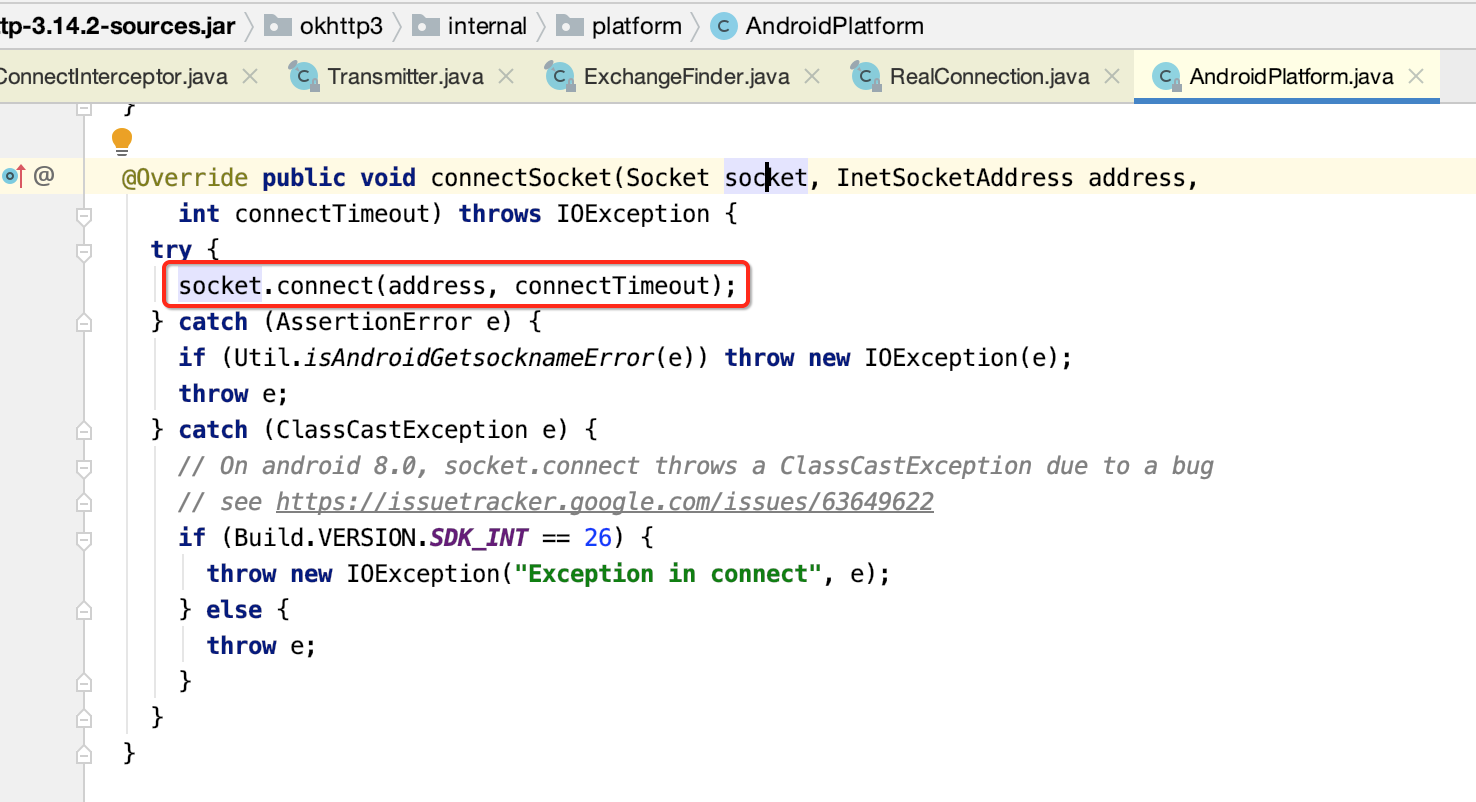
所以此时连接的细节就得跑到AndroidPlatform里面去了:
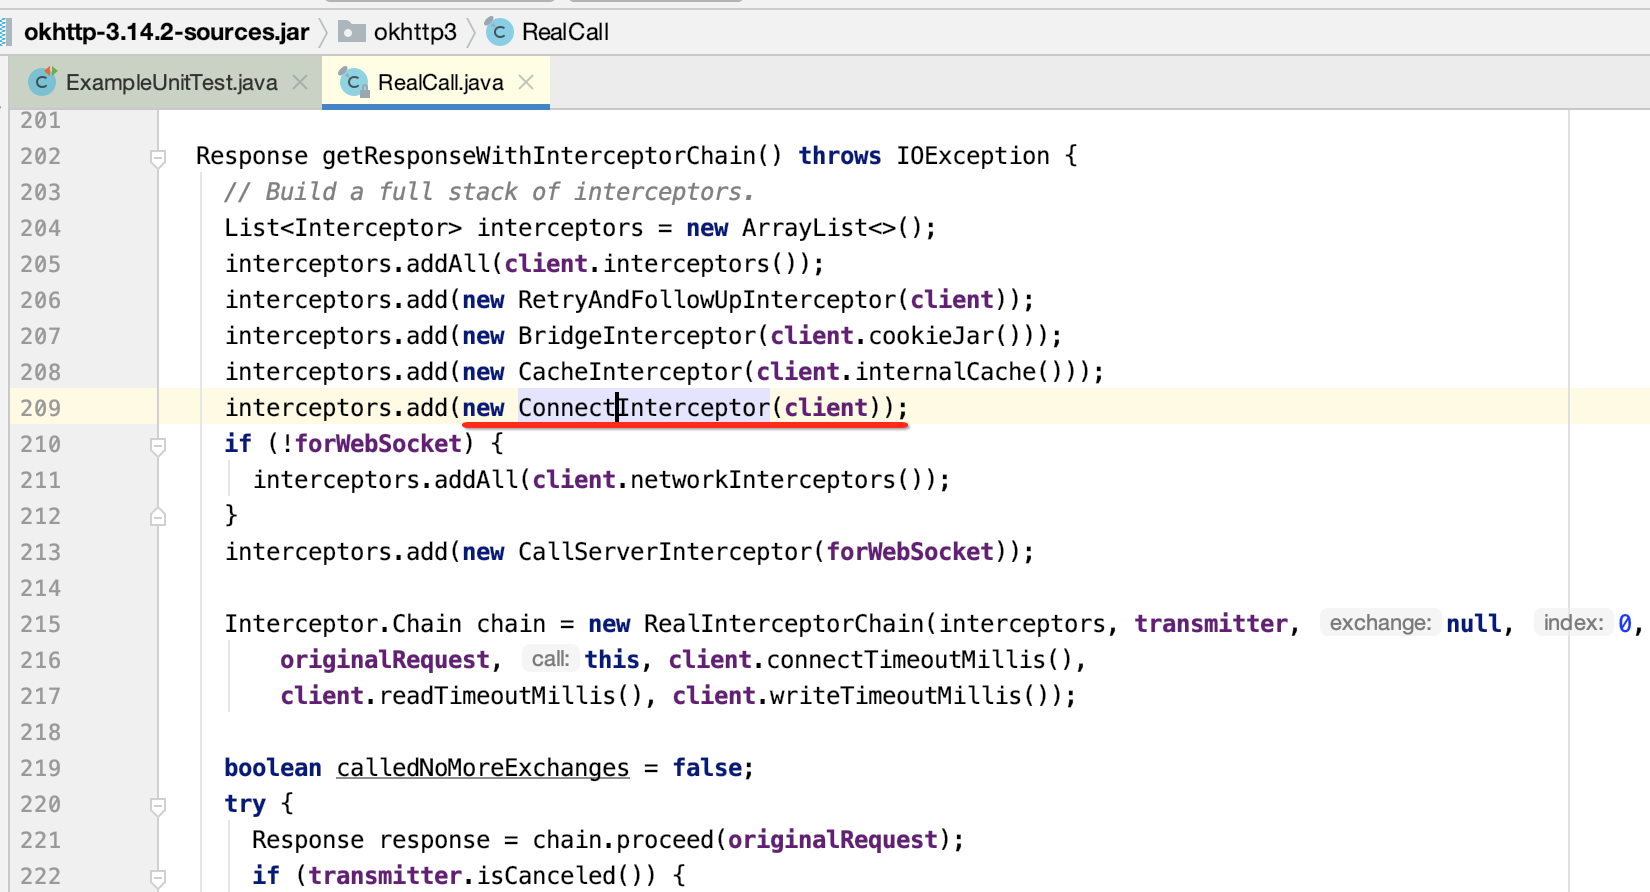
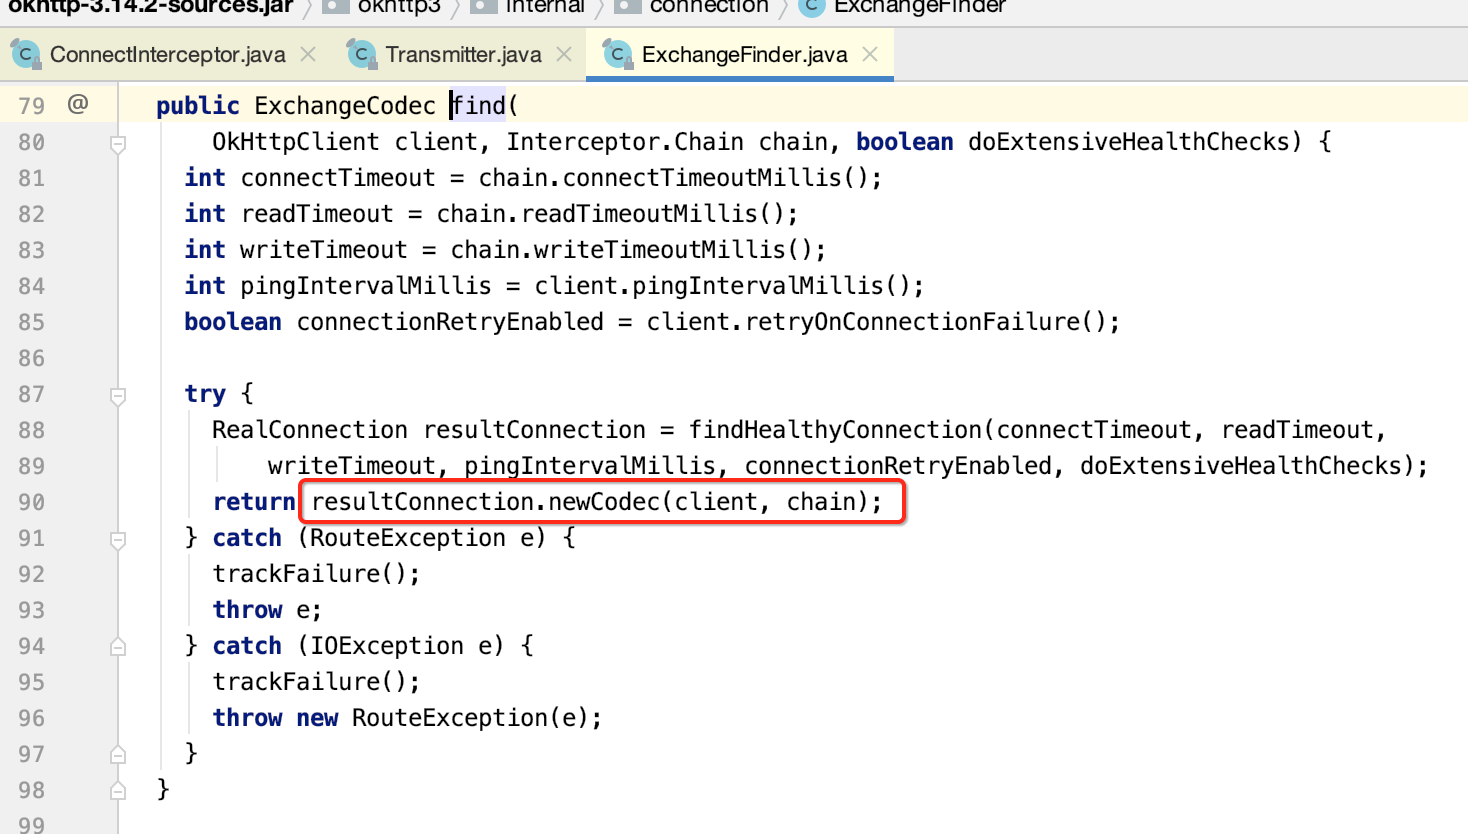
好,这个迷底揭晓了之后,继续往上回到主流程往下分析,接下来则就需根据连接器来创建相应的解码器了:

有了解码器之后,接下来就可以用它对整个通信数据进行使用了,具体的通信步骤则是最后一个拦截器所承担的:

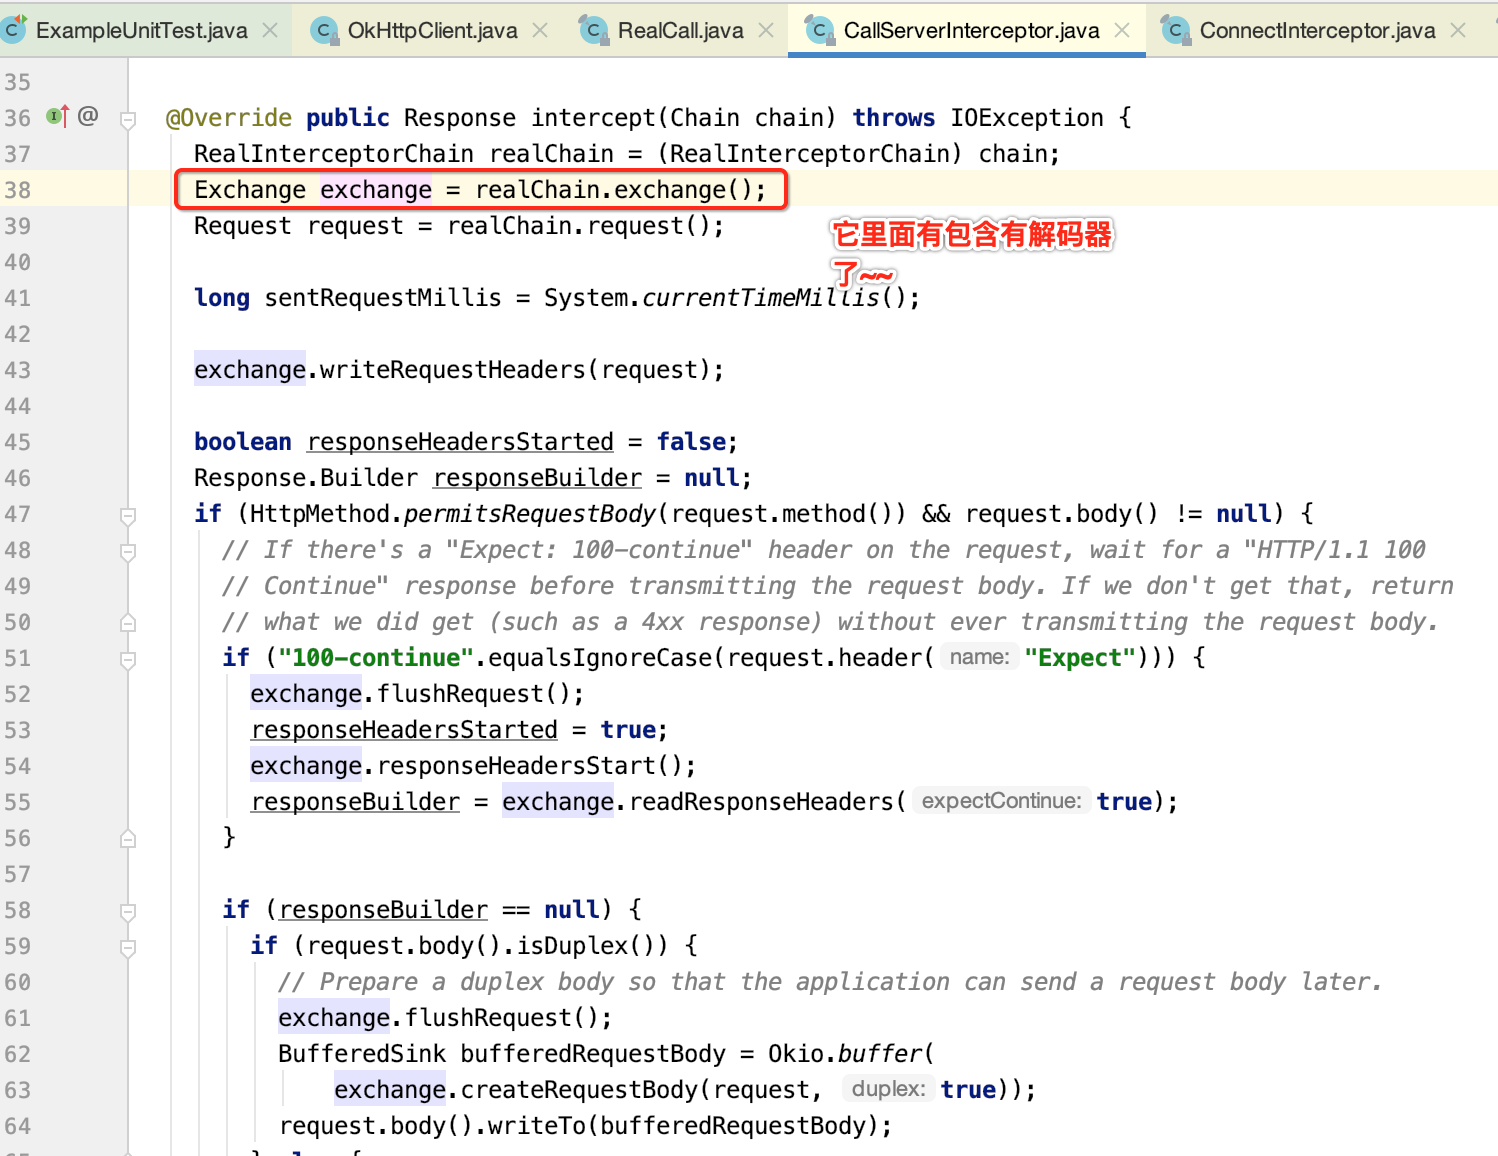
关于这个拦截器就不细究了,至此整个连接拦截器的细节就分析完了,下面总结一下刚才分析的流程图:
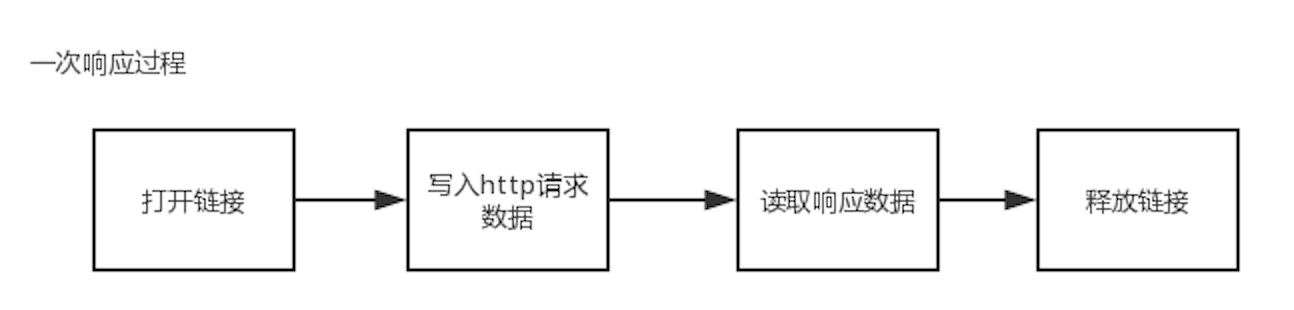
其中里面用到的复用连接池,对于这块再陈述一下,我们知道对于一次响应过程会经历如下过程:
而对于打开连接和释放连接是一个比较重的操作,如果对于一个完全一样的连接每次都得经历上述四个过程,那性能肯定不是太好,所以就需要加入一个复用缓存池来解决这样的问题,有了复用池之后,对于能复用的连接打开和释放这俩操作就可以省了,所以流程为:
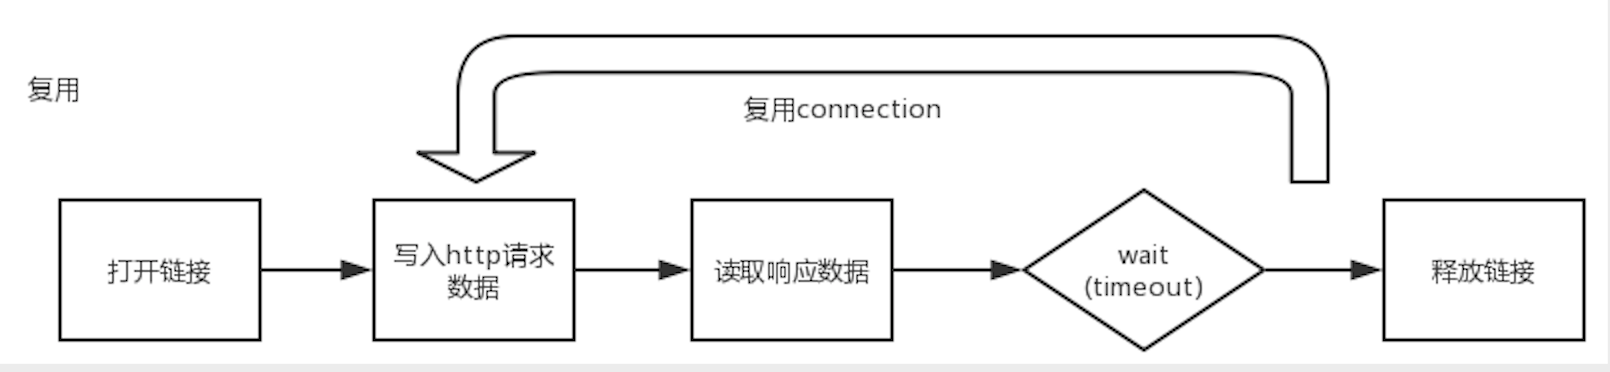
其中有一个wait(),这是啥意思呢?其实照理当一个连接处理完之后不是要立马释放该链接嘛,但是为了能复用,所以在完成连接之后做了一次的延时,在一定时间内如果该链接还没有被复用则就开始释放了,如果被复用了,那很显然释放操作就省了。
开启手写OkHttp核心流程:
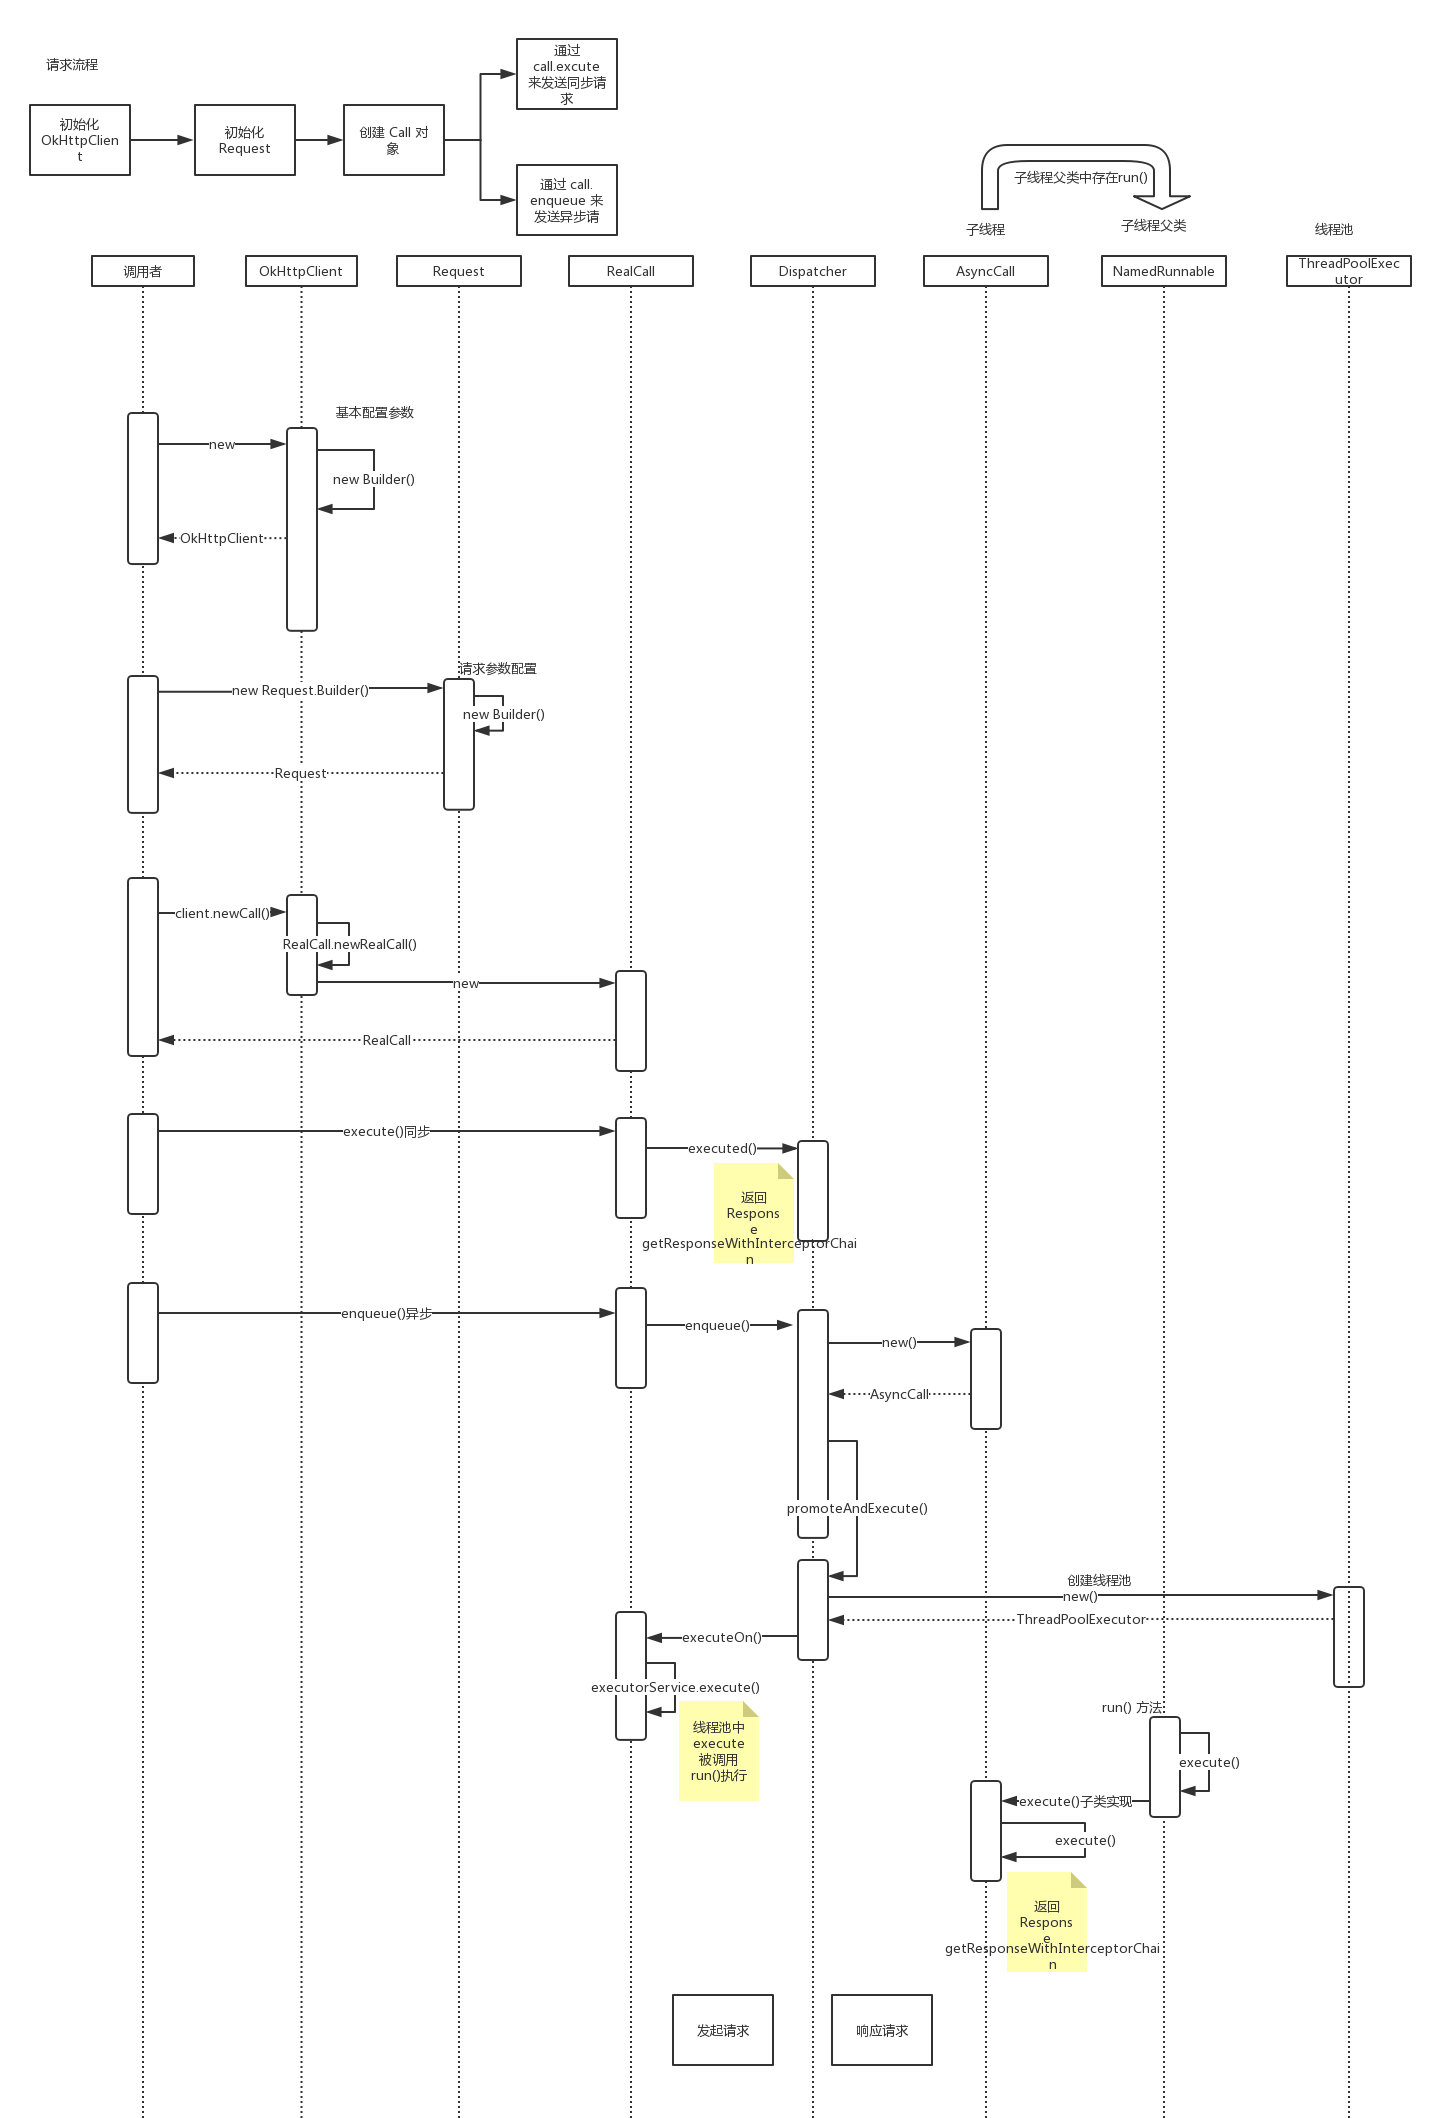
经过了上面的原理剖析之后,接下来则开启又惊险又刺激的撸码环节,其实这才是最透彻的学习方法,看得再多都不好自己动手来敲一遍来得实在,下面手写会以在之前分析整个OkHttp调用流程源码时的那张时序图为基准进行超级模仿,回忆一下:
而编写思路跟之前手写开源框架雷头,基本上是完全照抄官方的框架源码来,好,下面开始,先来新建一个包,里面存放手写框架的代码:

初始化OkHttpClient:
新建个类,它里面当然得要有Builder模式的身影了:

接下来就是Builder中的一些参数了,源码里面这块参数太多了,这里只弄一些核心的:
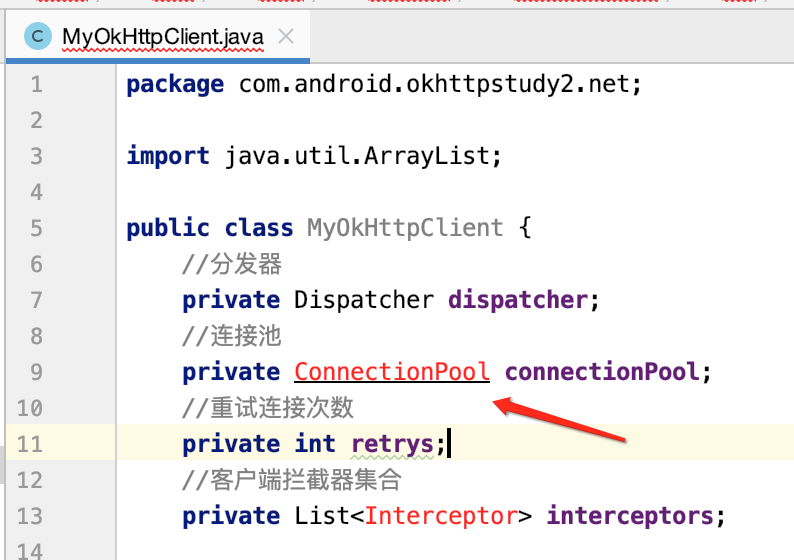
package com.android.okhttpstudy2.net;

import java.util.ArrayList;

public class MyOkHttpClient {
    //分发器
    private Dispatcher dispatcher;
    //连接池
    private ConnectionPool connectionPool;
    //重试连接次数
    private int retrys;
    //客户端拦截器集合
    private List<Interceptor> interceptors;

    public MyOkHttpClient() {
        this(new Builder());
    }

    public MyOkHttpClient(Builder builder) {
        dispatcher = builder.dispatcher;
        connectionPool = builder.connectionPool;
        retrys = builder.retrys;
        interceptors = builder.interceptors;
    }

    public static final class Builder {
        Dispatcher dispatcher = new Dispatcher();
        ConnectionPool connectionPool = new ConnectionPool();
        int retrys = 3;
        List<Interceptor> interceptors = new ArrayList<>();

        public Builder retrys(int retrys) {
            this.retrys = retrys;
            return this;
        }

        public Builder addInterceptor(Interceptor interceptor) {
            interceptors.add(interceptor);
            return this;
        }
    }

    public int retrys() {
        return retrys;
    }

    public Dispatcher dispatcher() {
        return dispatcher;
    }

    public ConnectionPool connectionPool() {
        return connectionPool;
    }

    public List<Interceptor> interceptors() {
        return interceptors;
    }
}
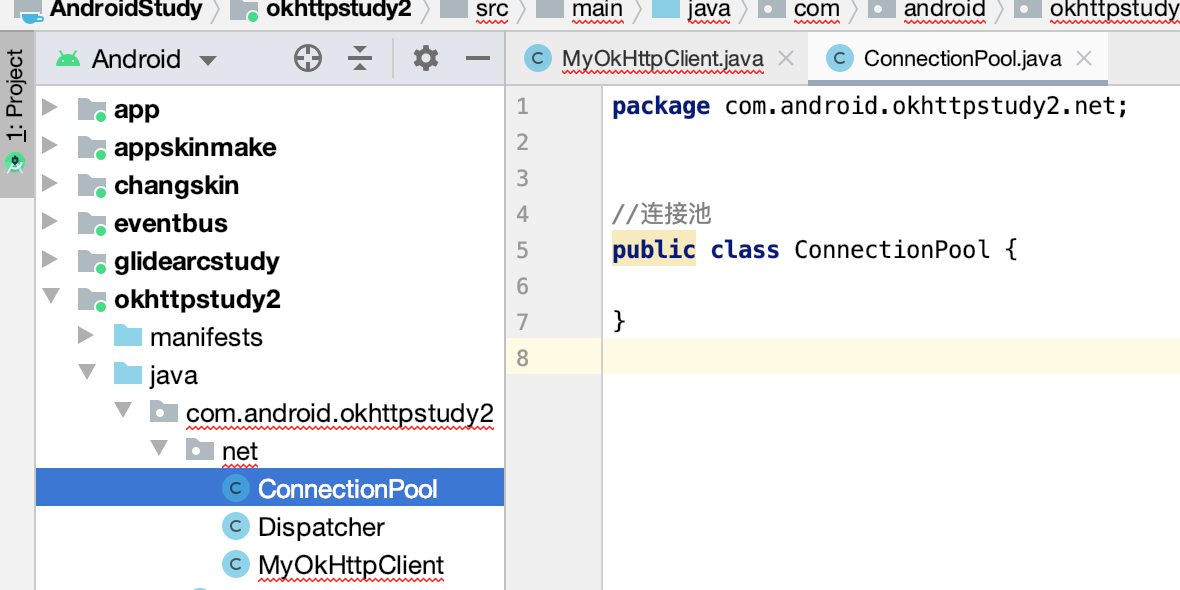
其中这里涉及到了三个类,所以下面来创建一下:

package com.android.okhttpstudy2.net;

import java.util.concurrent.ExecutorService;
import java.util.concurrent.SynchronousQueue;
import java.util.concurrent.ThreadFactory;
import java.util.concurrent.ThreadPoolExecutor;
import java.util.concurrent.TimeUnit;

public class Dispatcher {
    //最多同时请求
    private int maxRequests;
    //同一个host同时最多请求
    private int maxRequestsPerHost;

    //线程池,发送异步请求
    private ExecutorService executorService;

    public Dispatcher() {
        this(64, 2);
    }

    public Dispatcher(int maxRequests, int maxRequestsPerHost) {
        this.maxRequests = maxRequests;
        this.maxRequestsPerHost = maxRequestsPerHost;
    }

    /**
     * 线程池
     *
     * @return
     */
    public synchronized ExecutorService executorService() {
        if (executorService == null) {
            ThreadFactory threadFactory = new ThreadFactory() {
                @Override
                public Thread newThread(Runnable runnable) {
                    Thread result = new Thread(runnable, "OkHttp Dispatcher");
                    return result;
                }
            };
            /**
             *    1、corePoolSize:线程池中核心线程数的最大值
             *    2、maximumPoolSize:线程池中能拥有最多线程数
             *    3、keepAliveTime:表示空闲线程的存活时间  60秒
             *    4、表示keepAliveTime的单位。
             *    5、workQueue:它决定了缓存任务的排队策略。
             *      SynchronousQueue<Runnable>:此队列中不缓存任何一个任务。向线程池提交任务时,
             *      如果没有空闲线程来运行任务,则入列操作会阻塞。当有线程来获取任务时,
             *      出列操作会唤醒执行入列操作的线程。
             *    6、指定创建线程的工厂
             */
            executorService = new ThreadPoolExecutor(0, Integer.MAX_VALUE, 60, TimeUnit.SECONDS,
                    new SynchronousQueue<Runnable>(), threadFactory);
        }
        return executorService;
    }
}
接下来再来创建一个连接池类:
接下来再来新建一个拦截器:


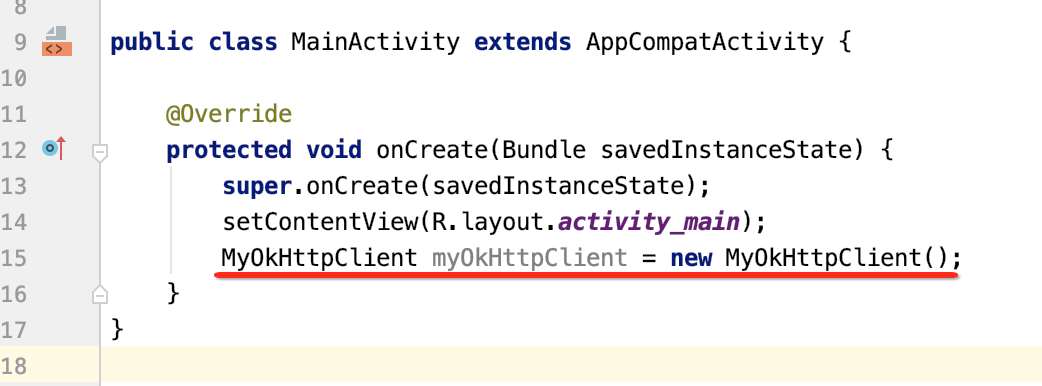
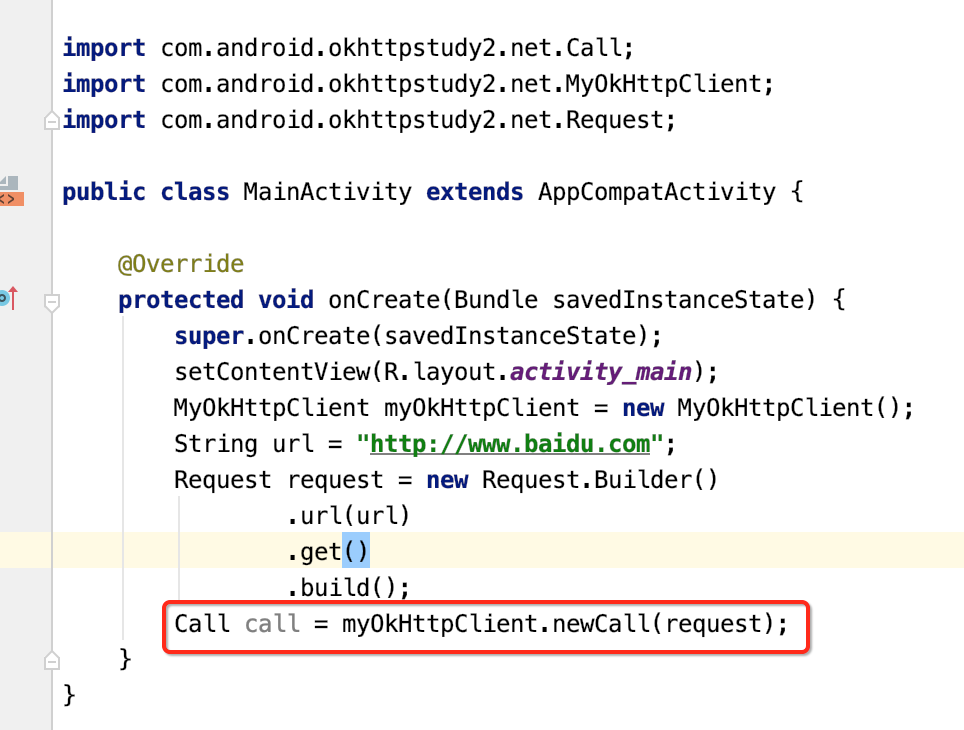
此时咱们就可以应用一下创建这个OkHttpClient对象了:
初始化Requst:

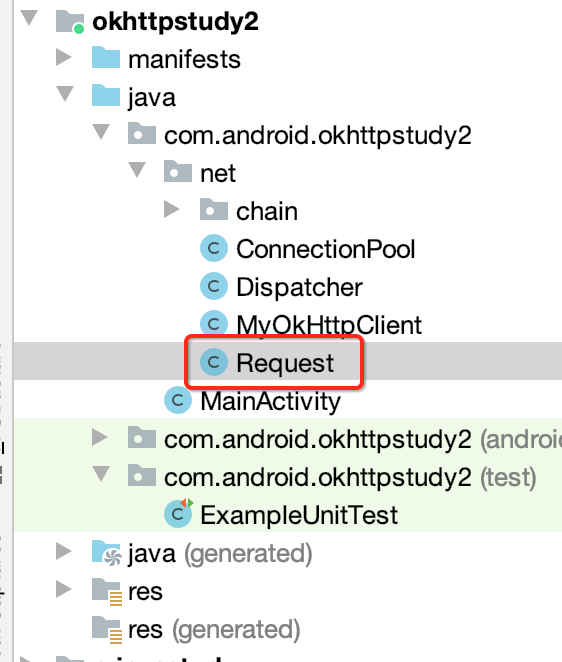
接下来则需要初始化Request了,先创建一个类:
里面的内容就不一一说明了,比较容易理解:
package com.android.okhttpstudy2.net;

import android.text.TextUtils;

import java.net.MalformedURLException;
import java.util.HashMap;
import java.util.Map;

public class Request {
    //请求头
    public Map<String, String> headers;
    //请求方式 get/post
    public String method;
    //请求体
    public RequestBody body;
    //解析url 成HttpUrl 对象
    public HttpUrl url;

    public Request(Builder builder) {
        this.url = builder.url;
        this.method = builder.method;
        this.headers = builder.headers;
        this.body = builder.body;
    }

    public String method() {
        return method;
    }

    public HttpUrl url() {
        return url;
    }

    public RequestBody body() {
        return body;
    }

    public Map<String, String> headers() {
        return headers;
    }

    public final static class Builder {

        HttpUrl url;
        Map<String, String> headers = new HashMap<>();
        String method;

        RequestBody body;

        public Builder url(String url) {
            try {
                this.url = new HttpUrl(url);
                return this;
            } catch (MalformedURLException e) {
                throw new IllegalStateException("Failed Http Url", e);
            }
        }


        public Builder addHeader(String name, String value) {
            headers.put(name, value);
            return this;
        }


        public Builder removeHeader(String name) {
            headers.remove(name);
            return this;
        }

        public Builder get() {
            method = "GET";
            return this;
        }


        public Builder post(RequestBody body) {
            this.body = body;
            method = "POST";
            return this;
        }

        public Request build() {
            if (url == null) {
                throw new IllegalStateException("url == null");
            }
            if (TextUtils.isEmpty(method)) {
                method = "GET";
            }
            return new Request(this);
        }

    }
}
其中还涉及到两个相关类,如下:
package com.android.okhttpstudy2.net;

import java.io.UnsupportedEncodingException;
import java.net.URLEncoder;
import java.util.HashMap;
import java.util.Map;

public class RequestBody {

    /**
     * 表单提交 使用url encoded编码
     */
    private final static String CONTENT_TYPE = "application/x-www-form-urlencoded";

    private final static String CHARSET = "utf-8";

    Map<String, String> encodedBodys = new HashMap<>();

    public String contentType() {
        return CONTENT_TYPE;
    }

    public long contentLength() {
        return body().getBytes().length;
    }

    public String body() {
        StringBuffer sb = new StringBuffer();
        for (Map.Entry<String, String> entry : encodedBodys.entrySet()) {
            sb.append(entry.getKey())
                    .append("=")
                    .append(entry.getValue())
                    .append("&");
        }
        if (sb.length() != 0) {
            sb.deleteCharAt(sb.length() - 1);
        }
        return sb.toString();
    }


    public RequestBody add(String name, String value) {
        try {
            encodedBodys.put(URLEncoder.encode(name, CHARSET), URLEncoder.encode(value, CHARSET));
        } catch (UnsupportedEncodingException e) {
            e.printStackTrace();
        }
        return this;
    }
}
package com.android.okhttpstudy2.net;

import android.text.TextUtils;

import java.net.MalformedURLException;
import java.net.URL;

public class HttpUrl {
    String protocol;  //协议http  https
    String host;      //192.6.2.3
    String file;    // 文件地址
    int port;     //端口

    /**
     * scheme://host:port/path?query#fragment
     * @param url
     * @throws MalformedURLException
     */
    public HttpUrl(String url) throws MalformedURLException {
        URL url1 = new URL(url);
        host = url1.getHost();
        file = url1.getFile();
        file = TextUtils.isEmpty(file) ? "/" : file;
        protocol = url1.getProtocol();
        port = url1.getPort();
        port = port == -1 ? url1.getDefaultPort() : port;
    }

    public String getProtocol() {
        return protocol;
    }

    public String getHost() {
        return host;
    }

    public String getFile() {
        return file;
    }

    public int getPort() {
        return port;
    }
}
此时咱们就可以创建Requst对象了:

创建Call对象:
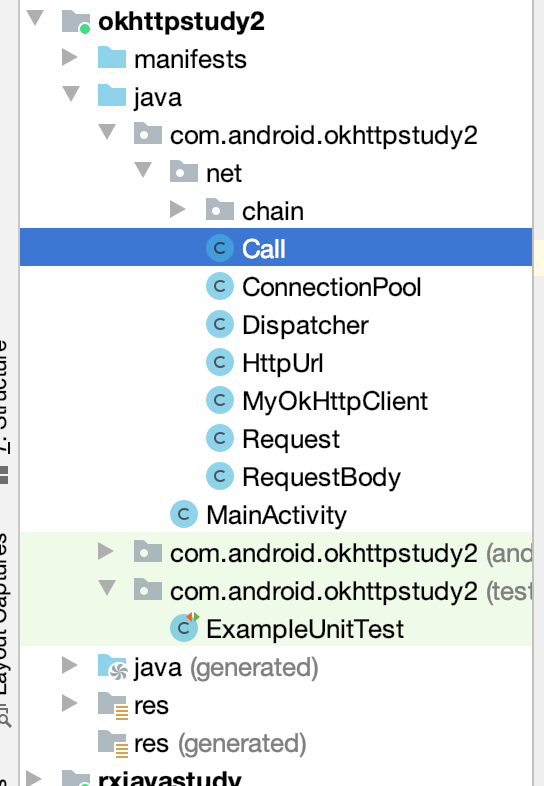
所以先来创建一个Call类:
package com.android.okhttpstudy2.net;

public class Call {
    Request request;
    MyOkHttpClient client;
    /**
     * 是否执行过
     */
    boolean executed;

    //取消
    boolean canceled;

    public Call(Request request, MyOkHttpClient client) {
        this.request = request;
        this.client = client;
    }

    public void cancel() {
        canceled = true;
    }

    public boolean isCanceled() {
        return canceled;
    }
}
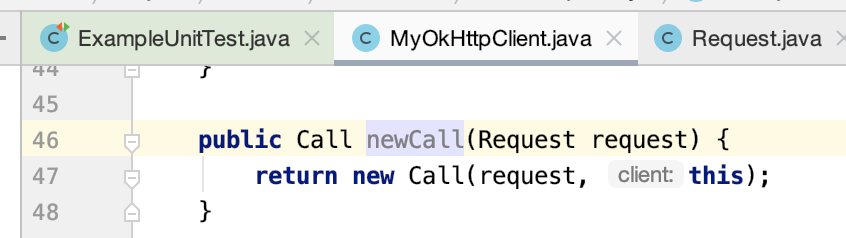
此时需要在MyHttpClient中增加一个方法:

在源码中的实现是对其又做了一层封装,如下:

咱们这里简化一下,直接将实现就放到Call类中了:
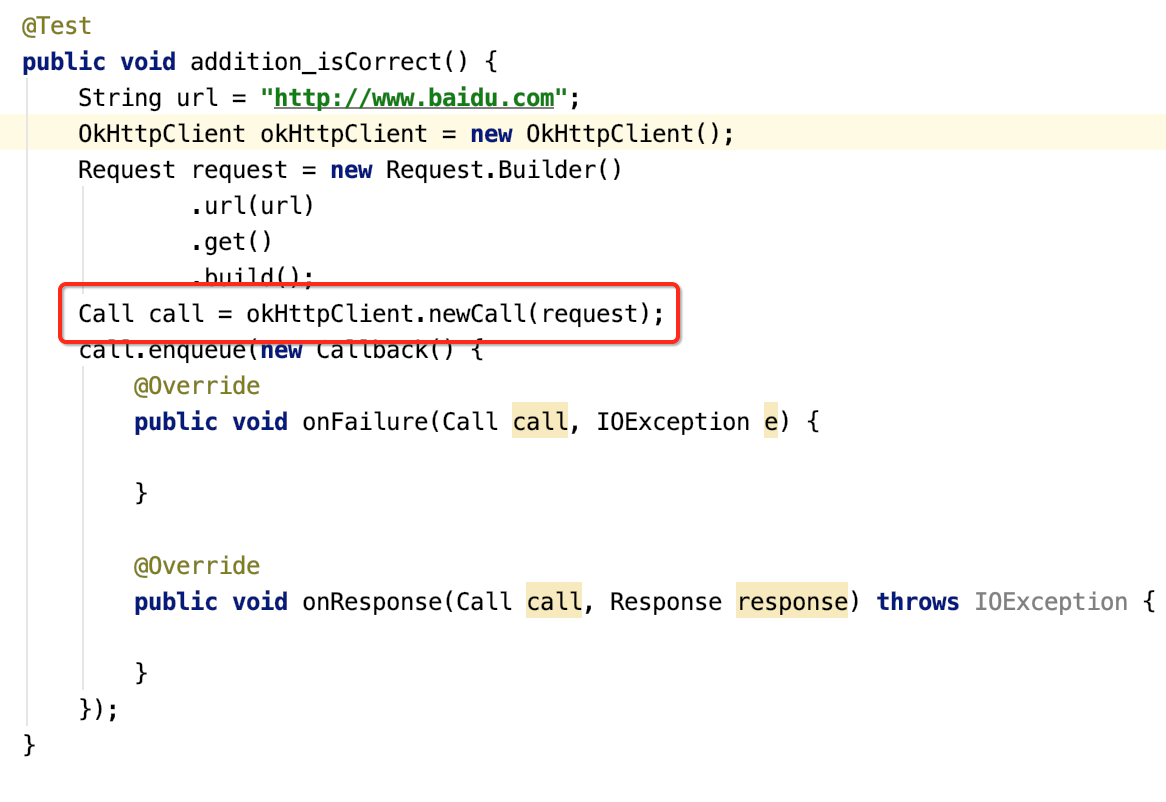
好,此时咱们就可以创建Call了:
发起请求:
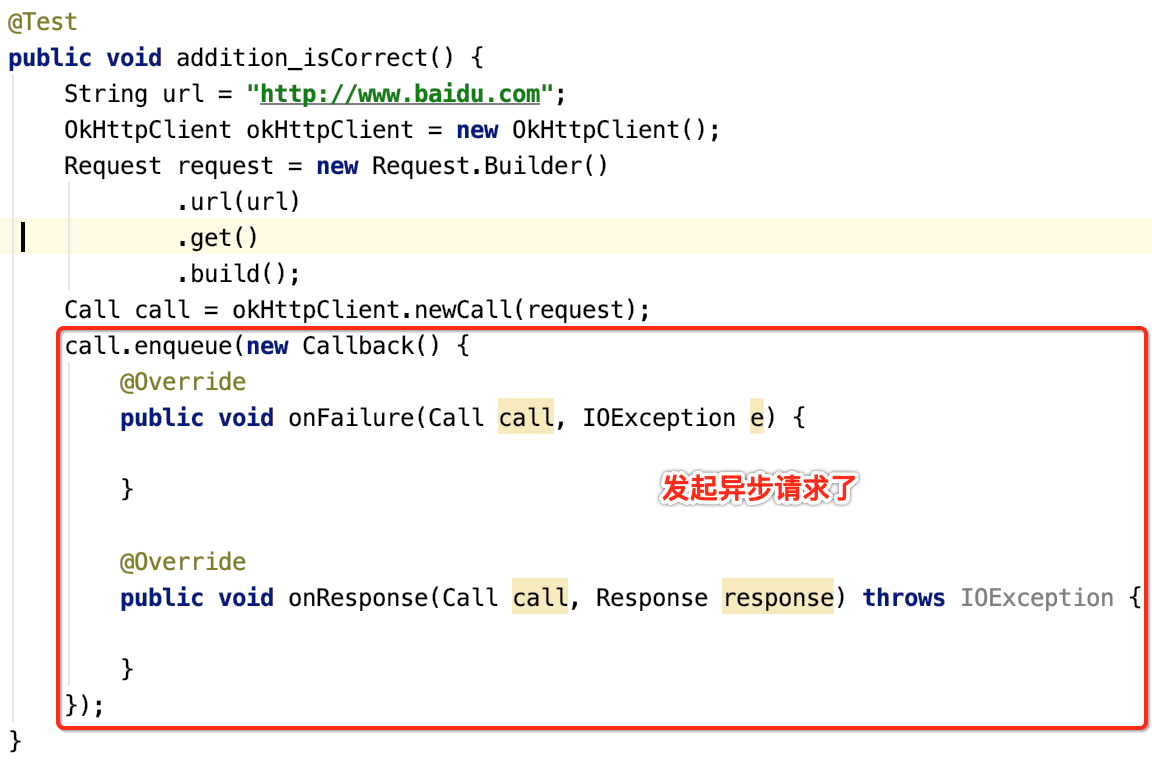
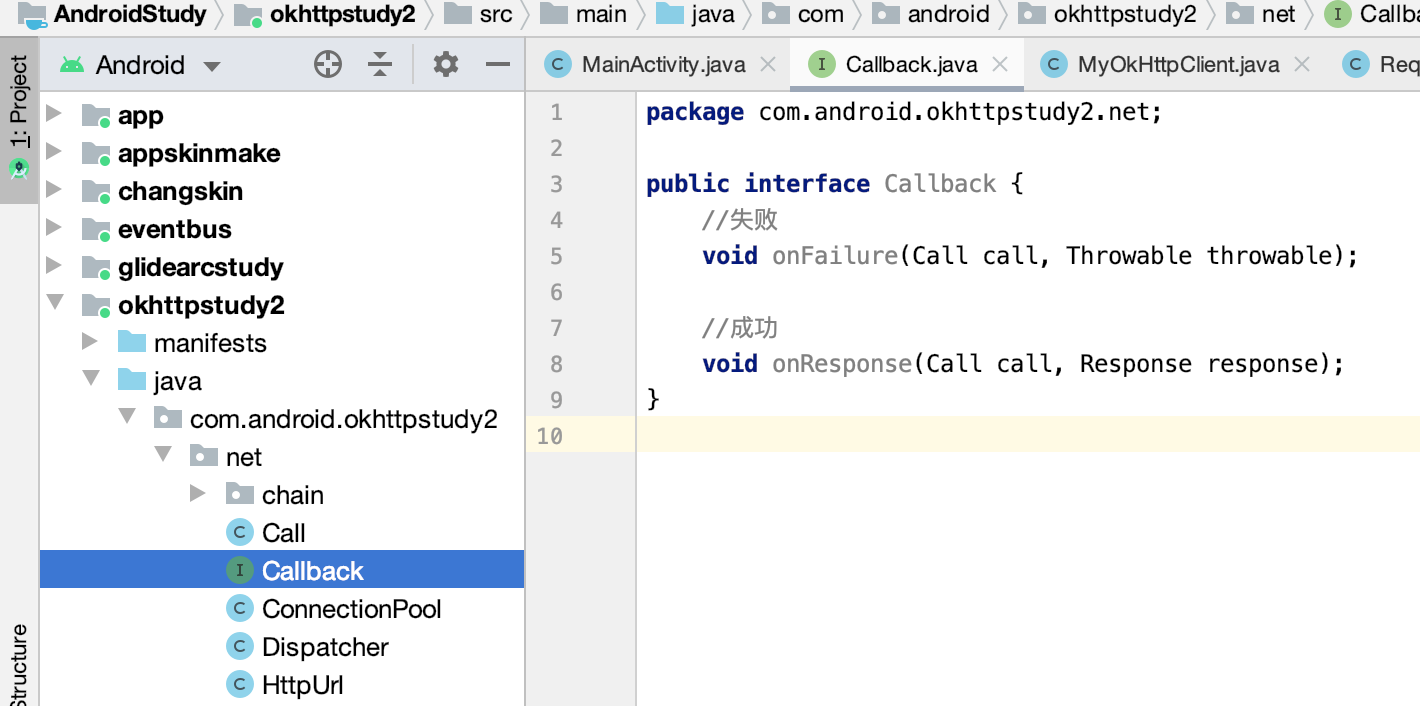
这里只实现异步请求,所以需要在Call中增加一个enququq就去,其中有一个Callback对象,先来新建这个回调类:
其中有个Response对象定义一下:
package com.android.okhttpstudy2.net;

import java.util.HashMap;
import java.util.Map;

public class Response {
    int code;
    int contentLength = -1;
    Map<String, String> headers = new HashMap<>();
    String body;
    //保持连接
    boolean isKeepAlive;

    public Response(int code, int contentLength, Map<String, String> headers, String body,
                    boolean isKeepAlive) {
        this.code = code;
        this.contentLength = contentLength;
        this.headers = headers;
        this.body = body;
        this.isKeepAlive = isKeepAlive;
    }

    public int getCode() {
        return code;
    }

    public int getContentLength() {
        return contentLength;
    }

    public Map<String, String> getHeaders() {
        return headers;
    }

    public String getBody() {
        return body;
    }

    public boolean isKeepAlive() {
        return isKeepAlive;
    }
}
好,接下来则来定义enqueue方法:
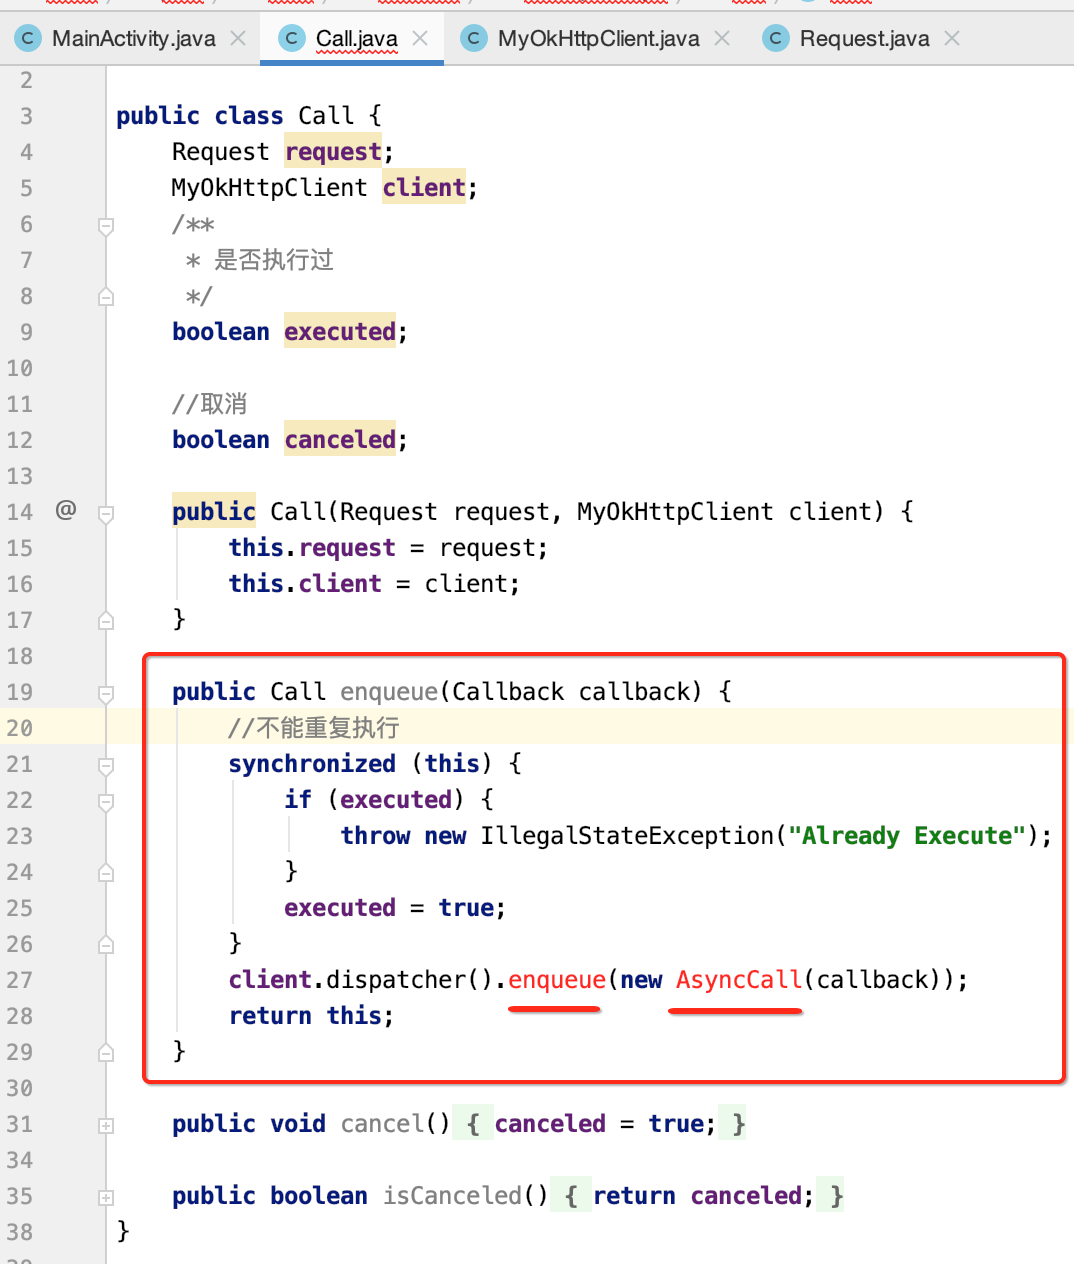
此时需要先定义这个AsyncCall,从之前的源码分析也能晓得它是一个线程:
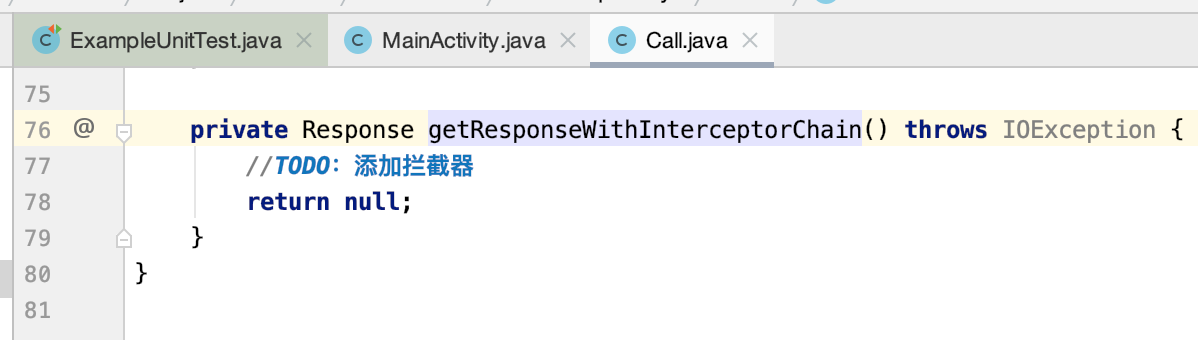
package com.android.okhttpstudy2.net;

import java.io.IOException;

public class Call {
    Request request;
    MyOkHttpClient client;
    /**
     * 是否执行过
     */
    boolean executed;

    //取消
    boolean canceled;

    public Call(Request request, MyOkHttpClient client) {
        this.request = request;
        this.client = client;
    }

    public Call enqueue(Callback callback) {
        //不能重复执行
        synchronized (this) {
            if (executed) {
                throw new IllegalStateException("Already Execute");
            }
            executed = true;
        }
        client.dispatcher().enqueue(new AsyncCall(callback));
        return this;
    }

    public void cancel() {
        canceled = true;
    }

    public boolean isCanceled() {
        return canceled;
    }

    final class AsyncCall implements Runnable {

        private final Callback callback;

        public AsyncCall(Callback callback) {
            this.callback = callback;
        }

        @Override
        public void run() {
            //是否已经通知过callback
            boolean signalledCallback = false;
            try {
                Response response = getResponseWithInterceptorChain();
                if (canceled) {
                    signalledCallback = true;
                    callback.onFailure(Call.this, new IOException("Canceled"));
                } else {
                    signalledCallback = true;
                    callback.onResponse(Call.this, response);
                }
            } catch (IOException e) {
                if (!signalledCallback) {
                    callback.onFailure(Call.this, e);
                }
            } finally {
                client.dispatcher().finished(this);
            }
        }

        public String host() {
            return request.url().host;
        }
    }

    private Response getResponseWithInterceptorChain() throws IOException {
        //TODO:添加拦截器
        return null;
    }
}
其中分发器中需要定义一个请求结束的方法,此时先来完善一下分发器,里面都是维护各请求状态:
package com.dn_alan.myapplication.net;

import com.android.okhttpstudy2.net.Call;

import java.util.ArrayDeque;
import java.util.Deque;
import java.util.Iterator;
import java.util.concurrent.ExecutorService;
import java.util.concurrent.SynchronousQueue;
import java.util.concurrent.ThreadFactory;
import java.util.concurrent.ThreadPoolExecutor;
import java.util.concurrent.TimeUnit;

public class Dispatcher {
    //最多同时请求
    private int maxRequests;
    //同一个host同时最多请求
    private int maxRequestsPerHost;

    //线程池,发送异步请求
    private ExecutorService executorService;

    /**
     * 等待执行队列
     */
    private final Deque<Call.AsyncCall> readyAsyncCalls = new ArrayDeque<>();

    /**
     * 正在执行队列
     */
    private final Deque<Call.AsyncCall> runningAsyncCalls = new ArrayDeque<>();

    public Dispatcher() {
        this(64, 2);
    }

    public Dispatcher(int maxRequests, int maxRequestsPerHost) {
        this.maxRequests = maxRequests;
        this.maxRequestsPerHost = maxRequestsPerHost;
    }

    /**
     * 线程池
     *
     * @return
     */
    public synchronized ExecutorService executorService() {
        if (executorService == null) {
            ThreadFactory threadFactory = new ThreadFactory() {
                @Override
                public Thread newThread(Runnable runnable) {
                    Thread result = new Thread(runnable, "OkHttp Dispatcher");
                    return result;
                }
            };
            /**
             *    1、corePoolSize:线程池中核心线程数的最大值
             *    2、maximumPoolSize:线程池中能拥有最多线程数
             *    3、keepAliveTime:表示空闲线程的存活时间  60秒
             *    4、表示keepAliveTime的单位。
             *    5、workQueue:它决定了缓存任务的排队策略。
             *      SynchronousQueue<Runnable>:此队列中不缓存任何一个任务。向线程池提交任务时,
             *      如果没有空闲线程来运行任务,则入列操作会阻塞。当有线程来获取任务时,
             *      出列操作会唤醒执行入列操作的线程。
             *    6、指定创建线程的工厂
             */
            executorService = new ThreadPoolExecutor(0, Integer.MAX_VALUE, 60, TimeUnit.SECONDS,
                    new SynchronousQueue<Runnable>(), threadFactory);
        }
        return executorService;
    }

    /**
     * 同一host 的 同时请求数
     *
     * @param call
     * @return
     */
    private int runningCallsForHost(Call.AsyncCall call) {
        int result = 0;
        //如果执行这个请求,则相同的host数量是result
        for (Call.AsyncCall c : runningAsyncCalls) {
            if (c.host().equals(call.host())) {
                result++;
            }
        }
        return result;
    }

    /*
     *请求结束 移出正在运行队列
     *并判断是否执行等待队列中的请求
     */
    public void finished(Call.AsyncCall asyncCall) {
        synchronized (this) {
            runningAsyncCalls.remove(asyncCall);
            //判断是否执行等待队列中的请求
            promoteCalls();
        }
    }

    /**
     * 判断是否执行等待队列中的请求
     */
    private void promoteCalls() {
        //同时请求达到上限
        if (runningAsyncCalls.size() >= maxRequests) {
            return;
        }
        //没有等待执行请求
        if (readyAsyncCalls.isEmpty()) {
            return;
        }
        for (Iterator<Call.AsyncCall> i = readyAsyncCalls.iterator(); i.hasNext(); ) {
            Call.AsyncCall call = i.next();
            //同一host同时请求为达上限
            if (runningCallsForHost(call) < maxRequestsPerHost) {
                i.remove();
                runningAsyncCalls.add(call);
                executorService().execute(call);
            }
            //到达同时请求上限
            if (runningAsyncCalls.size() >= maxRequests) {
                return;
            }
        }

    }
}
上面的细节不多说了,一看就能明白,接下来继续回到Call类中的equeue()方法:


好,整个框架代码现在就差这个拦截器链的方法实现了:
关于这块最最核心的逻辑放下次再来编写,目前咱们可以来调用发起请求的代码了:
