由于项目需要展示3d模型,所以对three做了点研究,分享出来 希望能帮到大家
先看看效果:
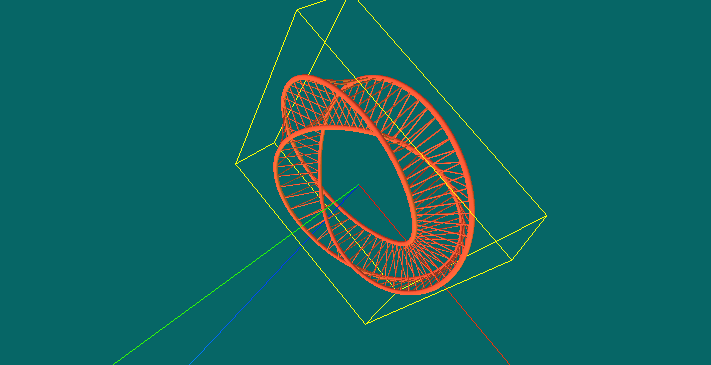
three.js整体来说 不是很难 只要你静下心来研究研究 很快就会上手的
首先我们在页面上需要创建一个能够放置3D模型的画布 也可以说是初始化 Three
 1 var WIDTH,HEIGHT;
 2     var    renderer;
 3     function initThree() {
 4         WIDTH = document.documentElement.clientWidth/2; <!--{foreach from=$recommended_goods item=rgoods}--> <!-- {/foreach} -->
 5         HEIGHT = document.documentElement.clientHeight/2;
 6         /* 渲染器 */
 7         renderer = new THREE.WebGLRenderer();
 8         renderer.setSize(WIDTH , HEIGHT);
 9         renderer.setClearColor(new THREE.Color(0x66666));
10         renderer.gammaInput = true;
11         renderer.gammaOutput = true;
12
13         document.body.appendChild(renderer.domElement);
14     }
通过上面的代码不难看出 我们设置了 在body里追加了一块画布 宽高是 client的一半颜色为 0x66666 这里要注意的是 renderer = new THREE.WebGLRenderer(); 因为我们所有的设置都是以renderer为对象设置
下来 我们需要调整摄像头 即视觉角度
 1 /* 摄像头 */
 2     var camera;
 3     function initCamera() {
 4         var VIEW_ANGLE = 45,
 5                 ASPECT = WIDTH / HEIGHT,
 6                 NEAR = 0.1,
 7                 FAR = 10000;
 8         camera = new THREE.PerspectiveCamera(VIEW_ANGLE, ASPECT, NEAR, FAR);
 9         camera.position.set(20, 0, 0);
10         //设置视野的中心坐标
11         camera.lookAt(scene.position);
12     }
以上代码主要是控制视觉角度 数值可以在后期根据自己的需求去调整
加载场景:
1     /* 场景 */
2     var scene;
3     function initScene() {
4         scene = new THREE.Scene();
5     }
加载灯光效果
 1 /* 灯光 */
 2     var light,light2,light3;
 3     function initLight() {
 4         //平行光
 5         light = new THREE.DirectionalLight(0xFFFFFF);
 6         light.position.set(0, 99, 0).normalize();
 7         scene.add(light);
 8         //环境光
 9         light2 = new THREE.AmbientLight(0x999999);
10         scene.add(light2);
11         //点光源
12         light3 = new THREE.PointLight(0x00FF00);
13         light3.position.set(300, 0, 0);
14         scene.add(light3);
15     }
显示模型对象:
 1     /* 显示对象 */
 2     var cube;
 3     function initObject(){
 4         // ASCII file
 5         var loader = new THREE.STLLoader();
 6
 7         loader.addEventListener( 'load', function ( event ) {
 8             var loading = document.getElementById("Loading");
 9             loading.parentNode.removeChild(loading);
10             var geometry = event.content;
11             //砖红色
12             var material = new THREE.MeshPhongMaterial( { ambient: 0xff5533, color: 0xff5533, specular: 0x111111, shininess: 200 } );
13             //纯黑色
14 //            var material = new THREE.MeshBasicMaterial( { envMap: THREE.ImageUtils.loadTexture( 'http://localhost:8080/textures/metal.jpg', new THREE.SphericalReflectionMapping() ), overdraw: true } ) ;
15             //粉色 带阴影
16 //            var material = new THREE.MeshLambertMaterial( { color:0xff5533, side: THREE.DoubleSide } );
17             //灰色
18 //            var material = new THREE.MeshLambertMaterial({color: 000000});    //材质设定  (颜色)
19
20
21             var mesh = new THREE.Mesh( geometry, material );
22
23             var center = THREE.GeometryUtils.center(geometry);
24             var boundbox=geometry.boundingBox;
25             var vector3 = boundbox.size(null);
26             var vector3 = boundbox.size(null);
27             console.log(vector3);
28             var scale = vector3.length();
29             camera.position.set(scale, 0, 0);
30             camera.lookAt(scene.position);
31             scene.add(camera);
32
33
34             //利用一个轴对象以可视化的3轴以简单的方式。X轴是红色的。Y轴是绿色的。Z轴是蓝色的。这有助于理解在空间的所有三个轴的方向。
35             var axisHelper = new THREE.AxisHelper(800);
36             scene.add(axisHelper);
37
38             //周围边框
39             bboxHelper = new THREE.BoxHelper();
40             bboxHelper.visible = true;
41             var meshMaterial = material;
42             mainModel = new THREE.Mesh(geometry, meshMaterial);
43             bboxHelper.update(mainModel);
44             bboxHelper.geometry.computeBoundingBox();
45             scene.add(bboxHelper);
46
47             //地板网格
48 //            var gridHelper = new THREE.GridHelper(500, 40); // 500 is grid size, 20 is grid step
49 //            gridHelper.position = new THREE.Vector3(0, 0, 0);
50 //            gridHelper.rotation = new THREE.Euler(0, 0, 0);
51 //            scene.add(gridHelper);
52 //            var gridHelper2 = gridHelper.clone();
53 //            gridHelper2.rotation = new THREE.Euler(Math.PI / 2, 0, 0);
54 //            scene.add(gridHelper2);
55 //            var gridHelper3 = gridHelper.clone();
56 //            gridHelper3.rotation = new THREE.Euler(Math.PI / 2, 0, Math.PI / 2);
57 //            scene.add(gridHelper3);
58 //
59 //            var grid = new THREE.GridHelper(300, 40, 25, [0, 0, 1], 0x000055, 0.2, true, "#FFFFFF", "left");
60 //            scene.add(grid);
61
62
63             var x = (boundbox.max.x - boundbox.min.x).toFixed(2);
64             var y = (boundbox.max.y - boundbox.min.y).toFixed(2);
65             var z = (boundbox.max.z - boundbox.min.z).toFixed(2);
66
67             console.log(x);
68             console.log(y);
69             console.log(z);
70             console.log(boundbox);
71
72             mesh.position.set(0,0,0);
73 //            mesh.position.x = scene.position.x;
74 //            mesh.position.y = scene.position.y ;
75 //            mesh.position.z = scene.position.z;
76             scene.add(mesh);
77
78
79             renderer.clear();
80             renderer.render(scene, camera);
81         } );
82         loader.load( '3dfile/莫比乌斯环.STL' );
83     }
这里根据文件类型选择相对应的js引入即可 我加载的是STL模型 所以我引入的是 STLLoader.js
1 <script src="js/STLLoader.js"></script>
如果需要显示网格标尺 将 网格部分代码 去掉注释即可
下来是控制方法 (虽然我没有在显示代码里面写根据键盘按键放大缩小 但还是提供给大家 参考)
1 //控制
2     var effect;
3     var controls;
4     function initControl(){
5         effect = new THREE.AsciiEffect( renderer );
6         effect.setSize( WIDTH, HEIGHT );
7         controls = new THREE.TrackballControls( camera,renderer.domElement);
8     }
最后就是一个初始调用了
 1   function animate() {
 2         requestAnimationFrame( animate );
 3         controls.update();
 4         effect.render( scene, camera );
 5     }
 6
 7     function threeStart() {
 8         initThree();
 9         initScene();
10         initCamera();
11         initLight();
12         initObject();
13         initControl();
14         animate();
15     }
附上完整代码
  1 <!DOCTYPE html>
  2 <html>
  3 <head>
  4     <meta charset="UTF-8" />
  5     <title>WebGL</title>
  6     <script type="text/javascript" charset="utf-8" src="js/three.js"></script>
  7     <script src="js/STLLoader.js"></script>
  8     <script src="js/TrackballControls.js"></script>
  9     <script src="js/AsciiEffect.js"></script>
 10     <style>body{overflow:hidden;background:#eee}</style>
 11 </head>
 12 <script>
 13     var WIDTH,HEIGHT;
 14     var    renderer;
 15     function initThree() {
 16         WIDTH = document.documentElement.clientWidth/2; <!--{foreach from=$recommended_goods item=rgoods}--> <!-- {/foreach} -->
 17         HEIGHT = document.documentElement.clientHeight/2;
 18         /* 渲染器 */
 19         renderer = new THREE.WebGLRenderer();
 20         renderer.setSize(WIDTH , HEIGHT);
 21         renderer.setClearColor(new THREE.Color(0x66666));
 22         renderer.gammaInput = true;
 23         renderer.gammaOutput = true;
 24
 25         document.body.appendChild(renderer.domElement);
 26     }
 27
 28     /* 摄像头 */
 29     var camera;
 30     function initCamera() {
 31         var VIEW_ANGLE = 45,
 32                 ASPECT = WIDTH / HEIGHT,
 33                 NEAR = 0.1,
 34                 FAR = 10000;
 35         camera = new THREE.PerspectiveCamera(VIEW_ANGLE, ASPECT, NEAR, FAR);
 36         camera.position.set(20, 0, 0);
 37         //设置视野的中心坐标
 38         camera.lookAt(scene.position);
 39     }
 40
 41     /* 场景 */
 42     var scene;
 43     function initScene() {
 44         scene = new THREE.Scene();
 45     }
 46
 47     /* 灯光 */
 48     var light,light2,light3;
 49     function initLight() {
 50         //平行光
 51         light = new THREE.DirectionalLight(0xFFFFFF);
 52         light.position.set(0, 99, 0).normalize();
 53         scene.add(light);
 54         //环境光
 55         light2 = new THREE.AmbientLight(0x999999);
 56         scene.add(light2);
 57         //点光源
 58         light3 = new THREE.PointLight(0x00FF00);
 59         light3.position.set(300, 0, 0);
 60         scene.add(light3);
 61     }
 62
 63     /* 显示对象 */
 64     var cube;
 65     function initObject(){
 66         // ASCII file
 67         var loader = new THREE.STLLoader();
 68
 69         loader.addEventListener( 'load', function ( event ) {
 70             var loading = document.getElementById("Loading");
 71             loading.parentNode.removeChild(loading);
 72             var geometry = event.content;
 73             //砖红色
 74             var material = new THREE.MeshPhongMaterial( { ambient: 0xff5533, color: 0xff5533, specular: 0x111111, shininess: 200 } );
 75             //纯黑色
 76 //            var material = new THREE.MeshBasicMaterial( { envMap: THREE.ImageUtils.loadTexture( 'http://localhost:8080/textures/metal.jpg', new THREE.SphericalReflectionMapping() ), overdraw: true } ) ;
 77             //粉色 带阴影
 78 //            var material = new THREE.MeshLambertMaterial( { color:0xff5533, side: THREE.DoubleSide } );
 79             //灰色
 80 //            var material = new THREE.MeshLambertMaterial({color: 000000});    //材质设定  (颜色)
 81
 82
 83             var mesh = new THREE.Mesh( geometry, material );
 84
 85             var center = THREE.GeometryUtils.center(geometry);
 86             var boundbox=geometry.boundingBox;
 87             var vector3 = boundbox.size(null);
 88             var vector3 = boundbox.size(null);
 89             console.log(vector3);
 90             var scale = vector3.length();
 91             camera.position.set(scale, 0, 0);
 92             camera.lookAt(scene.position);
 93             scene.add(camera);
 94
 95
 96             //利用一个轴对象以可视化的3轴以简单的方式。X轴是红色的。Y轴是绿色的。Z轴是蓝色的。这有助于理解在空间的所有三个轴的方向。
 97             var axisHelper = new THREE.AxisHelper(800);
 98             scene.add(axisHelper);
 99
100             //周围边框
101             bboxHelper = new THREE.BoxHelper();
102             bboxHelper.visible = true;
103             var meshMaterial = material;
104             mainModel = new THREE.Mesh(geometry, meshMaterial);
105             bboxHelper.update(mainModel);
106             bboxHelper.geometry.computeBoundingBox();
107             scene.add(bboxHelper);
108
109             //地板网格
110 //            var gridHelper = new THREE.GridHelper(500, 40); // 500 is grid size, 20 is grid step
111 //            gridHelper.position = new THREE.Vector3(0, 0, 0);
112 //            gridHelper.rotation = new THREE.Euler(0, 0, 0);
113 //            scene.add(gridHelper);
114 //            var gridHelper2 = gridHelper.clone();
115 //            gridHelper2.rotation = new THREE.Euler(Math.PI / 2, 0, 0);
116 //            scene.add(gridHelper2);
117 //            var gridHelper3 = gridHelper.clone();
118 //            gridHelper3.rotation = new THREE.Euler(Math.PI / 2, 0, Math.PI / 2);
119 //            scene.add(gridHelper3);
120 //
121 //            var grid = new THREE.GridHelper(300, 40, 25, [0, 0, 1], 0x000055, 0.2, true, "#FFFFFF", "left");
122 //            scene.add(grid);
123
124
125             var x = (boundbox.max.x - boundbox.min.x).toFixed(2);
126             var y = (boundbox.max.y - boundbox.min.y).toFixed(2);
127             var z = (boundbox.max.z - boundbox.min.z).toFixed(2);
128
129             console.log(x);
130             console.log(y);
131             console.log(z);
132             console.log(boundbox);
133
134             mesh.position.set(0,0,0);
135 //            mesh.position.x = scene.position.x;
136 //            mesh.position.y = scene.position.y ;
137 //            mesh.position.z = scene.position.z;
138             scene.add(mesh);
139
140
141             renderer.clear();
142             renderer.render(scene, camera);
143         } );
144         loader.load( '3dfile/莫比乌斯环.STL' );
145     }
146
147     //控制
148     var effect;
149     var controls;
150     function initControl(){
151         effect = new THREE.AsciiEffect( renderer );
152         effect.setSize( WIDTH, HEIGHT );
153         controls = new THREE.TrackballControls( camera,renderer.domElement);
154     }
155
156     function animate() {
157         requestAnimationFrame( animate );
158         controls.update();
159         effect.render( scene, camera );
160     }
161
162     function threeStart() {
163         initThree();
164         initScene();
165         initCamera();
166         initLight();
167         initObject();
168         initControl();
169         animate();
170     }
171 </script>
172 <body onload="threeStart()">
173 <div id="Loading" style="color:#fff">Loading...</div>
174 </body>
175 </html>
哦 我的文件结构
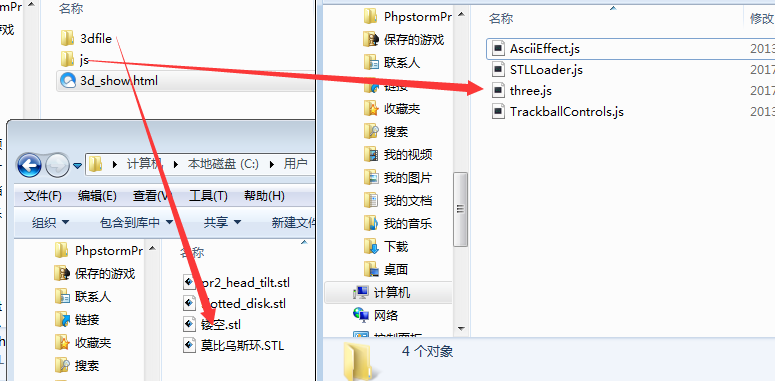
如果想要所有文件的小伙伴 给我留言即可
补充一点,由于在显示模型的方法里我加入了 bboxHelper = new THREE.BoxHelper() 所以我们可以获取到模型的 X Y Z三轴的尺寸 也可以当作 模型的长宽高
