博主刚开始实习不久,还是小白一枚,被公司的各种新奇技术搞得眼花缭乱了好久,主要是用springboot和dubbo构建起来的项目。看完之后才知道springboot真的是java开发者的福音啊 话不多说请看正文:
使用Spring Boot创建微服务
一:是什么
微服务是一种架构风格,一个大型复杂软件应用由一个或多个微服务组成。系统中的各个微服务可被独立部署,各个微服务之间是松耦合的。每个微服务仅关注于完成一件任务并很好地完成该任务。在所有情况下,每个任务代表着一个小的业务能力。
Spring由于其繁琐的配置,一度被人成为“配置地狱”,各种XML、Annotation配置,让人眼花缭乱,而且如果出错了也很难找出原因。Spring Boot项目就是为了解决配置繁琐的问题,最大化的实现convention over configuration(约定大于配置)。
Spring Boot的特性有以下几条:
创建独立Spring应用程序
嵌入式Tomcat,Jetty容器,无需部署WAR包
简化Maven及Gradle配置
尽可能的自动化配置Spring
直接植入产品环境下的实用功能,比如度量指标、健康检查及扩展配置等
无需代码生成及XML配置
目前Spring Boot的版本为1.2.3,需要Java7及Spring Framework4.1.5以上的支持。
springboot提供的功能还有很多这里就不一一介绍了 具体请看springboot中文文档
https://qbgbook.gitbooks.io/spring-boot-reference-guide-zh/content/I.%20Spring%20Boot%20Documentation/
二:怎么做
各位看官接下来开始我们的基本配置
在这里我用的是intellij idea开发工具 以及maven管理工具
1、springboot启动web工程
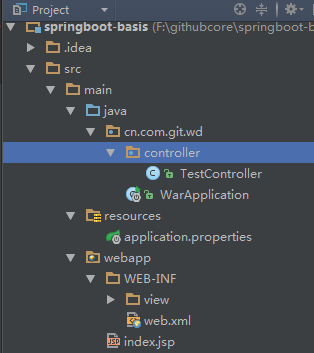
这是我的目录结构
注意这里的webapp必须放在main中与resource和java同级 不然匹配Url时会报404 一开始楼主以为是支持jsp部分配置出错改了好久 对比了别人的目录结构才发现 谨记!!!
a、编写pom
<parent>
        <groupId>org.springframework.boot</groupId>
        <artifactId>spring-boot-starter-parent</artifactId>
        <version>1.4.1.RELEASE</version>
    </parent>
    <dependencies>
        <!--
            spring-boot-starter-web: MVC,AOP的依赖包....
         -->
        <dependency>
            <groupId>org.springframework.boot</groupId>
            <artifactId>spring-boot-starter-web</artifactId>
        </dependency>
        <!--启动时启动内置tomcat-->
        <dependency>
            <groupId>org.springframework.boot</groupId>
            <artifactId>spring-boot-starter-tomcat</artifactId>
        </dependency>
        <!--对jsp支持  -->
        <dependency>
            <groupId>org.apache.tomcat.embed</groupId>
            <artifactId>tomcat-embed-jasper</artifactId>
        </dependency>
        <!--jstl-->
        <dependency>
            <groupId>javax.servlet</groupId>
            <artifactId>jstl</artifactId>
        </dependency>
    </dependencies>
b、创建主类WarApplication ()
@SpringBootApplication
public class WarApplication {
    public static void main(String[] args) {
        SpringApplication.run(WarApplication.class);
    }
}
注意 这里的@SpringBootApplication相当于@Configuration@EnableAutoConfiguration@ComponentScan
c、创建主配置文件application.properties(名字约定俗称,springboot启动时会自动读取resource下该名字的配置文件)
也可以在主类中用@Bean注解的方式注入bean完成整合其他框架 这里就不介绍了 个人觉得用application.properties的方式更加便捷
# 页面默认前缀目录
spring.mvc.view.prefix=/WEB-INF/view/
# 响应页面默认后缀
spring.mvc.view.suffix=.jsp
这里我采用的是properties,也可以使用yml文件 需注意两者配置规范不同
基本配置已经实现这里开始写controller和jsp页面
d、controller
@Controller
public class TestController {

    @RequestMapping("/helloworld")
    public String test(){
        return "helloworld";
    }
}
e、jsp
<%@ page contentType="text/html;charset=UTF-8" language="java" %>
<html>
<head>
    <title></title>
</head>
<body>
    hello world!!
</body>
</html>
到这里就算是完成了springboot最基本的web helloworld了
接下来我们跑一下:直接启动主类的main方法即可

成功启动!
在页面上请求url helloworld

成功跳转到helloworld.jsp界面。
各位看官如何 是否要比在xml里配置spring、视图解析器以及配置spring配置文件要方便的多呢,springboot的功能远不止如此,请听下回分解----springboot热部署配置。