DRBD:Distributed Replicated Block Device 分布式复制块设备,原理图如下

DRBD 有主双架构和双主架构的,当处于主从架构时,这个设备一定只有一个节点是可以读写的,另外的节点是不可读的,连挂载都不可能,只有一个节点是主的,其它节 点都是从的。当做为主主架构时,需要达到几个条件,1.在高可用集群中启用DRBD; 2. 启用分布式文件锁功能,即需要把磁盘格式化为集群文件系统(如GFS2,OCFS2等);3. 把DRBD做成资源。
数据的存储过程: 当某个进程存储数据时在内核中通过DRBD模块复制一分通过TCP/IP套接字发送到从节点上去,从节点的DRBD在套接字上接收数据并通过DRBD模块 存储到磁盘,并把结果返回给主节点 。但是内核传输的速度很快,而TCP报文的传输速度相对来说要慢得多,于是会把数据存入TCP协议栈的发送缓冲区,然后从缓冲区慢慢传递到从节点上。这个 数据传输过程有三个模型:
A : 异步模型,当内核把DRBD模块中复制的数据已经以报文方式发送到本地的TCP协议栈的缓冲区,至是从节点的数据是否已经传送到,保存是否完整,无法保证;
B : 半同步模型,报文已经发送到从节点的套接字上,已经接收,并发往内核,但从节点的存储过程没有回应过程。
C:同步模型,报文发往从节点,从节点已经接收,并发往内核,内核已经把数据报文存储到磁盘,并把结果返回给主节点,这个是默认的数据传输模型,可以保证数据的完整性。
安装环境:
centos6.5,安装corosync和pacemaker过程请参见上一篇博客,上一个环境安装的配置接口是crmsh,这里安装的是pcs,安装pcs比较简单,#yum install pcs –y 即可
安装完成后集群状态如下:

现在看到两个集群节点mysql1 mysql2在线,pacemaker是做为插件在使用的,没有stonith设备,只有两个节点,所以quorum也要忽略
#pcs property set stonith-enabled=false
# pcs property set no-quorum-policy=ignore
#pcs config show 查看配置文件

显示错误还没有集群配置文件,stonith已经禁用,quorum已经忽略
安装drbd:
根据官方文档,drbd在内核2.6.33版本以后就已经装载进了内核,不需要再额外安装drbd,只需要安装drbdadm管理软件就行,我这里用的是centos6.5,内核版本是2.6.32,所以还需要安装
![]()
drbd版本有8.1 8.2 8.3 8.4,我这里用的是已经做好的rpm包进行安装,下载目录:ftp://rpmfind.net/linux/atrpms/
把drbd的两个rpm包放在/root目录下,然后执行# yum --nogpgcheck localinstall *.rpm
--nogpgcheck 不执行gpg检测,因为在centos里面没有认证文件

在两个节点上安装完成。加载DRBD模块
|
1
2
3
4
|
[root@mysql1 ~]# modprobe drbd[root@mysql1 ~]# lsmod | grep drbddrbd 325978 0 libcrc32c 1246 1 drbd |
|
1
|
创建一个新的磁盘分区做为DRBD的共享磁盘,我这里是xen虚拟机添加的一个磁盘/dev/xvdb,创建的磁盘为/dev/xvdb1 |
|
1
2
3
4
5
6
7
8
9
10
11
12
13
14
15
16
17
18
19
20
21
22
23
24
25
26
27
28
29
30
31
32
33
34
35
36
37
38
39
40
|
[root@mysql1 drbd.d]# fdisk /dev/xvdbDevice contains neither a valid DOS partition table, nor Sun, SGI or OSF disklabelBuilding a new DOS disklabel with disk identifier 0x218cde3e.Changes will remain in memory only, until you decide to write them.After that, of course, the previous content won't be recoverable.Warning: invalid flag 0x0000 of partition table 4 will be corrected by w(rite)WARNING: DOS-compatible mode is deprecated. It's strongly recommended to switch off the mode (command 'c') and change display units to sectors (command 'u').Command (m for help): nCommand action e extended p primary partition (1-4)pPartition number (1-4): 1First cylinder (1-2610, default 1): Using default value 1Last cylinder, +cylinders or +size{K,M,G} (1-2610, default 2610): Using default value 2610Command (m for help): pDisk /dev/xvdb: 21.5 GB, 21474836480 bytes255 heads, 63 sectors/track, 2610 cylindersUnits = cylinders of 16065 * 512 = 8225280 bytesSector size (logical/physical): 512 bytes / 512 bytesI/O size (minimum/optimal): 512 bytes / 512 bytesDisk identifier: 0x218cde3e Device Boot Start End Blocks Id System/dev/xvdb1 1 2610 20964793+ 83 LinuxCommand (m for help): wThe partition table has been altered!Calling ioctl() to re-read partition table.Syncing disks. |
在mysql2节点上执行同样的操作。
配置drbd:
在/etc目录下有一个文件drbd.conf 主配置文件,里面主要调用了/etc/drbd.d/目录下的配置文件

配置/etc/drbd.d/global_common.conf
|
1
2
3
4
5
6
7
8
9
10
11
12
13
14
15
16
17
18
19
20
21
22
23
24
25
26
27
28
29
30
31
32
33
34
35
36
37
38
39
40
41
|
global { usage-count no; # minor-count dialog-refresh disable-ip-verification}common { protocol C; handlers { pri-on-incon-degr "/usr/lib/drbd/notify-pri-on-incon-degr.sh; /usr/lib/drbd/notify-emergency-reboot.sh; echo b > /proc/sysrq-trigger ; reboot -f"; pri-lost-after-sb "/usr/lib/drbd/notify-pri-lost-after-sb.sh; /usr/lib/drbd/notify-emergency-reboot.sh; echo b > /proc/sysrq-trigger ; reboot -f"; local-io-error "/usr/lib/drbd/notify-io-error.sh; /usr/lib/drbd/notify-emergency-shutdown.sh; echo o > /proc/sysrq-trigger ; halt -f"; #fence-peer "/usr/lib/drbd/crm-fence-peer.sh"; #split-brain "/usr/lib/drbd/notify-split-brain.sh root"; #out-of-sync "/usr/lib/drbd/notify-out-of-sync.sh root"; #before-resync-target "/usr/lib/drbd/snapshot-resync-target-lvm.sh -p 15 -- -c 16k"; #after-resync-target /usr/lib/drbd/unsnapshot-resync-target-lvm.sh; }#这个配置文件主要是防止脑裂的发生 startup { # wfc-timeout degr-wfc-timeout outdated-wfc-timeout wait-after-sb wfc-timeout 120; degr-wfc-timeout 120; } options { # cpu-mask on-no-data-accessible } disk { on-io-error detach; #fencing resource-only; } net { cram-hmac-alg "sha1"; shared-secret "drbd1"; } syncer { rate 1000M; }} |
在/etc/drbd.d/目录下再创建一个磁盘的资源
#vim /etc/drbd.d/stone.res
|
1
2
3
4
5
6
7
8
9
10
11
12
13
14
|
resource mysql{ on mysql1 { device /dev/drbd0; disk /dev/xvdb1; address 10.204.80.86:7789; meta-disk internal; } on mysql2 { device /dev/drbd0; disk /dev/xvdb1; address 10.204.80.85:7789; meta-disk internal; }} |
把这两个文件复制到mysql2节点上
然后在两个节点上初始化资源,分别执行
#drbdadm create-md mysql --这个资源是在stone.res文件中定义的资源

显示初始化成功
启动drbd服务
#service drbd start
查看drbd状态
#cat /proc/drbd

上面的信息两个节点都处于Secondary 状态,将mysql1节点设置为Primary
#drbdadm primary --force mysql

如上所示,数据同步过程已经开始,过一段时间后查看drbd状态

显示资源已经是主从状态
创建文件系统:
#mke2fs –t ext4 –L drbd /dev/drbd0 #格式化为ext4文件系统,并指定label名为drbd

创建/data目录,并挂载分区
#mkdir /data
#mount /dev/drbd0 /data

挂载成功
在/data目录中创建 a,b,c,d四个文件,然后再手动切换Primary/Secondary节点
在节点mysql1上执行
|
1
2
3
4
5
|
#cd /data && touch {a,b,c,d}#umount /data#drbdadm secondary mysql |

可以看到drbd的状态又重新变为secondary /secondary状态
在mysql2节点上把drbd节点设置为Primary 状态,创建/data 目录 ,并挂载
|
1
2
3
4
5
6
7
8
9
|
#drbdadm primary mysql#cat /proc/drbd#mkdir /data#mount /dev/drbd0 /data#ls /data |

可以看到在mysql1节点上创建的a,b,c,d四个文件在mysql2节点上依然存在,drbd共享存储已经Ok
安装mysql,创建集群资源,安装mysql过程略
配置资源资源
pcs创建资源可以用 #pcs ? 可以查看帮助信息
# pcs resource create mysqlip ipaddr ip=10.204.80.89 cidr_netmask=24 nic=eth0
添加DRBD资源,提供drbd的RA目前由OCF归类为linbit,其路径为/usr/lib/ocf/resource.d/linbit /drbd。drbd 需要同时运行在两个节点上,但只能有一个节点(primary/secondary模型)是Master,而另一个节点为Slave;因此,它是一种比较 特殊的集群资源,其资源类型为多状态(Multi-state)clone类型,即主机节点有Master和Slave之分,且要求服务刚启动时两个节点 都处于slave状态。
#pcs resource create primitive mysqldrbd ocf:linbit:drbd params drbd_resource=mysql op monitor role=Master interval=50s timeout=30s op monitor role=Slave interval=60s timeout=30s op start timeout=240 op stop timeout=100
或者#crm configure primitive mysqldrbd ocf:linbit:drbd params drbd_resource=mysql op monitor role=Master interval=10s timeout=20s op monitor role=Slave interval=20s timeout=20s op start timeout=240 op stop timeout=100
#pcs resource master ms_mysqldrbd mysqldrbd meta master-max="1" master-node-max="1" clone-max="2" clone-node-max="1" notify="true"
或者#crm configure ms ms_myqldrbd mysqldrbd meta master-max="1" master-node-max="1" clone-max="2" clone-node-max="1" notify="true"
把drbd定义为clone资源,查看资源状态#pcs resource show

但做为文件系统还需要挂载,把drbd挂载到/data目录
# pcs resource create drbdfs ocf:heartbeat:Filesystem params device="/dev/drbd0" directory="/data" fstype="ext4"
查看资源状态

文件系统挂载drbdfs必须和Master mysqldrbd在同一节点上,必须先启动mysqldrbd然后才能挂载drbdfs文件系统,所以必须定义资源约束
# pcs constraint colocation add drbdfs with master MS_mysqldrbd
# pcs constraint order promote MS_mysqldrbd then drbdfs ###drbd的资源添加完成
# pcs resource create MySQLD lsb:mysqld op monitor interval=20 timeout=20 on-fail=restart ###添加MySQLD 服务资源完成,定义MySQLD的资源约束,必须drbdfs文件系统先挂载然后才能启动MySQLD服务
# pcs constraint order drbdfs then MySQLD
![]()
把mysqlip ,drbdfs 和MySQLD服务定义到同一个资源组
# pcs resource group add myservice mysqlip drbdfs MySQLD
查看资源状态

定义资源组的约束
#pcs constraint order mysqlip then promote MS_mysqldrbd then drbdfs then MySQLD
查看集群的配置信息
#pcs config show
|
1
2
3
4
5
6
7
8
9
10
11
12
13
14
15
16
17
18
19
20
21
22
23
24
25
26
27
28
29
30
31
32
33
34
35
36
37
38
39
40
|
root@mysql1 /]# pcs config showCluster Name: Corosync Nodes: Pacemaker Nodes: mysql1 mysql2 Resources: Master: ms_mysqldrbd Meta Attrs: master-max=1 master-node-max=1 clone-max=2 clone-node-max=1 notify=true Resource: mysqldrbd (class=ocf provider=linbit type=drbd) Attributes: drbd_resource=mysql Operations: monitor interval=50s role=Master timeout=30s (mysqldrbd-monitor-interval-50s-role-Master) monitor interval=60s role=Slave timeout=30s (mysqldrbd-monitor-interval-60s-role-Slave) Group: myservice Resource: mysqlip (class=ocf provider=heartbeat type=IPaddr) Attributes: ip=10.204.80.89 Operations: monitor interval=60s (mysqlip-monitor-interval-60s) Resource: drbdfs (class=ocf provider=heartbeat type=Filesystem) Attributes: device=/dev/drbd0 directory=/data fstype=ext4 Operations: monitor interval=60s (drbdfs-monitor-interval-60s) Resource: MySQLD (class=lsb type=mysqld) Operations: monitor on-fail=restart interval=20 timeout=20 (MySQLD-monitor-interval-20)Stonith Devices: Fencing Levels: Location Constraints:Ordering Constraints: promote ms_mysqldrbd then start drbdfs (Mandatory) (id:order-ms_mysqldrbd-drbdfs-mandatory) start drbdfs then start MySQLD (Mandatory) (id:order-drbdfs-MySQLD-mandatory)Colocation Constraints: drbdfs with ms_mysqldrbd (INFINITY) (rsc-role:Started) (with-rsc-role:Master) (id:colocation-drbdfs-ms_mysqldrbd-INFINITY-1)Cluster Properties: cluster-infrastructure: classic openais (with plugin) dc-version: 1.1.10-14.el6_5.3-368c726 expected-quorum-votes: 2 no-quorum-policy: ignore stonith-enabled: false |
|
1
|
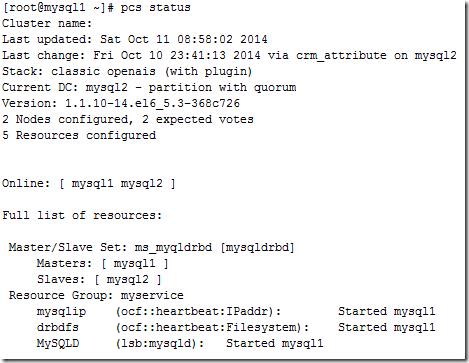
资源状态情况查看 |
|
1
|
<a target=""_blank"" href="http://img1.51cto.com/attachment/201410/11/287547_14129899470cu1.png"><img onunload="" onsubmit="" onselect="" onresize="" onreset="" onmouseup="" onmouseover="" onmouseout="" onmousemove="" onmousedown="" onkeyup="" onkeypress="" onkeydown="" onfocus="" onerror="" ondblclick="" onclick="" onchange="" onblur="" onabort="" onload="if(this.width>650) this.width=650;" style="background-image: none; border-bottom: 0px; border-left: 0px; margin: 0px; padding-left: 0px; padding-right: 0px; border-top: 0px; border-right: 0px; padding-top: 0px" title="image_thumb" alt="image_thumb" src="http://img1.51cto.com/attachment/201410/11/287547_1412989948zXME.png" "469"="" height="363" border="0"></a> |
|
1
|
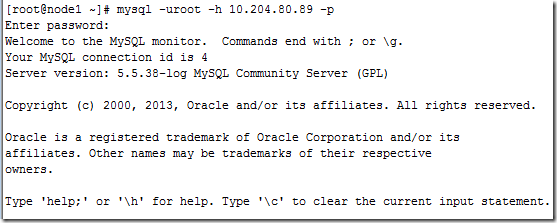
用其他机器连到10.204.80.89的mysql |
|
1
|
<a target=""_blank"" href="http://img1.51cto.com/attachment/201410/11/287547_1412989948oOXf.png"><img onunload="" onsubmit="" onselect="" onresize="" onreset="" onmouseup="" onmouseover="" onmouseout="" onmousemove="" onmousedown="" onkeyup="" onkeypress="" onkeydown="" onfocus="" onerror="" ondblclick="" onclick="" onchange="" onblur="" onabort="" onload="if(this.width>650) this.width=650;" style="background-image: none; border-bottom: 0px; border-left: 0px; margin: 0px; padding-left: 0px; padding-right: 0px; border-top: 0px; border-right: 0px; padding-top: 0px" title="image_thumb1" alt="image_thumb1" src="http://img1.51cto.com/attachment/201410/11/287547_1412989948YElu.png" "557"="" height="223" border="0"></a> |
|
1
|
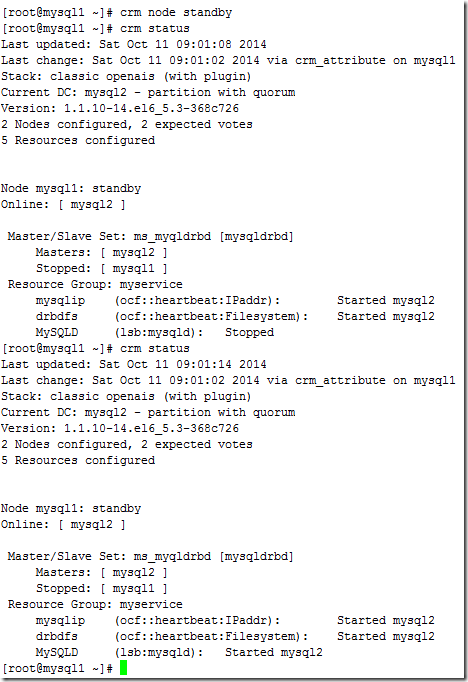
已经可以正常连接,把mysql1设置为standby |
|
1
|
<a target=""_blank"" href="http://img1.51cto.com/attachment/201410/11/287547_1412989948p4V6.png"><img onunload="" onsubmit="" onselect="" onresize="" onreset="" onmouseup="" onmouseover="" onmouseout="" onmousemove="" onmousedown="" onkeyup="" onkeypress="" onkeydown="" onfocus="" onerror="" ondblclick="" onclick="" onchange="" onblur="" onabort="" onload="if(this.width>650) this.width=650;" style="background-image: none; border-bottom: 0px; border-left: 0px; padding-left: 0px; padding-right: 0px; border-top: 0px; border-right: 0px; padding-top: 0px" title="image_thumb2" alt="image_thumb2" src="http://img1.51cto.com/attachment/201410/11/287547_1412989949GfXR.png" "468"="" height="682" border="0"></a> |
|
1
|
发现mysql的集群已经正常转移,高可用集群正常 |
转载:http://piao719.blog.51cto.com/287547/1562390