基于HEP(histograms of equivalent patterns【1】)框架下的特征具有良好的纹理分类效果,LBP(local binary patterns【2】)属于HEP框架下最常用的特征,具有对亮度、旋转等良好的不变特性。在基于分块的视频烟雾检测中,常使用其作为纹理分类的特征。然而,分块的图像具有局部性。这篇文章主要提出使用图像金字塔的方法让提取的烟雾块特征具有一定的全局属性。它将待检测烟雾块构成3级的金字塔,再对金字塔每一级提取不同模式的LBP特征,构成一个直方图序列作为特征向量,最后采用神经网络分类。
1.LBP 与 LBPV
本文用到的LBP共三种模式:统一模式,旋转不变模式,统一的旋转不变模式。每一级金字塔采用一种模式。LBP详见博客【3】
LBPV与LBP不同的是,LBP统计直方图的时候是每一个LBP(i,j)使第k个分量加1,而LBPV是加一个VAR(方差吧),VAR计算公式:
上面gp为领域内像素值,然后再归一化。
2.金字塔
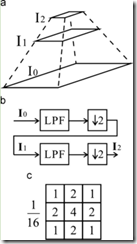
共三级金字塔,I0,I1,I2,I0为输入图像,I0通过高斯低通滤波(Gaussian low pass filter, LPF),然后下采样得到I1(采样大小2),同样由I1得到I2,如图:
最后从下到上对每一级分别提取统一模式LBP,旋转不变LBP,统一旋转不变LBP,按照如下的顺序组合成向量:
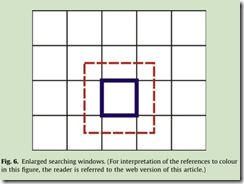
对于24x24的图像块,I2的大小仅为6x6,这样会获得稀疏的特征向量,不利于分类。因此,I1和I2通过相邻像素增大搜索窗口。如图:
3.实现
本人采用文章中的数据集作为训练与测试,剪切成96x96的灰度图,这样大小的图像下采样两次刚好24x24。提取每一张图像特征代码:
feature_t get_pyramid_feature(cv::Mat & img)
{
    assert((img.dims == 2) && (img.rows == 96) && (img.cols == 96));
    feature_t result, lbp0, lbp1, lbp2, lbpv0, lbpv1, lbpv2;
    result.resize(210);
    cv::Mat I0, I1, I2, L0, S0, L1;

    I0 = img(cv::Rect(36, 36, 24, 24)).clone();
    cv::GaussianBlur(img, L0, cv::Size(3,3), 0);
    cv::resize(L0, S0, cv::Size(48, 48));
    I1 = S0(cv::Rect(12, 12, 24, 24)).clone();
    cv::GaussianBlur(S0, L1, cv::Size(3,3), 0);
    cv::resize(L1, I2, cv::Size(24, 24));

    lbp0 = get_u_lbp_gray(I0);
    lbp1 = get_ri_lbp_gray(I1);
    lbp2 = get_riu_lbp_gray(I2);
    lbpv0 = get_u_lbpv_gray(I0);
    lbpv1 = get_ri_lbpv_gray(I1);
    lbpv2 = get_riu_lbpv_gray(I2);

    std::copy(lbp0.begin(), lbp0.end(), result.begin());
    std::copy(lbpv0.begin(), lbpv0.end(), result.begin()+59);
    std::copy(lbp1.begin(), lbp1.end(), result.begin()+118);
    std::copy(lbpv1.begin(), lbpv1.end(), result.begin()+154);
    std::copy(lbp2.begin(), lbp2.end(), result.begin()+190);
    std::copy(lbpv2.begin(), lbpv2.end(), result.begin()+200);
    return result;
}
提取特征过后,采用神经网络训练(采样tiny_cnn这个轻量级的神经网络库):
void mlp_train(std::vector<feature_t> & train_x, std::vector<int> & train_y, std::vector<feature_t> & test_x, std::vector<int> & test_y, const char * weights_file, int iter_num = 20)
{
    const int num_input = train_x[0].size();
    const int num_hidden_units = 30;
    int num_units[] = { num_input, num_hidden_units, 2 };
    auto nn = make_mlp<mse, gradient_descent_levenberg_marquardt, tan_h>(num_units, num_units + 3);

        //train mlp
        nn.optimizer().alpha = 0.005;
        boost::progress_display disp(train_x.size());
        boost::timer t;
        // create callback
        auto on_enumerate_epoch = [&](){
            std::cout << t.elapsed() << "s elapsed." << std::endl;
            tiny_cnn::result res = nn.test(test_x, test_y);
            std::cout << nn.optimizer().alpha << "," << res.num_success << "/" << res.num_total << std::endl;
            nn.optimizer().alpha *= 0.85; // decay learning rate
            nn.optimizer().alpha = std::max(0.00001, nn.optimizer().alpha);
            disp.restart(train_x.size());
            t.restart();
        };
        auto on_enumerate_data = [&](){
            ++disp;
        };

        nn.train(train_x, train_y, 1, iter_num, on_enumerate_data, on_enumerate_epoch);
        nn.test(test_x, test_y).print_detail(std::cout);
        nn.save_weights(weights_file);
}
最后得到测试的结果96%以上。
然后用于视频的处理中,只用处理单幅图像的情况。对于一副图像,首先得分块,将每一个分块的区域保存到向量中。分块的时候就考虑到金字塔每一级,因此3级的每一个向量对应的位置是对应的一个块。对于边缘块的处理忽略图像外的像素。分块代码如下:
std::vector<std::vector<cv::Rect>> make_image_blocks(const cv::Mat &in, const int iWD)
{
    std::vector<std::vector<cv::Rect>> result;
    std::vector<cv::Rect> level0, level1, level2;
    int rows = in.rows;
    int cols = in.cols;
    int rows_level1 = rows / 2;
    int cols_level1 = cols / 2;
    int rows_level2 = rows / 4;
    int cols_level2 = cols / 4;
    int left, top, right, bottom;
    for(int i = 0; i <= rows - iWD; i += iWD)
    {
        for(int j = 0; j <= cols - iWD; j += iWD)
        {
            level0.push_back(cv::Rect(j, i, iWD, iWD));
            //level1
            left = std::max(j/2-6,0);
            top = std::max(i/2-6,0);
            right = std::min(j/2+18, cols_level1);
            bottom = std::min(i/2+18, rows_level1);
            level1.push_back(cv::Rect(left, top, right-left, bottom-top));
            //level2
            left = std::max(j/4-9,0);
            top = std::max(i/4-9,0);
            right = std::min(j/4+15, cols_level2);
            bottom = std::min(i/4+15, rows_level2);
            level2.push_back(cv::Rect(left, top, right-left, bottom-top));
        }
    }
    result.push_back(level0);
    result.push_back(level1);
    result.push_back(level2);
    return result;
}
然后就是对每一张图像的处理了,首先创建3级金字塔,然后按照上面得到的分块索引轻松得到每一块的特征,然后predict就完事了。
template<typename NN>
std::vector<int> single_image_smoke_detect(const cv::Mat & img, const std::vector<std::vector<cv::Rect>> & locate_list, const std::vector<int> smoke_block, NN & nn)
{
    std::vector<int> result;
    cv::Mat I1, I2, L0, L1;
    cv::GaussianBlur(img, L0, cv::Size(3,3), 0);
    cv::resize(L0, I1, cv::Size(img.cols/2, img.rows/2));
    cv::GaussianBlur(I1, L1, cv::Size(3,3), 0);
    cv::resize(L1, I2, cv::Size(I1.cols/2, I1.rows/2));

    for(auto i : smoke_block)
    {
        cv::Mat block = img(locate_list[0][i]);
        auto lbp0 = get_u_lbp_gray(block);
        auto lbpv0 = get_u_lbpv_gray(block);
        block = I1(locate_list[1][i]);
        auto lbp1 = get_ri_lbp_gray(block);
        auto lbpv1 = get_ri_lbpv_gray(block);
        block = I2(locate_list[2][i]);
        auto lbp2 = get_riu_lbp_gray(block);
        auto lbpv2 = get_riu_lbpv_gray(block);

        feature_t feat;
        feat.resize(210,0);
        std::copy(lbp0.begin(), lbp0.end(), feat.begin());
        std::copy(lbpv0.begin(), lbpv0.end(), feat.begin()+59);
        std::copy(lbp1.begin(), lbp1.end(), feat.begin()+118);
        std::copy(lbpv1.begin(), lbpv1.end(), feat.begin()+154);
        std::copy(lbp2.begin(), lbp2.end(), feat.begin()+190);
        std::copy(lbpv2.begin(), lbpv2.end(), feat.begin()+200);

        vec_t y;
        nn.predict(feat, &y);
        const int predicted = max_index(y);
        if(predicted == 1)
            result.push_back(i);
    }
    return result;
}
在这之前加入运动检测:
smoke_blocks = single_image_smoke_detect(gray_img, locate_list, smoke_blocks, nn);
然后将检测得到的烟雾块显示出来:
auto merged_blocks = merge_blocks(smoke_blocks, gray_img.size(), 24);
            for(auto rect : merged_blocks)
            {
                cv::rectangle(img, rect, cv::Scalar(0,0,255));
            }

            cv::imshow("smoke", img);
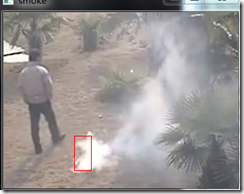
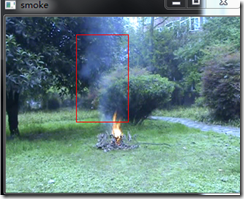
效果图:
1.实验结果分析
试了一下仅使用LBP或LBPV的情况下,单独使用LBPV的分类效果最差,多次测试平均94%多一点,而LBP和LBP+LBPV情况差不多,平均都在96%以上,因此,不加LBPV更好一点。
2.总结
加入金字塔对每一级提取特征的方法的确比单独采用分块提取特征的方法稍好一点,但是对于烟雾的检测,单帧的检测并不能满足于实际。这个可以作为一个novel方法用在一个框架中。
6.引用
【1】 Texture description through histograms of equivalent patterns
【2】 Multiresolution gray-scale and rotation invariant texture classification with local binary patterns
【3】 http://blog.csdn.net/zouxy09/article/details/7929531


