现在,C#创建不规则窗体不是一件难事,下面总结一下:
一、自定义窗体
一般为规则的图形,如圆、椭圆等。
做法:重写Form1_Paint事件(Form1是窗体的名字),最简单的一种情况如下:
System.Drawing.Drawing2D.GraphicsPath shape = new System.Drawing.Drawing2D.GraphicsPath(); shape.AddEllipse(0,0,this.Height, this.Width); this.Region = new Region(shape); 即重绘窗体的规则。
二、利用背景图片实现
1. 设置窗体的背景图片,其中背景图片是24位(不包括24)以下的位图(BMP图片),并且要设置TansparencyKey的值,一般为你背景图片的背景色,即创建不规则图片时的底色,一般设为你图片中没有的颜色。
这种做法的不好的地方就是背景图片一定要16位或者更低的,而且还要确保客户端的显示。如果监视器的颜色深度设置大于 24 位,则不管 TransparencyKey 属性是如何设置的,窗体的非透明部分都会产生显示问题。若要避免出现这种问题,请确保“显示”控制面板中的监视器颜色深度的设置小于 24 位。当开发具有这种透明功能的应用程序时,请牢记应使您的用户意识到此问题。
实现步骤如下:
1. 新建windows application
2. 选择窗体,找到BackgroundImage属性,点击打开新的窗口,选择下面的导入资源文件,选择你的不规则的BMP图片
3. 找到窗体的TansparencyKey,将它设置为你背景图片的背景色(如黄色)
4. 找到窗体的FormBorderStyle,将其设置为none,即不显示标题栏
5. 运行
<!--[endif]-->
2. 跟背景图片一样的图形,不过是动态加载,遍历位图以实现不规则窗体。它的原理是这样的,在Form的load事件中写方法使得窗体的描绘区域发生改变。
实现步骤如下:
1. 建立winform应用程序
2. 找到窗体的Load事件,双击进行编辑
3. 编写方法,主要的代码如下:
|
1
2
3
4
5
6
7
8
9
10
11
12
13
14
15
16
17
18
19
20
21
22
23
24
25
26
27
28
29
30
31
32
33
34
35
36
37
38
39
40
41
42
43
44
45
46
47
48
49
50
51
52
53
54
55
56
57
58
59
60
61
62
63
64
65
66
67
68
69
70
71
72
73
74
75
76
77
78
79
80
81
82
83
84
85
86
87
88
89
90
91
92
93
94
95
96
97
98
99
100
101
102
103
104
105
106
107
108
109
110
111
112
113
114
115
116
117
118
119
120
121
122
123
124
125
126
127
128
129
130
131
132
|
class BitmapRegion { public BitmapRegion() { } /// <summary> /// Create and apply the region on the supplied control /// 创建支持位图区域的控件(目前有button和form) /// </summary> /// <param name="control">The Control object to apply the region to控件</param> /// <param name="bitmap">The Bitmap object to create the region from位图</param> public static void CreateControlRegion(Control control, Bitmap bitmap) { // Return if control and bitmap are null //判断是否存在控件和位图 if (control == null || bitmap == null) return; // Set our control''s size to be the same as the bitmap //设置控件大小为位图大小 control.Width = bitmap.Width; control.Height = bitmap.Height; // Check if we are dealing with Form here //当控件是form时 if (control is System.Windows.Forms.Form) { // Cast to a Form object //强制转换为FORM Form form = (Form)control; // Set our form''s size to be a little larger that the bitmap just // in case the form''s border style is not set to none in the first place //当FORM的边界FormBorderStyle不为NONE时,应将FORM的大小设置成比位图大小稍大一点 form.Width = control.Width; form.Height = control.Height; // No border //没有边界 form.FormBorderStyle = FormBorderStyle.None; // Set bitmap as the background image //将位图设置成窗体背景图片 form.BackgroundImage = bitmap; // Calculate the graphics path based on the bitmap supplied //计算位图中不透明部分的边界 GraphicsPath graphicsPath = CalculateControlGraphicsPath(bitmap); // Apply new region //应用新的区域 form.Region = new Region(graphicsPath); } // Check if we are dealing with Button here //当控件是button时 else if (control is System.Windows.Forms.Button) { // Cast to a button object //强制转换为 button Button button = (Button)control; // Do not show button text //不显示button text button.Text = ""; // Change cursor to hand when over button //改变 cursor的style button.Cursor = Cursors.Hand; // Set background image of button //设置button的背景图片 button.BackgroundImage = bitmap; // Calculate the graphics path based on the bitmap supplied //计算位图中不透明部分的边界 GraphicsPath graphicsPath = CalculateControlGraphicsPath(bitmap); // Apply new region //应用新的区域 button.Region = new Region(graphicsPath); } } /// <summary> /// Calculate the graphics path that representing the figure in the bitmap /// excluding the transparent color which is the top left pixel. /// //计算位图中不透明部分的边界 /// </summary> /// <param name="bitmap">The Bitmap object to calculate our graphics path from</param> /// <returns>Calculated graphics path</returns> private static GraphicsPath CalculateControlGraphicsPath(Bitmap bitmap) { // Create GraphicsPath for our bitmap calculation //创建 GraphicsPath GraphicsPath graphicsPath = new GraphicsPath(); // Use the top left pixel as our transparent color //使用左上角的一点的颜色作为我们透明色 Color colorTransparent = bitmap.GetPixel(0, 0); // This is to store the column value where an opaque pixel is first found. // This value will determine where we start scanning for trailing opaque pixels. //第一个找到点的X int colOpaquePixel = 0; // Go through all rows (Y axis) // 偏历所有行(Y方向) for (int row = 0; row < bitmap.Height; row++) { // Reset value //重设 colOpaquePixel = 0; // Go through all columns (X axis) //偏历所有列(X方向) for (int col = 0; col < bitmap.Width; col++) { // If this is an opaque pixel, mark it and search for anymore trailing behind //如果是不需要透明处理的点则标记,然后继续偏历 if (bitmap.GetPixel(col, row) != colorTransparent) { // Opaque pixel found, mark current position //记录当前 colOpaquePixel = col; // Create another variable to set the current pixel position //建立新变量来记录当前点 int colNext = col; // Starting from current found opaque pixel, search for anymore opaque pixels // trailing behind, until a transparent pixel is found or minimum width is reached ///从找到的不透明点开始,继续寻找不透明点,一直到找到或则达到图片宽度 for (colNext = colOpaquePixel; colNext < bitmap.Width; colNext++) if (bitmap.GetPixel(colNext, row) == colorTransparent) break; // Form a rectangle for line of opaque pixels found and add it to our graphics path //将不透明点加到graphics path graphicsPath.AddRectangle(new Rectangle(colOpaquePixel, row, colNext - colOpaquePixel, 1)); // No need to scan the line of opaque pixels just found col = colNext; } } } // Return calculated graphics path return graphicsPath; } } |
4.运行
<!--[endif]-->
三、调用类库实现
主要就是根据一些坐标,然后根据这些坐标绘制窗体
代码如下:
|
1
2
3
4
5
6
7
8
9
10
11
12
13
14
15
16
17
18
19
20
21
22
23
24
25
26
27
28
29
30
31
32
33
34
35
36
37
38
39
40
41
42
43
|
public Form3() { InitializeComponent(); //创建不规则窗体 POINTAPI[] poin; poin = new POINTAPI[5]; poin[0].x = 90; poin[0].y = 90; poin[1].x = this.Width; poin[1].y = 0; poin[2].x = Width; poin[2].y = this.Height / 2; poin[3].x = Width / 2; poin[3].y = Height / 2; poin[4].x = 0; poin[4].y = Width; Boolean flag = true; IntPtr hRgn = CreatePolygonRgn(ref poin[0], 8, 1); SetWindowRgn(this.Handle, hRgn, ref flag); this.BackColor = Color.BurlyWood; } [StructLayout(LayoutKind.Sequential)] private struct POINTAPI { internal int x; internal int y; } [DllImport("gdi32.dll")] private static extern IntPtr CreatePolygonRgn(ref POINTAPI lpPoint,int nCount,int nPolyFillMode); [DllImport("user32.dll")] private static extern IntPtr SetWindowRgn(IntPtr hWnd,IntPtr hRgn, ref Boolean bRedraw); //设置窗体显示状态 [DllImport("user32.dll")] private static extern int SetWindowPos(IntPtr hwnd,int hWndInsertAfter,int x,int y,int cx,int cy,int wFlags); private void Start_Btn_Click(object sender, EventArgs e) {//始终显示在前面 SetWindowPos(this.Handle, -1, 0, 0, 0, 0, 1); } private void button1_Click(object sender, EventArgs e) { //最小化始终显示在前面 SetWindowPos(this.Handle, -1, 0, 0, 0, 0, 0); } |
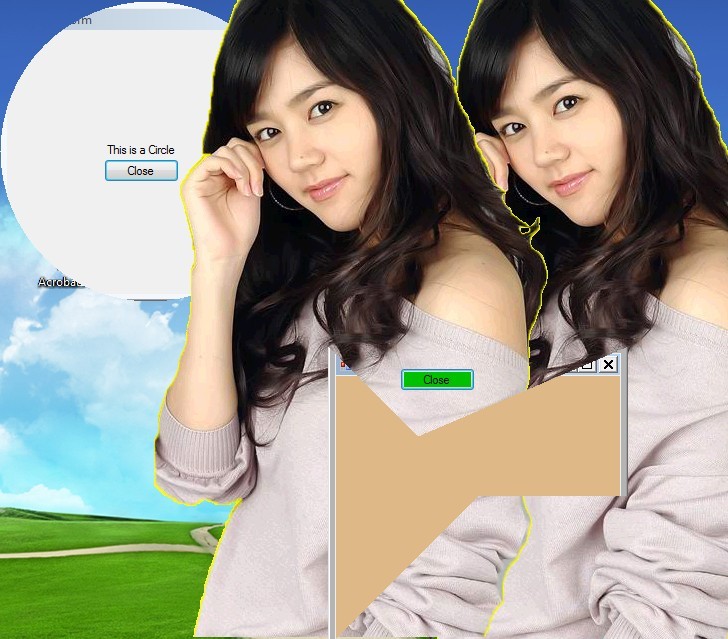
当然,我们也可以自定义窗体的动作,如按着某个轨迹一定,下面的代码中的BackgroundForm程序中就小试了一下,效果还不错,下面是这些程序的效果图:
代码是.Net 2.0的,也可以转换为其他版本的,只要运行主程序即可。
以上的四种方法有利也有弊,希望大家提意见或者更好的解决方案。