NetCore在Linux上部署
工具:WMWare虚拟机,Wmware12,CentOS7ISO镜像,VS2017
1、安装虚拟机,过程略,网上一搜一大把
2、用VS2017建一个NetCore的Web项目,用命令行生成也可以,然后发布
3、搭建Linux下的NetCore运行环境
Linux下访问这个网站:https://www.microsoft.com/net/download/windows
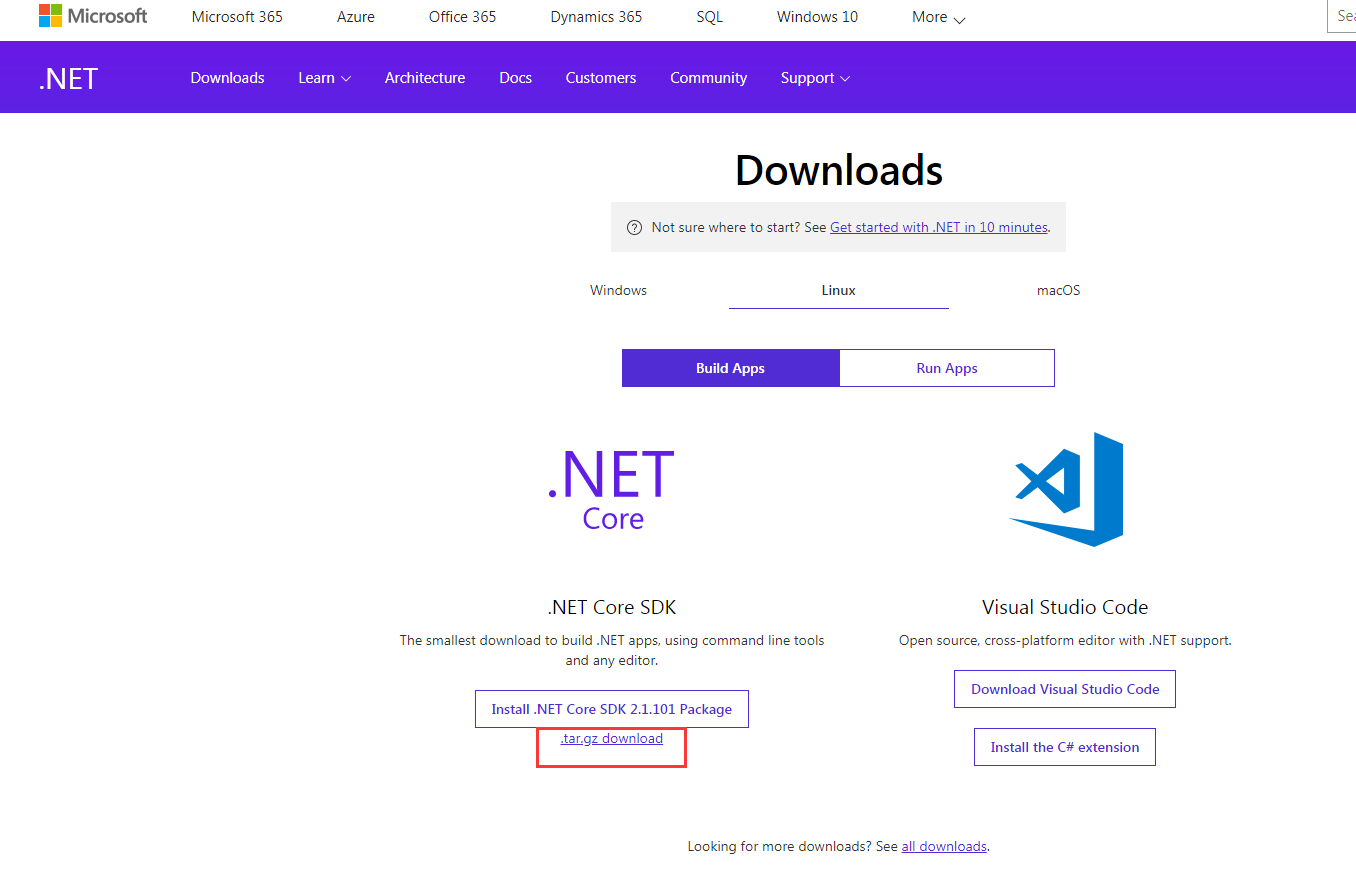
点击红色的部分,然后跳转到另一个页面,同时下载文件

按照上面的步骤配置好NetCore SDK。(个人认为使用Binaries方式简单些,如果你想换另一种方式,我没有异议)
4、windows下的发布包直接复制到主文件夹里面(home目录),然后进入复制过来的发布目录下,直接dotnet 项目名称.dll就可以访问5000端口了。
5、如果出现错误,请自己排查,大部分都是NetCore版本问题,也就是你VS生成的项目的NetCore版本和Linux上NetCore的版本不匹配
Nginx集群部署
1、这就需要在Home/Index文件上动手脚了,下面是我的代码
 1 using Cluster.Models;
 2 using Microsoft.AspNetCore.Mvc;
 3 using System.Diagnostics;
 4
 5 namespace Cluster.Controllers
 6 {
 7     public class HomeController : Controller
 8     {
 9         public IActionResult Index()
10         {
11             ViewBag.RemoteIpAddress = Request.HttpContext.Connection.RemoteIpAddress;
12             ViewBag.Header = Request.Headers["X-Forwarded-For"];
13             ViewBag.LocalIpAddress = HttpContext.GetClientUserIp();
14             ViewBag.RequestHeaders = Request.Headers;
15             return View();
16         }
17
18         public IActionResult About()
19         {
20             ViewData["Message"] = "Your application description page.";
21
22             return View();
23         }
24
25         public IActionResult Contact()
26         {
27             ViewData["Message"] = "Your contact page.";
28
29             return View();
30         }
31
32         public IActionResult Error()
33         {
34             return View(new ErrorViewModel { RequestId = Activity.Current?.Id ?? HttpContext.TraceIdentifier });
35         }
36     }
37 }
 1 using Microsoft.AspNetCore.Http;
 2 using System.Linq;
 3
 4 namespace Cluster.Models
 5 {
 6     public static class IPExtension
 7     {
 8         public static string GetClientUserIp(this HttpContext context)
 9         {
10             var ip = context.Request.Headers["X-Forwarded-For"].FirstOrDefault();
11             if (string.IsNullOrEmpty(ip))
12             {
13                 ip = context.Connection.LocalIpAddress.ToString();
14             }
15
16             return ip;
17         }
18     }
19 }
 1 using System;
 2 using System.Collections.Generic;
 3 using System.Linq;
 4 using System.Threading.Tasks;
 5 using Microsoft.AspNetCore.Builder;
 6 using Microsoft.AspNetCore.Hosting;
 7 using Microsoft.Extensions.Configuration;
 8 using Microsoft.Extensions.DependencyInjection;
 9
10 namespace Cluster
11 {
12     public class Startup
13     {
14         public Startup(IConfiguration configuration)
15         {
16             Configuration = configuration;
17         }
18
19         public IConfiguration Configuration { get; }
20
21         // This method gets called by the runtime. Use this method to add services to the container.
22         public void ConfigureServices(IServiceCollection services)
23         {
24             services.AddMvc();
25         }
26
27         // This method gets called by the runtime. Use this method to configure the HTTP request pipeline.
28         public void Configure(IApplicationBuilder app, IHostingEnvironment env)
29         {
30             if (env.IsDevelopment())
31             {
32                 app.UseBrowserLink();
33                 app.UseDeveloperExceptionPage();
34             }
35             else
36             {
37                 app.UseExceptionHandler("/Home/Error");
38             }
39             //添加转发设置
40             app.UseForwardedHeaders(new ForwardedHeadersOptions {
41                 ForwardedHeaders = Microsoft.AspNetCore.HttpOverrides.ForwardedHeaders.XForwardedFor | Microsoft.AspNetCore.HttpOverrides.ForwardedHeaders.XForwardedProto
42             });
43             app.UseStaticFiles();
44
45             app.UseMvc(routes =>
46             {
47                 routes.MapRoute(
48                     name: "default",
49                     template: "{controller=Home}/{action=Index}/{id?}");
50             });
51         }
52     }
53 }
 1 @{
 2     ViewData["Title"] = "Home Page";
 3 }
 4
 5 客户端:<br />
 6 Request.HttpContext获取访问ip: @ViewBag.RemoteIpAddress
 7 <br />
 8 Request.Headers获取访问ip:@ViewBag.Header
 9 <br />
10 服务端:<br />
11 Request.HttpContext获取响应服务所在服务器的ip:@ViewBag.LocalIpAddress
12 <table class="table">
13     <thead>
14         <tr>
15             <th>key</th>
16             <th>value</th>
17         </tr>
18     </thead>
19     <tbody>
20         @foreach (var item in ViewBag.RequestHeaders)
21         {
22             <tr>
23                 <td>@item.Key</td>
24                 <td>@item.Value</td>
25             </tr>
26         }
27     </tbody>
28 </table>
我的是:Windows下把发布包挂到了IIS上,然后有个访问地址,Linux下直接dotnet命令启动,还是本地访问,所以上面的代码,对我来说没啥用
2、Linux安装Nginx,Nginx作为反向代理服务器会把接受的请求转发给对应的Server,不过是随机的,Nginx安装过程略
3、修改Nginx配置文件
 1 #集群站点配置
 2 upstream xxx.services{
 3     server IP地址1:端口1 fail_timeout=60s;
 4     server IP地址2:端口2 fail_timeout=60s;
 5 }
 6
 7 server {
 8     #代理监听端口
 9     listen 80 default_server;
10     listen [::]:80 default_server;
11
12     root /var/www/html;
13
14     server_name _;   #_默认ip+端口访问,_可以替换成访问域名如:shenniu.core.com
15     #缓存文件路由
16     location ~ .*(.(js|css|jpg|svg)).* {
17
18         proxy_pass http://shenniu.services;
19         proxy_cache_valid 200;
20         proxy_cache my_cache;
21         expires 3d;
22     }
23     #集群站点路由
24     location / {
25
26         proxy_pass http://xxx.services;
27         #对应upstream后面的名称
28         proxy_http_version 1.1;
29         proxy_set_header Upgrade $http_upgrade;
30         proxy_set_header Connection keep-alive;
31         proxy_set_header Host $host;
32         proxy_set_header X-Real-IP $remote_addr;
33         proxy_cache_bypass $http_upgrade;
34
35         proxy_set_header X-Forwarded-For
36         $proxy_add_x_forwarded_for;
37     }
38 }
注意用Root用户修改,有的Nginx.Conf文件是只读的,修改完之后 Nginx -r reload一下
然后访问Nginx吧,不出意外的话你就可以看到效果了
备注:部署集群是为了提高性能的,Nginx作为一个反向代理服务器在集群部署方面还是很不错的