学习Python(一)
https://blog.csdn.net/u010608296/article/details/104561555
7 xpath
首先安装Google的Chrome浏览器
7.1 在chrome浏览器中安装xpath插件
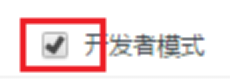
在Chrome浏览器中,访问 chrome://extensions/ ,打开开发者模式
把xpath_helper_2_0_2.crx拖动到Chrome中即可

点击“添加扩展程序”即可添加Chrome插件。
对于新版本的Chrome(67以上的)会报告错误
把crx后缀名改为rar,并解压到当前目录。
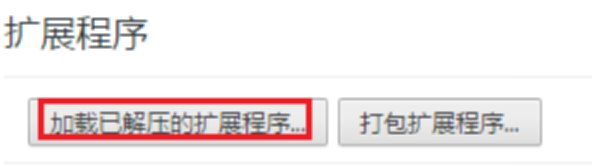
然后,点击“加载已解压的扩展程序”把解压后的rar文件目录加载。
安装后的效果
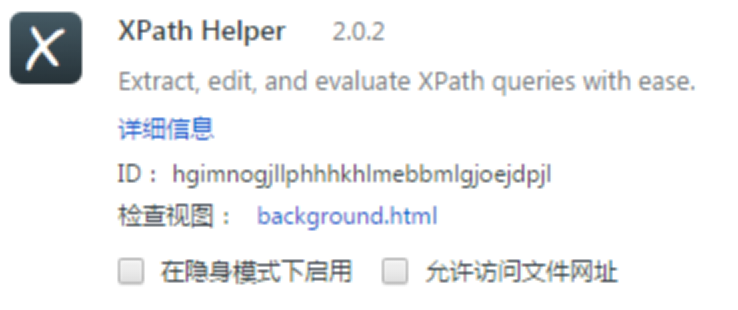
并且右上角出现了‘x’。访问任意页面,比如www.baidu.com,点击’x’,即可打开xpath功能。

7.2 xpath语法
以贴吧为例:https://tieba.baidu.com/f?kw=%E6%9F%AF%E5%8D%97&pn=50
1 查找标签
1.1 父目录查找。(以//开头)
|
//div |
|
//a |
|
//span |
1.2 当前路径下查找(以./开头)
|
./div |
|
./a |
|
./span |
1.3 子路径查找(在父目录下查找子目录)
|
//div/span |
|
//div/a |
|
//li/div/div/div/div/a |
|
//li//a |
|
//li/div//a |
2 查找属性。
2.1 属性全匹配
格式如下:
|
标签名[@属性名=属性值] |
比如:
|
//a[@class="j_th_tit"] |
|
//div[@class="threadlist_title pull_left j_th_tit"] |
|
//span[@class="frs-author-name-wrap"] |
2.2 属性部分匹配
格式如下:
|
标签名[contains(@属性名, 属性值)] |
比如:
|
//a[contains(@class, "frs-author-name")] |
|
//div[contains(@class, "threadlist_title")] |
3 获取属性
格式如下:
|
标签名/@属性名 |
获取到属性对于的值。比如:
|
//a/@href |
|
//img/@src |
|
//div/img[@class="j_retract"]/@src |
4 获取内容
格式如下:
|
标签名/text() |
<a href=”xxx”>yyy</a>
获取到内容对应的值,比如:
|
//a/text() |
|
//a[@class="j_th_tit"]/text() |
8 案例:贴吧图片下载
目标:访问贴吧。找出贴吧中每个帖子,根据链接进入帖子。找出帖子中的图片的链接地址。下载图片。
8.1 获取页面
|
from urllib import request, parse import ssl import random # 常用User-Agent列表 ua_list = [ 'Mozilla/5.0 (Windows; U; Windows NT 6.1; en-us) AppleWebKit/534.50 (KHTML, like Gecko) Version/5.1 Safari/534.50', 'Mozilla/5.0 (compatible; MSIE 9.0; Windows NT 6.1; Trident/5.0', 'Mozilla/5.0 (Macintosh; Intel Mac OS X 10.6; rv:2.0.1) Gecko/20100101 Firefox/4.0.1', 'Mozilla/5.0 (Macintosh; Intel Mac OS X 10_7_0) AppleWebKit/535.11 (KHTML, like Gecko) Chrome/17.0.963.56 Safari/535.11', 'Mozilla/4.0 (compatible; MSIE 7.0; Windows NT 5.1; 360SE)', 'Mozilla/5.0 (Linux; U; Android 2.3.7; en-us; Nexus One Build/FRF91) AppleWebKit/533.1 (KHTML, like Gecko) Version/4.0 Mobile Safari/533.1' ] # 加载一个页面 def loadPage(url): # 在ua_list列表中任意选择一个User-Agent userAgent = random.choice(ua_list) # 请求头 headers = { 'User-Agent' : userAgent } # 发送请求 req = request.Request(url) # 创建一个未经过验证的上下文(避开系统的验证的步骤) context = ssl._create_unverified_context() # 打开响应的对象 response = request.urlopen(req, context = context) # 获取网页的内容 html = response.read() # 对unicode编码进行解码 content = html.decode('utf-8') print(content) if __name__ == '__main__': url = 'https://tieba.baidu.com/f?kw=%E6%9F%AF%E5%8D%97&pn=50' loadPage(url) |
8.2 找出帖子链接地址
在python中使用xpath规则,需要安装LXML库
|
pip install lxml |
|
pip install lxml –i http://pypi.douban.com/simple --trusted-host pypi.douban.com |
在代码中使用lxml
|
from urllib import request, parse import ssl import random from lxml import etree |
|
# 加载一个页面 def loadPage(url): # 在ua_list列表中任意选择一个User-Agent userAgent = random.choice(ua_list) # 请求头 headers = { 'User-Agent' : userAgent } # 发送请求 req = request.Request(url) # 创建一个未经过验证的上下文(避开系统的验证的步骤) context = ssl._create_unverified_context() # 打开响应的对象 response = request.urlopen(req, context = context) # 获取网页的内容 html = response.read() # 对unicode编码进行解码 content = html.decode('utf-8') #print(content) # 使用etree来对html的内容建立文档树 content = etree.HTML(content) link_list = content.xpath('//a[contains(@class,"j_th_tit")]/@href') for link in link_list: fulllink = 'https://tieba.baidu.com' + link print(fulllink)
|
8.3 找出帖子中图片的链接
|
# 加载一个页面 def loadPage(url): ………… # 使用etree来对html的内容建立文档树 content = etree.HTML(content) link_list = content.xpath('//a[contains(@class,"j_th_tit")]/@href') for link in link_list: fulllink = 'https://tieba.baidu.com' + link #print(fulllink) loadImage(fulllink) |
|
# 加载帖子中的图片的链接 def loadImage(url): # 在ua_list列表中任意选择一个User-Agent userAgent = random.choice(ua_list) # 请求头 headers = { 'User-Agent' : userAgent } # 发送请求 req = request.Request(url, headers = headers) # 创建一个未经过验证的上下文(避开系统的验证的步骤) context = ssl._create_unverified_context() # 打开响应的对象 response = request.urlopen(req, context = context) # 获取网页的内容 html = response.read() # 对unicode编码进行解码 content = html.decode('utf-8') # 使用etree来对html的内容建立文档树 content = etree.HTML(content) link_list = content.xpath('//img[@class="BDE_Image"]/@src') for link in link_list: print(link) |
8.4 把图片保存到文件中
|
# 加载帖子中的图片的链接 def loadImage(url): ………… # 使用etree来对html的内容建立文档树 content = etree.HTML(content) link_list = content.xpath('//img[@class="BDE_Image"]/@src') for link in link_list: print(link) writeImage(link) |
|
# 下载图片并保存到本地文件中 def writeImage(url): # 在ua_list列表中任意选择一个User-Agent userAgent = random.choice(ua_list) # 请求头 headers = { 'User-Agent' : userAgent } # 发送请求 req = request.Request(url, headers = headers) # 创建一个未经过验证的上下文(避开系统的验证的步骤) context = ssl._create_unverified_context() # 打开响应的对象 response = request.urlopen(req, context = context) # 获取网页的内容 image = response.read() filename = url[-15:] f = open('img/' + filename, 'wb') f.write(image) f.close() |
8.5 用户输入参数
|
def tiebaSpider(url, beginPage, endPage): for page in range(beginPage, endPage + 1): pn = (page-1)*50 url += '&pn=' + str(pn) loadPage(url) |
|
if __name__ == '__main__': kw = input('请输入要爬取的贴吧:') beginPage = int(input('请输入起始页:')) endPage = int(input('请输入终止页:')) # 把用户输入的中文通过urlencode进行编码 key = parse.urlencode({'kw':kw}) url = 'https://tieba.baidu.com/f?' + key tiebaSpider(url, beginPage, endPage) |
9 selenium自动化工具
9.1 安装selenium插件
|
pip install selenium |
|
pip install selenium -i http://pypi.douban.com/simple --trusted-host pypi.douban.com |
9.2 安装phantomjs无界面浏览器
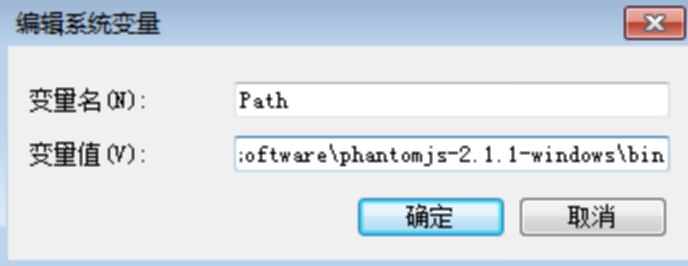
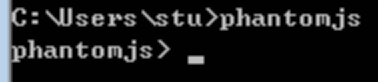
解压phantomjs压缩包,把bin所在的目录添加到环境变量PATH路径下。
重启命令行cmd,确保输入phantomjs可以进入phantomjs命令行
9.3 访问百度首页
|
# 导入selenium工具 from selenium import webdriver # 加载浏览器 driver = webdriver.PhantomJS() # 用浏览器打开网页 driver.get('https://www.baidu.com/') # 截图 driver.save_screenshot('baidu1.png') |
现在,浏览器访问百度首页的图片保存到baidu1.png中了。
9.4 进行搜索
|
# 导入selenium工具 from selenium import webdriver # 加载浏览器 driver = webdriver.PhantomJS() # 用浏览器打开网页 driver.get('https://www.baidu.com/') # 截图 driver.save_screenshot('baidu1.png') # 进行搜索 driver.find_element_by_id('kw').send_keys('古天乐') # 截图 driver.save_screenshot('baidu2.png')
# 点击“百度一下” driver.find_element_by_id('su').click() # 延迟1秒 稍等一下 import time time.sleep(1) # 截图 driver.save_screenshot('baidu3.png')
|
9.5 ChromeDriver
如果Selenium要和主流的浏览器关联,对应的浏览器需要安装驱动
比如:通过selenium和Chrome关联,Chrome需要安装ChromeDriver的驱动
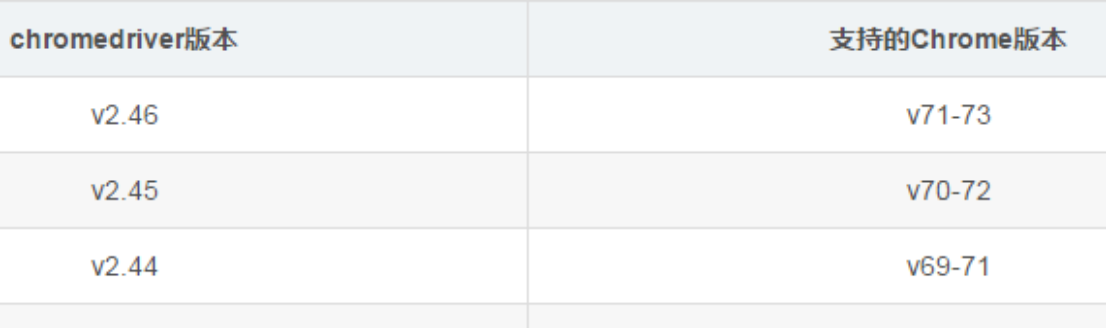
比如,Chrome版本是49的,对应的ChromeDriver可以选择v2.21或v2.22
可以在 http://chromedriver.storage.googleapis.com/index.html 下载对应的版本
下载后进行解压,并把解压后的文件chromedriver.exe拷贝到Chrome的安装目录下。
比如:C:UsersstuAppDataLocalGoogleChromeApplication
然后,修改上面的selenium的代码。把原先是通过PhantomJS浏览器打开的网页改为通过Chrome打开。
|
# 加载浏览器 #driver = webdriver.PhantomJS() driver = webdriver.Chrome() |
10 虎牙直播
留意:该URL当翻页的时候,并没有变化。不能按之前的方式去爬
此时,考虑使用自动化的方法模拟“点击”下一页按钮,每翻一页,就爬一页的数据。
目标:
1 直播房间数量
2 人气总数
10.1 找xpath规则
找房间
|
//ul[@id="js-live-list"]/li[@class="game-live-item"] |
房间的名称
|
//ul[@id="js-live-list"]/li[@class="game-live-item"]/a[contains(@class, "title")]/text() |
|
./a[contains(@class, "title")]/text() |
房间的人气
|
//ul[@id="js-live-list"]/li[@class="game-live-item"]/span[@class="txt"]/span[@class="num"]/i[@class="js-num"]/text() |
|
./span[@class="txt"]/span[@class="num"]/i[@class="js-num"]/text() |
10.2 环境搭建
|
# 导入selenium工具 from selenium import webdriver class Huya(object): # 初始化 def __init__(self): # 加载浏览器 self.driver = webdriver.PhantomJS() # 统计的数量 self.room_count = 0 # 直播房间数量 self.room_hot = 0 # 人气总数 # 执行爬虫 def run(self): # 打开网页 self.driver.get('https://www.huya.com/l') # 爬取相关的内容 # TODO 一会儿再做 # 输出结果 print('当前直播房间数量:', self.room_count) print('当前人气总数:', self.room_hot) if __name__ == '__main__': huya = Huya() huya.run() |
10.3 爬取首页数据
|
# 导入selenium工具 from selenium import webdriver # 导入lxml的库 from lxml import etree |
|
# 执行爬虫 def run(self): # 打开网页 self.driver.get('https://www.huya.com/l') # 爬取相关的内容 content = etree.HTML(self.driver.page_source) # 获取并构建网页的内容 # 获取房间的信息 rooms = content.xpath('//ul[@id="js-live-list"]/li[@class="game-live-item"]') for room in rooms: roomname = '' tmp = room.xpath('./a[contains(@class, "title")]/text()') if len(tmp) > 0: roomname = tmp[0] hot = '0' tmp = room.xpath('./span[@class="txt"]/span[@class="num"]/i[@class="js-num"]/text()') if len(tmp) > 0: hot = tmp[0] print('房间人气:' + hot + ' ' + '房间名称:' + roomname) # 输出结果 print('当前直播房间数量:', self.room_count) print('当前人气总数:', self.room_hot) |
10.4 统计首页的数据
|
# 执行爬虫 def run(self): # 打开网页 self.driver.get('https://www.huya.com/l') # 爬取相关的内容 content = etree.HTML(self.driver.page_source) # 获取并构建网页的内容 # 获取房间的信息 rooms = content.xpath('//ul[@id="js-live-list"]/li[@class="game-live-item"]') for room in rooms: roomname = '' tmp = room.xpath('./a[contains(@class, "title")]/text()') if len(tmp) > 0: roomname = tmp[0] hot = '0' tmp = room.xpath('./span[@class="txt"]/span[@class="num"]/i[@class="js-num"]/text()') if len(tmp) > 0: hot = tmp[0] print('房间人气:' + hot + ' ' + '房间名称:' + roomname) # 增加房间的数量 self.room_count += 1 # 增加人气的数量 if hot[-1] == '万': hot = hot[:-1] # '18.1万' --- '18.1' hot = int(float(hot) * 10000) # '18.1' --- 181000 self.room_hot += hot else: self.root_hot += int(hot) # '18' --- 18 # 输出结果 print('当前直播房间数量:', self.room_count) print('当前人气总数:', self.room_hot) |
10.5 尝试翻页
当有“下一页”按钮的时候,可以找到class="laypage_next"
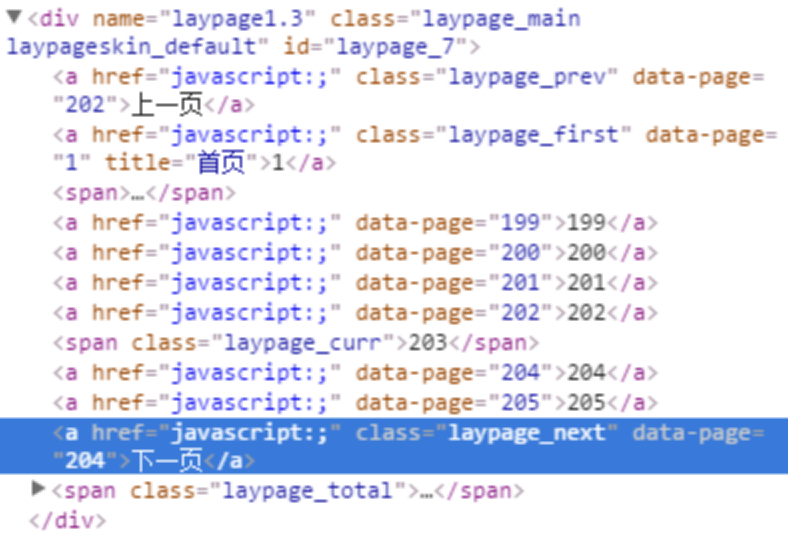
当没有“下一页”按钮的时候,找不到class="laypage_next"
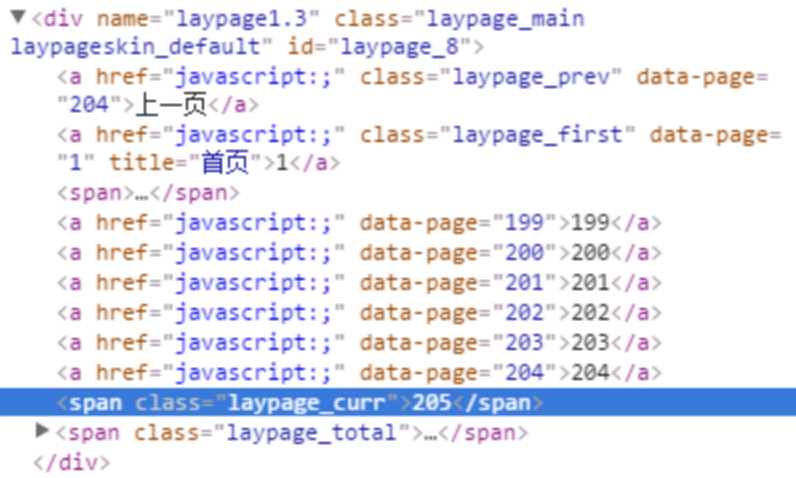
可以使用find("laypage_next")查找是否有这个元素
|
# 测试翻页的效果 def test(self): # 打开网页 self.driver.get('https://www.huya.com/l') # 循环遍历每一页 page = 0 while True: # 延时1秒 import time time.sleep(1) page += 1 ret = self.driver.page_source.find('laypage_next') if ret > 0: # 找到 print('第' + str(page) + '页') else: # 找不到 print('最后一页') break # 点击下一页按钮 self.driver.find_element_by_class_name('laypage_next').click() |
|
if __name__ == '__main__': huya = Huya() #huya.run() huya.test() |
10.6 爬取多页
结合10.4统计一页的数据,和10.5循环翻页的功能。整合出最终的爬虫程序,爬取所有的页面,并统计出结果。