Vue环境搭建
    方式1
         全局安装 vue-cli
        $ npm install --global vue-cli
        # 创建一个基于 webpack 模板的新项目
        $ vue init webpack my-project
        # 安装依赖
        $ cd my-project
        $ npm install
        $ npm run dev
    方式2:
        直接引入对应的js文件
基础知识
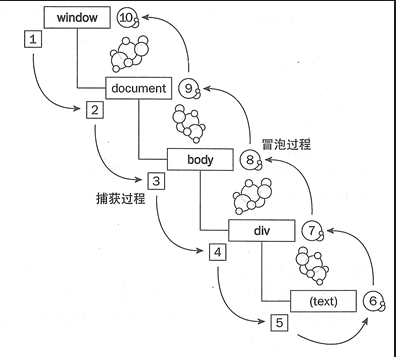
所谓指令,其实本质就是在模板中出现的特殊标记,根据这些标记让框架知道需要对这里的 DOM 元素进行什么操作。
v-text
- 解释:更新元素的 textContent,将数据解析为纯文本
<h1 v-text="msg"></h1>

这里v是vue的前缀,text是指令ID,msg是expression。 msg作为ViewModel,当它的值发生改变时,就触发指令text,重新计算标签的textContent(innerText)。
Mustache{{}}
- 解释:可以局部更新元素的 textContent,将数据解析为纯文本
<div id="app">
    <p>苹果的价格为{{ msg }}元</p>
</div>
v-html
- 解释:更新元素的 innerHTML,将数据解析成html标签
<h1 v-html="msg"></h1>
v-bind
- 作用:绑定属性
- 语法:
v-bind:title="msg" - 简写:
:title="msg"
v-on
- 作用:绑定事件
- 语法:
v-on:click="say"orv-on:click="say('参数', $event)" - 简写:
@click="say" - 说明:绑定的事件从
methods中获取
使用逗号分割绑定多个事件
<div v-on="click:onClick, keyup:onKeyup, keydown:onKeydown"></div>
事件修饰符
.stop阻止冒泡,调用 event.stopPropagation() // 比如说一个div下有一个弹窗和一个表单 点击提交按钮点击了<input type="submit" />提交表单信息 点击弹出层周边空白区域,关闭弹窗 ,当表单显示在弹窗层上方时,为防止弹窗被意外关闭,需要阻止表单提交按钮冒泡行为.prevent阻止默认事件,调用 event.preventDefault() // 比如说点击了链接标签a,在跳转之前,要修改一些URL参数.capture添加事件侦听器时使用事件捕获模式 // 捕获阶段先于冒泡,如果在尽量顶层处理事件,然后阻止传播,可以略微节约性能开销。scroll/resize 这类可能连续触发的事件不冒泡的原因.self只当事件在该元素本身(比如不是子元素)触发时触发回调.once事件只触发一次- 按键修饰符
 <input v-on:keyup.13="submit">
记住所有的 keyCode 比较困难,所以 Vue 为最常用的按键提供了别名:
 <input v-on:keyup.enter="submit">
 <input @keyup.enter="submit">
 按键别名包括:.enter .tab .delete (捕获 “删除” 和 “退格” 键) .esc .space .up .down .left .right.ctrl .shift .meta(windows 键,mac-command 键,)
.native在父组件中给子组件绑定一个原生的事件,不加'. native'事件是无法触发的
<div id="app">
  <my-component @click.native="clickFun"></my-component>
</div>
Vue.component('my-component', {
  template: `<a href='#'>click me</a>`
})
new Vue({
  el: '#app',
  methods: {
    clickFun: function(){
      console.log("message: success")
    }
  }
})
v-model
- 作用:在表单元素上创建双向数据绑定
- 说明:监听用户的输入事件以更新数据
<input v-model="message" placeholder="edit me">

<input  type='radio'  v-model="radioVal" value='单选按钮' placeholder="edit me">

<!-- checkboxArr的值必须为数组 -->
<input  type='checkbox'  v-model="checkboxArr" value='复选按钮' placeholder="edit me">
v-for
- 作用:基于源数据多次渲染元素或模板块
<div v-for="item in items">
  {{ item.text }}
</div>

<!-- 遍历数组 item 为当前项,index 为索引 -->
<p v-for="(item, index) in list">{{item}} -- {{index}}</p>
<!--遍历对象 item 为值,key 为键,index 为索引 -->
<p v-for="(item, key, index) in obj">{{item}} -- {{key}}</p>
<!-- 遍历常量 item为从1开始的递增值 -->
<p v-for="item in 10">{{item}}</p>
v-for的key属性
- 推荐:使用
v-for的时候提供key属性,以获得性能提升。 - 说明:使用
v-for更新已渲染的元素列表时,默认用就地复用策略;列表数据修改的时候,它会根据key值去判断某个值是否修改,如果修改,则重新渲染这一项,否则复用之前的元素; 我们在使用的使用经常会使用index(即数组的下标)来作为key,但其实这是不推荐的一种使用方法;
const list = [
    {
        id: 1,
        name: 'test1',
    },
    {
        id: 4,
        name: '我是插队的那条数据',
    }
    {
        id: 2,
        name: 'test2',
    },
    {
        id: 3,
        name: 'test3',
    },
]


之前的数据                         之后的数据

key: 0  index: 0 name: test1     key: 0  index: 0 name: test1
key: 1  index: 1 name: test2     key: 1  index: 1 name: 我是插队的那条数据
key: 2  index: 2 name: test3     key: 2  index: 2 name: test2
                                 key: 3  index: 3 name: test3
// 不推荐
<div v-for="(item, index) in list" :key="index" >{{item.name}}</div>

//推荐
<div v-for="(item, index) in list" :key="item.id" >{{item.name}}</div>
v-class和v-style
- 说明:这两个都是HTML元素的属性,使用
v-bind,只需要通过表达式计算出字符串结果即可 - 表达式的类型:字符串、数组、对象
- 语法:
<!-- 1 对象书写方式-->
<div v-bind:class="{ active: true }"></div> ===>
<div class="active"></div>

<!-- 2 数组书写方式-->
<div :class="['active', 'text-danger']"></div> ===>
<div class="active text-danger"></div>

<!-- 3 数组对象结合-->
<div v-bind:class="[{ active: true }, errorClass]"></div> ===>
<div class="active text-danger"></div>


<!-- style -->
<!-- 1 对象书写方式 -->
<div v-bind:style="{ color: activeColor, fontSize: fontSize + 'px' }"></div>
<!-- 2 数组书写方式-->
<div v-bind:style="[baseStyles, overridingStyles]"></div>
v-if 和 v-show
v-if:根据表达式的值的真假条件,销毁或重建元素 v-if适合条件不大可能改变的场景v-show:根据表达式之真假值,切换元素的 display CSS 属性,dom元素一直在 v-show适合频繁切换
v-cloak
- 这个指令保持在元素上直到关联实例结束编译。和 CSS 规则如 [v-cloak] { display: none } 一起用时,这个指令可以隐藏未编译的 Mustache 标签直到实例准备完毕。
- 防止刷新页面,网速慢的情况下出现{{ message }}等数据格式
<div v-cloak>
  {{ message }}
</div>
v-pre
- 说明:跳过这个元素和它的子元素的编译过程。可以用来显示原始 Mustache 标签。跳过大量没有指令的节点会加快编译。
<span v-pre>{{ this will not be compiled }}</span>
v-once
- 说明:只渲染元素和组件一次。随后的重新渲染,元素/组件及其所有的子节点将被视为静态内容并跳过。这可以用于优化更新性能。
<span v-once>This will never change: {{msg}}</span>
自定义指令
指令定义函数提供了几个钩子函数 (可选):
bind-只调用一次,指令第一次绑定到元素时调用。insert-被绑定元素插入父节点时调用。update-所在组件的 VNode 更新时调用,但是可能发生在其子元素的 VNode 更新之前。componentUpdated-所在组件的 VNode 及其子元素的 VNode 全部更新时调用。unbind-只调用一次,指令与元素解绑时调用
这五个钩子函数中bind和update是最有用的。
他们中的每一个都有可以用的el,binding和vnode参数,除了update和componentUpdated之外,还会暴露oldVnode,以区分传递的旧值和新值。
el指令所绑定的元素,可以用来直接操作 DOM 。binding一个对象,包含以下属性:name,value,oldValue,expression,arg和modifiers(修饰符对象)。
<div id="hook-arguments-example" v-demo:foo.a.b="message"></div>


Vue.directive('demo', {
  bind: function (el, binding, vnode) {
    var s = JSON.stringify
    el.innerHTML =
      'name: '       + s(binding.name) + '<br>' +
      'value: '      + s(binding.value) + '<br>' +
      'expression: ' + s(binding.expression) + '<br>' +
      'argument: '   + s(binding.arg) + '<br>' +
      'modifiers: '  + s(binding.modifiers) + '<br>' +
      'vnode keys: ' + Object.keys(vnode).join(', ')
  }
})

new Vue({
  el: '#hook-arguments-example',
  data: {
    message: 'hello!'
  }
})


name:'demo',
value:'hello',
expression:'message',
arg:'foo',
modifiers:{"a":true,"b":true}
vnodeVue 编译生成的虚拟节点。
binding和vnode都是只读。
比如要实现一个设置元素在某个位置的功能
Vue.directive('tack',{
    bind(el,binding,vnode){
        el.style.position = 'fixed';
        el.style.top = binding.value.top+'px';
        el.style.left = binding.value.left+'px';
    }
})

<p v-tack="{top:'40',left:'100'}">我固定在离顶部40px、左侧100px的地方</p>
Vue自定义指令优先级顺序
-
系统默认指令会先于自定义指令执行
<!-- v-show 先于 v-block 执行 -->
<div v-block v-show="false"></div>
-
自定义指令在标签上的位置越靠前就越早执行
<!-- v-none 先于 v-block 执行 -->
<div v-none v-block></div>
常用属性
1、watch 监听props或本组件的值
immediate属性
watch 的一个特点是,最初绑定的时候是不会执行的,要等到数据改变时才执行监听计算。那我们想要一开始就让他最初绑定的时候就执行改怎么办呢?我们需要修改一下我们的 watch 写法,修改过后的 watch 代码如下:
watch: {
  firstName: {
    handler(newName, oldName) {
      this.fullName = newName + ' ' + this.lastName;
    },
    // 代表在wacth里声明了firstName这个方法之后立即先去执行handler方法
    immediate: true
  }
}
deep属性
默认情况下 handler 只监听obj这个属性它的引用的变化,我们只有给obj赋值的时候它才会监听到,如果我们需要监听obj里的属性a的值呢?这时候deep属性就派上用场了!
<div>
      <p>obj.a: {{obj.a}}</p>
      <p>obj.a: <input type="text" v-model="obj.a"></p>
</div>

new Vue({
  el: '#root',
  data: {
    obj: {
      a: 123
    }
  },
  watch: {
    obj: {
      handler(newName, oldName) {
         console.log('obj.a changed');
      },
      immediate: true,
    deep:true,
    }
  }
})
deep的意思就是深入观察,监听器会一层层的往下遍历,给对象的所有属性都加上这个监听器,但是这样性能开销就会非常大了,任何修改obj里面任何一个属性都会触发这个监听器里的 handler。
优化,我们可以是使用字符串形式监听
watch: {
  'obj.a': {
    handler(newName, oldName) {
      console.log('obj.a changed');
    },
    immediate: true,
    // deep: true
  }
}
全局watch的注销方式
app.$watch调用后会返回一个值,就是unWatch方法,你要注销 watch 只要调用unWatch方法就可以了。
const unWatch = app.$watch('text', (newVal, oldVal) => {
  console.log(`${newVal} : ${oldVal}`);
})

unWatch(); // 手动注销watch
2、computed 类似于过滤器,对绑定到view的数据进行处理。不能与data中定义的变量重名,具有缓存性,页面重新渲染值不变化,计算属性会立即返回之前的计算结果,而不必再次执行函数
<template>
  <div>
    <h4>测试</h4>
    <div>
      {{didi}}
      {{family}}
    </div>
    <div>
      {{didiFamily}}
    </div>
  </div>

</template>

<script>
   export default {
    data () {
       return {
        didi: 'didi',
        family: 'family'
       }
     },
    computed: {
      didiFamily:{
        //getter
        get:function(){
          return this.didi + ' ' + this.family
        },
        //setter
        set:function(newValue){
          // 这里由于该计算属性被赋值,将被调用
          console.log(newValue)
          this.didi = 123
          this.family = 456
        }
      }
    },
    mounted () {
      // 赋值,调用setter函数
      this.didiFamily = 'John Doe'
    }
  }
</script>
Vue实例中被观察的数据属性发生了改变时才会重新执行getter,但是我们有时候计算属性依赖实时的非观察数据属性,比如下面例子中的Date.now
<template>
  <div>
    <h4>测试</h4>
    <div>
      <input type="text" v-model="message" />
      <div>{{now}}</div>
    </div>
  </div>

</template>

<script>
   export default {
    data () {
       return {
         message: 'hello'
       }
     },
    computed: {
      now:{
        cache: false,
        get:function(){
          return Date.now() + this.message
        }
      }
    },
    mounted () {
      setInterval(() => {
        // 当缓存开关为false的时候,定时器每次打印的时间都是不一样的
        console.log(this.now)
      }, 500)
    }
  }
</script>
- 当一个变量会引起多个变量的变化时,应该用watch,多个变量的变化会引起一个变量变化时,应该用computed
- 虽然方法也能实现computed同样的效果,但是因为计算属性可以基于它们的依赖进行缓存,所以选择计算属性会比方法更优。
过滤器
过滤器是针对一些数据 进行筛选、过滤、格式化等相关的处理,变成我们想要的数据,过滤器的本质 就是一个带有参数带有返回值的方法 ,过滤器只能用在{{}}和v-bind里面
1、过滤器的创建和使用
1.创建
全局过滤器
 Vue.filter(
  'filterA',
  function(myInput){
     //myInput是在调用过滤器时,管道前表达式执行的结果
     //针对myInput,按照业务需求做处理
     //返回
     return '处理后的结果'
  })
  局部过滤器
  filters: {
       filterB: function (value) {
         if (!value) return ''
         value = value.toString()
         return value.charAt(0).toUpperCase() + value.slice(1)
       }
     }

2.使用
  <any>{{expression | filterA | filterB}}</any>
2、如何在调用过滤器时,完成参数的发送和接受
1.发送
<any>{{expression | myFilter(参数1,参数2)}}</any>

2.接受
Vue.filter('myFilter',function(myInput,参数1,参数2){
    return '处理后的结果'
})
混合mixins和继承extends
mixins接收对象数组(可理解为多继承),extends接收的是对象或函数(可理解为单继承)。
在项目中我们经常会遇到多个组件调用同一个方法的问题,为了避免每次都在.vue文件中定义并调用,我们可采用vue的mixin的用法,mixins就是定义一部分公共的方法或者计算属性,然后混入到各个组件中使用,方便管理与统一修改
const extend = {
  data() {
    return {
      name: 'extend',
    }
  },
  created() {
    console.log('extends created')
  },
}
const mixin1 = {
  data() {
    return {
      name: 'mixin1',
    }
  },
  created() {
    console.log('mixin1 created')
  },
  methods: {
    fun() {
      console.log('mixin1 fun')
    },
  },
}
const mixin2 = {
  data() {
    return {
      name: 'mixin2',
    }
  },
  created() {
    console.log('mixin2 created')
  },
  methods: {
    fooB() {
      console.log('fooB')
    },
    fun() {
      console.log('mixin2 fun')
    },
  },
}
export default {
  mixins: [mixin1, mixin2],
  extends: extend,
  name: 'app',
  created() {
    console.log('created')
  },
}
生命周期
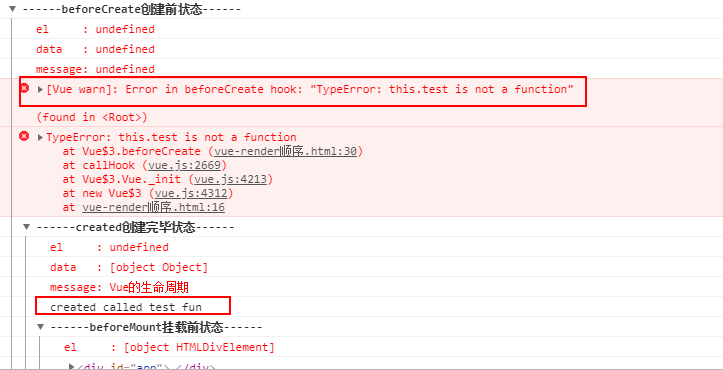
<!DOCTYPE html>
<html lang="en">
<head>
  <meta charset="UTF-8">
  <meta name="viewport" content="width=device-width, initial-scale=1.0">
  <meta http-equiv="X-UA-Compatible" content="ie=edge">
  <title>vue生命周期</title>
  <script src="https://cdn.bootcss.com/vue/2.4.2/vue.js"></script>
</head>
<body>
  <div id="app">
    <h1>{{message}}</h1>
  </div>
</body>
<script>
  var vm = new Vue({
    el: '#app',
    data: {
      message: 'Vue的生命周期'
    },
    // template: "<h1>{{message +'这是在template中的'}}</h1>", //在vue配置项中修改的
    // render: function(createElement) {
    //     return createElement('h1', 'this is createElement')
    // },
    beforeCreate: function() {
      console.group('------beforeCreate创建前状态------');
      console.log("%c%s", "color:red" , "el     : " ,this.$el); //undefined
      console.log("%c%s", "color:red","data   : " ,this.$data); //undefined
      console.log("%c%s", "color:red","message: " + this.message)
      this.test('beforeCreate');

    },
    created: function() {
      console.group('------created创建完毕状态------');
      console.log("%c%s", "color:red","el     : " ,this.$el); //undefined
      console.log("%c%s", "color:red","data   : " ,this.$data); //已被初始化
      console.log("%c%s", "color:red","message: " + this.message); //已被初始化
      this.test('created');
    },
    beforeMount: function() {
      console.group('------beforeMount挂载前状态------');
      console.log("%c%s", "color:red","el     : " + (this.$el)); //已被初始化
      console.log(this.$el);
      console.log("%c%s", "color:red","data   : " ,this.$data); //已被初始化
      console.log("%c%s", "color:red","message: " + this.message); //已被初始化
    },
    mounted: function() {
      console.group('------mounted 挂载结束状态------');
      console.log("%c%s", "color:red","el     : " ,this.$el); //已被初始化
      console.log(this.$el);
      console.log("%c%s", "color:red","data   : " ,this.$data); //已被初始化
      console.log("%c%s", "color:red","message: " + this.message); //已被初始化
    },
    beforeUpdate: function () {
      console.group('beforeUpdate 更新前状态===============》');
      console.log("%c%s", "color:red","el     : " ,this.$el);
      console.log(this.$el);
      console.log("%c%s", "color:red","data   : " ,this.$data);
      console.log("%c%s", "color:red","message: " + this.message);
    },
    updated: function () {
      console.group('updated 更新完成状态===============》');
      console.log("%c%s", "color:red","el     : " ,this.$el);
      console.log(this.$el);
      console.log("%c%s", "color:red","data   : " ,this.$data);
      console.log("%c%s", "color:red","message: " + this.message);
    },
    beforeDestroy: function () {
      alert();
      console.group('beforeDestroy 销毁前状态===============》');
      console.log("%c%s", "color:red","el     : " ,this.$el);
      console.log(this.$el);
      console.log("%c%s", "color:red","data   : " ,this.$data);
      console.log("%c%s", "color:red","message: " + this.message);
    },
    destroyed: function () {
      console.group('destroyed 销毁完成状态===============》');
      console.log("%c%s", "color:red","el     : " ,this.$el);
      console.log(this.$el);
      console.log("%c%s", "color:red","data   : " ,this.$data);
      console.log("%c%s", "color:red","message: " + this.message)
    },
    methods:{
      test(stage){
        console.log(stage+' called test fun')
      }
    }
  })
</script>
</html>

每个阶段可以做的事情
beforeCreate 可以在这加个loading事件,
created 在这里结束loading事件,发送异步请求
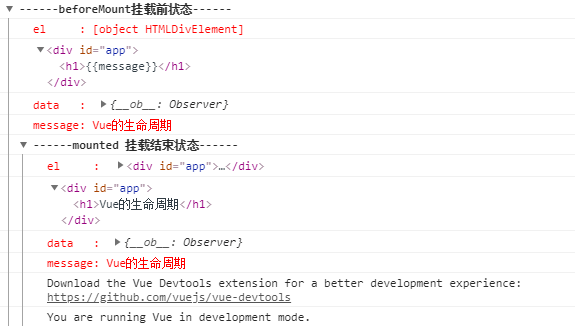
beforeMount
mounted 操作dom
beforeUpdate
updated 对更新后的数据统一处理
beforeDestroy 清除定时器,清除无用的全局缓存数据 这一步,实例仍然完全可用。
destroyed Vue 实例指示的所有东西都会解绑定,所有的事件监听器会被移除,所有的子实例也会被销毁。
组件化
组件:组件就是可被反复使用的,带有特定功能的视图

所谓的组件化,就像玩积木一样,把封装的组件进行复用,把积木(组件)拼接在一起,构成一个复杂的页面应用程序。

组件树就是由各个组件构成的一种数据结构,它存在的意义是为了帮梳理应用程序

1、组件的创建
1.1、直接在template属性中指定模板内容
    1.全局组件
    Vue.component
    Vue.component('my-com',{
      template:`
        <h2>it is a global components</h2>
      `
    })
2.局部组件
    new Vue({
        components:{
            'my-footer':{
           template:'<h1>it is local components</h1>'
         }
        }
})1.2、.vue结尾的文件 <template></template> <script></script> <style></style> 1.3、单独指定一个模板内容 <script id='myContent' type='text/x-template'> </script> Vue.component('my-component',{ template:'#myContent' })
2、组件使用
    作为普通的标签去使用
    <my-com></my-com>


3、注意事项
    1.组件命名方式使用ComponentName和component-name均可,但是当应用到dom的时候,应该使用短横线分割命名方式。
    2.如果一个组件 要渲染多个元素,将多个元素放在一个顶层标签中,比如div、form
Vue.component("my-component", {
    template: "<div>
        <h1>我是全局组件元素1</h1>
        <h1>我是全局组件元素2</h1>
    </div>"
  });
3.全局组件必须写在Vue实例创建之前,才在该根元素下面生效;局部组件只能在父模板中直接调用
组件间通信
1、父与子通信 (props down)
    1.发送
        <son myName='zhangsan'>
        </son>
    2.接受
        到son组件:
        Vue.component('son',{
          props:['myName'],
          template:`
           <p>{{myName}}</p>
          `
        })

2、子与父通信 (events up)
     1.绑定
    methods:{
     handleEvent:function(msg){
    console.log('子组件传过来的值:',msg);
     }
    }
    <son @customEvent="handleEvent"></son>
    2.触发
    子组件内部:
    this.$emit(‘customEvent’,100);

3、ref(reference 引用/参考) 帮助父组件得到子组件中的数据、方法。
    1.指定ref属性
    <son ref="mySon"></son>

    2.根据ref得到子组件实例
    this.$refs.mySon

4、$parent 帮助子组件拿到父组件的实例中的数据,方法
    this.$parent得到父组件的实例 this.$root得到根组件的实例

5、兄弟组件通信
    1.var bus = new Vue();
    2.接收方
    bus.$on('eventName',function(msg){})
    3.发送方
    bus.$emit('eventName',123);
路由模块
路由模块的本质 就是建立起url和页面之间的映射关系
1、SPA的基本概念和工作原理
SPA:single page application 单一页面应用程序,只有一个完整的页面;
它在加载页面时,不会加载整个页面,而是只更新某个指定的容器中内容。


工作原理:
1.解析地址栏 完整的页面地址、路由地址
2.根据路由地址 从路由词典中找到真正的要加载的页面
3.发起ajax请求  请求要加载的页面
4.像指定的容器中 插入加载来的页面
2、路由模块的基本使用
专业术语:
    router路由容器
    route路由
    routes 路由数组(路由词典)
1.引入vue.js vue-router.js
2.指定一个容器
<router-view></router-view>
3.创建业务所需要用到的组件类
var MyLogin = Vue.component()
4.配置路由词典
 const myRoutes = [
  {
   path:'base',component:MyLogin,
  // 路由嵌套
  children:[
{path:'/a',component:A}
  ]
  },
  {path:'/login',component:MyLogin}
 ];

 const myRouter = new VueRouter({
  routes:myRoutes
 })

 new Vue({
   mode:'hash',
   router:myRouter
 })
5.测试
    修改地址栏中的路由地址,测试看加载的组件是否正确

注意事项:
 1.先引入vue,再引入插件
 2.一定要指定router-view
3、使用路由模块来实现页面跳转的方式
方式1:直接修改地址栏
方式2:this.$router.push(‘路由地址’);
方式3:<router-link to="路由地址"></router-link>
4、完成参数的传递
在页面之间跳转的时候,在有些场景下,比如说list --> detail 需要同时指定参数

1.配置接收方的路由地址 /detail --> /detail/:index
2.发送
    <router-link to="/detail/20" />
    this.$router.push('/detail/20')
3.接收
    this.$route.params.index
5.传参生成url
      const { href } = this.$router.resolve(
        {
          path: '/dataQuery/decisionDetail',
          query: { productCode, applyNo }
        });

      window.open(href, "_blank");
6.登陆验证
router.beforeEach((to, from, next) => {
  if (!cookie.get("isLogin")) {
    to.path !== "/login" ? next({ path: "/login" }) : next();
  }else {
   next();
  }
})
7.草稿保存
beforeRouteLeave (to, from, next) {
     if(用户已经输入信息){
       //出现弹窗提醒保存草稿,或者自动后台为其保存
     }else{
       next(true);//用户离开
     }
   }
Vuex
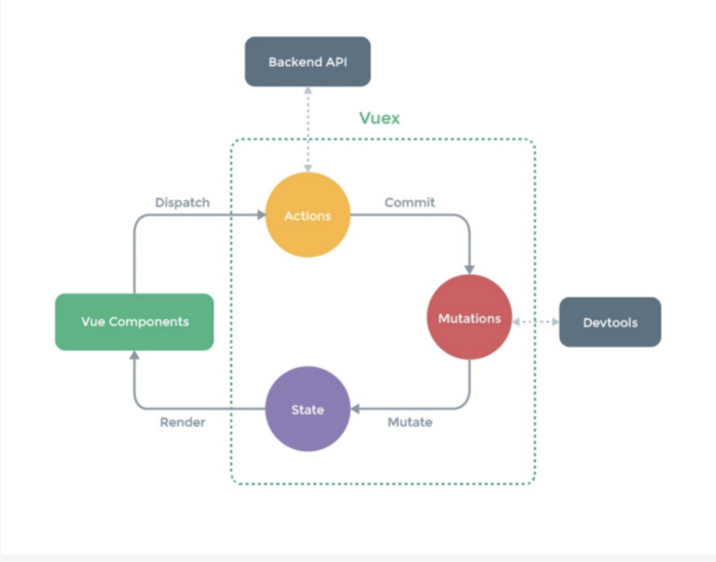
Vuex 是一个专为 Vue.js 应用程序开发的状态管理模式。它采用集中式存储管理应用的所有组件的状态。
vuex解决了组件之间同一状态的共享问题。多个组件依赖于同一状态。传参的方法对于多层嵌套的组件将会变得很繁琐,不同组件的行为需要变更同一状态,父子组件直接引用或者通过事件来变更和同步状态的多份拷贝,通常会导致无法维护代码。这时就出现了Vuex,这是Vuex出现的背景。,而现在有了vuex,这意味着本来需要共享状态的更新需要组件之间的通讯,现在组件就都和store通讯了
• Vue Components:Vue组件。HTML页面上,负责接收用户操作等交互行为,执行dispatch方法触发对应action进行回应。
• dispatch:操作行为触发方法,是唯一能执行action的方法。
• actions:操作行为处理模块。负责处理Vue Components接收到的所有交互行为。包含同步/异步操作,支持多个同名方法,按照注册的顺序依次触发。向后台API请求的操作就在这个模块中进行,包括触发其他action以及提交mutation的操作。该模块提供了Promise的封装,以支持action的链式触发。
• commit:状态改变提交操作方法。对mutation进行提交,是唯一能执行mutation的方法。
• mutations:状态改变操作方法。是Vuex修改state的唯一推荐方法,其他修改方式在严格模式下将会报错。该方法只能进行同步操作,且方法名只能全局唯一。操作之中会有一些hook暴露出来,以进行state的监控等。
• state:页面状态管理容器对象。集中存储Vue components中data对象的零散数据,全局唯一,以进行统一的状态管理。页面显示所需的数据从该对象中进行读取,利用Vue的细粒度数据响应机制来进行高效的状态更新。
• getters:state对象读取方法。图中没有单独列出该模块,这个方法包含在了render中,Vue Components通过该方法读取全局state对象。
下面来看一下如何使用vuex
1. 首先建立一个store分支文件,如建立一个city_store.js的文件,通常设计store对象都包含4个属性:state,getters,actions,mutations。
state (类似存储全局变量的数据)
getters (提供用来获取state数据的方法)
actions (提供跟后台接口打交道的方法,并调用mutations提供的方法)
mutations (提供存储设置state数据的方法)
export default {
    // 1. state
    state:{
        city:"城市名"
    },

    // // 2. getters
    getters:{
        // 参数列表state指的是state数据
        getCityFn(state){
            return state.city;
        }
    },
    // 3. actions
    // 通常跟api接口打交道
    actions:{
        // 设置城市信息
        // 参数列表:{commit, state}
        // state指的是state数据
        // commit调用mutations的方法
        // name就是调用此方法时要传的参数
        setCityName({commit,state}, name){
            // 跟后台打交道
            // 调用mutaions里面的方法
            commit("setCity", name);
        }
    },
    // 4. mutations
    mutations:{
        // state指的是state的数据
        // name传递过来的数据
        setCity(state, name){
            state.city = name;//将传参设置给state的city
        }
    }
}
2.在store主文件中引入
import Vue from 'vue'
import vuex from 'vuex'
Vue.use(vuex);

import city_store from '../store/modules/city_store.js';//引入某个store对象

export default new vuex.Store({
    modules: {
        dialog: city_store
    }
})
3.在入口文件main.js中引用vuex
//vuex
import store from './store'

new Vue({
  el: '#app',
  router,
  store,//使用store
  template: '<App/>',
  components: { App }
})
4.在页面中使用store中的数据和方法
<template>
    <div class="city">
        <h1>{{city}}</h1>
        <ul>
            <li v-for="(item,index) in cityArr" @click="backFn(index)">
                <h2>{{item}}</h2>
            </li>
        </ul>
    </div>
</template>
<script>
export default {
  name: 'HelloWorld',
  data () {
    return {
        cityArr:['北京','上海','广州','深圳','茂名','张家界','清远','汕头','佛山']
    }
  },
  computed:{
    city:function() {
      // 通过vuex的getters方法来获取state里面的数据
      return this.$store.getters.getCityFn;
    }
  },
  methods:{
      backFn : function(index){
          // 调用vuex的ations设置城市的值
          this.$store.dispatch("setCityName", this.cityArr[index]);

          //返回到首页
          this.$router.push("/");
      }
  }
}
</script>
mapState、mapGetters、mapActions,mapMutations的作用
很多时候 , this.$store.state.city 、this.$store.dispatch("setCityName", this.cityArr[index]);这种写法不方便 ,使用 mapState、mapGetters、mapActions ,mapMutations就不会这么复杂了。
<script>
import { mapGetters, mapActions, mapState, mapMutations } from "vuex";
export default {
  name: 'HelloWorld',
  data () {
    return {
        cityArr:['北京','上海','广州','深圳','茂名','张家界','清远','汕头','佛山']
    }
  },
  computed:{
   ...mapGetters(["getCityFn"]),
    city:function() {
      // 通过vuex的getters方法来获取state里面的数据
      return this.getCityFn;
    }
  },
  methods:{
      ...mapActions(["setCityName"]),
      backFn : function(index){
          // 调用vuex的ations设置城市的值
          this.setCityName(this.cityArr[index]);

          //返回到首页
          this.$router.push("/");
      }
  }
}
</script>
mapGetters mapState一般写在 computed 中 , mapMutations, mapActions 一般写在methods 中。
keep-alive属性
在Vue构建的单页面应用(SPA)中,路由模块一般使用vue-router。vue-router不保存被切换组件的状态,它进行push或者replace时,旧组件会被销毁,而新组件会被新建,走一遍完整的生命周期。
但有时候,我们有一些需求,比如跳转到详情页面时,需要保持列表页的滚动条的深度,等返回的时候依然在这个位置,这样可以提高用户体验。在Vue中,对于这种“页面缓存”的需求,我们可以使用keep-alive组件来解决这个需求。
假如有下面这个场景:
- 现有页面:首页(A)、列表页(B)、详情页(C),一般可以从:A->B->C;
- B到C再返回B时,B要保持列表滚动的距离;
- B返回A再进入B时,B不需要保持状态,是全新的。
在根页面中定义keep-alive,并传入全局的缓存数组:在Vuex中定义一个全局的缓存数组,待传给include:
// App.vue

<div class="app">
  <!--传入include数组-->
  <keep-alive :include="keepAliveComponents">
    <router-view></router-view>
  </keep-alive>
</div>

export default {
  computed: {
    ...mapState({
      keepAliveComponents: state => state.keepAliveComponents
    })
  }
}
// global.js

export default {
  namespaced: true,
  state: {
    keepAliveComponents: [] // 缓存数组
  },
  mutations: {
    keepAlive (state, component) {
      // 注:防止重复添加
      !state.keepAliveComponents.includes(component) &&
        state.keepAliveComponents.push(component)
    },
    noKeepAlive (state, component) {
      const index = state.keepAliveComponents.indexOf(component)
      index !== -1 &&
        state.keepAliveComponents.splice(index, 1)
    }
  }
}
缓存:在路由配置页中,约定使用meta属性keepAlive,值为true表示组件需要缓存。在全局路由钩子beforeEach中对该属性进行处理,这样一来,每次进入该组件,都进行缓存:
const router = new Router({
  routes: [
    {
      path: '/B',
      name: 'B',
      component: B,
      meta: {
        title: 'B页面',
        keepAlive: true // 这里指定B组件的缓存性
      }
    }
  ]
})

router.beforeEach((to, from, next) => {
  // 在路由全局钩子beforeEach中,根据keepAlive属性,统一设置页面的缓存性
  // 作用是每次进入该组件,就将它缓存
  if (to.meta.keepAlive) {
    store.commit('keepAlive', to.name)
  }
})
取消缓存的时机:对缓存组件使用路由的组件层钩子beforeRouteLeave。因为B->A->B时不需要缓存B,所以可以认为:当B的下一个页面不是C时取消B的缓存,那么下次进入B组件时B就是全新的:
export default {
  name: 'B',
  created () {
      // ...设置滚动条在最顶部
  },
  beforeRouteLeave (to, from, next) {
    // 如果下一个页面不是详情页(C),则取消列表页(B)的缓存
    if (to.name !== 'C') {
        this.$store.commit('noKeepAlive', from.name)
    }
    next()
  }
}
slot 插槽
当某个组件被多个地方使用 , 每个地方使用该组件时对该组件的内部有一部分需要特殊定制 , 这个时候slot可以让我们更好的复用组件的同时并对其定制。 插槽,也就是slot,是组件的一块HTML模板,这块模板显示不显示、以及怎样显示由父组件来决定, 插槽显示的位置却由子组件自身决定,slot写在组件template的什么位置,父组件传过来的模板将来就显示在什么位置。
<template>
  <div id="app">
      <children>
        <span>子组件内部元素</span>
      </children>
  </div>
</template>


<script>
  export default {
    name: 'hello',
    components: {
      children: {
        template: '<div>这里是子组件</div>'
      }
    }
  }
</script>

<!--渲染结果-->
<div id="app">
    <div>这里是子组件</div>
</div>
<template>
  <div id="app">
      <children>
        <span>子组件内部元素</span>
      </children>
  </div>
</template>

<script>
  export default {
    name: 'hello',
    components: {
      children: {
        template: '<div><slot><p>默认效果</p></slot>这里是子组件</div>'
      }
    }
  }
</script>

<!--渲染结果-->
<div id="app">
    <span>子组件内部元素</span>
    "这里是子组件"
</div>
具名插槽可以有多个,匿名插槽只能有一个
<template>
  <div class="father">
    <h3>这里是父组件</h3>
    <child>
      <div slot="up">
        <span>菜单1</span>
      </div>
      <div slot="down">
        <span>菜单-1</span>
      </div>
      <div>
        <span>菜单->1</span>
      </div>
    </child>
  </div>
</template>
<template>
  <div class="child">
    // 具名插槽
    <slot name="up"></slot>
    // 具名插槽
    <slot name="down"></slot>
    // 匿名插槽
    <slot></slot>
  </div>
</template>
作用域插槽-- 作用域插槽的关键之处就在于,父组件能接收来自子组件的slot传递过来的参数
<div id="root">
        <child>
            <template slot-scope="props"><!--定义一个插槽,该插槽必须放在template标签内-->
                <li>{{props.value}}</li>
            </template>
        </child>
    </div>
    <script>
        Vue.component('child',{
            data: function(){
                return {
                    list:[1,2,3,4]
                }
            },
            template: `<div>
                            <ul>
                                <slot v-for="value in list" :value='value'>//使用slot占位
                                </slot>
                            </ul>
                        </div>`
        })
        var vm=new Vue({
            el: '#root'
        })
    </script>
axios
1.axios的get方法
export const getAjax= function (getUrl,getAjaxData) {
  return axios.get(getUrl, {
    params: {
      'getAjaxDataObj1': getAjaxData.obj1,
      'getAjaxDataObj2': getAjaxData.obj2
    }
  })
}
2.axios的post方法
export const postAjax= function (getUrl,postAjaxData) {
  return axios.post(postUrl, {
    data:{
       'postAjaxDataObj1': postAjaxData.obj1,
      'postAjaxDataObj2': postAjaxData.obj2
      }
  })
}
3.axios的拦截器
主要分为请求和响应两种拦截器,请求拦截一般就是配置对应的请求头信息(适用与常见请求方法,虽然ajax的get方法没有请求头,但是axios里面进行啦封装),响应一般就是对reponse进行拦截处理,如果返回结果为[]可以转化为0
Vue.use(Vuex)
Vue.use(VueAxios, axios)
Vue.use(qs)
// 注:qs,使用axios,必须得安装 qs,所有的Post 请求,我们都需要 qs,对参数进行序列化。

在 request 拦截器实现

axios.interceptors.request.use(
 config => {
  config.baseURL = '/api/'
  config.withCredentials = true // 允许携带token ,这个是解决跨域产生的相关问题
  config.timeout = 6000
  let token = sessionStorage.getItem('access_token')

   config.headers = {
    'access-token': token,
    'Content-Type': 'application/x-www-form-urlencoded'
   }
return config
 },
 error => {
  return Promise.reject(error)
 }
)
//在 response 拦截器实现

axios.interceptors.response.use(
 response => {
  // 定时刷新access-token
  if (!response.data.value && response.data.data.message === 'token invalid') {
   // 刷新token
   store.dispatch('refresh').then(response => {
    sessionStorage.setItem('access_token', response.data)
   }).catch(error => {
    throw new Error('token刷新' + error)
   })
  }
  return response
 },
 error => {
  return Promise.reject(error)
 }
)
踩坑经验
1.修改了数据某项内容,或修改了对象的新增的某个属性,视图没有同步更新
解决方法:Vue.set( target, key, value )
Vue.set(this.items,0,{message:"Change Test",id:'10'})
2.组件命名与html标签重名
[Vue warn]: Do not use built-in or reserved HTML elements as component id: Table
不要使用内建或预留的HTML 标签作为组件ID,改成其它名称
3. action中commit的行为名称不能重名,重名会造成mutations动作执行覆盖
4.vue中使用$refs的时候,有时候要用[0]区获取,有时候不需要
这是由于vue中的v-for去读取ref的是读取的是domlist,而单独的ref读取的是实体单独的dom
5.vue中使用vue-lazyload的时候数据改变,但是图片没有改变,这是由于懒加载的机制导致的,需要给load的img加上一个:key就会更新了
<el-image :key="url" :src="url" lazy></el-image>
6.vue-router跳转的时候用path的时候参数传递只能用query,而用params传参的时候只能用name来设置跳转的连接
this.$router.push({ name:'router1',params: { id: status ,id2: status3},query: { queryId: status2 }});
query刷新不会丢失query里面的数据, params刷新 会 丢失 params里面的数据
7.vue加载图片
1、绝对路径访问
<template>
    <div>
        <img :src="src" alt="图片" />
    </div>
</template>
<script>
    export default{
        data(){
          return {
              src:`/static/img/user.png`
          }
        }
    }
</script>
2、使用require
如果想在不调整目录结构的情况下读取图片,还可以使用require:
data(){
     return {
         src:require('../assets/user.png')    //重点看这里
    }
}
3、使用import
也可以用import引入图片路径:
<script>
    import userPath from '../assets/user.png'
    export default{
        data(){
          return {
              src:userPath
          }
        }
    }
</script>
vue性能优化
1.非页面中用到的变量不要定义在data中或者使用freeze属性
new Vue({
  data: {
    // vue不会对list里的object做getter、setter绑定
    list: Object.freeze([
      { value: 1 },
      { value: 2 },
  },
  created() {
    // 界面不会有响应
    this.list[0].value = 100
    // 下面两种做法,界面都会响应
    this.list = [
      { value: 100 },
      { value: 200 },
    ]
    this.list = Object.freeze([
      { value: 100 },
      { value: 200 },
    ])
  }
})
2.组件要使用懒加载
const Foo = resolve => {
  // require.ensure 是 Webpack 的特殊语法,用来设置 code-split point
  require.ensure(['./Foo.vue'], () => {
    resolve(require('./Foo.vue'))
  })
}

简写为
const Foo = resolve => require(['./Foo.vue'], resolve)

const router = new VueRouter({
  routes: [
    { path: '/foo', component: Foo }
  ]
})
3.引入生产环境的 Vue 文件
开发环境下,Vue 会提供很多警告来帮你对付常见的错误与陷阱。而在生产环境下,这些警告语句没有用,反而会增加应用的体积。有些警告检查还有一些小的运行时开销。
4.提取组件的 CSS 到单独到文件
当使用单文件组件时,组件内的 CSS 会以 <style> 标签的方式通过 JavaScript 动态注入。这有一些小小的运行时开销,将所有组件的 CSS 提取到同一个文件可以避免这个问题,也会让 CSS 更好地进行压缩和缓存。
5.使用单文件组件预编译模板
这种定义组件的方式不能在构建阶段使用预处理器,如 Pug (formerly Jade) 和 Babel,模板在运行时才被编译为渲染函数,使用单文件组件在构建好的代码已经包含了编译出来的渲染函数而不是原始的模板字符串
    Vue.component('my-com',{
      template:`
        <h2>it is a global components</h2>
      `
    })
6.采用预渲染(Prerender)来优化加载性能
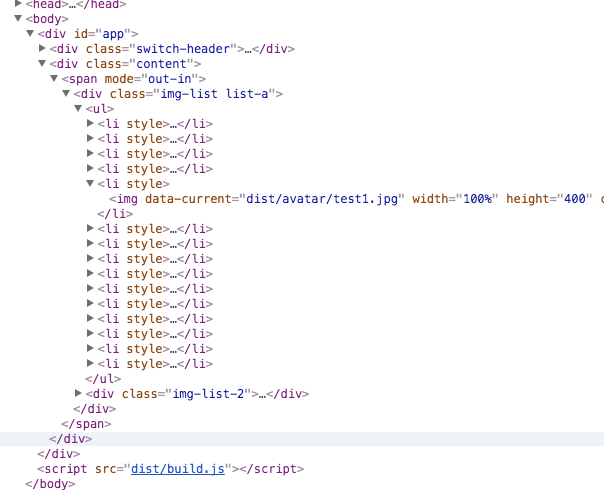
采用vue-router history模式+webpack的PrerenderSpaPlugin插件,生成的html文件有内容和数据
1.无预渲染
<!DOCTYPE html>
<html lang="en">
  <head>
    <meta charset="utf-8">
    <title>vue-lz-2.0</title>
    <meta name="viewport" content="width=device-width,initial-scale=1,maximum-scale=1,user-scalable=no">
  </head>
  <body>
    <div id="app"></div>
    <script src="dist/build.js"></script>
  </body>
</html>
2.有预渲染