参考:https://github.com/milesial/Pytorch-UNet
实现的是二值汽车图像语义分割,包括 dense CRF 后处理.
使用python3,我的环境是python3.6
1.使用
1> 预测
1)查看所有的可用选项:
python predict.py -h
返回:
(deeplearning) userdeMBP:Pytorch-UNet-master user$ python predict.py -h
usage: predict.py [-h] [--model FILE] --input INPUT [INPUT ...]
                  [--output INPUT [INPUT ...]] [--cpu] [--viz] [--no-save]
                  [--no-crf] [--mask-threshold MASK_THRESHOLD] [--scale SCALE]

optional arguments:
  -h, --help            show this help message and exit
  --model FILE, -m FILE
                        Specify the file in which is stored the model (default
                        : 'MODEL.pth')  #指明使用的训练好的模型文件,默认使用MODEL.pth
  --input INPUT [INPUT ...], -i INPUT [INPUT ...] #指明要进行预测的图像文件,必须要有的值
                        filenames of input images
  --output INPUT [INPUT ...], -o INPUT [INPUT ...] #指明预测后生成的图像文件的名字
                        filenames of ouput images
  --cpu, -c             Do not use the cuda version of the net #指明使用CPU,默认为false,即默认使用GPU
  --viz, -v             Visualize the images as they are processed #当图像被处理时,将其可视化,默认为false,即不可以可视化
  --no-save, -n         Do not save the output masks #不存储得到的预测图像到某图像文件中,和--viz结合使用,即可对预测结果可视化,但是不存储结果,默认为false,即会保存结果
  --no-crf, -r          Do not use dense CRF postprocessing #指明不使用CRF对输出进行后处理,默认为false,即使用CRF
  --mask-threshold MASK_THRESHOLD, -t MASK_THRESHOLD
                        Minimum probability value to consider a mask pixel #最小化考虑掩模像素为白色的概率值,默认为0.5
                        white
  --scale SCALE, -s SCALE
                        Scale factor for the input images #输入图像的比例因子,默认为0.5
2)预测单一图片image.jpg并存储结果到output.jpg的命令
python predict.py -i image.jpg -o output.jpg
测试一下:
(deeplearning) userdeMBP:Pytorch-UNet-master user$ python predict.py --cpu --viz -i image.jpg -o output.jpg
Loading model MODEL.pth
Using CPU version of the net, this may be very slow
Model loaded !

Predicting image image.jpg ...
/anaconda3/envs/deeplearning/lib/python3.6/site-packages/torch/nn/modules/upsampling.py:129: UserWarning: nn.Upsample is deprecated. Use nn.functional.interpolate instead.
  warnings.warn("nn.{} is deprecated. Use nn.functional.interpolate instead.".format(self.name))
/anaconda3/envs/deeplearning/lib/python3.6/site-packages/torch/nn/functional.py:1332: UserWarning: nn.functional.sigmoid is deprecated. Use torch.sigmoid instead.
  warnings.warn("nn.functional.sigmoid is deprecated. Use torch.sigmoid instead.")
Visualizing results for image image.jpg, close to continue ...
返回可视化图片为:
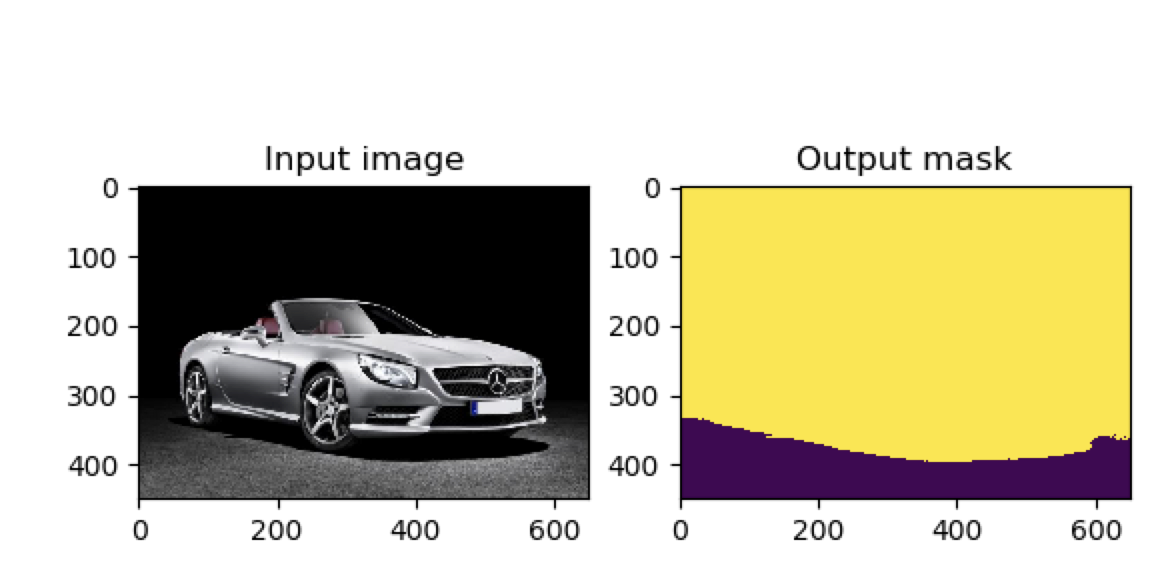
关闭该可视化图片命令就会运行结束:
Mask saved to output.jpg
(deeplearning) userdeMBP:Pytorch-UNet-master user$
并且在当前文件夹中生成名为output.jpg的文件,该图为:

3)预测多张图片并显示,预测结果不存储:
python predict.py -i image1.jpg image2.jpg --viz --no-save
测试:
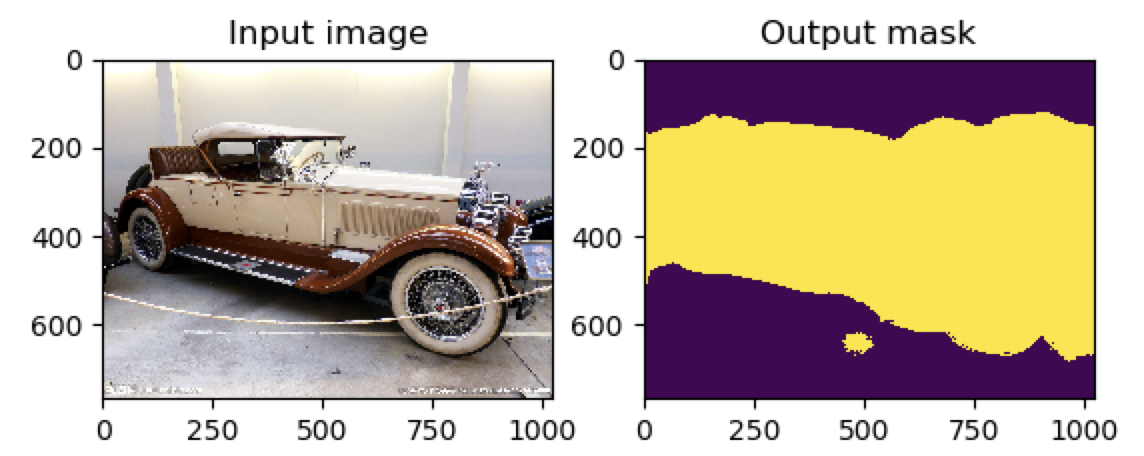
先得到的是image1.jpg的可视化结果:
(deeplearning) userdeMBP:Pytorch-UNet-master user$ python predict.py -i image1.jpg image2.jpg --viz --no-save --cpu
Loading model MODEL.pth
Using CPU version of the net, this may be very slow
Model loaded !

Predicting image image1.jpg ...
/anaconda3/envs/deeplearning/lib/python3.6/site-packages/torch/nn/modules/upsampling.py:129: UserWarning: nn.Upsample is deprecated. Use nn.functional.interpolate instead.
  warnings.warn("nn.{} is deprecated. Use nn.functional.interpolate instead.".format(self.name))
/anaconda3/envs/deeplearning/lib/python3.6/site-packages/torch/nn/functional.py:1332: UserWarning: nn.functional.sigmoid is deprecated. Use torch.sigmoid instead.
  warnings.warn("nn.functional.sigmoid is deprecated. Use torch.sigmoid instead.")
Visualizing results for image image1.jpg, close to continue ...
图为:

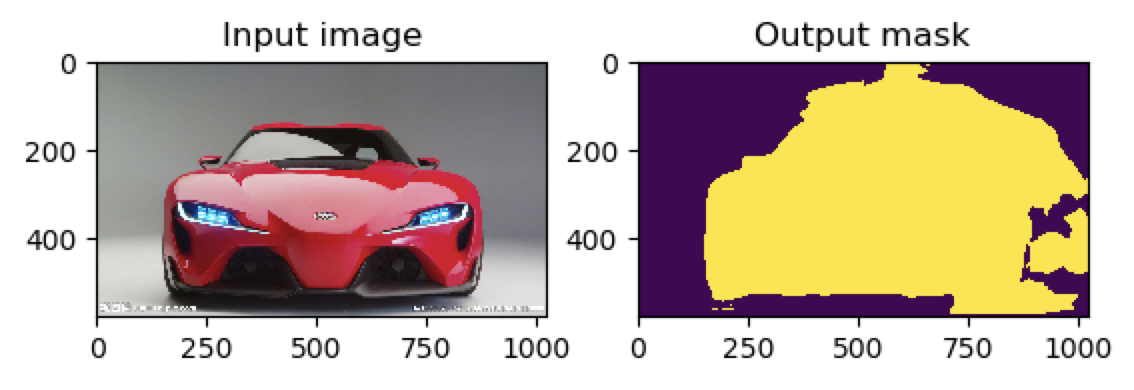
关闭这个后就会接着生成image2.jpg的可视化结果:
Predicting image image2.jpg ...
Visualizing results for image image2.jpg, close to continue ...
返回图为:
这时候关闭该可视化服务就会结束了,并且没有在本地保存生成的图片
4)如果你的计算机只有CPU,即CPU-only版本,使用选项--cpu指定
5)你可以指定你使用的训练好的模型文件,使用--mode MODEL.pth
6)如果使用上面的命令选项--no-crf:
(deeplearning) userdeMBP:Pytorch-UNet-master user$ python predict.py -i image1.jpg image2.jpg --viz --no-save --cpu --no-crf
返回的结果是:
还有:

可见crf后处理后,可以将一些不符合事实的判断结果给剔除,使得结果更加精确
2〉训练
python train.py -h
首先需要安装模块pydensecrf,实现CRF条件随机场的模块:
pip install pydensecrf
但是出错:
pydensecrf/densecrf/include/Eigen/Core:22:10: fatal error: 'complex' file not found
  #include <complex>
           ^~~~~~~~~
  1 warning and 1 error generated.
  error: command 'gcc' failed with exit status 1

  ----------------------------------------
  Failed building wheel for pydensecrf
  Running setup.py clean for pydensecrf
Failed to build pydensecrf
解决办法,参考https://github.com/lucasb-eyer/pydensecrf:
先安装cython,需要0.22以上的版本:
(deeplearning) userdeMBP:Pytorch-UNet-master user$ pip install -U cython
Installing collected packages: cython
Successfully installed cython-0.29.7
然后从git安装最新版本:
pip install git+https://github.com/lucasb-eyer/pydensecrf.git
但还是没有成功
后面找到了新的方法,使用conda来安装就成功了:
userdeMacBook-Pro:~ user$ conda install -n deeplearning -c conda-forge pydensecrf
-c指明从conda-forge下载模块
conda-forge是可以安装软件包的附加渠道,使用该conda-forge频道取代defaults
因为直接安装conda install -n deeplearning pydensecrf找不到该模块
这时候运行python train.py -h可见支持的选项的信息:
(deeplearning) userdeMBP:Pytorch-UNet-master user$ python train.py -h
Usage: train.py [options]

Options:
  -h, --help            show this help message and exit
  -e EPOCHS, --epochs=EPOCHS
                        number of epochs #指明迭代的次数
  -b BATCHSIZE, --batch-size=BATCHSIZE
                        batch size #图像批处理的大小
  -l LR, --learning-rate=LR
                        learning rate #使用的学习率
  -g, --gpu             use cuda #使用GPU进行训练
  -c LOAD, --load=LOAD  load file model #下载预训练的文件,在该基础上进行训练
  -s SCALE, --scale=SCALE
                        downscaling factor of the images #图像的缩小因子
3>代码分析
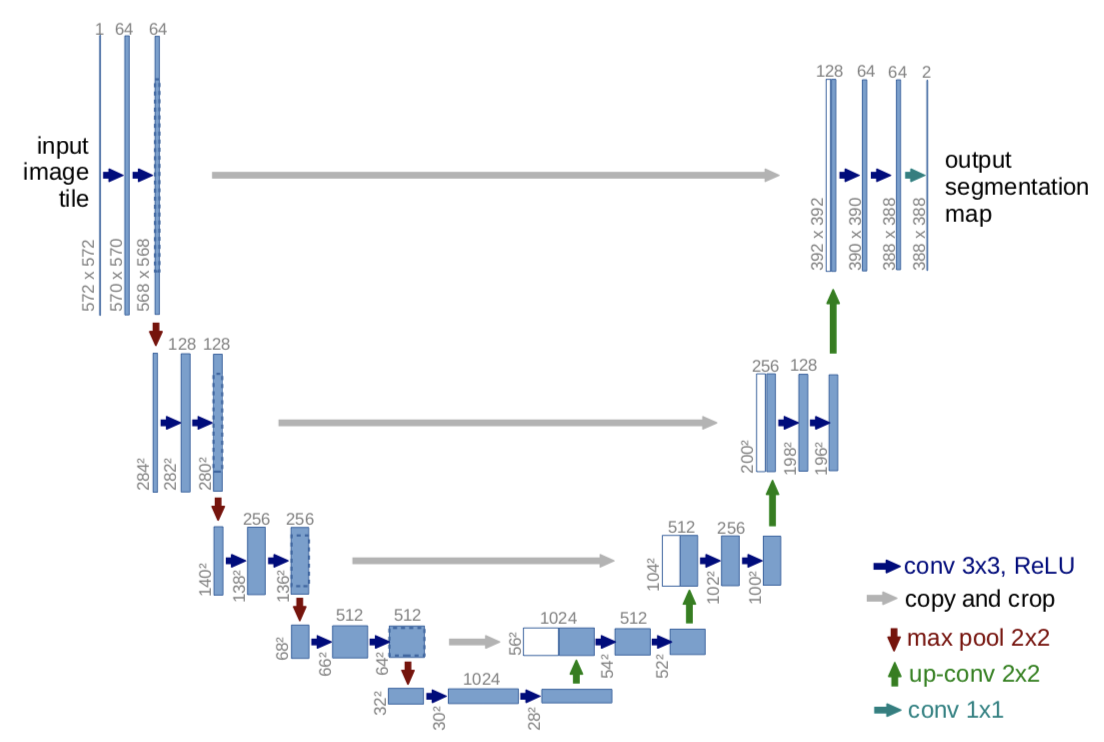
1》unet定义网络
unet/unet_parts.py
# sub-parts of the U-Net model

import torch
import torch.nn as nn
import torch.nn.functional as F

#实现左边的横向卷积
class double_conv(nn.Module):
    '''(conv => BN => ReLU) * 2'''
    def __init__(self, in_ch, out_ch):
        super(double_conv, self).__init__()
        self.conv = nn.Sequential(
            #以第一层为例进行讲解
            #输入通道数in_ch,输出通道数out_ch,卷积核设为kernal_size 3*3,padding为1,stride为1,dilation=1
            #所以图中H*W能从572*572 变为 570*570,计算为570 = ((572 + 2*padding - dilation*(kernal_size-1) -1) / stride ) +1
            nn.Conv2d(in_ch, out_ch, 3, padding=1),
            nn.BatchNorm2d(out_ch), #进行批标准化,在训练时,该层计算每次输入的均值与方差,并进行移动平均
            nn.ReLU(inplace=True), #激活函数
            nn.Conv2d(out_ch, out_ch, 3, padding=1), #再进行一次卷积,从570*570变为 568*568
            nn.BatchNorm2d(out_ch),
            nn.ReLU(inplace=True)
        )

    def forward(self, x):
        x = self.conv(x)
        return x

#实现左边第一行的卷积
class inconv(nn.Module):#
    def __init__(self, in_ch, out_ch):
        super(inconv, self).__init__()
        self.conv = double_conv(in_ch, out_ch) # 输入通道数in_ch为3, 输出通道数out_ch为64

    def forward(self, x):
        x = self.conv(x)
        return x

#实现左边的向下池化操作,并完成另一层的卷积
class down(nn.Module):
    def __init__(self, in_ch, out_ch):
        super(down, self).__init__()
        self.mpconv = nn.Sequential(
            nn.MaxPool2d(2),
            double_conv(in_ch, out_ch)
        )

    def forward(self, x):
        x = self.mpconv(x)
        return x

#实现右边的向上的采样操作,并完成该层相应的卷积操作
class up(nn.Module):
    def __init__(self, in_ch, out_ch, bilinear=True):
        super(up, self).__init__()

        #  would be a nice idea if the upsampling could be learned too,
        #  but my machine do not have enough memory to handle all those weights
        if bilinear:#声明使用的上采样方法为bilinear——双线性插值,默认使用这个值,计算方法为 floor(H*scale_factor),所以由28*28变为56*56
            self.up = nn.Upsample(scale_factor=2, mode='bilinear', align_corners=True)
        else: #否则就使用转置卷积来实现上采样,计算式子为 (Height-1)*stride - 2*padding -kernal_size +output_padding
            self.up = nn.ConvTranspose2d(in_ch//2, in_ch//2, 2, stride=2)

        self.conv = double_conv(in_ch, out_ch)

    def forward(self, x1, x2): #x2是左边特征提取传来的值
        #第一次上采样返回56*56,但是还没结束
        x1 = self.up(x1)

        # input is CHW, [0]是batch_size, [1]是通道数,更改了下,与源码不同
        diffY = x1.size()[2] - x2.size()[2] #得到图像x2与x1的H的差值,56-64=-8
        diffX = x1.size()[3] - x2.size()[3] #得到图像x2与x1的W差值,56-64=-8

        #用第一次上采样为例,即当上采样后的结果大小与右边的特征的结果大小不同时,通过填充来使x2的大小与x1相同
        #对图像进行填充(-4,-4,-4,-4),左右上下都缩小4,所以最后使得64*64变为56*56
        x2 = F.pad(x2, (diffX // 2, diffX - diffX//2,
                        diffY // 2, diffY - diffY//2))

        # for padding issues, see
        # https://github.com/HaiyongJiang/U-Net-Pytorch-Unstructured-Buggy/commit/0e854509c2cea854e247a9c615f175f76fbb2e3a
        # https://github.com/xiaopeng-liao/Pytorch-UNet/commit/8ebac70e633bac59fc22bb5195e513d5832fb3bd

        #将最后上采样得到的值x1和左边特征提取的值进行拼接,dim=1即在通道数上进行拼接,由512变为1024
        x = torch.cat([x2, x1], dim=1)
        x = self.conv(x)
        return x

#实现右边的最高层的最右边的卷积
class outconv(nn.Module):
    def __init__(self, in_ch, out_ch):
        super(outconv, self).__init__()
        self.conv = nn.Conv2d(in_ch, out_ch, 1)

    def forward(self, x):
        x = self.conv(x)
        return x
unet/unetmodel.py
# full assembly of the sub-parts to form the complete net

import torch.nn.functional as F

from .unet_parts import *

class UNet(nn.Module):
    def __init__(self, n_channels, n_classes): #图片的通道数,1为灰度图像,3为彩色图像
        super(UNet, self).__init__()
        self.inc = inconv(n_channels, 64) #假设输入通道数n_channels为3,输出通道数为64
        self.down1 = down(64, 128)
        self.down2 = down(128, 256)
        self.down3 = down(256, 512)
        self.down4 = down(512, 512)
        self.up1 = up(1024, 256)
        self.up2 = up(512, 128)
        self.up3 = up(256, 64)
        self.up4 = up(128, 64)
        self.outc = outconv(64, n_classes)

    def forward(self, x):
        x1 = self.inc(x)
        x2 = self.down1(x1)
        x3 = self.down2(x2)
        x4 = self.down3(x3)
        x5 = self.down4(x4)
        x = self.up1(x5, x4)
        x = self.up2(x, x3)
        x = self.up3(x, x2)
        x = self.up4(x, x1)
        x = self.outc(x)
        return F.sigmoid(x) #进行二分类
2》utils
实现dense CRF的代码utils/crf.py:
详细可见pydensecrf的使用
#coding:utf-8
import numpy as np
import pydensecrf.densecrf as dcrf

def dense_crf(img, output_probs): #img为输入的图像,output_probs是经过网络预测后得到的结果
    h = output_probs.shape[0] #高度
    w = output_probs.shape[1] #宽度

    output_probs = np.expand_dims(output_probs, 0)
    output_probs = np.append(1 - output_probs, output_probs, axis=0)

    d = dcrf.DenseCRF2D(w, h, 2) #NLABELS=2两类标注,车和不是车
    U = -np.log(output_probs) #得到一元势
    U = U.reshape((2, -1)) #NLABELS=2两类标注
    U = np.ascontiguousarray(U) #返回一个地址连续的数组
    img = np.ascontiguousarray(img)

    d.setUnaryEnergy(U) #设置一元势

    d.addPairwiseGaussian(sxy=20, compat=3) #设置二元势中高斯情况的值
    d.addPairwiseBilateral(sxy=30, srgb=20, rgbim=img, compat=10)#设置二元势众双边情况的值

    Q = d.inference(5) #迭代5次推理
    Q = np.argmax(np.array(Q), axis=0).reshape((h, w)) #得列中最大值的索引结果

    return Q
utils/utils.py
import random
import numpy as np

#将图像分成左右两块
def get_square(img, pos):
    """Extract a left or a right square from ndarray shape : (H, W, C))"""
    h = img.shape[0]
    if pos == 0:
        return img[:, :h]
    else:
        return img[:, -h:]

def split_img_into_squares(img):
    return get_square(img, 0), get_square(img, 1)

#对图像进行转置,将(H, W, C)变为(C, H, W)
def hwc_to_chw(img):
    return np.transpose(img, axes=[2, 0, 1])

def resize_and_crop(pilimg, scale=0.5, final_height=None):
    w = pilimg.size[0] #得到图片的宽
    h = pilimg.size[1]#得到图片的高
    #默认scale为0.5,即将高和宽都缩小一半
    newW = int(w * scale)
    newH = int(h * scale)

    #如果没有指明希望得到的最终高度
    if not final_height:
        diff = 0
    else:
        diff = newH - final_height
    #重新设定图片的大小
    img = pilimg.resize((newW, newH))
    #crop((left,upper,right,lower))函数,从图像中提取出某个矩形大小的图像。它接收一个四元素的元组作为参数,各元素为(left, upper, right, lower),坐标系统的原点(0, 0)是左上角
    #如果没有设置final_height,其实就是取整个图片
    #如果设置了final_height,就是取一个上下切掉diff // 2,最后高度为final_height的图片
    img = img.crop((0, diff // 2, newW, newH - diff // 2))
    return np.array(img, dtype=np.float32)

def batch(iterable, batch_size):
    """批量处理列表"""
    b = []
    for i, t in enumerate(iterable):
        b.append(t)
        if (i + 1) % batch_size == 0:
            yield b
            b = []

    if len(b) > 0:
        yield b

#然后将数据分为训练集和验证集两份
def split_train_val(dataset, val_percent=0.05):
    dataset = list(dataset)
    length = len(dataset) #得到数据集大小
    n = int(length * val_percent) #验证集的数量
    random.shuffle(dataset) #将数据打乱
    return {'train': dataset[:-n], 'val': dataset[-n:]}

#对像素值进行归一化,由[0,255]变为[0,1]
def normalize(x):
    return x / 255

#将两个图片合并起来
def merge_masks(img1, img2, full_w):
    h = img1.shape[0]

    new = np.zeros((h, full_w), np.float32)
    new[:, :full_w // 2 + 1] = img1[:, :full_w // 2 + 1]
    new[:, full_w // 2 + 1:] = img2[:, -(full_w // 2 - 1):]

    return new


# credits to https://stackoverflow.com/users/6076729/manuel-lagunas
def rle_encode(mask_image):
    pixels = mask_image.flatten()
    # We avoid issues with '1' at the start or end (at the corners of
    # the original image) by setting those pixels to '0' explicitly.
    # We do not expect these to be non-zero for an accurate mask,
    # so this should not harm the score.
    pixels[0] = 0
    pixels[-1] = 0
    runs = np.where(pixels[1:] != pixels[:-1])[0] + 2
    runs[1::2] = runs[1::2] - runs[:-1:2]
    return runs
utils/data_vis.py实现结果的可视化:
import matplotlib.pyplot as plt

def plot_img_and_mask(img, mask):
    fig = plt.figure()
    a = fig.add_subplot(1, 2, 1) #先是打印输入的图片
    a.set_title('Input image')
    plt.imshow(img)

    b = fig.add_subplot(1, 2, 2) #然后打印预测得到的结果图片
    b.set_title('Output mask')
    plt.imshow(mask)
    plt.show()
utils/load.py
#
# load.py : utils on generators / lists of ids to transform from strings to
#           cropped images and masks

import os

import numpy as np
from PIL import Image

from .utils import resize_and_crop, get_square, normalize, hwc_to_chw


def get_ids(dir):
    """返回目录中的id列表"""
    return (f[:-4] for f in os.listdir(dir)) #图片名字的后4位为数字,能作为图片id


def split_ids(ids, n=2):
    """将每个id拆分为n个,为每个id创建n个元组(id, k)"""
    #等价于for id in ids:
    #       for i in range(n):
    #           (id, i)
    #得到元祖列表[(id1,0),(id1,1),(id2,0),(id2,1),...,(idn,0),(idn,1)]
    #这样的作用是后面会通过后面的0,1作为utils.py中get_square函数的pos参数,pos=0的取左边的部分,pos=1的取右边的部分
    return ((id, i)  for id in ids for i in range(n))


def to_cropped_imgs(ids, dir, suffix, scale):
    """从元组列表中返回经过剪裁的正确img"""
    for id, pos in ids:
        im = resize_and_crop(Image.open(dir + id + suffix), scale=scale) #重新设置图片大小为原来的scale倍
        yield get_square(im, pos) #然后根据pos选择图片的左边或右边

def get_imgs_and_masks(ids, dir_img, dir_mask, scale):
    """返回所有组(img, mask)"""

    imgs = to_cropped_imgs(ids, dir_img, '.jpg', scale)

    # need to transform from HWC to CHW
    imgs_switched = map(hwc_to_chw, imgs) #对图像进行转置,将(H, W, C)变为(C, H, W)
    imgs_normalized = map(normalize, imgs_switched) #对像素值进行归一化,由[0,255]变为[0,1]

    masks = to_cropped_imgs(ids, dir_mask, '_mask.gif', scale) #对图像的结果也进行相同的处理

    return zip(imgs_normalized, masks) #并将两个结果打包在一起


def get_full_img_and_mask(id, dir_img, dir_mask):
    im = Image.open(dir_img + id + '.jpg')
    mask = Image.open(dir_mask + id + '_mask.gif')
    return np.array(im), np.array(mask)
3》预测
predict.py使用训练好的U-net网络对图像进行预测,使用dense CRF进行后处理:
#coding:utf-8
import argparse
import os

import numpy as np
import torch
import torch.nn.functional as F

from PIL import Image

from unet import UNet
from utils import resize_and_crop, normalize, split_img_into_squares, hwc_to_chw, merge_masks, dense_crf
from utils import plot_img_and_mask

from torchvision import transforms

def predict_img(net,
                full_img,
                scale_factor=0.5,
                out_threshold=0.5,
                use_dense_crf=True,
                use_gpu=False):

    net.eval() #进入网络的验证模式,这时网络已经训练好了
    img_height = full_img.size[1] #得到图片的高
    img_width = full_img.size[0] #得到图片的宽

    img = resize_and_crop(full_img, scale=scale_factor) #在utils文件夹的utils.py中定义的函数,重新定义图像大小并进行切割,然后将图像转为数组np.array
    img = normalize(img) #对像素值进行归一化,由[0,255]变为[0,1]

    left_square, right_square = split_img_into_squares(img)#将图像分成左右两块,来分别进行判断

    left_square = hwc_to_chw(left_square) #对图像进行转置,将(H, W, C)变为(C, H, W),便于后面计算
    right_square = hwc_to_chw(right_square)

    X_left = torch.from_numpy(left_square).unsqueeze(0) #将(C, H, W)变为(1, C, H, W),因为网络中的输入格式第一个还有一个batch_size的值
    X_right = torch.from_numpy(right_square).unsqueeze(0)

    if use_gpu:
        X_left = X_left.cuda()
        X_right = X_right.cuda()

    with torch.no_grad(): #不计算梯度
        output_left = net(X_left)
        output_right = net(X_right)

        left_probs = output_left.squeeze(0)
        right_probs = output_right.squeeze(0)

        tf = transforms.Compose(
            [
                transforms.ToPILImage(), #重新变成图片
                transforms.Resize(img_height), #恢复原来的大小
                transforms.ToTensor() #然后再变成Tensor格式
            ]
        )

        left_probs = tf(left_probs.cpu())
        right_probs = tf(right_probs.cpu())

        left_mask_np = left_probs.squeeze().cpu().numpy()
        right_mask_np = right_probs.squeeze().cpu().numpy()

    full_mask = merge_masks(left_mask_np, right_mask_np, img_width)#将左右两个拆分后的图片合并起来

    #对得到的结果根据设置决定是否进行CRF处理
    if use_dense_crf:
        full_mask = dense_crf(np.array(full_img).astype(np.uint8), full_mask)

    return full_mask > out_threshold


def get_args():
    parser = argparse.ArgumentParser()
    parser.add_argument('--model', '-m', default='MODEL.pth', #指明使用的训练好的模型文件,默认使用MODEL.pth
                        metavar='FILE',
                        help="Specify the file in which is stored the model"
                             " (default : 'MODEL.pth')")
    parser.add_argument('--input', '-i', metavar='INPUT', nargs='+',  #指明要进行预测的图像文件
                        help='filenames of input images', required=True)

    parser.add_argument('--output', '-o', metavar='INPUT', nargs='+', #指明预测后生成的图像文件的名字
                        help='filenames of ouput images')
    parser.add_argument('--cpu', '-c', action='store_true', #指明使用CPU
                        help="Do not use the cuda version of the net",
                        default=False)
    parser.add_argument('--viz', '-v', action='store_true',
                        help="Visualize the images as they are processed", #当图像被处理时,将其可视化
                        default=False)
    parser.add_argument('--no-save', '-n', action='store_true', #不存储得到的预测图像到某图像文件中,和--viz结合使用,即可对预测结果可视化,但是不存储结果
                        help="Do not save the output masks",
                        default=False)
    parser.add_argument('--no-crf', '-r', action='store_true', #指明不使用CRF对输出进行后处理
                        help="Do not use dense CRF postprocessing",
                        default=False)
    parser.add_argument('--mask-threshold', '-t', type=float,
                        help="Minimum probability value to consider a mask pixel white", #最小概率值考虑掩模像素为白色
                        default=0.5)
    parser.add_argument('--scale', '-s', type=float,
                        help="Scale factor for the input images", #输入图像的比例因子
                        default=0.5)

    return parser.parse_args()

def get_output_filenames(args):#从输入的选项args值中得到输出文件名
    in_files = args.input
    out_files = []

    if not args.output: #如果在选项中没有指定输出的图片文件的名字,那么就会根据输入图片文件名,在其后面添加'_OUT'后缀来作为输出图片文件名
        for f in in_files:
            pathsplit = os.path.splitext(f) #将文件名和扩展名分开,pathsplit[0]是文件名,pathsplit[1]是扩展名
            out_files.append("{}_OUT{}".format(pathsplit[0], pathsplit[1])) #得到输出图片文件名
    elif len(in_files) != len(args.output): #如果设置了output名,查看input和output的数量是否相同,即如果input是两张图,那么设置的output也必须是两个,否则报错
        print("Error : Input files and output files are not of the same length")
        raise SystemExit()
    else:
        out_files = args.output

    return out_files

def mask_to_image(mask):
    return Image.fromarray((mask * 255).astype(np.uint8)) #从数组array转成Image

if __name__ == "__main__":
    args = get_args() #得到输入的选项设置的值
    in_files = args.input #得到输入的图像文件
    out_files = get_output_filenames(args) #从输入的选项args值中得到输出文件名

    net = UNet(n_channels=3, n_classes=1) #定义使用的model为UNet,调用在UNet文件夹下定义的unet_model.py,定义图像的通道为3,即彩色图像,判断类型设为1种

    print("Loading model {}".format(args.model)) #指定使用的训练好的model

    if not args.cpu: #指明使用GPU
        print("Using CUDA version of the net, prepare your GPU !")
        net.cuda()
        net.load_state_dict(torch.load(args.model))
    else: #否则使用CPU
        net.cpu()
        net.load_state_dict(torch.load(args.model, map_location='cpu'))
        print("Using CPU version of the net, this may be very slow")

    print("Model loaded !")

    for i, fn in enumerate(in_files): #对图片进行预测
        print("
Predicting image {} ...".format(fn))

        img = Image.open(fn)
        if img.size[0] < img.size[1]: #(W, H, C)
            print("Error: image height larger than the width")

        mask = predict_img(net=net,
                           full_img=img,
                           scale_factor=args.scale,
                           out_threshold=args.mask_threshold,
                           use_dense_crf= not args.no_crf,
                           use_gpu=not args.cpu)

        if args.viz: #可视化输入的图片和生成的预测图片
            print("Visualizing results for image {}, close to continue ...".format(fn))
            plot_img_and_mask(img, mask)

        if not args.no_save:#设置为False,则保存
            out_fn = out_files[i]
            result = mask_to_image(mask) #从数组array转成Image
            result.save(out_files[i]) #然后保存

            print("Mask saved to {}".format(out_files[i]))
4》训练
import sys
import os
from optparse import OptionParser
import numpy as np

import torch
import torch.backends.cudnn as cudnn
import torch.nn as nn
from torch import optim

from eval import eval_net
from unet import UNet
from utils import get_ids, split_ids, split_train_val, get_imgs_and_masks, batch

def train_net(net,
              epochs=5,
              batch_size=1,
              lr=0.1,
              val_percent=0.05,
              save_cp=True,
              gpu=False,
              img_scale=0.5):

    dir_img = 'data/train/' #训练图像文件夹
    dir_mask = 'data/train_masks/' #图像的结果文件夹
    dir_checkpoint = 'checkpoints/' #训练好的网络保存文件夹

    ids = get_ids(dir_img)#图片名字的后4位为数字,能作为图片id

    #得到元祖列表为[(id1,0),(id1,1),(id2,0),(id2,1),...,(idn,0),(idn,1)]
    #这样的作用是后面重新设置生成器时会通过后面的0,1作为utils.py中get_square函数的pos参数,pos=0的取左边的部分,pos=1的取右边的部分
    #这样图片的数量就会变成2倍
    ids = split_ids(ids)

    iddataset = split_train_val(ids, val_percent) #将数据分为训练集和验证集两份

    print('''
    Starting training:
        Epochs: {}
        Batch size: {}
        Learning rate: {}
        Training size: {}
        Validation size: {}
        Checkpoints: {}
        CUDA: {}
    '''.format(epochs, batch_size, lr, len(iddataset['train']),
               len(iddataset['val']), str(save_cp), str(gpu)))

    N_train = len(iddataset['train']) #训练集长度

    optimizer = optim.SGD(net.parameters(), #定义优化器
                          lr=lr,
                          momentum=0.9,
                          weight_decay=0.0005)

    criterion = nn.BCELoss()#损失函数

    for epoch in range(epochs): #开始训练
        print('Starting epoch {}/{}.'.format(epoch + 1, epochs))
        net.train() #设置为训练模式

        # reset the generators重新设置生成器
        # 对输入图片dir_img和结果图片dir_mask进行相同的图片处理,即缩小、裁剪、转置、归一化后,将两个结合在一起,返回(imgs_normalized, masks)
        train = get_imgs_and_masks(iddataset['train'], dir_img, dir_mask, img_scale)
        val = get_imgs_and_masks(iddataset['val'], dir_img, dir_mask, img_scale)

        epoch_loss = 0

        for i, b in enumerate(batch(train, batch_size)):
            imgs = np.array([i[0] for i in b]).astype(np.float32) #得到输入图像数据
            true_masks = np.array([i[1] for i in b]) #得到图像结果数据

            imgs = torch.from_numpy(imgs)
            true_masks = torch.from_numpy(true_masks)

            if gpu:
                imgs = imgs.cuda()
                true_masks = true_masks.cuda()

            masks_pred = net(imgs) #图像输入的网络后得到结果masks_pred,结果为灰度图像
            masks_probs_flat = masks_pred.view(-1) #将结果压扁

            true_masks_flat = true_masks.view(-1)

            loss = criterion(masks_probs_flat, true_masks_flat) #对两个结果计算损失
            epoch_loss += loss.item()

            print('{0:.4f} --- loss: {1:.6f}'.format(i * batch_size / N_train, loss.item()))

            optimizer.zero_grad()
            loss.backward()
            optimizer.step()

        print('Epoch finished ! Loss: {}'.format(epoch_loss / i)) #一次迭代后得到的平均损失

        if 1:
            val_dice = eval_net(net, val, gpu)
            print('Validation Dice Coeff: {}'.format(val_dice))

        if save_cp:
            torch.save(net.state_dict(),
                       dir_checkpoint + 'CP{}.pth'.format(epoch + 1))
            print('Checkpoint {} saved !'.format(epoch + 1))


def get_args():
    parser = OptionParser()
    parser.add_option('-e', '--epochs', dest='epochs', default=5, type='int', #设置迭代数
                      help='number of epochs')
    parser.add_option('-b', '--batch-size', dest='batchsize', default=10, #设置训练批处理数
                      type='int', help='batch size')
    parser.add_option('-l', '--learning-rate', dest='lr', default=0.1, #设置学习率
                      type='float', help='learning rate')
    parser.add_option('-g', '--gpu', action='store_true', dest='gpu', #是否使用GPU,默认是不使用
                      default=False, help='use cuda')
    parser.add_option('-c', '--load', dest='load', #下载之前预训练好的模型
                      default=False, help='load file model')
    parser.add_option('-s', '--scale', dest='scale', type='float', #图像的缩小因子,用来重新设置图片大小
                      default=0.5, help='downscaling factor of the images')

    (options, args) = parser.parse_args()
    return options

if __name__ == '__main__':
    args = get_args() #得到设置的所有参数信息

    net = UNet(n_channels=3, n_classes=1)

    if args.load: #是否加载预先训练好的模型
        net.load_state_dict(torch.load(args.load))
        print('Model loaded from {}'.format(args.load))

    if args.gpu: #是否使用GPU,设置为True,则使用
        net.cuda()
        # cudnn.benchmark = True # faster convolutions, but more memory

    try: #开始训练
        train_net(net=net,
                  epochs=args.epochs,
                  batch_size=args.batchsize,
                  lr=args.lr,
                  gpu=args.gpu,
                  img_scale=args.scale)
    except KeyboardInterrupt: #如果键盘输入ctrl+c停止,则会将结果保存在INTERRUPTED.pth中
        torch.save(net.state_dict(), 'INTERRUPTED.pth')
        print('Saved interrupt')
        try:
            sys.exit(0)
        except SystemExit:
            os._exit(0)