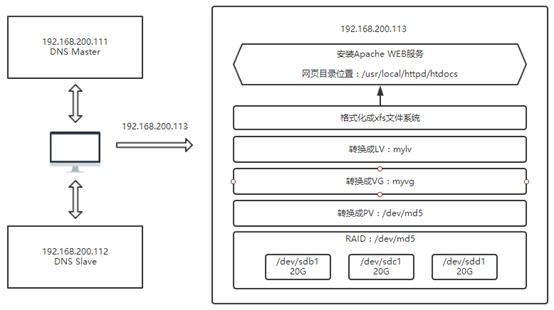
创建RAID5
首先添加四块磁盘bcde,我这里是每块容量20G,第四块备用
使用fdisk为每块磁盘分一个主分区。容量为20G
fdisk -l|grep "/dev/sd"

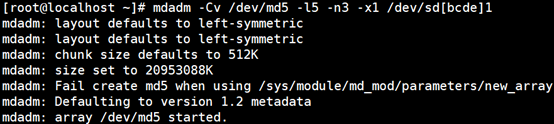
分完区之后开始创建RAID5命名为md5
mdadm -Cv /dev/md5 -l5 -n3 -x1 /dev/sd[bcde]1
手动创建RAID配置文件 /etc/mdadm.conf
mdadm -D -s > /etc/mdadm.conf
vim /etc/mdadm.conf
ARRAY /dev/md5 metadata=1.2 spares=2 name=localhost.localdomain:5 UUID=01d880fd:4716cca7:7072e584:e3c07be2 auto=yes
保存退出
创建物理卷、卷组、逻辑卷
转换成PV
[root@localhost ~]#pvcreate /dev/md5
Physical volume "/dev/md5" successfully created.
转换成VG
[root@localhost ~]# vgcreate -s 8 myvg /dev/md5
Volume group "myvg" successfully created
转换成LV
[root@localhost ~]# lvcreate -L 10G -n mylv myvg
Logical volume "mylv" created.
格式化为xfs系统
[root@localhost ~]# mkfs.xfs /dev/myvg/mylv
meta-data=/dev/myvg/mylv isize=512 agcount=16, agsize=163712 blks
= sectsz=512 attr=2, projid32bit=1
= crc=1 finobt=0, sparse=0
data = bsize=4096 blocks=2619392, imaxpct=25
= sunit=128 swidth=256 blks
naming =version 2 bsize=4096 ascii-ci=0 ftype=1
log =internal log bsize=4096 blocks=2560, version=2
= sectsz=512 sunit=8 blks, lazy-count=1
realtime =none extsz=4096 blocks=0, rtextents=0
安装Apache Web服务
使用xftp工具上传软件包释放到//src/目录

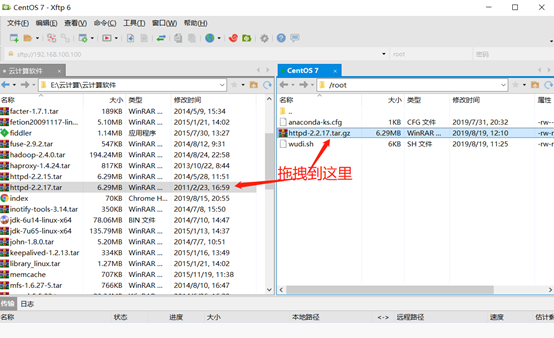

释放到/usr/src/
[root@localhost ~]# tar xf httpd-2.2.17.tar.gz -C /usr/src/
预配置
[root@localhost httpd-2.2.17]# ./configure --prefix=/usr/local/apache
……….
config.status: creating support/log_server_status
config.status: creating support/logresolve.pl
config.status: creating support/phf_abuse_log.cgi
config.status: creating support/split-logfile
config.status: creating build/rules.mk
config.status: creating build/pkg/pkginfo
config.status: creating build/config_vars.sh
config.status: creating include/ap_config_auto.h
config.status: executing default commands
编译
[root@localhost httpd-2.2.17]#make
………………..
.la modules/http/libmod_mime.la modules/generators/libmod_status.la modules/generators/libmod_autoindex.la modules/generators/libmod_asis.la modules/generators/libmod_cgi.la modules/mappers/libmod_negotiation.la modules/mappers/libmod_dir.la modules/mappers/libmod_actions.la modules/mappers/libmod_userdir.la modules/mappers/libmod_alias.la modules/mappers/libmod_so.la server/mpm/prefork/libprefork.la os/unix/libos.la -lm /usr/src/httpd-2.2.17/srclib/pcre/libpcre.la /usr/src/httpd-2.2.17/srclib/apr-util/libaprutil-1.la /usr/src/httpd-2.2.17/srclib/apr-util/xml/expat/libexpat.la /usr/src/httpd-2.2.17/srclib/apr/libapr-1.la -lrt -lcrypt -lpthread -ldl
make[1]: 离开目录“/usr/src/httpd-2.2.17”
安装
[root@localhost httpd-2.2.17]# make install
………….
mkdir /usr/local/apache/cgi-bin
Installing header files
Installing build system files
Installing man pages and online manual
mkdir /usr/local/apache/man
mkdir /usr/local/apache/man/man1
mkdir /usr/local/apache/man/man8
mkdir /usr/local/apache/manual
make[1]: 离开目录“/usr/src/httpd-2.2.17”
备份后修改配置文件
[root@localhost httpd-2.2.17]# cd /usr/local/apache/conf/
[root@localhost conf]# cp httpd.conf httpd.conf.bak
………
# This can often be determined automatically, but we recommend you specify
# it explicitly to prevent problems during startup.
#
# If your host doesn't have a registered DNS name, enter its IP address here.
#
ServerName www.example.com:80
#
# DocumentRoot: The directory out of which you will serve your
# documents. By default, all requests are taken from this directory, but
# symbolic links and aliases may be used to point to other locations.
打开80
保存退出
启动Apache
[root@localhost conf]# /usr/local/apache/bin/apachectl start
运行lynx 127.0.0.1 测试 #如没有lynx命令需安装
1、用户需把/dev/myvg/mylv逻辑卷以支持磁盘配额的方式挂载到网页目录下
[root@localhost ~]# mount /dev/myvg/mylv /usr/local/apache/htdocs/
[root@localhost ~]# mount -o remount,usrquota,grpquota /usr/local/apache/htdocs/
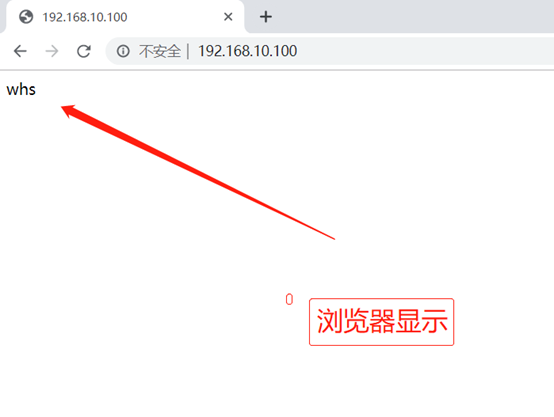
2、在网页目录下创建测试文件index.html,内容为用户名称,通过浏览器访问测试
[root@localhost ~]# vim /usr/local/apache/htdocs/index.html
whs
3、创建用户账户,对LVM配置磁盘配额限制用户磁盘容量为软限制80M;硬限制100M、文件数量软限制为80个;硬限制为100个
[root@ localhost ~]# useradd whs
[root@localhost ~]# vim /etc/fstab
/dev/mapper/centos-root / xfs defaults 0 0
UUID=a220eccb-2c0f-485d-bca4-f3659f3326e8 /boot xfs defaults 0
0
/dev/mapper/centos-swap swap swap defaults 0 0
/dev/mapper/myvg-mylv /usr/local/apache/htdocs xfs defaults,usrquota 0 0
[root@ localhost ~]# umount /usr/local/apache/htdocs
[root@ localhost ~]#mount-a
[root@ localhost ~]#mount|grep/usr/local/apache/htdocs
/dev/mapper/myvg-mylv on /usr/local/apache/htdocs type xfs (rw,relatime,seclabel,attr2,inode64,sunit=1024,swidth=2048,usrquota)
[root@ localhost ~]# quotacheck -avug
[root@ localhost ~]# quotaon -avug
[root@localhost ~]# setquota -u whs 80000 100000 80 100 /usr/local/apache/htdocs
[root@ localhost ~]# quota -uvs whs
Disk quotas for user whs (uid 8905):
Filesystem space quota limit grace files quota limit grace
/dev/mapper/myvg-mylv
0K 80000K 100000K 0 80 100
4、构建主从DNS域名解析环境
配置本地yum源
主服务器
[root@localhost ~]# yum -y install bind
[root@localhost ~]# vim /etc/resolv.conf
# Generated by NetworkManager
nameserver 192.168.10.11
nameserver 192.168.10.12
[root@localhost ~]# cat /etc/hosts
127.0.0.1 localhost localhost.localdomain localhost4 localhost4.localdomain4
::1 localhost localhost.localdomain localhost6 localhost6.localdomain6
192.168.10.11 ns1.whs.com
192.168.10.12 ns2.whs.com
[root@localhost ~]# cat /etc/named.conf
options {
directory "/var/named";
};
zone "whs.com" IN {
type master;
file "whs.zheng";
allow-transfer { 192.168.10.12; };
};
zone "10.168.192.in-addr.arpa" IN {
type master;
file "whs.fan";
allow-transfer { 192.168.10.12; };
};
[root@localhost ~]# cat /var/named/crushlinux.zheng
$TTL 86400
@ IN SOA whs.com. admin.whs.com. (
12345
3H
15M
1W
1D
)
IN NS ns1.crushlinux.com.
IN NS ns2.crushlinux.com.
ns1 IN A 192.168.10.11
ns2 IN A 192.168.10.12
www IN A 192.168.10.100
[root@localhost ~]# cat /var/named/crushlinux.fan
$TTL 86400
@ IN SOA whs.com. admin.whs.com. (
20190817
3H
15M
1W
1D
)
IN NS ns1.whs.com.
IN NS ns2.whs.com.
11 IN PTR ns1.whs.com.
12 IN PTR ns2.whs.com.
100 IN PTR www.whs.com.
保存退出
[root@localhost ~]# systemctl restart named
从服务器
同样配置yum本地仓库
[root@localhost ~]# yum -y install bind
[root@localhost ~]# cat /etc/resolv.conf
# Generated by NetworkManager
nameserver 192.168.10.11
nameserver 192.168.10.12
[root@localhost ~]# cat /etc/named.conf
options {
directory "/var/named";
};
zone "whs.com" IN {
type slave;
file "slaves/whs.zheng";
masters { 192.168.10.11; };
};
zone "10.168.192.in-addr.arpa" IN {
type slave;
file "slaves/whs.fan";
masters { 192.168.10.11; };
};
[root@localhost ~]# systemctl restart named
主从DNS都可将www.whs.com域名解析为192.168.200.113

