一、准备工作
1.开发工具 Visual Studio 2013
2.安装 Entity Framework 6 Tools for Visual Studio 2012 & 2013 来实现 Code First with Database
工具下载: http://www.microsoft.com/en-us/download/details.aspx?id=40762
3.创建示例数据库 MyShop


USE MyShop
GO

CREATE TABLE [dbo].[Categories]
(
  [CategoryId] [INT] NOT NULL IDENTITY ,
  [Name] [NVARCHAR](MAX) ,
  CONSTRAINT [PK_dbo.Categories] PRIMARY KEY ( [CategoryId] )
)

CREATE TABLE [dbo].[Products]
(
  [ProductId] [INT] NOT NULL
                    IDENTITY ,
  [Name] [NVARCHAR](MAX) ,
  [CategoryId] [INT] NOT NULL ,
  CONSTRAINT [PK_dbo.Products] PRIMARY KEY ( [ProductId] )
)

CREATE INDEX [IX_CategoryId] ON [dbo].[Products]([CategoryId])

ALTER TABLE [dbo].[Products]
ADD CONSTRAINT [FK_dbo.Products_dbo.Categories_CategoryId]
FOREIGN KEY ([CategoryId]) REFERENCES [dbo].[Categories] ([CategoryId])
ON DELETE CASCADE
GO

INSERT INTO dbo.Categories ( Name ) VALUES( N'水果' )
INSERT INTO dbo.Categories ( Name ) VALUES( N'肉类' )
GO

INSERT INTO dbo.Products ( Name, CategoryId ) VALUES  ( N'苹果', 1)
INSERT INTO dbo.Products ( Name, CategoryId ) VALUES  ( N'菠萝', 1)
INSERT INTO dbo.Products ( Name, CategoryId ) VALUES  ( N'猪肉', 2)
INSERT INTO dbo.Products ( Name, CategoryId ) VALUES  ( N'牛肉', 2)
INSERT INTO dbo.Products ( Name, CategoryId ) VALUES  ( N'人肉', 2)
GO

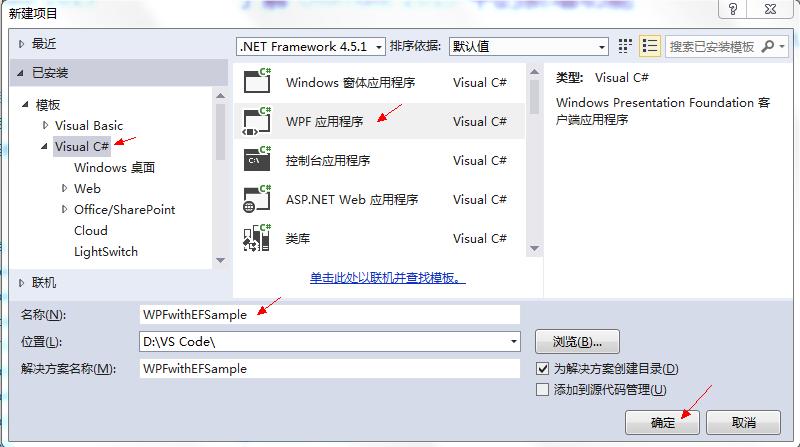
二、创建项目 WPFwithEFSample
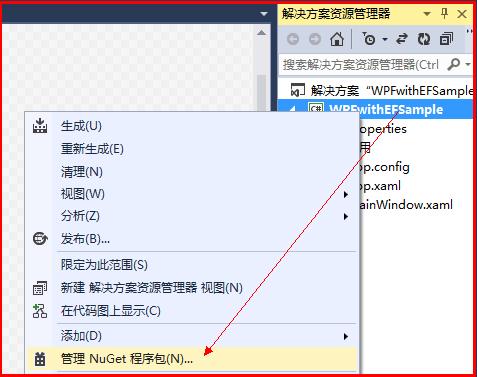
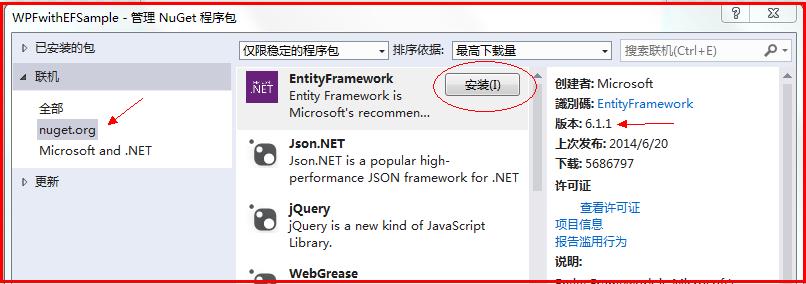
三、更新 Entity Framework
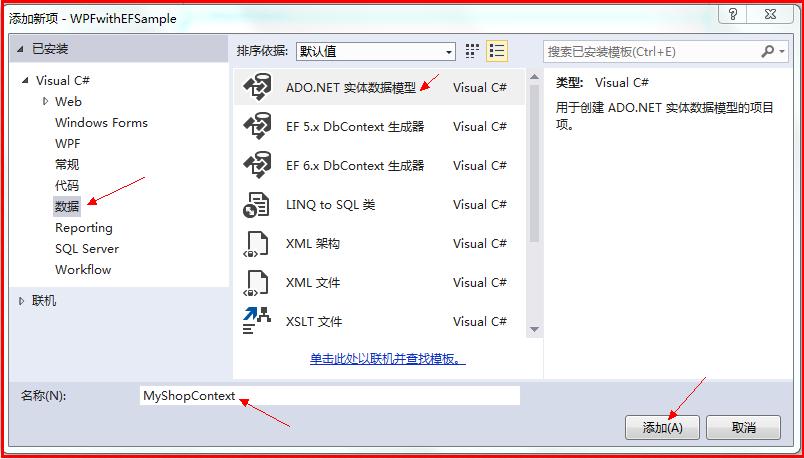
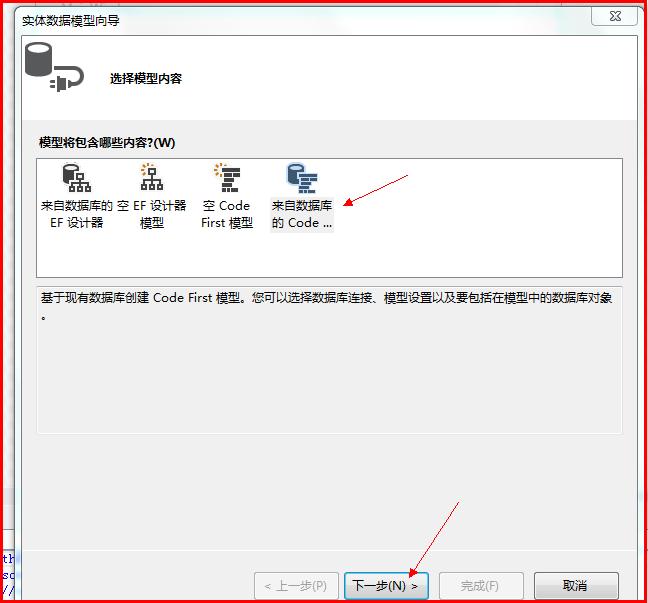
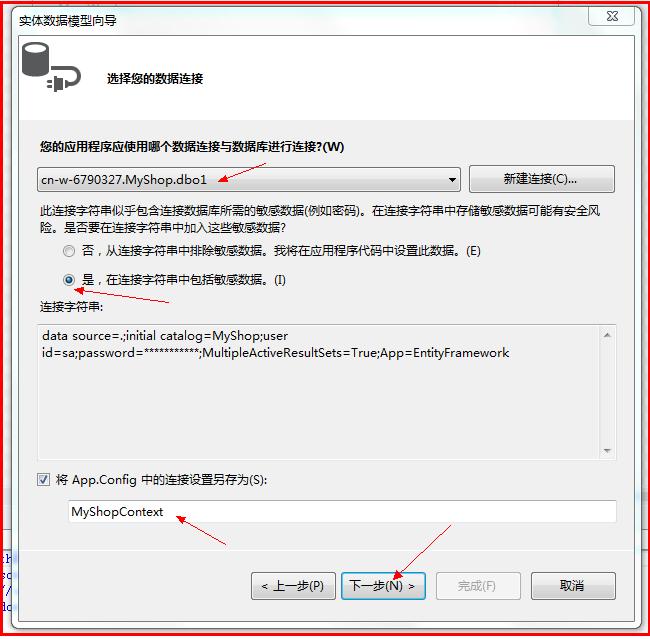
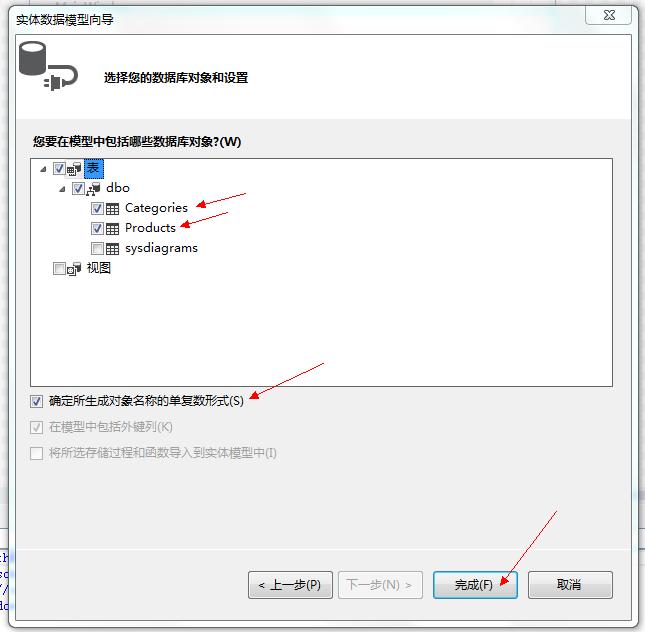
四、创建Code First with Database
上面的步骤会自动生成实体类,所以需要编译一下,下一步的动作才会显示出需要的对象。

我们看下Code First with Database 工具帮我们生成了什么东东。

生成了3个文件,其中2个实体文件,分别对应数据库里的2张表Category 和 Product。还有一个MyShopContext.cs,这是数据库上下文,操作数据库的时候需要实例化此类。
namespace WPFwithEFSample
{
    using System;
    using System.Collections.Generic;
    using System.ComponentModel.DataAnnotations;
    using System.ComponentModel.DataAnnotations.Schema;
    using System.Data.Entity.Spatial;

    public partial class Category
    {
        public Category()
        {
            Products = new HashSet<Product>();
        }

        public int CategoryId { get; set; }

        public string Name { get; set; }

        public virtual ICollection<Product> Products { get; set; }
    }
}
namespace WPFwithEFSample
{
    using System;
    using System.Collections.Generic;
    using System.ComponentModel.DataAnnotations;
    using System.ComponentModel.DataAnnotations.Schema;
    using System.Data.Entity.Spatial;

    public partial class Product
    {
        public int ProductId { get; set; }

        public string Name { get; set; }

        public int CategoryId { get; set; }

        public virtual Category Category { get; set; }
    }
}
namespace WPFwithEFSample
{
    using System;
    using System.Data.Entity;
    using System.ComponentModel.DataAnnotations.Schema;
    using System.Linq;

    public partial class MyShopContext : DbContext
    {
        public MyShopContext()
            : base("name=MyShopContext")
        {
        }

        public virtual DbSet<Category> Categories { get; set; }
        public virtual DbSet<Product> Products { get; set; }

        protected override void OnModelCreating(DbModelBuilder modelBuilder)
        {
        }
    }
}
MyShopContext.cs 代码中的 name=MyShopContext 值来自于配置文件 App.Config中的数据库连接字符串

  <connectionStrings>
    <add name="MyShopContext"
         connectionString="data source=.;initial catalog=MyShop;user id=sa;password=*******;MultipleActiveResultSets=True;App=EntityFramework"
         providerName="System.Data.SqlClient" />
  </connectionStrings>
五、添加数据源,来自对象,也就是刚才用Code First with Database 工具生成的类,并且需要编译一次,否则向导工具发现不了!
调出数据源窗口:视图 -> 其他窗口 -> 数据源
然后点击 数据库窗口的超链接“添加数据源...”

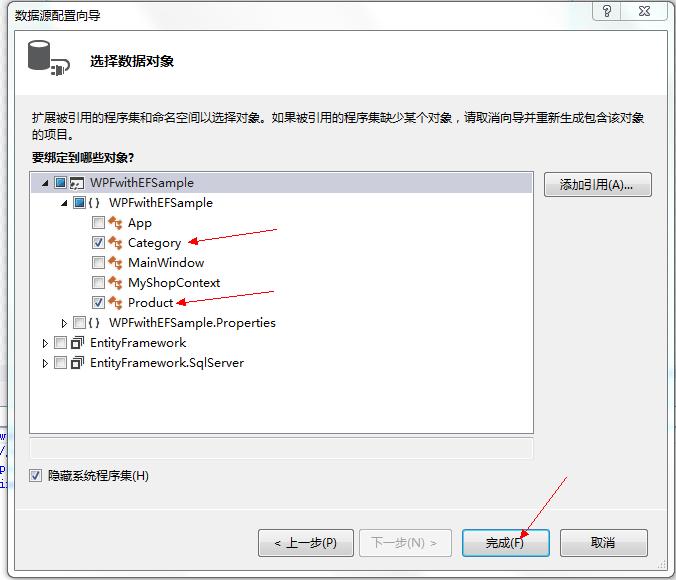
如果没发现Category 和Product 选项,重新编译一下就可以了。
点击完成后,在数据源窗口会出现相关项:

生成的这些项后,我们就可以用鼠标拖到窗口后,就能创建界面控件
如果把Category用鼠标拖到界面就能创建GridView控件等
接下来我们就点击上面第一个Category项直接拖入到 MainWindow.xaml 图形界面,看看会产生什么。(不知道为什么每次都要拖2次才成功,可能是VS2013的bug吧)
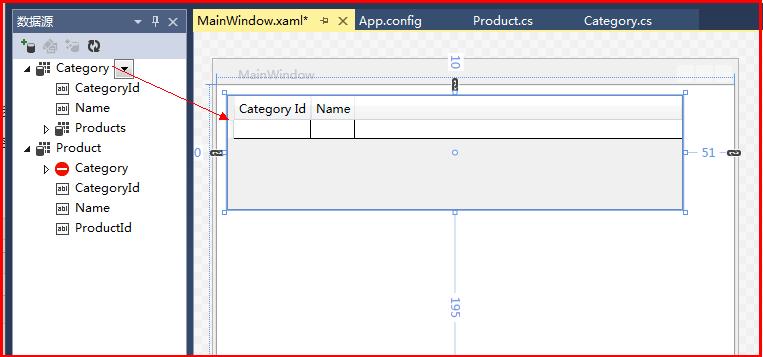
拖入完后,会在2处自动添加代码,一个是 MainWindow.xaml , 另一个是 MainWindow.xaml.cs
<Window
        xmlns="http://schemas.microsoft.com/winfx/2006/xaml/presentation"
        xmlns:x="http://schemas.microsoft.com/winfx/2006/xaml"
        xmlns:d="http://schemas.microsoft.com/expression/blend/2008"
        xmlns:mc="http://schemas.openxmlformats.org/markup-compatibility/2006"
        xmlns:local="clr-namespace:WPFwithEFSample" mc:Ignorable="d" x:Class="WPFwithEFSample.MainWindow"
        Title="MainWindow" Height="350" Width="525" Loaded="Window_Loaded">
    <Window.Resources>
        <CollectionViewSource x:Key="categoryViewSource" d:DesignSource="{d:DesignInstance {x:Type local:Category}, CreateList=True}"/>
    </Window.Resources>
    <Grid DataContext="{StaticResource categoryViewSource}">

        <DataGrid x:Name="categoryDataGrid" RowDetailsVisibilityMode="VisibleWhenSelected" Margin="10,10,51,195" ItemsSource="{Binding}" EnableRowVirtualization="True" AutoGenerateColumns="False">
            <DataGrid.Columns>
                <DataGridTextColumn x:Name="categoryIdColumn" Width="SizeToHeader" Header="Category Id" Binding="{Binding CategoryId}"/>
                <DataGridTextColumn x:Name="nameColumn" Width="SizeToHeader" Header="Name" Binding="{Binding Name}"/>
            </DataGrid.Columns>
        </DataGrid>

    </Grid>
</Window>
using System.Text;
using System.Threading.Tasks;
using System.Windows;
using System.Windows.Controls;
using System.Windows.Data;
using System.Windows.Documents;
using System.Windows.Input;
using System.Windows.Media;
using System.Windows.Media.Imaging;
using System.Windows.Navigation;
using System.Windows.Shapes;

namespace WPFwithEFSample
{
    /// <summary>
    /// MainWindow.xaml 的交互逻辑
    /// </summary>
    public partial class MainWindow : Window
    {
        public MainWindow()
        {
            InitializeComponent();
        }

        private void Window_Loaded(object sender, RoutedEventArgs e)
        {

            System.Windows.Data.CollectionViewSource categoryViewSource = ((System.Windows.Data.CollectionViewSource)(this.FindResource("categoryViewSource")));
            // 通过设置 CollectionViewSource.Source 属性加载数据:
            // categoryViewSource.Source = [一般数据源]
        }
    }
}
接下来我们要分析一下这些自动生成的代码的用意。先看 MainWindow.xaml.cs,它就一条语句,意思是:在MainWindow.xaml 页面找到名为"categoryViewSource" 控件,并把他转换为CollectionViewSource类型。
private void Window_Loaded(object sender, RoutedEventArgs e)
{

    System.Windows.Data.CollectionViewSource categoryViewSource = ((System.Windows.Data.CollectionViewSource)(this.FindResource("categoryViewSource")));
    // 通过设置 CollectionViewSource.Source 属性加载数据:
    // categoryViewSource.Source = [一般数据源]
}
来看下 MainWindow.xaml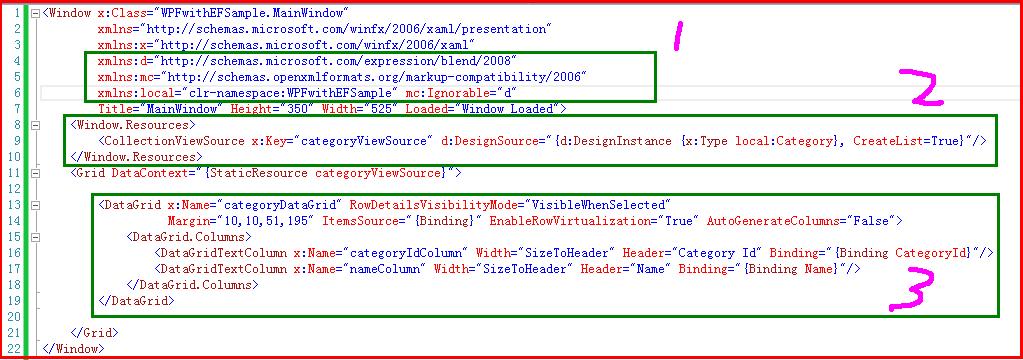
共自动生成了3大块代码,和其他的一些属性
明天继续。。。
第一段不知道怎么解释,搜了好多资料都没搜到,大概意思就是定义设计器里的名称空间d.......
第二段在窗体级别中定义资源,资源的内容为数据视图,它是数据源和请求数据源之前的接口,如图:

在CollectionViewSource 这里可以对请求的数据“把把关”(添加条件),做排序等。
最重要的是这个扩展属性 x:Key="categoryViewSource" 。对于窗体上的控件来说,它就是数据源。对于后台代码来说,需要把真正的后台数据交给它。
第三段就没什么好讲的了,就是DataGrid控件的具体细节,不过要注意的是它外层的Grid布局空间的一个属性DataContext="{StaticResource categoryViewSource}"
这个属性把上下文内容定义到这个控件的级别,那么他的子空间都可以共享其数据了。
六、添加管理子表的DataGrid 控件,达到的效果是,当电子表里的记录时,子表里的内容会根据附表中的类别号来检索产品。
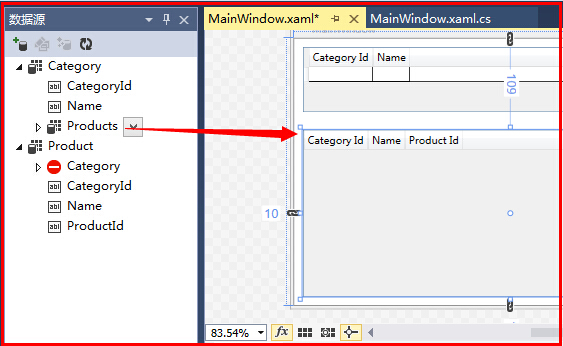
我们来看一下代码发生了什么变化,绿色框起来的为新增的,变化的文件只有一个 MainWindow.xaml
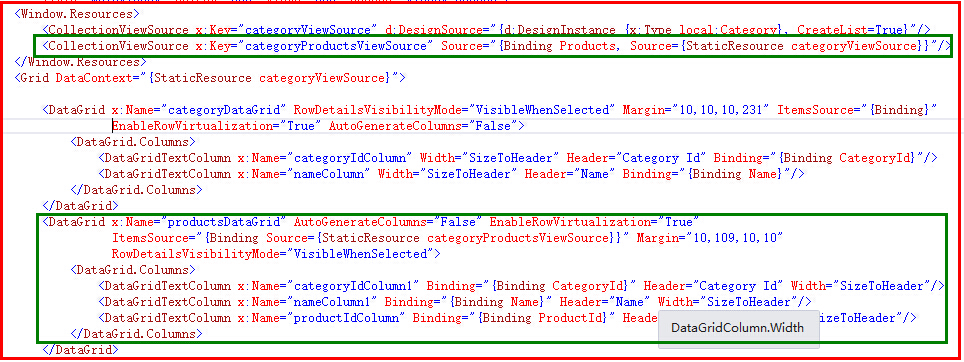
第一段绿色框起来的也是定义了一个“视图” ,它的数据类型为Products ,但数据源却是来自于上面那个视图的,也就是父视图
好了,到这里为止基本前台的界面都完成了,下面我们要在后台代码来检索数据,然后付给那个父视图控件。
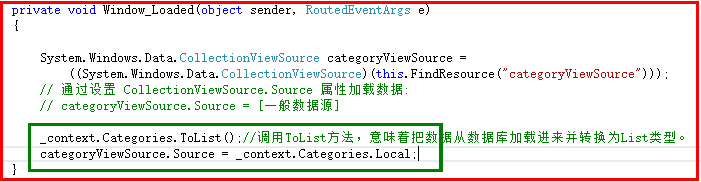
System.Windows.Data.CollectionViewSource categoryViewSource =
                ((System.Windows.Data.CollectionViewSource)(this.FindResource("categoryViewSource")));
上面的代码是在我们拖入第一个DataGrid的时候自动创建的,意思是,在资源里找到一个名为categoryViewSource的资源对象,并转化为CollectionViewSource类型,
这样我们就能在后台代码里操作这个对象了。
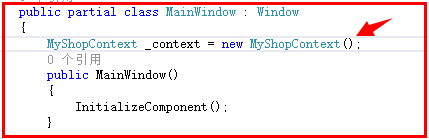
首先在主窗体类的内部的最上面实例化我们的上下文类,可以把对象 _context看着是一个数据库。
然后再添加加载数据的代码
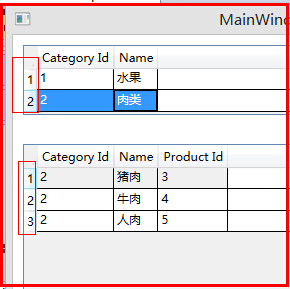
按F5运行程序,如下,在父表点击不同的记录,在子表里或自动变化。

接下来为程序做点加工,这些也都是在软件中经常要用到的功能。
1、为DataGrid 控件添加行编号,这样就能一眼看出记录数和快速定位行了。
实现很简单,只要添加一个DataGrid 的 LoadingRow 事件即可。添加方法:选择DataGrid控件,然后再在属性窗口的事件标签项里找到 LoadingRow,在输入框中双击,就会跳转到实现代码,然后加入下列代码即可。
private void categoryDataGrid_LoadingRow(object sender, DataGridRowEventArgs e)
{
    e.Row.Header = e.Row.GetIndex() + 1;
}
下面还要添加几个按钮,来做数据的增删改查(CURD)
为了再在页面条件其他控件,我们必须用布局控件来规划窗体的布局。布局后的全部代码为:
<Window x:Class="WPFwithEFSample.MainWindow"
        xmlns="http://schemas.microsoft.com/winfx/2006/xaml/presentation"
        xmlns:x="http://schemas.microsoft.com/winfx/2006/xaml"
        xmlns:d="http://schemas.microsoft.com/expression/blend/2008"
        xmlns:mc="http://schemas.openxmlformats.org/markup-compatibility/2006"
        xmlns:local="clr-namespace:WPFwithEFSample" mc:Ignorable="d"
        Title="MainWindow" Loaded="Window_Loaded">
    <Window.Resources>
        <CollectionViewSource x:Key="categoryViewSource" d:DesignSource="{d:DesignInstance {x:Type local:Category}, CreateList=True}"/>
        <CollectionViewSource x:Key="categoryProductsViewSource" Source="{Binding Products, Source={StaticResource categoryViewSource}}"/>
    </Window.Resources>
    <Grid DataContext="{StaticResource categoryViewSource}" Margin="5">
        <Grid.RowDefinitions>
            <RowDefinition Height="*"/>
            <RowDefinition Height="*"/>
        </Grid.RowDefinitions>
        <StackPanel Grid.Row="0" Grid.Column="0">
            <WrapPanel Orientation="Horizontal">
                <Button x:Name="btnAddCategory" Content="Add..." Margin="5,5,0,5" Padding="8,5,8,5" />
                <Button x:Name="btnDeleteCategory" Content="Delete..." Margin="5,5,0,5" Padding="8,5,8,5" />
                <Button x:Name="btnUpdateCategory" Content="Upate..." Margin="5,5,0,5" Padding="8,5,8,5" />
                <Button x:Name="btnSeachCategory" Content="Seach" Margin="5,5,0,5" Padding="8,5,8,5" />
            </WrapPanel>
            <DataGrid x:Name="categoryDataGrid" RowDetailsVisibilityMode="VisibleWhenSelected" ItemsSource="{Binding}"
                  EnableRowVirtualization="True" AutoGenerateColumns="False" LoadingRow="categoryDataGrid_LoadingRow" CanUserDeleteRows="False" CanUserAddRows="False">
                <DataGrid.Columns>
                    <DataGridTextColumn x:Name="categoryIdColumn" Width="SizeToHeader" Header="Category Id" Binding="{Binding CategoryId}"/>
                    <DataGridTextColumn x:Name="nameColumn" Width="SizeToHeader" Header="Name" Binding="{Binding Name}"/>
                </DataGrid.Columns>
            </DataGrid>
        </StackPanel>
        <StackPanel Grid.Row="1" Grid.Column="0">
            <WrapPanel Orientation="Horizontal">
                <Button x:Name="btnAddProduct" Content="Add..." Margin="5,5,0,5" Padding="8,5,8,5" />
                <Button x:Name="btnDeleteProduct" Content="Delete..." Margin="5,5,0,5" Padding="8,5,8,5" />
                <Button x:Name="btnUpdateProduct" Content="Upate..." Margin="5,5,0,5" Padding="8,5,8,5" />
                <Button x:Name="btnSeachProduct" Content="Seach" Margin="5,5,0,5" Padding="8,5,8,5" />
            </WrapPanel>
            <DataGrid x:Name="productsDataGrid" AutoGenerateColumns="False" EnableRowVirtualization="True"
                  ItemsSource="{Binding Source={StaticResource categoryProductsViewSource}}"
                  RowDetailsVisibilityMode="VisibleWhenSelected" LoadingRow="productsDataGrid_LoadingRow">
                <DataGrid.Columns>
                    <DataGridTextColumn x:Name="categoryIdColumn1" Binding="{Binding CategoryId}" Header="Category Id" Width="SizeToHeader"/>
                    <DataGridTextColumn x:Name="nameColumn1" Binding="{Binding Name}" Header="Name" Width="SizeToHeader"/>
                    <DataGridTextColumn x:Name="productIdColumn" Binding="{Binding ProductId}" Header="Product Id" Width="SizeToHeader"/>
                </DataGrid.Columns>
            </DataGrid>
        </StackPanel>
    </Grid>
</Window>
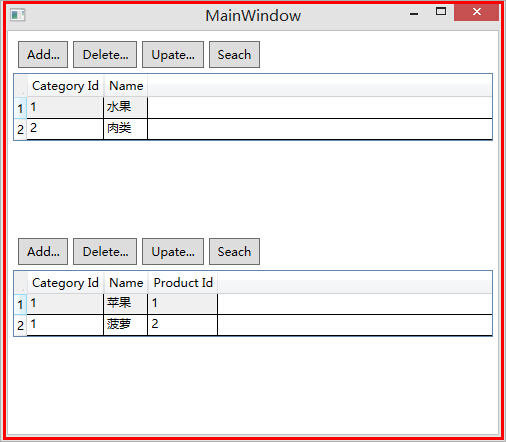
这样看起来还不错!
2个DataGrid还有一个小问题,就是选择一行后,其后有个很长的空白行,看起来很不爽,处理办法是吧最后一列的宽度该为* ,如:
