概述:https://www.cnblogs.com/wang-jin-fu/p/10975660.html
注意事项:
1.python如何解析命令行参数
2.python如何调用unity命令进行打包
3.unity如何解析命令行参数,例如命令行传过来的:
'"%s" -batchmode -projectPath %s -executeMethod ExportProject.Build name:"%s" output:"%s" id:"%s" symbols:"%s" development:%s release:%s language:%s checkupdate:%s expansion:%s version:"%s" compatibility:%s -quit -logFile ./log/%s'
其中name是bundleid,识别平台、是否是测试包等,release是否是正式包等等参数。
4.如何更新git
5.unity一键导出图集、ab包名字,生个成功md5文件
6.配制参数导出到两端平台
ios:修改info.plist文件
android:将配置保存成java可以解析的本地文件,例如json.properties文件,在导出结束后拷贝到android工程目录下。
详细步骤:
1.python调用unity命令,通知unity打包AssetBundle.
1-1.更新git
1-2.一键设置图集
1-3.一键设置ab包
1-4.生成ab包
1-5.压缩ab包(可选)
1-6.生成md5文件
2.python调用unity命令,导出工程。(正常打包)
2-1.导出工程
2-2.导出配置文件,如app id,app key。
3.python调用两端命令进行打包。(正常打包)
3-1.python拷贝文件,组合unity导出项目和两端备份工程。
3-2.android端调用:./gradlew assembleNormal
3-3.ios端先调用pod repo update(可选,看sdk是否从远端拉取),在调用cmdBuild = 'xcodebuild archive -workspace Unity-iPhone.xcworkspace -scheme Unity-iPhone -archivePath %s || exit '%(archivePath)生成archive 包,最后调用cmdIpa = 'xcodebuild -exportArchive -archivePath %s -exportPath %s -exportOptionsPlist "%s/config/ad-hoc.plist"' % (archivePath, ipaDir, self.CurrPath)生成ipa。
4.python将变更的ab包以及md5文件上传网站(热更)
下面对一些关键步骤进行详细分析
一、python如何解析命令行参数
api使用:https://docs.python.org/zh-cn/3/howto/argparse.html
API:https://docs.python.org/zh-cn/3/library/argparse.html#action。看完这两篇,解析参数其实很简单~
import argparse
import configparser

def Run(self):
        parser = argparse.ArgumentParser()

        group = parser.add_mutually_exclusive_group()
        group.add_argument("-f", action="store_true", help="打完整包")

        args = parser.parse_args()
如上所示,使用python的库即可解析命令行的参数
1.创建一个解析器:parser = argparse.ArgumentParser()
2.添加解析器要解析的参数add_argument
ArgumentParser.add_argument(name or flags...[, action][, nargs][, const][, default][, type][, choices][, required][, help][, metavar][, dest])
name or flags:参数的flag(名字),例如:foo 或 -f, —foo。注意不带-的参数是必须输入的,带-的是可选参数,可以不再命令行输入。
action:获取的参数该采取何种提取方式。例如action="store_true",那么命令行有输入参数时,该参数为true,否则为false。action="store_const",那么参数等于const的值
const: 被一些 action 和 nargs 选择所需求的常数
default: 当参数未在命令行中出现时使用的值。
type: 命令行参数应当被转换成的类型。默认是string型
choice: 参数允许的值。例如choice = [0,1,2]那么参数值只能是这三个中的一个
help: 对该参数的简要说明。
3.ArgumentParser 通过 parse_args() 方法解析参数。它将检查命令行,把每个参数转换为适当的类型然后调用相应的操作。
二、python如何调用unity打包
这边应该是命令行如何调用。
API说明:https://docs.unity3d.com/Manual/CommandLineArguments.html
fumExport = ""%s" -batchmode -projectPath %s -executeMethod ExportAssetBundle.Build symbols:"%s" checkupdate:%s -quit -logFile ./log/%s"
cmdExport = fumExport%(self.UnityPath, self.ProjectPath,self.BaseSymbols, checkupdate, logFileName)
主要关注以下几个参数,参数间以空格隔开
1.-batchmode:打开unity,但不会弹出unity界面。需要确保要打开的项目没有被unity打开,不然会报错,一次只能运行一个Unity项目实例。
Run Unity in batch mode. You should always use this in conjunction with the other command line arguments, because it ensures no pop-up windows appear and eliminates the need for any human intervention.
When an exception occurs during execution of the script code, the Asset server updates fail, or other operations fail, Unity immediately exits with return code 1.
Note that in batch mode, Unity sends a minimal version of its log output to the console. However, the Log Files still contain the full log information.
You cannot open a project in batch mode while the Editor has the same project open; only a single instance of Unity can run at a time.
Tip: To check whether you are running the Editor or Standalone Player in batch mode, use the Application.isBatchMode operator.

If the project has not yet been imported when using -batchmode, the target platform is the default one. To force a different platform when using -batchmode, use the -buildTarget option.
2.-projectPath:要打开的unity工程路径
3.-executeMethod:要触发的unity方法,该方法必须是静态方法且放在Editor目录下
Execute the static method as soon as Unity opens the project, and after the optional Asset server update is complete.
You can use this to do tasks such as continous integration, performing Unit Tests, making builds or preparing data.
To return an error from the command line process, either throw an exception which causes Unity to exit with return code 1, or call EditorApplication.Exit with a non-zero return code.
To pass parameters, add them to the command line and retrieve them inside the function using System.Environment.GetCommandLineArgs.
To use -executeMethod, you need to place the enclosing script in an Editor folder. The method you execute must be defined as static.
4.-quit:退出unity
5.-logFile:log的输出路径,方便在命令失败时查看日志
6.-buildTarget:指定目标平台。建议每个平台拷贝一份unity项目而不是通过这个参数指定平台
三、unity如何解析命令行参数
使用c# 的Environment.GetCommandLineArgs方法可以获取到命令行的参数列表
//Returns a string array containing the command-line arguments for the current process.
public static string[] GetCommandLineArgs ();
建议使用键值对的方式定义参数,方便解析和理解。例如symbols:"1" checkupdate:0。解析如下,key对应参数名字如symbols
static string GetValueFromArgs(string key, string defaultValue)
    {
        string ret = defaultValue;
        foreach (string arg in System.Environment.GetCommandLineArgs())
        {
            if (arg.StartsWith(key))
            {
                ret = arg.Split(":"[0])[1];
                break;
            }
        }
        return ret;
    }
四、如何同步git代码?
git:定位到你的git目录(cd),然后调用'git pull'命令
svn:定位到你的svn目录(cd),然后调用'TortoiseProc.exe /command:update /path ' + dist + ' /notempfile' + configs.setting['closeOption']
可以参考https://www.cnblogs.com/zblade/p/9380845.html
那么在unity可以调用命令行吗? 可以的
public static void ProcessCommand(string command, string argument, string workingdir)
    {
        ProcessStartInfo start = new ProcessStartInfo(command)
        {
            Arguments = argument,
            CreateNoWindow = false,
            ErrorDialog = true,
            UseShellExecute = true,
            WorkingDirectory = workingdir
        };

        Process p = Process.Start (start);

        p.WaitForExit ();
        p.Close ();
    }
调用:
ShellHelper.ProcessCommand("TortoiseProc.exe", "/command:update /path:" + svnPath + " /closeonend:1", null);
ShellHelper.ProcessCommand ("git", "pull", loadDir);
五、如何统一设置图集
private static void SetSingleAtlasName(string strFile)
{
    string strPath = Path.GetDirectoryName (strFile);
    string strSPName = GetSpriteNameFromPath (strPath);

    TextureImporter importer = TextureImporter.GetAtPath (strFile) as TextureImporter;
    if(importer==null)
    {
        Debug.LogErrorFormat ("Import atlas:{0}, is not a texture!", strFile);
        return;
    }
    Debug.LogFormat ("TextureImport:{0}-->spname:{1}", strFile, strSPName);
    if(importer.textureType != TextureImporterType.Sprite)
    {
         return;
    }

    if(importer.spritePackingTag!=strSPName)
    {
        importer.spritePackingTag = strSPName;
        importer.SaveAndReimport ();
     }
}

private static string GetSpriteNameFromPath(string strSpritePath)
{
   strSpritePath = strSpritePath.Replace ("/", "_");
   string strAtlasName = strSpritePath.Replace ("Assets_Art_", "").Replace ("Assets_Data_", "").ToLower();
   return strAtlasName;
}
如上,核心是GetSpriteNameFromPath和importer.spritePackingTag。GetSpriteNameFromPath通过图片的目录获取图片的图集名字,importer.spritePackingTag设置图片的名字。使用时需要将每个要打图集的.pngg文件调用此方法。获取某个目录下的.png文件方法如下
string[] arrFiles = FileHelper.GetAllChildFiles (strPath, ".png", SearchOption.AllDirectories);
int len = arrFiles.Length;
for(int i=0; i<len; i++)
{
    string strFile = arrFiles [i];
    SetSingleAtlasName (strFile);
}
六、如何统一设置ab包并生成md5
这边需要注意的是,业务传入文件名,框架如何加载到对应的ab包并加载出asset。
一个可行的方法是把文件的文件名和文件的ab包名字作一个映射并保存到本地,框架加载ab包时先加载该配置并获取对应的ab包名字。
核心的方法是unity设置ab包的方法
    //
        // 摘要:
        //     Set the AssetBundle name and variant.
        //
        // 参数:
        //   assetBundleName:
        //     AssetBundle name.
        //
        //   assetBundleVariant:
        //     AssetBundle variant.
        [GeneratedByOldBindingsGenerator]
        public void SetAssetBundleNameAndVariant(string assetBundleName, string assetBundleVariant);
详细代码如下
using System.Collections.Generic;
using System.IO;
using System.Text;
using UnityEditor;
using UnityEngine;

public class ImporterAssetBundle
{
    static Dictionary<string, string> ms_uiBundles = new Dictionary<string, string>();
    public static void Reimport(bool buildLua = false)
    {
        ClearBundleName();
        ms_uiBundles.Clear();

        ImportAll();

        AssetDatabase.RemoveUnusedAssetBundleNames();
        AssetDatabase.Refresh();
    }

    // 清除AssetBundle设置
    public static void ClearBundleName()
    {
        var names = AssetDatabase.GetAllAssetBundleNames();
        foreach (string name in names)
        {
            AssetDatabase.RemoveAssetBundleName(name, true);
        }
    }

    private static void ImportAll()
    {
        ImportSubPath("Assets/Data/city/sky", "city/sky/", true);
        ImportFilesInPath("Assets/Data/city/buildingpart", "city/buildingpart/", true);
        ImportSingleFile("Assets/Data/city/other", "city/other", true);

        SaveBundleList(ms_uiBundles, "BundleDefine");
    }

    public static bool CheckStringInArray(string[] arrStr, string value)
    {
        if (arrStr == null)
        {
            return false;
        }
        for (int i = 0; i < arrStr.Length; i++)
        {
            if (arrStr[i] == value)
            {
                return true;
            }
        }
        return false;
    }

    //获取所有子文件
    public static string[] GetAllChildFiles(string path, string suffix = "", SearchOption option = SearchOption.AllDirectories)
    {
        string strPattner = "*";
        if (suffix.Length > 0 && suffix[0] != '.')
        {
            strPattner += "." + suffix;
        }
        else
        {
            strPattner += suffix;
        }

        string[] files = Directory.GetFiles(path, strPattner, option);

        return files;
    }

    #region 导入功能函数
    // 将路径下的子路径,按目录设置Bundle
    private static void ImportSubPath(string strPath, string abHead, bool bAddDefine, string[] excludes = null)
    {
        if (!Directory.Exists(strPath))
        {
            return;
        }

        string[] allChilds = Directory.GetDirectories(strPath);
        for (int i = 0; i < allChilds.Length; i++)
        {
            string childPath = allChilds[i];
            if (excludes != null && CheckStringInArray(excludes, childPath))
            {
                continue;
            }
            string strPathName = childPath.Replace('\', '/');
            strPathName = strPathName.Substring(strPathName.LastIndexOf('/') + 1);
            string strAbName = abHead + strPathName;

            ImportSingleFile(childPath, strAbName, bAddDefine);
        }
    }

    // 将路径下的每个文件导出成独立的Bundle 只处理一级文件
    private static void ImportFilesInPath(string path, string abHead, bool bAddDefine, string suffix = "", string[] excludes = null, SearchOption option = SearchOption.TopDirectoryOnly)
    {
        if (!Directory.Exists(path))
        {
            return;
        }

        string[] allFiles = GetAllChildFiles(path, suffix, option);
        for (int i = 0; i < allFiles.Length; i++)
        {
            string file = allFiles[i];
            if (file.EndsWith(".meta") || file.EndsWith("txt"))
            {
                continue;
            }

            string strFileName = Path.GetFileNameWithoutExtension(file);
            if (excludes != null && CheckStringInArray(excludes, strFileName))
            {
                continue;
            }

            string abName = abHead + strFileName;
            ImportSingleFile(file, abName, bAddDefine);
        }
    }

    // 设置单个文件(或目录)的ABName
    private static void ImportSingleFile(string Path, string abName, bool bAddDefine)
    {
        AssetImporter importer = AssetImporter.GetAtPath(Path);
        if (bAddDefine)
        {
            AddBundleDefine(Path, abName);
        }

        if (importer == null)
        {
            return;
        }
        abName = abName.Replace('\', '_').Replace('/', '_');
        importer.SetAssetBundleNameAndVariant(abName, "unity3d");
    }

    #endregion

    private static void AddBundleDefine(string strPath, string strABName)
    {
        //如果是一个路径 才需要添加到字典
        if (Directory.Exists(strPath))
        {
            string[] files = Directory.GetFiles(strPath, "*", SearchOption.AllDirectories);
            for (int i = 0; i < files.Length; i++)
            {
                string filename = files[i];
                if (filename.EndsWith(".meta"))
                {
                    continue;
                }

                AddToBundleDic(filename, strABName);
            }
        }
        else if (File.Exists(strPath))
        {
            AddToBundleDic(strPath, strABName);
        }
    }

    private static void AddToBundleDic(string strFileName, string strABName)
    {
        string strExtension = Path.GetExtension(strFileName);
        string fullName = strFileName.Replace("Assets/Data/", "").Replace(strExtension, "").Replace("\", "/");

        if (ms_uiBundles.ContainsKey(fullName))
        {
            Debug.LogWarningFormat("文件名字重复:{0}, strABName old:{1}, new:{2}", strFileName, ms_uiBundles[fullName], strABName);
        }

        ms_uiBundles[fullName] = strABName;
    }

    static void SaveBundleList(Dictionary<string, string> dicAB, string strFileName)
    {
        string strSaveFile = string.Format("Assets/Lua/game/define/{0}.lua", strFileName);
        // 保存到文件
        StringBuilder builder = new StringBuilder();
        builder.AppendLine("-- Create by Tool, don`t modify");
        builder.AppendLine();

        string strHeadLine = strFileName + " = {";
        builder.AppendLine(strHeadLine);
        {
            var iter = dicAB.GetEnumerator();
            while (iter.MoveNext())
            {
                string prefabName = iter.Current.Key.Replace("\", "/").ToLower();
                string abName = iter.Current.Value.Replace("\", "/").ToLower();
                builder.AppendFormat("	["{0}"] = "{1}",
", prefabName, abName);
            }
        }

        builder.AppendLine("}");
        builder.AppendLine();
        builder.AppendLine("--EOF");

        FileHelper.SaveTextToFile(builder.ToString(), strSaveFile);
        EditorHelper.EditorSaveFile(strSaveFile);

        ms_uiBundles.Clear();
    }
}
生成ab包:ab包的压缩模式选择:https://docs.unity3d.com/Manual/AssetBundles-Building.html
  public static void BuildAssetBundle()
 {
    string pathDst = AssetBundlePath;
    FileHelper.CreateDirectory (pathDst);

    BuildAssetBundleOptions options = BuildAssetBundleOptions.DeterministicAssetBundle;
    options |= BuildAssetBundleOptions.ChunkBasedCompression;

    BuildPipeline.BuildAssetBundles (pathDst, options, EditorUserBuildSettings.activeBuildTarget);
    AssetDatabase.Refresh ();
 }
md5生成:md5用于热更时判断一个文件是否需要更新(只有变化的文件md5才会变更改)
FileStream fs = File.OpenRead(filePath)
MD5 md5 = MD5.Create();
byte[] fileMd5Bytes=md5.ComputeHash(fs);//计算FileStream 对象的哈希值
fileMd5 = System.BitConverter.ToString(fileMd5Bytes).Replace("-", "").ToLower();
七、如何导出包给两端使用

获取当前项目的平台:BuildTarget target = EditorUserBuildSettings.activeBuildTarget;
如果使用xcodeas等进行打包,options需要设置成BuildOptions options = BuildOptions.AcceptExternalModificationsToPlayer;
On iOS, this setting will append an existing Xcode project. Existing Xcode project setting changes will be preserved. With the IL2CPP scripting backend, this setting will also allow incremental builds of the generated C++ code to work in Xcode.

On Android, this setting will create a new Eclipse project. Existing Eclipse project setting changes will be discarded.
当然你也可以拼接多个option
if (CommandHelper.IsDevelopment) {
    options |= BuildOptions.Development;
    options |= BuildOptions.AllowDebugging;
}
八、如何调用as命令生成apk,如何调用xcode生成ipa
ipa生成参考文章:https://www.jianshu.com/p/3f43370437d2
主要就是下面两行命令
cmdBuild = 'xcodebuild archive  -workspace Unity-iPhone.xcworkspace  -scheme Unity-iPhone -archivePath %s || exit '%(archivePath)
cmdIpa = 'xcodebuild -exportArchive -archivePath %s -exportPath %s -exportOptionsPlist "%s/config/ad-hoc.plist"' % (archivePath, ipaDir, self.CurrPath)
archive参数如下,如果使用CocoaPod,workspace必须传,scheme不传则默认为项目第一个Target。archivePath为archive包存储路径。其余参数可不传
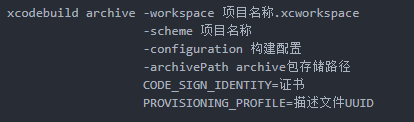
exportArchive ,导出ipa,参数如下:archivePath上面的archivePath路径。exportPath :ipa导出路径。exportOptionsPlist :list文件

android 端直接调用:./gradlew assembleNormal就好了
九、如何导出配置给两个端使用
1.ios直接修改info.plist文件和项目设置项
首先我们需要了解OnPostprocessBuild方法。就是说unity每次build完后都会回调这个方法,该方法有两个参数,一个是xcode的Target,一个是导出的工程目录。我们可以在这个回调里设置证书、权限、白名单等信息
Implement this function to receive a callback after the build is complete.
示例如下,具体可以参考API:https://docs.unity3d.com/ScriptReference/iOS.Xcode.PBXProject.html。主要是PBXProject这个API
  [PostProcessBuild]
    static void OnPostprocessBuild(BuildTarget target, string pathToBuildProject){
        //pathToBuildProject unity export路径
        EditProject(pathToBuildProject);//添加framework、设置证书
        EditPlist (pathToBuildProject);//配置appid等、设置白名单、权限
    }

  static void EditProject(string path)
    {
        string projPath = PBXProject.GetPBXProjectPath(path);
        PBXProject pbxProj = new PBXProject();
        pbxProj.ReadFromString(File.ReadAllText(projPath));

        string target = pbxProj.TargetGuidByName("Unity-iPhone");
        if (!string.IsNullOrEmpty(target))
        {
            pbxProj.RemoveFrameworkFromProject(target, "libiconv.2.dylib");
            pbxProj.AddFrameworkToProject(target, "AdSupport.framework", true); //用于firebase推送

            pbxProj.SetBuildProperty(target, "ENABLE_BITCODE", "false");
            pbxProj.SetBuildProperty(target, "DEVELOPMENT_TEAM", GetTeamId());
            pbxProj.SetBuildProperty(target, "CODE_SIGN_IDENTITY", GetCertificate()); //证书
            pbxProj.SetBuildProperty(target, "PROVISIONING_PROFILE", GetProfiles());//描述文件

            string googleServicedir = ConfigHelper.IsDeveloper ? "develop" : "release";
            string rootGoogleServicepath = string.Format("{0}/../Config/GoogleService/", Application.dataPath) + googleServicedir;
            FileCopy(rootGoogleServicepath, path);
            pbxProj.AddFileToBuild(target, pbxProj.AddFile(path + "/GoogleService-Info.plist", "GoogleService-Info.plist", PBXSourceTree.Build));
            pbxProj.AddFileToBuild(target, pbxProj.AddFile(path + "/OMTService-Info.plist", "OMTService-Info.plist", PBXSourceTree.Build));
        }

        File.WriteAllText(projPath, pbxProj.WriteToString());
    }

    /// <summary>
    /// 这是plist
    /// </summary>
    /// <param name="pathToBuildProject">Path to build project.</param>
    static void EditPlist(string pathToBuildProject)
    {
        string _plistPath = pathToBuildProject + "/Info.plist";
        PlistDocument _plist = new PlistDocument();

        _plist.ReadFromString(File.ReadAllText(_plistPath));
        PlistElementDict _rootDic = _plist.root;

        //添加Scheme白名单
        PlistElementArray _array2 = _rootDic.CreateArray("LSApplicationQueriesSchemes");
        _array2.AddString("fbapi");
        _array2.AddString("fb-messenger-api");
        _array2.AddString("fbauth2");
        _array2.AddString("fbshareextension");
        _array2.AddString("gamcoios");
        _array2.AddString("whatsapp");
        _array2.AddString("twitter");
        _array2.AddString("twitterauth");
        _array2.AddString("instagram");

        //配置权限
        _rootDic.SetString("NSPhotoLibraryUsageDescription", SDKConfig.PhotoDesc);
        _rootDic.SetString("NSMicrophoneUsageDescription", SDKConfig.MicrophoneDes);
        _rootDic.SetString("NSPhotoLibraryAddUsageDescription", SDKConfig.PhotoAddDesc);
        _rootDic.SetString("NSCameraUsageDescription", SDKConfig.CameraDes);
        _rootDic.SetString("NSLocationWhenInUseUsageDescription", SDKConfig.LocationDes);

        //正式版/测试版
        _rootDic.SetBoolean("DebugMode", ConfigHelper.IsDeveloper);

        File.WriteAllText(_plistPath, _plist.WriteToString());
    }
2.Android端:通过json或.properties文件存储,然后拷贝到android目录下就好了。以下以.properties文件作为实例
c#端存储:FileHelper.SaveTextToFile只是调用file.write方法,把字符串写进文件里。
System.Text.StringBuilder sb = new System.Text.StringBuilder();
sb.AppendFormat("GAME_NAME={0}
", ConfigHelper.GameName);
sb.AppendFormat("VERSION_NAME={0}
", ConfigHelper.Version);
sb.AppendFormat("VERSION_CODE={0}
", ConfigHelper.BuildNo);
sb.AppendFormat("BUNDLE_IDENTIFIER={0}
", CommandHelper.BundleIdentifier);
sb.AppendFormat("IS_DEVELOPER={0}
", ConfigHelper.IsDeveloper);
sb.AppendFormat("IABKEY={0}
", SDKConfig.IABKey);

FileHelper.SaveTextToFile(sb.ToString(), string.Format("{0}/{1}/version.properties", CommandHelper.OutputPath, CommandHelper.ProjectName));
android端读取:
  def verName = "1.0.0"
    def verCode = 8
    def bundleId = "and.onemt.sf.ar"
    def isDeveloper = false
    def iabKey = ""
    def name = "@string/app_name"

    def versionPropsFile = file('version.properties')

    if (versionPropsFile.canRead()) {
        def Properties versionProps = new Properties()
        versionProps.load(new FileInputStream(versionPropsFile))
        verName = versionProps['VERSION_NAME']
        verCode = versionProps['VERSION_CODE'].toInteger()
        bundleId = versionProps['BUNDLE_IDENTIFIER']
        isDeveloper = versionProps['IS_DEVELOPER']

        iabKey = versionProps['IABKEY']
        if ("True".equalsIgnoreCase(isDeveloper)) {
            name = "@string/app_name_test"
        }
    }
详细导图如下,其实一键打包无非就是命令行调用python,python调用各个引擎(asxcodeunity)命令进行打包。