vue学习资料
Vue.js官网(https://vuejs.org.cn/)
Vue-cli (https://github.com/vuejs/vue-cli)
Vue-rescource (https//github.com/vuejs/vue-rescource)
Vue-router (https://github.com/vuejs/vue-router)
better-scroll (https://github.com/ustbhuangyi/
webpack官网(http://webpack.github.io/
Stylus中文文档(http://www.zhangxinxu.com/
es6入门学习 (http://es6.ruanyifeng.com/
eslint规则 (http://eslint.org/docs/rules/)
设备像素比(http://www.zhangxinxu.com/wordpress/2012/08/window-devicepixelratio/)
flex布局(阮一峰)
贝塞尔曲线测试(http://cubic-bezier.com)
1.node.js安装
http://nodejs.cn/进去该网站下载最新版本的node
检查node是否安装成功
node -v
2.node安装完成,自带npm,可以检查npm是否已经安装
npm -v
3.安装淘宝镜像
npm install -g cnpm --registry=https://registry.npm.taobao.org
4.安装webpack
cnpm install webpack -g
查看npm是否安装完成
cnpm webpack -v
5.安装vue-cli脚手架
npm install vue-cli -g
查看vue-cli是否安装成功
npm vue-cli -v
6.创建项目
vue init webpack 项目名
7.安装依赖
第一步:进入项目文件夹 cd 项目名
第二步:cnpm i
8.安装vue路由模块vue-router和网络请求模块vue-resource
cnpm install vue-router vue-resource --save
9.运行项目
cnpm run dev
实例功能简述:
1.创建首页
因为是web端的,所以首先在index.html中加入meta标签
<meta name="viewport" content="width=device-width,initial-scale=1,user-scalable=no">
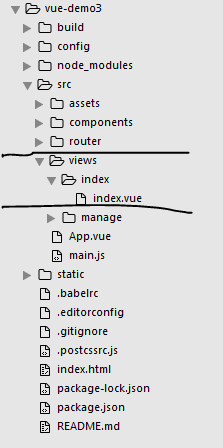
1.1新建目录
方便管理,我们在src文件夹下新建一个views文件夹,用于存放所有的模块组件
在views文件夹下新建index文件夹,在index文件夹下新建index.vue作为项目的首页
1.2编辑首页index.vue
<template>
    <div>
        欢迎来到人员管理系统
    </div>
</template>
接着路由配置文件index.js引入首页index.vue,并更改路由配置
import Vue from 'vue'
import Router from 'vue-router'
import Hello from '@/components/Hello'
//导入模块
import Index from '../views/index/index'

Vue.use(Router)

//配置路由
export default new Router({
  routes: [
    {
      path: '/',
      name: 'Index',
      component: Index
    }
  ]
})
2.添加底部导航组件
因为底部导航组件是公共组件,所以在components文件夹下建一个footer.vue文件
<template>
    <div class="footer fixed">
        <ul>
            <li><router-link to='/'>首页</router-link></li>
            <li><router-link to='/manage'>人员管理</router-link></li>
        </ul>
    </div>
</template>

<style scoped>
    li a{display:inline-block;100%;height:100%;}
    .footer{100%;height:50px;bottom:0;}
    ul{display:flex;height:100%;line-height:50px;}
    ul li{flex:1;background-color:#f1f1f1}
    .isIndex li:first-child{background-color:#d3d3d3;}
    .isIndex li:first-child a{color:#41b883;}
    .isManage li:last-child{background-color:#d3d3d3;}
    .isManage li:last-child a{color:#41b883;}
</style>
div的fixed样式写在了公共样式public.css里面,并在App.vue中引入

*{padding:0;margin:0;}
ul li{list-style:none;}
a{text-decoration: none;color: #000;}
.fixed{position:fixed;}
.tc{text-align:center;}
在app.vue文件的style里面引入@import './assets/css/public.css';
(1)<router-link>
可以看到footer.vue使用了<router-link>标签,该标签主要实现跳转链接功能,属性to='/'即是跳转到path为'/'的路径
(2)scoped
在<style>标签上添加scoped,声明作用域,样式效果只在该页面内生效,不污染全局
3.在首页中引入底部导航组件
<template>
    <div>
        欢迎来到人员管理系统
        <footer-nav></footer-nav>
    </div>
</template>

<script>
    import FooterNav from '../../components/footer.vue'
    export default{
        components: {
            FooterNav
        }
    }
</script>
使用组件步骤:
(1)引入组件 import FooterNav from '../../components/footer.vue'
(2)局部注册 注意写在export default内部,components:{FooterNav}
(3)使用组件 <footer-nav></footer-nav> 注意命名,驼峰法定义的组件FooterNav需在使用时用短横线连接<footer-nav>
4.创建人员管理页面
同样的,因为人员管理可以算另外一个模块,所以我们在src/views/新建一个文件夹manage,再在manage文件夹下新建index.vue
同样在页面引入底部导航组件footer.vue
<template>
    <div class="manage tc">
        <button class="add">新增</button>
        <div class="input-area">
            <input type="text" placeholder="请输入人员姓名" class="input">
            <button class="sure">确定</button>
        </div>
        <table>
            <tr>
                <th>姓名</th>
                <th>操作</th>
            </tr>
            <tr>
                <td>张三</td>
                <td v-bind:id="index">
                    <span>编辑</span>
                    <span>删除</span>
                </td>
            </tr>
        </table>

        <footer-nav></footer-nav>
    </div>
</template>
4.2为底部导航绑定class
为底部切换时绑定class,使切换状态更加明显
在首页使用<foot-nav>时绑定class类名isIndex
<template>
<div>
欢迎来到人员管理系统
<footer-nav v-bind:class="{'isIndex':isNowPage}"></footer-nav>
</div>
</template>

<script>
import FooterNav from '../../components/footer.vue'
export default{
  components: {
    FooterNav
  },
  data(){
    return{
      isNowPage:true
    }
  }
}
</script>
这里使用v-bind指令来绑定class,第一个属性为class名字,第二个属性为布尔值,为true,则表示该组件有这个class,为false则没有。所以,当访问首页模块时,底部导航有一个类名isIndex,我们可以在底部导航内部为isIndex设置样式。
同样的,也在管理页面manage.vue为底部导航绑定class isManage。
vue项目中常用技巧
1.keep-alive
vue2.0提供了一个keep-alive组件用来缓存组件,避免多次加载相应的组件,减少性能消耗
<keep-alive>
      <router-view :seller="seller"></router-view>
</keep-alive>
2. Object.assign() 合并对象,给一个对象添加属性
this.seller = Object.assign({},this.seller,res.data)