一:使用实践
常常在开发过程中,碰到一个实体上的属性值,要赋值给另外一个相类似实体属性时,且属性有很多的情况。一般不利用工具的话,就要实例化被赋值实体B,然后再将实体A的字段一个个赋值给B的属性,单单写这些没有技术含量的赋值语句,就要用很大的代码篇幅。假如做得好一点的话,一般就是利用反射的方式,将A属性赋值给B,当然用反射的话,要顺利将A的属性,赋值B的属性,这样确实能够减少代码篇幅,那就要有一些约束或者限制,例如属性名称要相同,属性的数据类型要相同,这样反射起来才不费力。那如何使反射起来,更加灵活,可配置,且配置和反射过程能够分离,实现职责单一,AutoMapper 就是这样一个开源类库。
二. 认识AutoMapper
官方地址 :http://automapper.org/
GitHub 地址:https://github.com/AutoMapper/AutoMapper 包含AutoMapper 源代码与应用Simple。
开发指南:https://github.com/AutoMapper/AutoMapper/wiki/Getting-started
从我开发过程使用到一些场景
- 实体->实体
- 集合->集合
- 实体字段名称不同
- 实体数据类型不同
- 相同名称,相同数据类型无需配置
- 有Queryable Extensions ,也即支持Entity Framework
三. 最佳实践
AutoMapper开发指南,有详细的介绍,我这里就不再搬过说了,大家有空自己研究研究,我这里主要介绍一下AutoMapper比较好的实践方式,废话不多说,直接做项目给大家看。
- 项目结构
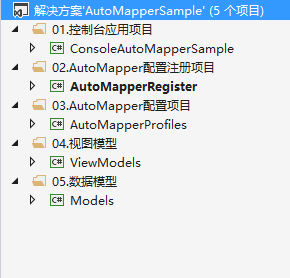
每个项目用途,解决方案文件夹基本标示清楚。
2. 以订单为例(不是真实业务,只是举个简单的例子),在Models 实体类库 新增OrderModel模型,在ViewModels 新增OrderViewModel模型,代码在下面
using System;
namespace Models
{
public class OrderModel
{
public Guid OrderGuid { get; set; }
public string OrderNo { get; set; }
public string OrderCreator { get; set; }
public DateTime OrderDateTime { get; set; }
public string OrderStatus { get; set; }
public string Description { get; set; }
public string Creator { get; set; }
public DateTime CreateDateTime { get; set; }
public string LastModifier { get; set; }
public DateTime LastModifiedDateTime { get; set; }
}
}
using System;
namespace ViewModels
{
public class OrderViewModel
{
public Guid OrderGuid { get; set; }
public string OrderNo { get; set; }
public string OrderCreator { get; set; }
public DateTime OrderDateTime { get; set; }
public string OrderStatus { get; set; }
public string Description { get; set; }
}
}
这里假设ViewModel,在使用过程中,不需要创建与修改相关的字段。
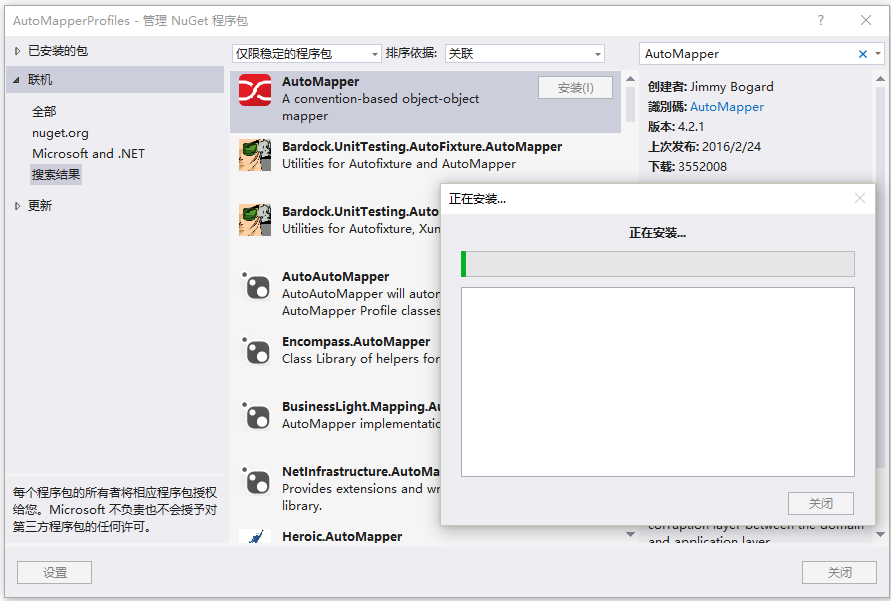
3. AutoMapper 配置
通过NuGet 程序包管理器,下载AutoMapper Dll,右键-》AutoMapperProfiles 类库-》管理NuGet程序包-》联机-》右上角搜索“AutoMapper” 下载安装
新增 ModelToViewModelProfile,ViewModelToModelProfile 两个配置类,继承AutoMapper 的 Profile 类,实现Configure重载方法,并分别引入Models & ViewModels 类库,ModelToViewModelProfile,ViewModelToModelProfile 代码如下:
using AutoMapper;
using Models;
using ViewModels;
namespace AutoMapperProfiles
{
public class ModelToViewModelProfile:Profile
{
protected override void Configure()
{
CreateMap<OrderModel, OrderViewModel>();
}
}
}
using AutoMapper;
using Models;
using ViewModels;
namespace AutoMapperProfiles
{
public class ViewModelToModelProfile : Profile
{
protected override void Configure()
{
CreateMap<OrderViewModel, OrderModel>();
}
}
}
4.注册配置
在AutoMapperRegister 项目中,新增AutoMapperProfileRegister 类,按照 第3点,安装一下AutoMapper,同时引用AutoMapperProfiles 类库。代码如下:
using AutoMapper;
using AutoMapperProfiles;
namespace AutoMapperRegister
{
public class AutoMapperProfileRegister
{
public static void Register()
{
Mapper.Configuration.AddProfile(new ModelToViewModelProfile());
Mapper.Configuration.AddProfile(new ViewModelToModelProfile());
}
}
}
5. 控制台验证是否能够顺利转换
按照 第3点,安装一下AutoMapper,引入 AutoMapperRegister ,Models,ViewModels Dll,编写测试代码,代码如下:
using System;
using System.Collections.Generic;
using System.Linq;
using System.Text;
using System.Threading.Tasks;
using AutoMapper;
using AutoMapperRegister;
using Models;
using ViewModels;
namespace ConsoleAutoMapperSample
{
class Program
{
static void Main(string[] args)
{
AutoMapperProfileRegister.Register();
var order = new OrderModel
{
OrderGuid = Guid.NewGuid(),
OrderNo = "201604020001",
OrderCreator = "david",
OrderDateTime = DateTime.Now,
OrderStatus = "已出库",
Description = "请提供个人发票"
};
var orderView = Mapper.Map<OrderModel, OrderViewModel>(order);
orderView.OrderStatus = "已完成";
var updateOrder = Mapper.Map<OrderViewModel, OrderModel>(orderView);
}
}
}
经过追踪对象属性变化,全部转换成功,不方便截图,稍后我会放出源代码。
最后源代码:https://files.cnblogs.com/files/davidzhou/AutoMapperSample.zip
转自:https://www.cnblogs.com/davidzhou/p/5347556.html