MAC升级到最新系统后 本地测试的站点不能正常运行,其原因是mac系统升级后 他的apache的版本也随之升级了版本
Server version: Apache/2.4.9 (Unix)
Server built: Sep 9 2014 14:48:20
升级前的版本为 10.9
Server version: Apache/2.2.26 (Unix)
Server built:   Dec 10 2013 22:09:38

基本上之前配置的block都被覆盖了
所以导致站点不能正常工作
解决办法是
1 重新启用php 以避免php的脚本文件直接显示到网页上
|
1
|
sudo mvim /etc/apache2/httpd.conf |
打开文件后 回车 输入
/LoadModule php5_module libexec/apache2/libphp5.so
再文件中找到该行 去掉前面的#
保存即可

2、开启支持用户级目录 http://localhost/~username/

用户级目录不能访问了
Not Found
The requested URL /~zhuzi/ was not found on this server.
配置用户级目录的.conf(一般会在用户级的根目录下有一个~/Sites)的目录 该目录就是用户级的站点
没有的话需要重新创建
sudo mkdir ~/Sites
这时需要配置zhuzi.conf
sudo mvim /etc/apache2/users/zhuzi.conf
添加如下代码(10.10)配置方式
|
1
2
3
4
5
|
<Directory "/Users/zhuzi/Sites/"> Options Indexes MultiViews AllowOverride None Require all granted</Directory> |
然后更改目录权限
sudo chmod 775 /etc/apache3/users/zhuzi.conf
还需要配置 httpd.conf
sudo mvim /etc/apache2/httpd.conf
通过vim的查找命令找到一下几个块去掉前面的#
LoadModule authz_core_module libexec/apache2/mod_authz_core.so
LoadModule authz_host_module libexec/apache2/mod_authz_host.so
LoadModule userdir_module libexec/apache2/mod_userdir.so
Include /private/etc/apache2/extra/httpd-userdir.conf
配置httpd-userdir.conf
|
1
|
sudo nano /etc/apache2/extra/httpd-userdir.conf |
将这个块前的#去掉
|
1
|
Include /private/etc/apache2/users/*.conf |
重启apache
|
1
|
sudo apachectl restart |
这是就能访问
http://localhost/~zhuzi/

最后
<Directory />
AllowOverride none
# Require all denied
Require all granted
</Directory>
How to set up Virtual Hosts in Apache on Mac OSX 10.10 Yosemite
http://coolestguidesontheplanet.com/set-virtual-hosts-apache-mac-osx-10-10-yosemite/
Setting up Virtual Hosts in Apache on Mac OSX 10.10 Yosemite is straight forward after you have your local Web Development environment up and running – get your web development up and running first including Apache, PHP and MySQL following this AMP stack guide here 10.10 if required.
The process of setting up Virtual Hosts is done easier in the Terminal either using nano or viwith sudo or as a root user, or you can you a GUI visual editor like Text Wrangler which allows access to the /private/etc directory by clicking ‘Show Everything” in the open dialog box.
Allow the vhosts configuration from the Apache configuration file httpd.conf
Open the httpd.conf
sudo nano /etc/apache2/httpd.conf
Search for ‘vhosts‘ and uncomment the include line
# Virtual hosts

Include /private/etc/apache2/extra/httpd-vhosts.conf
Also allow another module to run by uncommenting:
LoadModule vhost_alias_module libexec/apache2/mod_vhost_alias.so
Edit the vhosts.conf file
Open this file to add in the vhost.
sudo nano /etc/apache2/extra/httpd-vhosts.conf
An example in the file is given of the format required to add additional domains, just follow this to create your new virtual host:
<VirtualHost *:80>
ServerAdmin webmaster@dummy-host2.example.com
DocumentRoot "/usr/docs/dummy-host2.example.com"
ServerName dummy-host2.example.com
ErrorLog "/private/var/log/apache2/dummy-host2.example.com-error_log"
CustomLog "/private/var/log/apache2/dummy-host2.example.com-access_log" common
</VirtualHost>
We can take this example and extend on it, if you wanted a domain named apple.com for example, you can copy the existing text block and edit to suit:
<VirtualHost *:80>
    ServerName apple.com
    ServerAlias www.apple.com
    DocumentRoot "/Users/USERNAME/Sites/apple"
    ErrorLog "/private/var/log/apache2/apple.com-error_log"
    CustomLog "/private/var/log/apache2/apple.com-access_log" common
    ServerAdmin web@coolestguidesontheplanet.com
</VirtualHost>
So in the example above a vhost for apple.com is created and the document root is in the Sites folder, in the text block above I have also added in some log files, what you need to change is the document root location username and domain name to suit your needs. Finish and save the file.
Now also you need to map the IP address to be the localhost.
Map Your IP address to localhost
sudo nano /etc/hosts
Add the Domain and ‘www‘ alias to resolve to the localhost address
127.0.0.1 apple.com www.apple.com
Restart Apache
sudo apachectl restart
Check out your local vhost domain in the browser
Losing Localhost
One caveat to note about virtual hosts is that once set up you lose your older document root previously at /LIbrary/WebServer/Documents or accessed in the browser athttp://localhost what happens is that you get a 403 Forbidden Error. But the ~/username document root is still compatible.
To get around this, you need to add in a vhost for localhost and declare this vhost before any of the others, in the same file:
sudo nano /etc/apache2/extra/httpd-vhosts.conf
Add in:
<VirtualHost *:80>
ServerName localhost
DocumentRoot /Library/WebServer/Documents/
</VirtualHost>
Restart Apache
sudo apachectl restart
Changing the WebServer Default User
One of the frustrations of using the Users/username/Sites folder for vhosts is the permissions issues with things like updates and authentication.
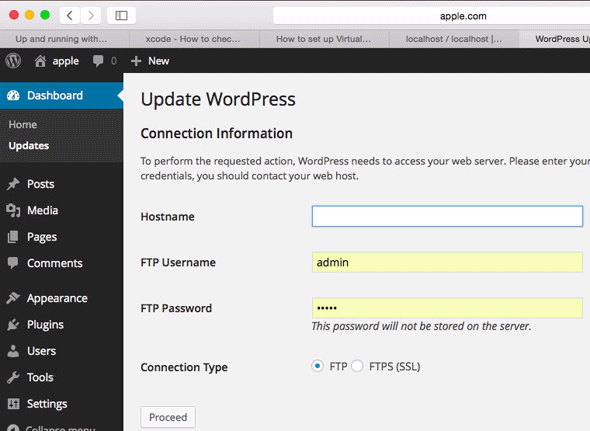
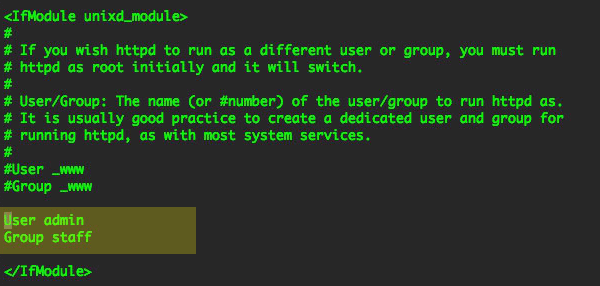
This is because the default webserver user which runs httpd is known as _www, which will not be the user in your local account. If your machine is only in use by you and the webserver will run only under your account then you can change the user.
Find Your User and Group
In the Terminal use the id command to see your username and group
id
You will get a bunch of user groups, you need your primary user uid and group gid names
uid=502(admin) gid=20(staff)
Change this back in /etc/apache2/httpd.conf
Restart Apache
sudo apachectl restart
Restart Apache and now you are running httpd as your local account.