httpd配置内容
httpd2.2
配置文件:
    /etc/httpd/conf/httpd.conf
    /etc/httpd/conf.d/*.conf
服务脚本:
    /etc/rc.d/init.d/httpd
脚本配置文件:
    /etc/sysconfig/httpd
主程序文件:
    /usr/sbin/httpd
    /usr/sbin/httpd.event
    /usr/sbin/httpd.worker
日志文件:
    /var/log/httpd:access_log:访问日志,error_log:错误日志
站点文档:
    /var/www/html
模块文件路径:
    /usr/lib64/httpd/modules
服务控制和启动:
    chkconfig  httpd  on|off
    service {start|stop|restart|status|configtest|reload} httpd
httpd2.4
配置文件:
    /etc/httpd/conf/httpd.conf
    /etc/httpd/conf.d/*.conf
模块相关的配置文件:
    /etc/httpd/conf.modules.d/*.conf
systemd unit file:
    /usr/lib/systemd/system/httpd.service
主程序文件:
    /usr/sbin/httpd(httpd-2.4支持MPM的动态切换)
日志文件:
    /var/log/httpd: access_log:访问日志,    error_log:错误日志
站点文档:
    /var/www/html
模块文件路径:
    /usr/lib64/httpd/modules
服务控制:
    systemctl enable|disable httpd.service
    systemctl {start|stop|restart|status} httpd.service
httpd的基础配置
1)修改监听的ip和port,在主配置文件/etc/httpd/conf/httpd.conf中修改,格式如:Listen [IP:]PORT。需要注意的有3点:
①省略IP表示匹配本机全部ip;
②Listen指令可重复出现多次;
③修改监听socket,重启服务进程方可生效。
示例:
[root@happiness ~]# vim /etc/httpd/conf/httpd.conf
    Listen 80
    Listen 192.168.4.50:8090
[root@happiness ~]# systemctl start httpd.service
[root@happiness ~]# ss -tan
State       Recv-Q Send-Q             Local Address:Port                            Peer Address:Port
LISTEN      0      128                 192.168.4.50:8080                                       *:*
LISTEN      0      5                  192.168.122.1:53                                         *:*
LISTEN      0      128                            *:22                                         *:*
LISTEN      0      128                    127.0.0.1:631                                        *:*
LISTEN      0      100                    127.0.0.1:25                                         *:*
ESTAB       0      52                 192.168.4.119:22                              192.168.4.93:49948
LISTEN      0      128                           :::80                                        :::*
LISTEN      0      128                           :::22                                        :::*
LISTEN      0      128                          ::1:631                                       :::*
LISTEN      0      100                          ::1:25                                        :::*
2)长连接。tcp连续建立后,每个资源获取完成后不全断开连接,而是继续等待其它资源请求的进行。对并发访问量较大的服务器,长连接机制会使得后续某些请求无法得到正常响应,对这种情况,我们可以使用较短的持久连接时长,以及较少的请求数量。
配置指令:
KeepAlive On|Off #是否启用长连接
KeepAliveTimeout Seconds #超时时长
MaxKeepAliveRequests Number #最多保持多少个长连接的请求
示例:
[root@happiness ~]# vim /etc/httpd/conf.d/keepalive.conf  #新建
    KeepAlive On
    KeepAliveTimeout 30
    MaxKeepAliveRequests 200
[root@happiness ~]# systemctl restart httpd.service
[root@happiness ~]# telnet 192.168.4.50 8080
Trying 192.168.4.50...
Connected to 192.168.4.50.
Escape character is '^]'.
GET /index.html HTTP/1.1
HOST:192.168.4.50    #输入后连按两次Enter

HTTP/1.1 200 OK
Date: Fri, 08 Jun 2018 04:25:03 GMT
Server: Apache/2.4.6 (CentOS)
Last-Modified: Fri, 08 Jun 2018 01:50:41 GMT
ETag: "17-56e17a0a33249"
Accept-Ranges: bytes
Content-Length: 23
Content-Type: text/html; charset=UTF-8

<h2>hello, world.</h2>
#注意:此处因为启用了KeepAlive,连接没有断开,可以继续输入内容;如果没有启用KeepAlive则请求成功后会直接退出telnet
3)自定义web站点。在httpd服务的主配置文件中,默认情况下DocumentRoot "/var/www/html"定义了默认web站点目录的路径。如需自定义站点,需按如下格式进行添加:
httpd-2.2:
DocumentRoot "/PATH/TO/FILE"
<Directory "/PATH/TO/FILE">
Options Indexes FollowSymLinks
AllowOverride None #用于定义每个目录下.htaccess文件中的指令类型,但通常设置None
Order allow,deny #定义默认的访问权限与Allow和Deny语句的处理顺序,此处先匹配allow再匹配deny
Allow from all #针对客户机的域名或IP地址进行访问限制,如:Allow from all或者Deny from 192.168等
</Directory>
httpd-2.4:
DocumentRoot "/PATH/TO/FILE"
<Directory "/PATH/TO/FILE">
Options Indexes FollowSymLinks
AllowOverride None
Require all granted #http-2.4中的允许所有人访问,如果要禁止某个IP或域名的访问,如:Require not ip 1.1.1.1、Require not host xxxx.com或者禁止所有人访问Require all denied
</Directory>
其中options包括以下的可选参数:
| 参数 | 说明 |
|---|---|
| Indexes | 允许目录浏览,当客户仅指定要访问的目录,但没有指定要访问的文件,且目录下不存在默认文档时,显示该目录中的文件及子目录列表索引 |
| MultiViews | 允许内容协商的多重视图,允许返回指定的访问目录下的相关联的文件 |
| All | All包含了除MultiViews之外的所有特性,如没有指定options,默认为All |
| ExecCGI | 允许在该目录下执行CGI脚本 |
| FollowSymLinks | 允许跟踪符号链接到源文件 |
| Includes | 允许服务器端包含功能 |
| IncludesNoExec | 允许服务器端包含功能,但禁止执行CGI脚本 |
| None | 不调用options参数 |
示例:
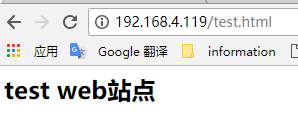
[root@happiness ~]# mkdir -p /test/html
[root@happiness ~]# vim /test/html/test.html
   <h2>test web站点</h2>
[root@happiness ~]# chcon -R --reference /var/www/html /test/html #复制/var/www/html的selinux安全上下文到/data/html,如果没复制安全上下文可能会导致访问index.html出现403的提示
[root@happiness ~]# vim /etc/httpd/conf/httpd.conf
   #DocumentRoot "/var/www/html"  #注释默认的web根站点
   DocumentRoot "/test/html"  #定义要启用的web根站点
   <Directory "/test/html">
        Options None
        AllowOverride None
        Require all granted
   </Directory>
[root@happiness ~]# systemctl restart httpd.service
结果:
httpd的访问控制
1)在Directory中基于IP地址实现访问控制
http-2.2中基于IP地址的访问控制是利用Allow和Deny来实现的,如:
<Directory "/PATH/TO/FILE">
Options Indexes FollowSymLinks
AllowOverride None
Order allow, deny
Allow from IP | NetAddr
Deny from IP | NetAddr
</Directory>
其中NetAddr的格式可类似:172.16、172.16.0.0、172.16.0.0/16、172.16.0.0/255.255.0.0。
httpd-2.4中基于Ip地址访问的控制是利用Require实现,如:
<Directory "/PATH/TO/FILE">
AllowOverride none
Options none
<RequireAll>
Require ip IP | NetAddr #允许访问的IP或网段
Require not ip IP | NetAddr #拒绝访问的Ip或网段
</RequireAll>
</Directory>
此外httpd-2.4版本中还可以利用host名来进行访问控制,如:
<Directory "/PATH/TO/FILE">
AllowOverride none
Options none
<RequireAll>
Require host google.com #允许来自域名为google.com所有主机的访问
Require not host www.xxxx.com #不允许来自主机名为www.xxxx.com的访问
</RequireAll>
</Directory>
示例:
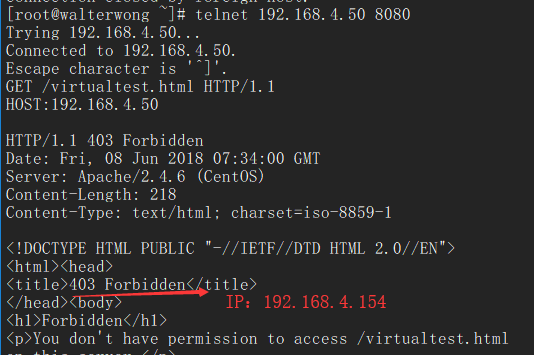
[root@happiness ~]# mkdir /test/virtualhtml
[root@happiness ~]# vim /test/virtualhtml/virtualtest.html
     <h2>test for virtual</h2>
[root@happiness ~]# vim /etc/httpd/conf.d/virualhost.conf
  <VirtualHost 192.168.4.50:8080>
      DocumentRoot "/test/virtualhtml"
      <Directory "/test/virtualhtml">
          AllowOverride None
          Options None
          <RequireAll>
              Require all granted
              Require not ip 192.168.4.154    #禁止ip192.168.4.154的主机访问
          </RequireAll>
      </Directory>
  </VirtualHost>
结果:

2)在Directory中基于用户的访问控制
在Directory中支持的认证方式有两种 basic明文认证和 digest消息摘要认证,不是所有浏览器都支持摘要认证,因此一般来说用的较多的是 basic明文认证。
用htpasswd命令生成认证的配置文件:
[root@happiness ~]# htpasswd -cb /data/httpduser walter 123456
[root@happiness ~]# htpasswd -b /data/httpduser alex 123456
[root@happiness ~]# cat /data/httpduser
  walter:$apr1$CYZpqBy5$gxnNCiKSIX.qN8LRI809L.
  alex:$apr1$vGncT2dc$.S0TsnDFINqf5BhHP0Hvi.
[root@happiness ~]# chcon -R --reference /var/www /data/httpduser
编辑主配置文件:
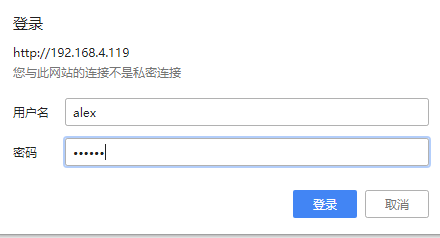
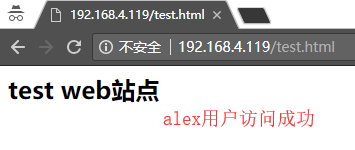
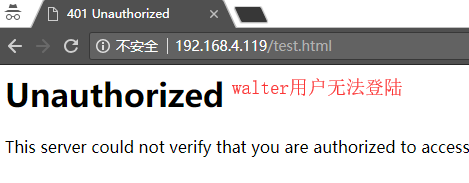
[root@happiness ~]# vim /etc/httpd/conf/httpd.conf
DocumentRoot "/test/html"
<Directory "/test/html">
    Options None
    AllowOverride None
    AuthType Basic  #认证方式Basic
    AuthName "user test"    #授权机制名称
    AuthUserFile "/data/httpduser"  #授权文件位置
    Require user alex  #允许访问的用户
</Directory>
[root@happiness ~]# systemctl restart httpd.service
结果:
3)基于组的用户访问控制
除了对用户做访问控制之外,还能将用户划分为相应的组从而根据组来做相应的访问控制,接着上一个例子中的用户来做组访问控制。
创建组文件:
[root@happiness ~]# vim /data/httpdgroup
   groupA:walter
   groupB:alex
[root@happiness ~]# chcon -R --reference /var/www /data/httpdgroup
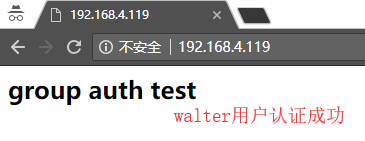
编辑主配置文件:
[root@happiness ~]# vim /etc/httpd/conf/httpd.conf
DocumentRoot "/test/html"
<Directory "/test/html">
    Options None
    AllowOverride None
    AuthType Basic  #认证方式Basic
    AuthName "user test"    #授权机制名称
    AuthUserFile "/data/httpduser"  #授权用户文件位置
    AuthGroupFile "/data/httpdgroup"  #授权用户组文件位置
    Require group groupA  #允许访问的组
</Directory>
[root@happiness ~]# systemctl restart httpd.service
结果:

httpd的虚拟主机VirtualHost
通常在一台服务器安装Apache后,我们只能访问一个web站点,如果我们需要在一台服务器访问多个web站点,则需要通过Apache的VirtualHost虚拟主机实现,其实就是通过VirtualHost实现访问同一个服务器上的不同目录。
虚拟主机支持三种建立方式:
- 基于ip的方式,需要为每个虚拟主机准备至少一个ip地址,配置格式如:
<VirtualHost IP:PORT>
ServerName "www.xxx.cn" #虚拟主机域名
DocumentRoot "/www/xxx" #虚拟主机web目录
</VirtualHost>
示例:
#创建目录
  [root@happiness ~]# mkdir -p /data/Vip/test1
  [root@happiness ~]# mkdir -p /data/Vip/test2
  [root@happiness ~]# chcon -R --reference /var/www/html /data/Vip #复制安全上下文
#创建index.html文件
  [root@happiness ~]# vim /data/Vip/test1/index.html
      <h1>virtual test based on ip. one</h1>
  [root@happiness ~]# vim /data/Vip/test2/index.html
      <h1>virtual test based on ip. two</h1>
#注释/var/www/html作为根路径
  [root@happiness ~]# vim /etc/httpd/conf/httpd.conf
      #DocumentRoot /var/www/html
#添加virtualhost.conf配置文件(文件名自定义)
  [root@happiness ~]# vim /etc/httpd/conf.d/virtualhost.conf
    <VirtualHost 192.168.4.119:80>
         DocumentRoot "/data/Vip/test1"
         <Directory "/data/Vip/test1">
             AllowOverride None
             Options None
             Require all granted
         </Directory>
    </VirtualHost>

    <VirtualHost 192.168.4.120:80>
        DocumentRoot "/data/Vip/test2"
        <Directory "/data/Vip/test2">
           AllowOverride None
           Options None
           Require all granted
         </Directory>
    </VirtualHost>
#启动httpd服务
  [root@happiness ~]# systemctl start httpd.service
#清空防火墙规则
  [root@happiness ~]# iptables -F
访问结果: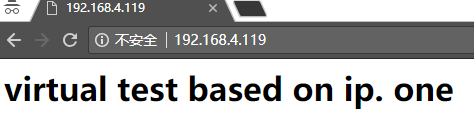

- 基于port的方式,需要为每个虚拟主机配置一个独立的port,配置格式如:
Listen 8080 #指定其它端口时,需要添加监听该端口
<VirtualHost IP:PORT>
ServerName "www.xxx.cn" #虚拟主机域名
DocumentRoot "/www/xxx" #虚拟主机web目录
</VirtualHost>
示例:
#在上面的基础上直接修改virtualhost文件
[root@happiness ~]# vim /etc/httpd/conf.d/virtualhost.conf
Listen 8080
<VirtualHost 192.168.4.119:80>
    DocumentRoot "/data/Vip/test1"
    <Directory "/data/Vip/test1">
        AllowOverride None
        Options None
        Require all granted
    </Directory>
</VirtualHost>

<VirtualHost 192.168.4.119:8080>
    DocumentRoot "/data/Vip/test2"
    <Directory "/data/Vip/test2">
        AllowOverride None
        Options None
        Require all granted
    </Directory>
</VirtualHost>
访问结果:

- 基于FQDN的方式,需要为每个虚拟主机配置一个FQDN,配置格式如:
NameVirtualHost 172.16.100.6:80 #httpd-2.2需要在配置文件中添加此句
<VirtualHost 172.16.100.6:80>
ServerName www.xxx.com #指定FQDN
DocumentRoot "/www/xxxcom"
</VirtualHost>
<VirtualHost 172.16.100.6:80>
ServerName www.xxx.cn #指定FQDN
DocumentRoot "/www/xxxcn"
</VirtualHost>
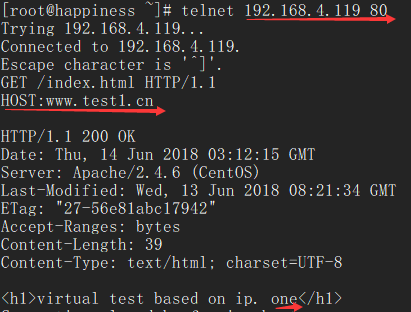
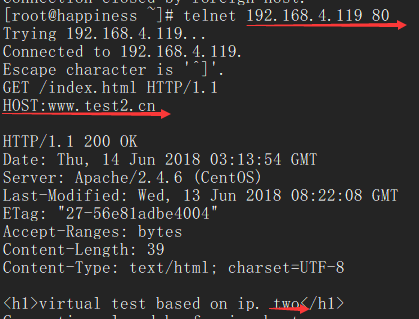
示例:
#在上面的基础上直接修改virtualhost文件
[root@happiness ~]# vim /etc/httpd/conf.d/virtualhost.conf
<VirtualHost 192.168.4.119:80>
    ServerName www.test1.cn
    DocumentRoot "/data/Vip/test1"
    <Directory "/data/Vip/test1">
        AllowOverride None
        Options None
        Require all granted
    </Directory>
</VirtualHost>

<VirtualHost 192.168.4.119:80>
    ServerName www.test2.cn
    DocumentRoot "/data/Vip/test2"
    <Directory "/data/Vip/test2">
        AllowOverride None
        Options None
        Require all granted
    </Directory>
</VirtualHost>
访问结果: